오토인코더
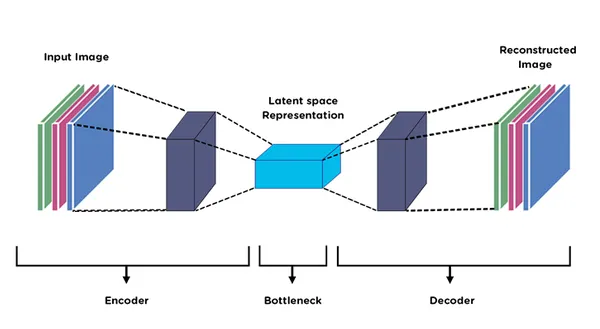
오토인코더는 비지도방식으로 훈련된 인공 신경망으로, 먼저 데이터에 인코딩 된 표현을 학습한 다음, 학습 된 인코딩 표현에서 입력 데이터를 생성하는 것을 목표로 한다. 따라서, 오토인코더의 출력은 입력에 대한 예측이다.

오토인코더의 가장 중요한 목적은 차원축소(Dimension Reduction)이다.
오토인코더의 앞단을 인코더(Encoder), 뒷단을 디코더(Decoder)라고 부릅니다. 인코더의 역할은 입력 데이터(x)를 압축해 z를 만드는 일입니다. 압축된 z를 Latent Vector라고 부릅니다.
Latent Vector에는 입력 데이터의 '중요한' 정보가 압축되어있다.
Latent Vector가 잘 압축된 건지 검증하기 위해서는 Latent Vector를 원복해봐야 하며 그게 디코더가 필요한 이유이다.
여기서 중요한 점은 Auto Encoder가 출력하는 latent vector를 미리 알 수 없다. 우리는 단지 3차원으로 데이터를 압축하라는 명령을 내렸을 뿐, 이후에는 모델이 알아서 중요한 latent vector를 찾아 준 것입니다.
즉, Encoder 모델이 학습을 통해 자동적(automatically)으로 latent vector를 찾아준 것이죠.
그래서 우리는 고차원 데이터를 잘 표현해주는 latent vector를 자동으로 추출해주는 모델을 Auto Encoder라 부릅니다.
다른 말로 하면 오토인코더는 표현학습(representation learning), 특징학습(feature learning)을 비지도 학습(unsupervised learning) 형태로 훈련하는 신경망이다.
오토인코더에서 인코더는 차원축소하는 역할, 디코더는 생성 모델 역할을 합니다.
Manifold Learning

차원축소는 Manifold Learning과 같은 의미입니다. 따라서 오토인코더의 궁극적인 목적은 Manifold Learning이라고도 할 수 있다.
Manifold는 데이터가 있는 공간을 뜻합니다. Manifold를 학습한다는 말은 데이터가 위치한 공간을 찾아낸다는 이야기이다.
매니폴드 학습 절차
- 데이터를 고차원 공간에 뿌립니다.
- 해당 데이터를 오류 없이 잘 아우르는 sub-space(=manifold)를 구합니다.
- 데이터를 Manifold에 투영(projection)하면 데이터 차원이 축소됩니다.
매니폴드 학습의 목적은 데이터 압축, 데이터 시각화, 차원의 저주 피하기, 유용한 특징(피처) 추출 이렇게 네 가지가 있다.
manifold 예제

왼쪽과 오른쪽 사진의 중간값

MNIST를 이용한 AutoEncoder 실습
데이터 가져오기
(train_X, train_y), (test_X, test_y) = tf.keras.datasets.mnist.load_data()
train_X= train_X/255
test_X = test_X/255
train_X[0] 이미지

model
train_X = train_X.reshape(-1, 28*28)
test_X = test_X.reshape(-1, 28*28)

model = tf.keras.Sequential([
    tf.keras.layers.Dense(784, activation='relu', input_shape=(784,)),
    tf.keras.layers.Dense(64, activation='relu'),
    tf.keras.layers.Dense(784, activation='sigmoid')
])

model.compile(optimizer=tf.optimizers.Adam(), loss='mse')
model.summary()
Model: "sequential_2"
_________________________________________________________________
 Layer (type)                Output Shape              Param #
=================================================================
 dense_6 (Dense)             (None, 784)               615440

 dense_7 (Dense)             (None, 64)                50240

 dense_8 (Dense)             (None, 784)               50960

=================================================================
Total params: 716,640
Trainable params: 716,640
Non-trainable params: 0
_________________________________________________________________
model.fit(train_X, train_X, epochs=20, batch_size=256) # 입력과 타겟이 동일학습결과 입력과 유사한 이미지 에측

MNIST with CNN
train_X = train_X.reshape(-1, 28, 28, 1)
test_X = test_X.reshape(-1, 28, 28, 1)

model = tf.keras.Sequential([
    tf.keras.layers.Conv2D(filters=32, kernel_size=2, strides=(2,2), activation='relu', input_shape=(28, 28, 1)),
    tf.keras.layers.Conv2D(filters=64, kernel_size=2, strides=(2,2), activation='relu'),
    tf.keras.layers.Flatten(),
    tf.keras.layers.Dense(64, activation = 'relu'),
    tf.keras.layers.Dense(7*7*64, activation = 'relu'),
    tf.keras.layers.Reshape(target_shape=(7,7,64)),
    tf.keras.layers.Conv2DTranspose(filters=32, kernel_size=2, strides=(2,2), padding='same', activation='relu'),
    tf.keras.layers.Conv2DTranspose(filters=1, kernel_size=2, strides=(2,2), padding='same', activation='sigmoid')
])

model.compile(optimizer=tf.optimizers.Adam(), loss = 'mse')
model.summary()
Model: "sequential_4"
_________________________________________________________________
 Layer (type)                Output Shape              Param #
=================================================================
 conv2d_2 (Conv2D)           (None, 14, 14, 32)        160

 conv2d_3 (Conv2D)           (None, 7, 7, 64)          8256

 flatten_1 (Flatten)         (None, 3136)              0

 dense_11 (Dense)            (None, 64)                200768

 dense_12 (Dense)            (None, 3136)              203840

 reshape_1 (Reshape)         (None, 7, 7, 64)          0

 conv2d_transpose_2 (Conv2DT  (None, 14, 14, 32)       8224
 ranspose)

 conv2d_transpose_3 (Conv2DT  (None, 28, 28, 1)        129
 ranspose)

=================================================================
Total params: 421,377
Trainable params: 421,377
Non-trainable params: 0
_________________________________________________________________
CNN을 이용한 학습 결과가 더 높은 예측을 보여준다

CNN with ELU
activation function을 ReLU 대신 ELU 이용

train_X = train_X.reshape(-1, 28, 28, 1)
test_X = test_X.reshape(-1, 28, 28, 1)

model = tf.keras.Sequential([
    tf.keras.layers.Conv2D(filters=32, kernel_size=2, strides=(2,2), activation='relu', input_shape=(28, 28, 1)),
    tf.keras.layers.Conv2D(filters=64, kernel_size=2, strides=(2,2), activation='relu'),
    tf.keras.layers.Flatten(),
    tf.keras.layers.Dense(64, activation = 'elu'),
    tf.keras.layers.Dense(7*7*64, activation = 'elu'),
    tf.keras.layers.Reshape(target_shape=(7,7,64)),
    tf.keras.layers.Conv2DTranspose(filters=32, kernel_size=2, strides=(2,2), padding='same', activation='elu'),
    tf.keras.layers.Conv2DTranspose(filters=1, kernel_size=2, strides=(2,2), padding='same', activation='sigmoid')
])

model.compile(optimizer=tf.optimizers.Adam(), loss = 'mse')
model.summary()
Model: "sequential_6"
_________________________________________________________________
Layer (type) Output Shape Param #
=================================================================
conv2d_6 (Conv2D) (None, 14, 14, 32) 160
conv2d_7 (Conv2D) (None, 7, 7, 64) 8256
flatten_3 (Flatten) (None, 3136) 0
dense_15 (Dense) (None, 64) 200768
dense_16 (Dense) (None, 3136) 203840
reshape_3 (Reshape) (None, 7, 7, 64) 0
conv2d_transpose_6 (Conv2DT (None, 14, 14, 32) 8224
ranspose)
conv2d_transpose_7 (Conv2DT (None, 28, 28, 1) 129
ranspose)
=================================================================
Total params: 421,377
Trainable params: 421,377
Non-trainable params: 0
_________________________________________________________________

Latent Vector
인코더의 역할은 입력 데이터(x)를 압축해 z를 만드는 일입니다. 압축된 z를 Latent Vector라고 부릅니다.
latent_vector_model = tf.keras.Model(inputs=model.input, outputs = model.layers[3].output)
latent_vector = latent_vector_model.predict(train_X)
print(latent_vector.shape)
print(latent_vector[0])
1875/1875 [==============================] - 4s 2ms/step
(60000, 64)
[19.243433 -1. 34.30929 -1. 17.565643 18.309574
1.5808065 -1. 29.521202 9.738793 -0.9999996 15.561413
12.655551 16.273901 -1. 15.102857 -1. 10.751307
-0.99999994 14.539401 19.53631 -0.99999994 -1. 31.22077
24.787672 2.8425474 31.92695 -1. -0.9999992 13.101514
-1. 13.148969 -0.99999994 -0.99999976 -0.99999964 5.911452
-0.9984088 3.0830107 -0.99999857 32.798557 -0.99999976 30.040194
-0.9999499 -1. 15.158767 2.7359354 -1. 2.38393
18.668074 -0.9999449 -0.99999845 15.935744 -0.9999976 19.445414
-0.9999883 -0.9999809 8.520239 11.424801 5.173744 -1.
-1. 12.825708 16.93995 -1. ]
10개의 군집(cluster)으로 데이터를 클러스터링하는 KMeans 객체를 생성합니다.
n_init=10은 알고리즘을 10번 실행하여 무작위 초기화에서 가장 좋은 결과를 선택하도록 합니다.
Kmeans = KMeans(n_clusters=10, n_init=10, random_state=42)
Kmeans.fit(latent_vector)
labels_에는 각 데이터가 0부터 9사이의 어떤 클러스터에 속하는지에 대한 정보가 저장됩니다.
clustercetners에는 각 클러스터의 중심 좌표가 저장되고, 잠재변수와 마찬가지로 64차원이기 때문에 이 좌표가 각각 무엇을 의미지하는지 직관적으로 알기 어렵습니다.
print(Kmeans.labels_)
print(Kmeans.cluster_centers_.shape)
print(Kmeans.cluster_centers_[0])
[4 2 6 ... 8 7 5]
(10, 64)
[13.3507 -0.99999994 12.755156 -0.99999994 19.815527 12.8845215
2.8769965 -0.9999999 19.754719 26.573452 -0.9999993 18.88453
7.5569024 21.810745 -0.99999994 25.482258 -0.9999999 5.1079216
-0.99999964 13.301533 16.83107 -0.99999857 -0.99999994 31.941223
19.54553 6.8958507 13.610795 -0.99999994 -0.9999935 22.695007
-0.99999994 18.79152 -0.9999995 -0.9999994 -0.9999978 24.359478
-0.98437107 14.256262 -0.9999991 11.592746 -0.9999994 13.421804
-0.9964313 -0.9999985 12.144585 3.6482275 -0.99999994 2.2535498
18.639652 -0.993491 -0.9999647 16.073473 -0.99994487 13.2682495
-0.99999416 -0.99991715 18.417551 18.600996 20.111761 -0.9999999
-0.9999998 26.299923 15.149674 -0.9999998 ]t-SNE
- 고차원의 멕터를 저차원으로 옮겨 시각화에 도움을 주는 방법
- k-Means 가 각 클러스터를 계산하기 위한 단위로 중심과 각 데이터의 거리를 측정한다면
- t-SNE는 각 데이터의 유사도를 정의하고 원래 공간에서의 유사도와 저차원의 공간에서의 유사도가 비슷해지도록 학습시킴
- 여기서 유사도는 수학적 확률로 표현
tsne = TSNE(n_components=2, learning_rate=100, perplexity=15, random_state=0)
tsne_vector = tsne.fit_transform(latent_vector[:5000])

cmap = plt.get_cmap('rainbow', 10)
fig = plt.scatter(tsne_vector[:, 0], tsne_vector[:, 1], marker='.', c=train_y[:5000], cmap=cmap)
cb = plt.colorbar(fig, ticks=range(10))
n_clusters=10
tick_locs = (np.arange(n_clusters)+ 0.5)*(n_clusters-1)/n_clusters
cb.set_ticks(tick_locs)
cb.set_ticklabels(range(10))

plt.show()
t-SNE 클러스터 위에 MNIST 이미지 표시
from matplotlib.offsetbox import TextArea, DrawingArea, OffsetImage, AnnotationBbox

plt.figure(figsize=(16, 16))

tsne=TSNE(n_components=2, learning_rate=100, perplexity=15, random_state=0)
tsne_vector=tsne.fit_transform(latent_vector[:5000])

ax = plt.subplot(1, 1, 1)
ax.scatter(tsne_vector[:, 0], tsne_vector[:,1], marker='.', c=train_y[:5000], cmap='rainbow')
for i in range(200):
  imagebox = OffsetImage(train_X[i].reshape(28, 28))
  ab = AnnotationBbox(imagebox, (tsne_vector[i, 0], tsne_vector[i, 1]), frameon=False, pad=0.0)
  ax.add_artist(ab)

ax.set_xticks([])
ax.set_yticks([])
plt.show()
📌 참고
오토인코더(Autoencoder)가 뭐에요? : by climba
컴퓨터 비전 - 7. 오토인코더(AutoEncoder)와 매니폴드 학습(Manifold Learning) : 귀퉁이 서재 Baek Kyun Shin
1.오토인코더(AutoEncoder) : pebpung.github
AutoEncoder의 모든것 (2. Manifold Learning) : JINSOL KIM
