1. Node, Package
- ROS에서 노드(node)는 어떤 프로그램의 최소 단위라고 생각
- 이러한 노드들이 모여서 큰 기능을 하는 패키지가 됨
- 예를 들어, 로봇이 검정색 공을 찾아 들어올리도록 하는 패키지가 있다고 할 때, 해당 패키지 내에는 카메라 영상에서 검정색 공을 찾는 노드, 특정 위치의 물체로 로봇을 움직여 접근하게 하는 노드, 특정 물체를 들어올리는 노드 등이 포함되어 있음
2. 토픽(Topic)이란?
토픽 통신 개념
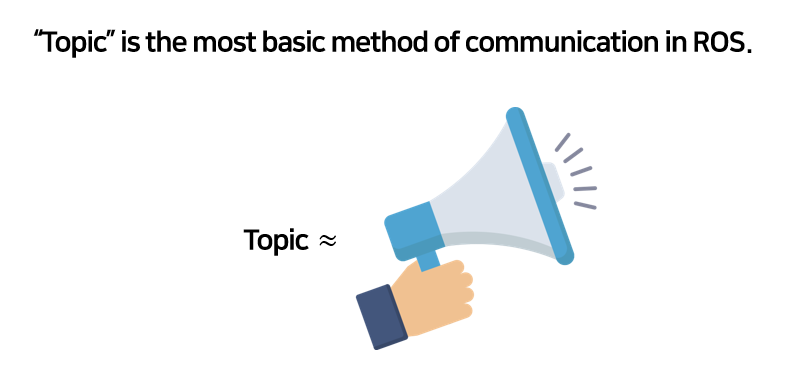
- ROS의 가장 기본적인 통신 방법
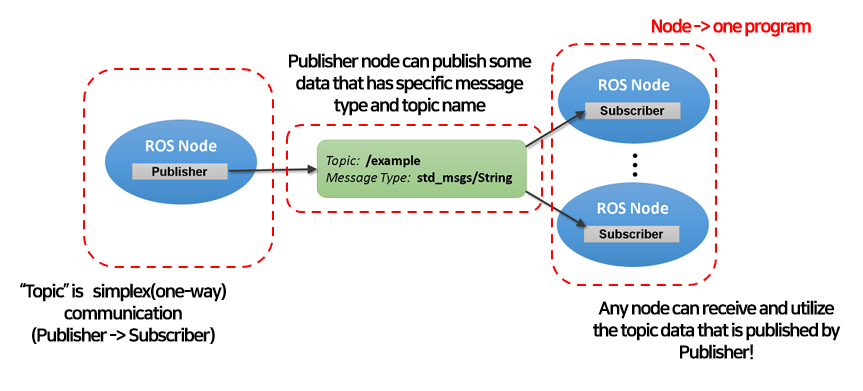
- publisher와 subscriber로 구성됨
- publisher로부터 메세지(데이터)를 담은 토픽이 발행되고, 이를 subscriber가 받아 사용함: 단방향 통신
- 마치 publisher가 확성기에 대고 자신의 토픽를 외치고 있는 것과 같으며, subscriber가 있든 없든 계속 토픽를 발산함
- 또한, 확성기 소리를 아무나 들을 수 있듯이, 아무나 subscriber가 되어 해당 토픽을 받아 사용할 수 있음
- subscriber가 늘어나도 publisher의 소스코드를 변경할 필요가 없음
- 하나의 노드가 publisher, subscriber 모두가 되는 것 또한 가능함
토픽 통신 예시
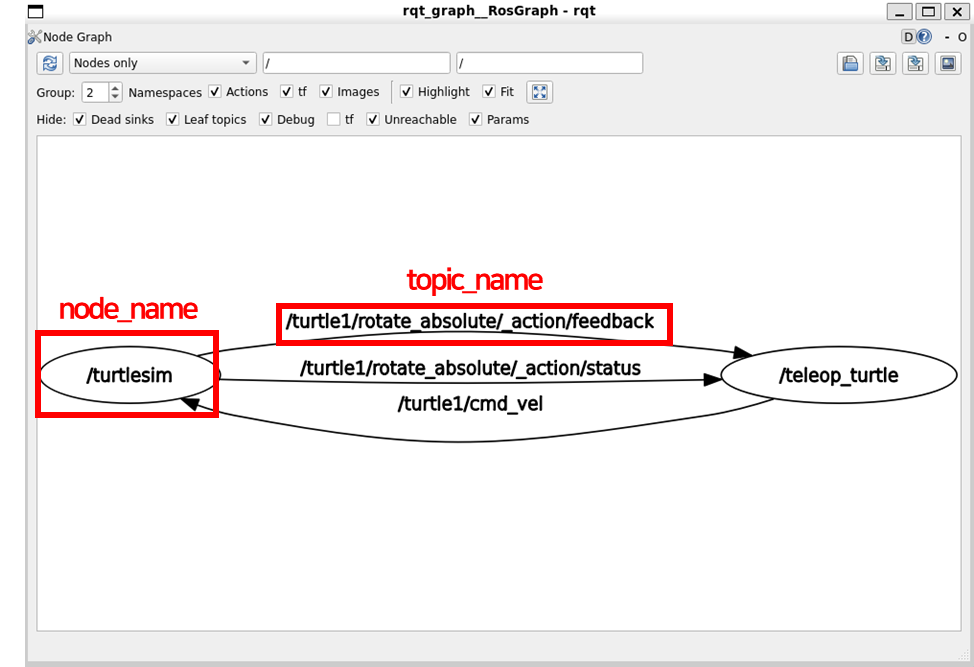
3. Turtlesim에서의 토픽
- 세번째 tab에서 다음의 명령어 실행
- 각 노드와 그 사이에서 이동하는 데이터를 시각화함
$ rqt_graph
rqt_graph 시각화 예시
-
유용한 명령어
$ ros2 node list: 현재 동작하고 있는 node의 목록$ ros2 topic list: 현재 동작하고 있는 topic의 목록$ ros2 service list: 현재 동작하고 있는 service의 목록$ ros2 action list: 현재 동작하고 있는 action의 목록- ros2는 각 소프트웨어 모듈을 node 단위로 관리 및 실행하고, topic, service, action은 ros의 대표적인 통신 방법으로 현재 동작하는 node, topic, service, action의 목록을 출력하는 명령어는 굉장히 많이 사용하게 됨
-
토픽 관련 유용한 명령어
-
$ ros2 topic info /tutle1/cmd_vel: "/tutle1/cmd_vel"이라는 토픽의 정보를 출력

-
$ ros2 topic echo /tutle1/cmd_vel: "/tutle1/cmd_vel"이라는 토픽에 현재 담긴 데이터를 실시간으로 출력

-
$ ros2 topic pub --once /turtle1/cmd_vel geometry_msg/msg/Twist “linear: {x: 2.0, y: 0.0, z: 0.0}, angular: {x: 0.0, y: 0.0, z: 0.0}“: "geometry_msg/msg/Twist"라는 메세지 타입으로 만들어진 "/tutle1/cmd_vel"이라는 토픽에 "x: 2.0"이라는 값을 담아서 publish함. 굳이 소스코드를 작성하지 않고 간단하게 command line에서 특정 토픽을 publish하는 방법으로, 노드의 동작을 간단한게 테스트할 때 유용함
-ros2 topic pub <옵션> <토픽이름> <메세지타입> <입력할 데이터>의 형태

-
$ ros2 topic hz <토픽이름>: 해당 토픽의 발행 주기(Hz)를 출력 -
$ ros2 topic delay <토픽이름>: 해당 토픽의 네트워크 지연 시간을 출력 -
$ ros2 topic bw <토픽이름>: 해당 토픽의 bandwidth를 출력
-
4. Publisher, Subscriber 소스코드 작성 실습(Python)
-
우선 실습을 진행할 작업공간(workspace)를 생성함
-
작업 공간은 어떤 프로젝트라고 생각하면 됨
-
자율주행차 만들기 프로젝트(작업공간) 내에 여러 패키지(인지, 판단, 제어)가 존재하며, 각 패키지를 구성하는 세부 소프트웨어 모듈인 노드(SLAM, 객체 검출, RRT 탐색 등)가 존재
-
-
아래 명령어를 실행
$ mkdir my_ws
$ cd my_ws
$ mkdir src
$ cd src- 앞으로 src 폴더 안에 패키지들을 생성 및 저장 할 것이며, 아래 명령어를 통해 패키지를 생성
ros2 pkg create <만들 패키지 이름> --build-type <빌드 타입> --dependencies <의존성 목록>- 아래 예시는 "my_rclpy_package"라는 이름의 패키지를 생성하며, python 패키지임으로 빌드 옵션은 "ament_python"으로 선택, 내부적으로 "rclpy", "std_msgs"라는 외부 패키지를 사용할 것임으로 의존성 추가한 예시임
- "rclpy": ROS에서 python을 사용하기 위한 기본적인 라이브러리
- "std_msgs": standard message 타입들을 모아놓은 라이브러리이며, 가장 기본적인 int, float, string 등의 타입이 포함되어 있음
$ ros2 pkg create my_rclpy_package --build-type ament_python --dependencies rclpy std_msgs-
패키지 생성 결과로 여러 파일들이 생성됨
-
$ cd my_rclpy_package,$ls명령어를 통해 위 명령어를 통해 생성된 파일과 디렉토리를 볼 수 있음 -
"my_rclpy_package/": 패키지 이름과 같은 이름의 디렉토리가 생성되며 그 안에는 "init.py"파일이 하나 있음. 보통 이 디렉토리 안에 노드를 정의한 파이썬 파일들을 모아놓음
-
"package.xml": 패키지 설정파일. 추후 의존성 등을 추가할 때 이 파일에 잘 추가해야 빌드가 성공적으로 이루어짐
-
"setup.py": 설정파일. 마찬가지로 의존성 등을 잘 추가해야하며, 특히 "entry_point"라는 필드는 나중에 노드를 실행시키는
ros2 run또는ros2 launch명령어가 어떤 파일의 어떤 함수를 실행시킬지 명시하는 곳이므로 주의해서 작성해야함 -
"setup.cfg": 빌드 후 실행 파일의 설치 경로
-
-
ROS에서 패키지 및 파일 이름 등은 snake_case를 class는 CamelCase를 따라 이름을 작성하며, msg, srv, action 파일 등은 빌드 후 class가 되므로 CamelCase로 이름을 작성
publisher 파일 작성
- 파이썬 파일을 저장할 경로로 이동
- 실습 예시에서는 오류를 줄이기 위해 절대경로를 사용하지만, 익숙해지면 상대경로를 사용할 수도 있음
$ cd ~/my_ws/src/my_rclpy_package/my_rclpy_package- "helowworld_publisher.py" 파일을 생성
$ code helloworld_publisher.py- 아래 코드를 복사(설명은 주석 참고)(일부 시스템에서 한글 주석이 문제를 일으킬 수 있음. 한글 인코딩 추가로 해결)
import rclpy #ROS python 기본 라이브러리
from rclpy.node import Node #rclpy내 Node 클래스를 import. Node clas 내에는 node를 정의하고 사용하기 위한 유용한 메소드들이 구현되어 있어 이를 상속받아 사용
from rclpy.qos import QoSProfile #네트워크 관련 내용
from std_msgs.msg import String # std_msgs 내의 String 메세지 타입을 사용

class HelloworldPublisher(Node): #Node 클래스를 상속

    def __init__(self):
        super().__init__('helloworld_publisher') # node 이름 정의
        qos_profile = QoSProfile(depth=10) # 네트워크 설정. 네트워크가 불안정할 경우 데이터를 버리지 말고 10개까지 버퍼에 저장
        self.helloworld_publisher = self.create_publisher(String, 'helloworld', qos_profile) # publisher 선언. 입력인자로 (<메세지타입>, <토픽이름>, <네트워크 설정>)을 입력
        self.timer = self.create_timer(1, self.publish_helloworld_msg) # 타이머. 1초마다 self.publish_helloworld_msg 함수가 실행됨
        self.count = 0

    def publish_helloworld_msg(self): # 토픽에 데이터를 담고, 실제 publish하는 함수
        msg = String() #메세지 타입을 선언
        msg.data = 'Hello World: {0}'.format(self.count) #메세지 타입이 string임으로 문자열을 msg의 data 필드에 입력
        self.helloworld_publisher.publish(msg) #토픽을 publish
        self.get_logger().info('Published message: {0}'.format(msg.data)) #publish한 데이터를 확인할 수 있도록 출력
        self.count += 1


def main(args=None): # 메인함수. 추후 setup.py의 entry_points 필드에서 노드 실행시 메인함수가 실행되도록 설정할 예정
    rclpy.init(args=args) #초기화
    node = HelloworldPublisher() #위에서 정의한 publisher class 선언
    try:
        rclpy.spin(node) #publisher는 끝나지 말고 데이터를 계속 발행해줘야하므로, 무한루프에 넣음
    except KeyboardInterrupt:
        node.get_logger().info('Keyboard Interrupt (SIGINT)') #KeyboardInterrupt발생시 해당 에러 메세지를 출력
    finally:
        node.destroy_node() # 종료
        rclpy.shutdown() # 종료

if __name__ == '__main__':
    main()
Subscriber 파일 작성
- publisher와 같은 디렉토리에 파일 생성
$ code helloworld_subscriber.py- 아래 코드를 복사
import rclpy
from rclpy.node import Node
from rclpy.qos import QoSProfile
from std_msgs.msg import String


class HelloworldSubscriber(Node):

    def __init__(self):
        super().__init__('Helloworld_subscriber')
        qos_profile = QoSProfile(depth=10)
        self.helloworld_subscriber = self.create_subscription(
            String,
            'helloworld',
            self.subscribe_topic_message,
            qos_profile) # subscriber 선언. (<수신할 데이터 타입>, <수신할 토픽이름>, <콜백함수>, <네트워크설정>)을 입력. 콜백함수는 subscriber가 토픽을 수신할 때마다 실행되는 함수임

    def subscribe_topic_message(self, msg): # 콜백함수
        self.get_logger().info('Received message: {0}'.format(msg.data)) #수신한 메세지(msg)의 데이터를 그대로 출력


def main(args=None):
    rclpy.init(args=args)
    node = HelloworldSubscriber()
    try:
        rclpy.spin(node) #subscriber 또한 끝나지말고 계속 토픽을 수신해야함으로 spin에 넣어 무한루프
    except KeyboardInterrupt:
        node.get_logger().info('Keyboard Interrupt (SIGINT)')
    finally:
        node.destroy_node()
        rclpy.shutdown()


if __name__ == '__main__':
    main()
setup.py 파일 수정
$ cd ~/my_ws/src/my_rclpy_package$ code setup.py- 아래 코드 복사
- 만든 사람, 연락처 등의 메타데이터는 알맞게 수정(안해도 코드는 동작함)
- "entry_points" 필드에 유의
helloworld_publisher = my_rclpy_package.helloworld_publisher:main: "helloworld_publisher" 노드 실행시, "my_rclpy_package"패키지의 "helloworld_publisher"파일의 "main"함수 실행
from setuptools import find_packages, setup

package_name = 'my_rclpy_package'

setup(
    name=package_name,
    version='0.0.0',
    packages=find_packages(exclude=['test']),
    data_files=[
        ('share/ament_index/resource_index/packages',
            ['resource/' + package_name]),
        ('share/' + package_name, ['package.xml']),
    ],
    install_requires=['setuptools'],
    zip_safe=True,
    maintainer='kym',
    maintainer_email='kym@todo.todo',
    description='TODO: Package description',
    license='TODO: License declaration',
    tests_require=['pytest'],
    entry_points={
        'console_scripts': [
            'helloworld_publisher = my_rclpy_package.helloworld_publisher:main',
            'helloworld_subscriber = my_rclpy_package.helloworld_subscriber:main',
        ],
    },
)
빌드
-
새로운 코드 등이 추가되었다면 빌드를 해주어야 사용 가능
-
빌드는 반드시 작업공간의 루트에서
$ cd ~/my_ws- 아래 명령어를 통해 빌드
- 여러 빌드 옵션이 존재
$ colcon build: 전체 패키지를 빌드$ colcon build --symlink-install: 전체 패키지를 빌드하지만, 설치파일을 install 폴더에 복사하는 것이 아닌 심볼릭 파일만 생성. 심볼릭 파일은 윈도우의 바로가기 파일과 비슷. 그냥 빌드하면 코드가 바뀌었을 때 설치파일의 내용과 달리지므로 다시 빌드해야하지만, 심볼릭 파일을 사용했을 경우 해당 코드와 연결만 해주기 때문에 다시 빌드하지 않아도 괜찮음$ colcon build --symlink-install --package-select <패키지이름>: 특정 패키지만 빌드. 하나의 패키지만 업데이트 했는데, 전체를 다시 빌드하면 오래걸림$ colcon build --symlink-install --package-up-to <패키지이름>: 특정 패키지와 해당 패키지가 의존하는 패키지까지 빌드- 실습에서는 가장 기본적인 빌드 명령어 사용
$ colcon build --symlink-install
- 위 에러가 발생하는 경우 아래 명령어를 실행하고 다시 빌드
$ sudo apt install python3-pip
$ pip3 install setuptools==58.2.0
노드 실행
- 다음 명령어를 통해 publisher 실행
$ ros2 run my_rclpy_package helloworld_publisher-
이때, 아래와 같은 에러 발생함

-
처음 ros2를 설치했을 때와 마찬가지로 어딘가에 우리가 만든 패키지가 설치되었지만, 그 경로를 찾지 못하는 경우임
- 우리가 이 작업공간에서 작업할 것임을 설정해야함
-
아래 명령어를 통해 환경 설정
- 해당 명령어는 새로운 터미널 탭을 열 때마다 실행해주어야함
- 이게 귀찮다면 ros2 설치 때처럼 ~/.bashrc에 추가
$ . ~/my_ws/install/local_setup.bash-
다시 publisher를 실행하면 아래와 같이 동작

-
새로운 탭을 열고 아래 명령어로 subscriber도 실행
- 환경설정 까먹지 말기!
$ ros2 run my_rclpy_package helloworld_subscriber
$rqt_graph시각화 결과

5. Custom interface(msg) 생성 및 사용 실습(Python)
-
ROS는 자주 사용하는 메세지 타입에 대해 미리 정의해 놓았기 때문에, 필요시 이를 가져와 사용할 수 있음
- 센서데이터: 이미지, point cloud 등
- std_msgs 등
-
하지만 로봇을 이용한 서비스를 개발하는 과정에서 미리 정의된 메세지 타입이 아닌 새로운 타입이 필요한 경우가 있음
- 예시: 배달로봇
- 배달물품, 주소 등 여러 개의 문자열 데이터가 결합된 정보를 송수신 해야함
- 하나의 문자열 데이터는 std_msgs의 String 타입을 통해 송수신 할 수 있지만, 여러 개의 문자열이 결합된 형태는 정의되어 있지 않음
- 따라서, 새로운 타입을 정의해야함
-
이러한 경우 custom interface를 생성해야하며, topic을 통해 송수신하는 정보는 메세지(msg)이므로, 새로운 msg 타입을 생성함
- 다른 통신 방법인 service, action이 송수신하는 데이터는 토픽을 통해 송수신하는 메세지와는 다른 형태의 구조로 되어 있음
- 물론 service, action이 송수신하는 데이터 또한 우리가 원하는 형태로 자유롭게 정의할 수 있음
- Custom Interface(msg) 생성
- Custom Interface를 모아 놓는 새로운 패키지 생성
- 패키지는 작업 공간 내 "src" 디렉토리에 생성
$ cd ~/my_ws/src
$ ros2 pkg create --build-type ament_cmake msg_interface_example- Custom message는 "msg"라는 폴더를 생성하여 모아놓음
$ cd msg_interface_example
$ mkdir msg
$ cd msg- Custom message 형태를 정의하는 파일을 생성
- 이 파일은 빌드 후 다른 코드에서 class처럼 사용하므로 CamelCased로 작성
- 주의) msg 파일의 이름, msg내 데이터 필드명 등에는 정해진 규칙이 있으며, 지키지 않으면 빌드가 되지 않음. 따라서 왠만하면 msg 파일의 이름은 CamelCased(특수문자도 일부만 허용됨), 데이터 필드명은 대문자가 없도록 하자.
$ code TwoTextMessage.msg- 아래 코드 복사
<데이터타입> <데이터필드 이름>형태로 각 데이터 필드 작성- 여러 개의 데이터 필드를 조합하여 하나의 custom message를 정의
builtin_interfaces/Time stamp부분은 해당 메세지가 토픽을 통해 발행되었을 때, 발행 시간을 기록하기 위한 데이터 필드이며, 로봇 소프트웨어에서는 매우 많은 토픽 데이터가 쏟아지기 때문에 각 토픽마다 발행된 시간을 알고 있어야 데이터 동기화 등이 가능함string text_a,string text_b는 문자열데이터를 의미. 총 2개가 결합되어 있음
# Messages
builtin_interfaces/Time stamp
string text_a
string text_bpackage.xml파일을 다음과 같이 수정<buildtool_depend>,<exec_depend>,<member_of_group>부분 작성에 유의- 해당 부분은 패키지 빌드시 필요한 의존성을 명시함
- 우리가 정의한 msg파일 내에서 사용한 "builtin_interfaces", 새로운 메세지를 생성하기 위한 "rosidl_default_generators" 등이 포함된 것을 확인할 수 있음
$ cd ..
$ code package.xml
<?xml version="1.0"?>
<?xml-model href="http://download.ros.org/schema/package_format3.xsd" schematypens="http://www.w3.org/2001/XMLSchema"?>
<package format="3">
<name>msg_interface_example</name>
<version>0.0.0</version>
<description>TODO: Package description</description>
<maintainer email="kym@todo.todo">kym</maintainer>
<license>TODO: License declaration</license>
<buildtool_depend>ament_cmake</buildtool_depend>
<buildtool_depend>rosidl_default_generators</buildtool_depend>
<exec_depend>builtin_interfaces</exec_depend>
<exec_depend>rosidl_default_runtime</exec_depend>
<member_of_group>rosidl_interface_packages</member_of_group>
<export>
<build_type>ament_cmake</build_type>
</export>
</package>
- CMakeLists.txt를 다음과 같이 수정
- 이 파일 또한 빌드시에 필요한 의존성 정보, 우리가 정의한 메세지 파일을 명시함 등의 역할을 가지고 있음
find_package파트에서 의존하고 있는 외부 패키지를 불러와 빌드할 때 사용set부분에 우리가 정의한 msg 파일의 목록을 작성(오타주의, 위에서 생성한 msg 파일 이름과 정확히 동일해야함).
$ code CMakeLists.txtcmake_minimum_required(VERSION 3.8)
project(msg_interface_example)
if(CMAKE_COMPILER_IS_GNUCXX OR CMAKE_CXX_COMPILER_ID MATCHES "Clang")
add_compile_options(-Wall -Wextra -Wpedantic)
endif()
################################################################################
# Find and load build settings from external packages
################################################################################
find_package(ament_cmake REQUIRED)
find_package(builtin_interfaces REQUIRED)
find_package(rosidl_default_generators REQUIRED)
################################################################################
# Declare ROS messages, services and actions
################################################################################
set(msg_files
"msg/TwoTextMessage.msg"
)
rosidl_generate_interfaces(${PROJECT_NAME}
${msg_files}
DEPENDENCIES builtin_interfaces
)
################################################################################
# Macro for ament package
################################################################################
ament_export_dependencies(rosidl_default_runtime)
ament_package()- 만약 여러개의 msg 파일을 생성했다면 다음과 같이 작성
- 목록 사이에 쉼표가 없음에 유의
set(msg_files
  "msg/TwoTextMessage.msg"
  "msg/TwoTextMessage2.msg"
)- 빌드
$ cd ~/my_ws
$ colcon build --symlink-install
- Custom Interface(msg) 사용
-
이제 우리가 정의한 custom interface를 노드에서 사용하여 토픽을 publish, subscribe하는 방법을 알아본다.
-
새로운 패키지 생성
- 이때 의존성으로 위에서 생성한 custom interface의 패키지를 명시하는 것을 볼 수 있음
- 실수로 생성 단계에서 필요한 패키지를 명시하지 않았더라도 나중에 package.xml, setup.py 등을 수정하여 반영 가능
$ cd ~/my_ws/src
$ ros2 pkg create my_custom_msg_topic_package --build-type ament_python --dependencies rclpy std_msgs msg_interface_example- 다음과 같은 코드를 publisher로 작성
$ cd my_custom_msg_topic_package/my_custom_msg_topic_package
$ code custom_topic_publisher.py
import rclpy
from rclpy.node import Node
from rclpy.qos import QoSProfile
from msg_interface_example.msg import TwoTextMessage # std_msgs의 String 대신 우리가 정의한 custom interface를 import
class HelloworldPublisher(Node):
def __init__(self):
super().__init__('custom_msg_publisher')
qos_profile = QoSProfile(depth=10)
self.helloworld_publisher = self.create_publisher(TwoTextMessage, 'my_custom_msg', qos_profile) # 토픽에 넣을 데이터 타입으로 우리가 정의한 TwoTextMessage 타입을 입력
self.timer = self.create_timer(1, self.publish_helloworld_msg)
self.count = 0
def publish_helloworld_msg(self):
msg = TwoTextMessage() # 우리가 정의한 TwoTextMessage 타입을 선언
msg.stamp = self.get_clock().now().to_msg() # stamp 데이터 필드에 시간정보 입력
msg.text_a = 'text_a: {0}'.format(self.count) # text_a 데이터 필드에 string 데이터 입력. 앞에서는 msg.data에 string데이터를 입력했지만, 우리가 정의한 TwoTextMessage 타입에는 data라는 이름의 데이터 필드가 없음에 유의
msg.text_b = 'text_b: {0}'.format(self.count*2)
self.helloworld_publisher.publish(msg)
self.get_logger().info('Published message: {0}'.format(msg.text_a))
self.get_logger().info('Published message: {0}'.format(msg.text_b))
self.count += 1
def main(args=None):
rclpy.init(args=args)
node = HelloworldPublisher()
try:
rclpy.spin(node)
except KeyboardInterrupt:
node.get_logger().info('Keyboard Interrupt (SIGINT)')
finally:
node.destroy_node()
rclpy.shutdown()
if __name__ == '__main__':
main()- 다음과 같이 subscriber 작성
- publisher 코드와 같은 디렉토리에 생성
$ code custom_topic_subscriber.pyimport rclpy
from rclpy.node import Node
from rclpy.qos import QoSProfile
from msg_interface_example.msg import TwoTextMessage # std_msgs의 String 대신 우리가 정의한 custom interface를 import
class HelloworldSubscriber(Node):
def __init__(self):
super().__init__('custom_msg_subscriber')
qos_profile = QoSProfile(depth=10)
self.helloworld_subscriber = self.create_subscription(
TwoTextMessage,
'my_custom_msg',
self.subscribe_topic_message,
qos_profile) # TwoTextMessage타입의 토픽을 수신
def subscribe_topic_message(self, msg): # TwoTextMessage 타입의 msg 데이터 내의 text_a, text_b 필드를 출력
self.get_logger().info('Received message: {0}'.format(msg.text_a))
self.get_logger().info('Received message: {0}'.format(msg.text_b))
def main(args=None):
rclpy.init(args=args)
node = HelloworldSubscriber()
try:
rclpy.spin(node)
except KeyboardInterrupt:
node.get_logger().info('Keyboard Interrupt (SIGINT)')
finally:
node.destroy_node()
rclpy.shutdown()
if __name__ == '__main__':
main()- package.xml 파일 확인
- 의존성에 패키지 생성 당시 명시한
msg_interface_example패키지(앞에서 생성한 우리의 custom interface 패키지)가 들어있는 것을 확인할 수 있음
- 의존성에 패키지 생성 당시 명시한
$ cd ..
$ code package.xml
<?xml version="1.0"?>
<?xml-model href="http://download.ros.org/schema/package_format3.xsd" schematypens="http://www.w3.org/2001/XMLSchema"?>
<package format="3">
<name>my_custom_msg_topic_package</name>
<version>0.0.0</version>
<description>TODO: Package description</description>
<maintainer email="kym@todo.todo">kym</maintainer>
<license>TODO: License declaration</license>
<depend>rclpy</depend>
<depend>std_msgs</depend>
<depend>msg_interface_example</depend>
<test_depend>ament_copyright</test_depend>
<test_depend>ament_flake8</test_depend>
<test_depend>ament_pep257</test_depend>
<test_depend>python3-pytest</test_depend>
<export>
<build_type>ament_python</build_type>
</export>
</package>- setup.py 파일 작성
- "entry_points" 필드 작성에 주의
$ code setup.pyfrom setuptools import find_packages, setup
package_name = 'my_custom_msg_topic_package'
setup(
name=package_name,
version='0.0.0',
packages=find_packages(exclude=['test']),
data_files=[
('share/ament_index/resource_index/packages',
['resource/' + package_name]),
('share/' + package_name, ['package.xml']),
],
install_requires=['setuptools'],
zip_safe=True,
maintainer='kym',
maintainer_email='kym@todo.todo',
description='TODO: Package description',
license='TODO: License declaration',
tests_require=['pytest'],
entry_points={
'console_scripts': [
'custom_topic_publisher = my_custom_msg_topic_package.custom_topic_publisher:main',
'custom_topic_subscriber = my_custom_msg_topic_package.custom_topic_subscriber:main',
],
},
)- 빌드
$ cd ~/my_ws
$ colcon build --symlink-install
$. install/local_setup.bash- 노드 실행
- publisher와 subscriber 실행
- 각각 다른 터미널 탭에서 실행
- 제대로 실행된다면, 두 개의 문자열 데이터가 송수신되는 것을 확인할 수 있음
$ ros2 run my_custom_msg_topic_package custom_topic_publisher
$ ros2 run my_custom_msg_topic_package custom_topic_subscriber - 시각화
- publisher와 subscriber를 실행한 채로 새로운 탭 생성
$ rqt_graph
