Next.js 데이터 페칭 가이드 📊
Next.js에서 데이터를 가져오고 처리하는 방법에 대한 종합적인 가이드입니다.
🔗 1. API Layer
API(응용 프로그램 프로그래밍 인터페이스)는 하나의 응용 프로그램이 다른 응용 프로그램에 서비스를 요청하는 방식입니다.
API 사용 케이스
API는 애플리케이션 코드와 데이터베이스 사이의 중간 계층으로 작동하며, 다음과 같은 경우에 사용됩니다:
- 3rd party 서비스를 사용하여 API를 제공하는 경우
- 클라이언트에서 데이터를 가져오는 경우 - 데이터베이스의 secrets 데이터를 클라이언트에 노출시키지 않기 위해 서버에서 실행되는 API Layer가 필요합니다.
Next.js의 Route Handlers
Next.js에서는 Route Handlers를 사용하여 API 엔드포인트를 생성할 수 있습니다. API 엔드포인트는 API 호출이 수행되는 부분입니다.
🗄️ 2. Database Query
풀스택 애플리케이션을 개발한다면 데이터베이스와 상호작용하는 로직을 작성하는 것은 필수입니다.
지원 데이터베이스
- Postgres와 같은 관계형 데이터베이스의 경우 SQL 또는 Prisma와 같은 ORM을 사용할 수 있습니다.
데이터베이스 쿼리 작성 시나리오
- API 엔드포인트를 생성할 때 - 데이터베이스와 상호 작용하는 로직을 작성해야 합니다.
- React Server Components(RSC)를 사용하는 경우 - 서버에서 데이터를 가져오는 경우, API Layer를 건너뛸 수 있으며, 데이터베이스의 secrets 데이터를 클라이언트에 노출시키지 않고도 데이터베이스에 직접 쿼리할 수 있습니다.
⚛️ 3. Using Server Components to fetch Data
기본 개념
기본적으로 Next.js 애플리케이션의 모든 컴포넌트는 React Server Component(RSC)로 구성됩니다.
Server Component의 장점
-
Promise 지원
- 데이터 Fetch와 같은 비동기 작업에 대한 간단한 솔루션을 제공
async/await구문을 사용하여useEffect,useState또는 Fetch 용도의 각종 라이브러리에 의존하지 않고 데이터 Fetch 진행 가능
-
서버 실행
- 비용이 많이 드는 데이터 Fetch 및 로직을 서버에 유지하고 결과를 클라이언트에만 전송
-
직접 데이터베이스 쿼리
- 추가적인 API Layer 없이 데이터베이스에 직접 쿼리 가능
🛠️ 4. Using SQL
이 과정에서는 Vercel Postgres SDK와 SQL을 사용하여 데이터베이스 쿼리를 작성합니다.
SQL을 사용하는 이유
- 산업 표준: SQL은 관계형 데이터베이스를 쿼리하는 산업 표준 (ORM도 내부적으로 SQL을 생성)
- 기본 이해: SQL에 대한 기본적인 이해는 관계형 데이터베이스의 기본을 이해하는 데 도움
- 유연성: 다양한 데이터를 가져오고 조작할 수 있는 유연성
- 보안: Vercel Postgres SDK는 SQL Injection 공격에 대한 보호 기능 제공
데이터 함수들
/app/lib/data.ts 파일에서 @vercel/postgres의 SQL 함수를 사용하여 다양한 데이터베이스 쿼리를 정의합니다:
import { sql } from "@vercel/postgres";
import {
  CustomerField,
  CustomersTable,
  InvoiceForm,
  InvoicesTable,
  LatestInvoiceRaw,
  User,
  Revenue,
} from "./definitions";
import { formatCurrency } from "./utils";

export async function fetchRevenue() {
  try {
    const data = await sql<Revenue>`SELECT * FROM revenue`;
    return data.rows;
  } catch (error) {
    console.error("Database Error:", error);
    throw new Error("Failed to fetch revenue data.");
  }
}

export async function fetchLatestInvoices() {
  try {
    const data = await sql<LatestInvoiceRaw>`
      SELECT invoices.amount, customers.name, customers.image_url, customers.email, invoices.id
      FROM invoices
      JOIN customers ON invoices.customer_id = customers.id
      ORDER BY invoices.date DESC
      LIMIT 5`;

    const latestInvoices = data.rows.map((invoice) => ({
      ...invoice,
      amount: formatCurrency(invoice.amount),
    }));
    return latestInvoices;
  } catch (error) {
    console.error("Database Error:", error);
    throw new Error("Failed to fetch the latest invoices.");
  }
}

export async function fetchCardData() {
  try {
    const invoiceCountPromise = sql`SELECT COUNT(*) FROM invoices`;
    const customerCountPromise = sql`SELECT COUNT(*) FROM customers`;
    const invoiceStatusPromise = sql`SELECT
         SUM(CASE WHEN status = 'paid' THEN amount ELSE 0 END) AS "paid",
         SUM(CASE WHEN status = 'pending' THEN amount ELSE 0 END) AS "pending"
         FROM invoices`;

    const data = await Promise.all([
      invoiceCountPromise,
      customerCountPromise,
      invoiceStatusPromise,
    ]);

    const numberOfInvoices = Number(data[0].rows[0].count ?? "0");
    const numberOfCustomers = Number(data[1].rows[0].count ?? "0");
    const totalPaidInvoices = formatCurrency(data[2].rows[0].paid ?? "0");
    const totalPendingInvoices = formatCurrency(data[2].rows[0].pending ?? "0");

    return {
      numberOfCustomers,
      numberOfInvoices,
      totalPaidInvoices,
      totalPendingInvoices,
    };
  } catch (error) {
    console.error("Database Error:", error);
    throw new Error("Failed to card data.");
  }
}

// 추가 함수들...
📈 5. 대시보드 개요 페이지 데이터 가져오기
대시보드 개요 페이지의 데이터를 가져오기 위한 기본 구조입니다.
/app/dashboard/page.tsx 기본 구조
import { Card } from "@/app/ui/dashboard/cards";
import RevenueChart from "@/app/ui/dashboard/revenue-chart";
import LatestInvoices from "@/app/ui/dashboard/latest-invoices";
import { lusitana } from "@/app/ui/font";

export default async function Page() {
  return (
    <main>
      <h1 className={`${lusitana.className} mb-4 text-xl md:text-2xl`}>
        Dashboard
      </h1>
      <div className="grid gap-6 sm:grid-cols-2 lg:grid-cols-4">
        {/* Card 컴포넌트들 */}
      </div>
      <div className="mt-6 grid grid-cols-1 gap-6 md:grid-cols-4 lg:grid-cols-8">
        {/* RevenueChart와 LatestInvoices 컴포넌트들 */}
      </div>
    </main>
  );
}
📊 6. RevenueChart 데이터 가져오기
구현 단계
Step 1: /app/dashboard/page.tsx에서 revenue 데이터 가져오기
import { fetchRevenue } from "../lib/data";
export default async function Page() {
const revenue = await fetchRevenue();
console.log("revenue: ", revenue);
return (
<main>
{/* 기존 코드 */}
<div className="mt-6 grid grid-cols-1 gap-6 md:grid-cols-4 lg:grid-cols-8">
<RevenueChart revenue={revenue} />
{/* 다른 컴포넌트들 */}
</div>
</main>
);
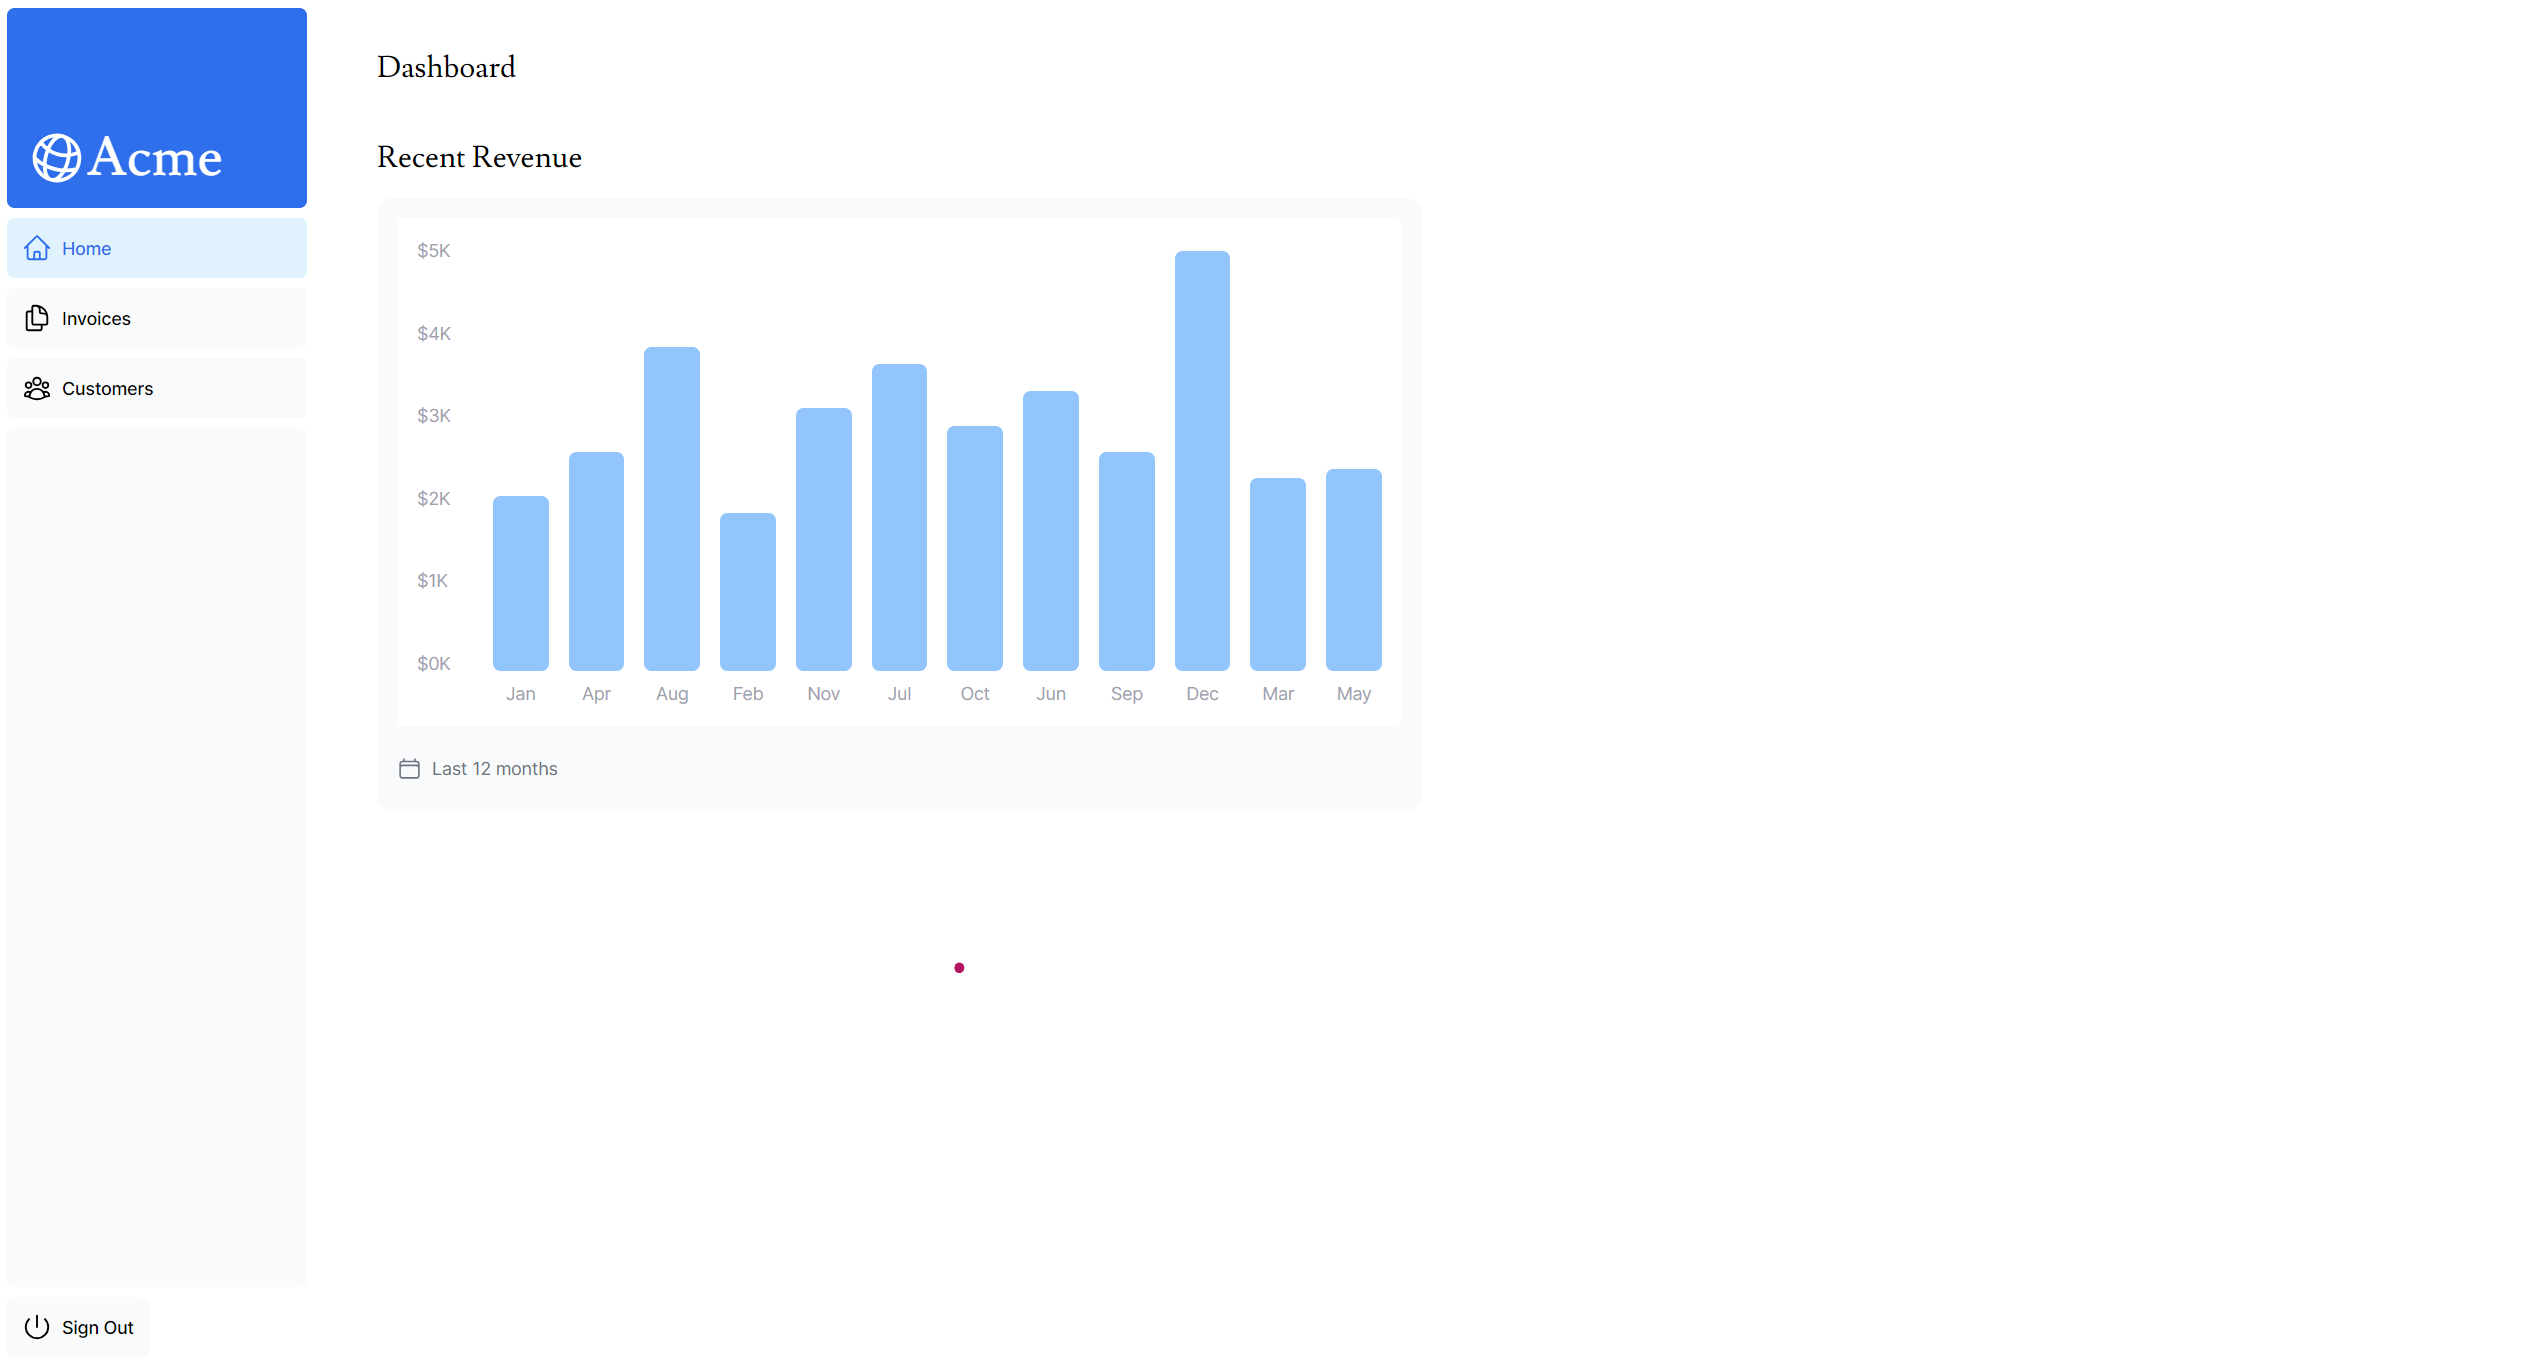
}Step 2: /app/ui/dashboard/revenue-chart.tsx 컴포넌트 구현
import { generateYAxis } from "@/app/lib/utils";
import { CalendarIcon } from "@heroicons/react/24/outline";
import { lusitana } from "../font";
import { Revenue } from "@/app/lib/definitions";

export default async function RevenueChart({
  revenue,
}: {
  revenue: Revenue[];
}) {
  const chartHeight = 350;
  const { yAxisLabels, topLabel } = generateYAxis(revenue);

  if (!revenue || revenue.length === 0) {
    return <p className="mt-4 text-gray-400">No data available.</p>;
  }

  return (
    <div className="w-full md:col-span-4">
      <h2 className={`${lusitana.className} mb-4 text-xl md:text-2xl`}>
        Recent Revenue
      </h2>
      <div className="rounded-xl bg-gray-50 p-4">
        <div className="sm:grid-cols-13 mt-0 grid grid-cols-12 items-end gap-2 rounded-md bg-white p-4 md:gap-4">
          <div
            className="mb-6 hidden flex-col justify-between text-sm text-gray-400 sm:flex"
            style={{ height: `${chartHeight}px` }}
          >
            {yAxisLabels.map((label) => (
              <p key={label}>{label}</p>
            ))}
          </div>

          {revenue.map((month) => (
            <div key={month.month} className="flex flex-col items-center gap-2">
              <div
                className="w-full rounded-md bg-blue-300"
                style={{
                  height: `${(chartHeight / topLabel) * month.revenue}px`,
                }}
              ></div>
              <p className="-rotate-90 text-sm text-gray-400 sm:rotate-0">
                {month.month}
              </p>
            </div>
          ))}
        </div>
        <div className="flex items-center pb-2 pt-6">
          <CalendarIcon className="h-5 w-5 text-gray-500" />
          <h3 className="ml-2 text-sm text-gray-500 ">Last 12 months</h3>
        </div>
      </div>
    </div>
  );
}
결과 화면
📋 7. LatestInvoices 데이터 가져오기
<LatestInvoices/> 컴포넌트는 날짜별로 정렬된 5개의 최신 송장 데이터를 가져와 출력합니다.
구현 단계
Step 1: 데이터 가져오기 함수 (/app/lib/data.ts)
export async function fetchLatestInvoices() {
try {
const data = await sql<LatestInvoiceRaw>`
SELECT invoices.amount, customers.name, customers.image_url, customers.email, invoices.id
FROM invoices
JOIN customers ON invoices.customer_id = customers.id
ORDER BY invoices.date DESC
LIMIT 5`;
const latestInvoices = data.rows.map((invoice) => ({
...invoice,
amount: formatCurrency(invoice.amount),
}));
return latestInvoices;
} catch (error) {
console.error("Database Error:", error);
throw new Error("Failed to fetch the latest invoices.");
}
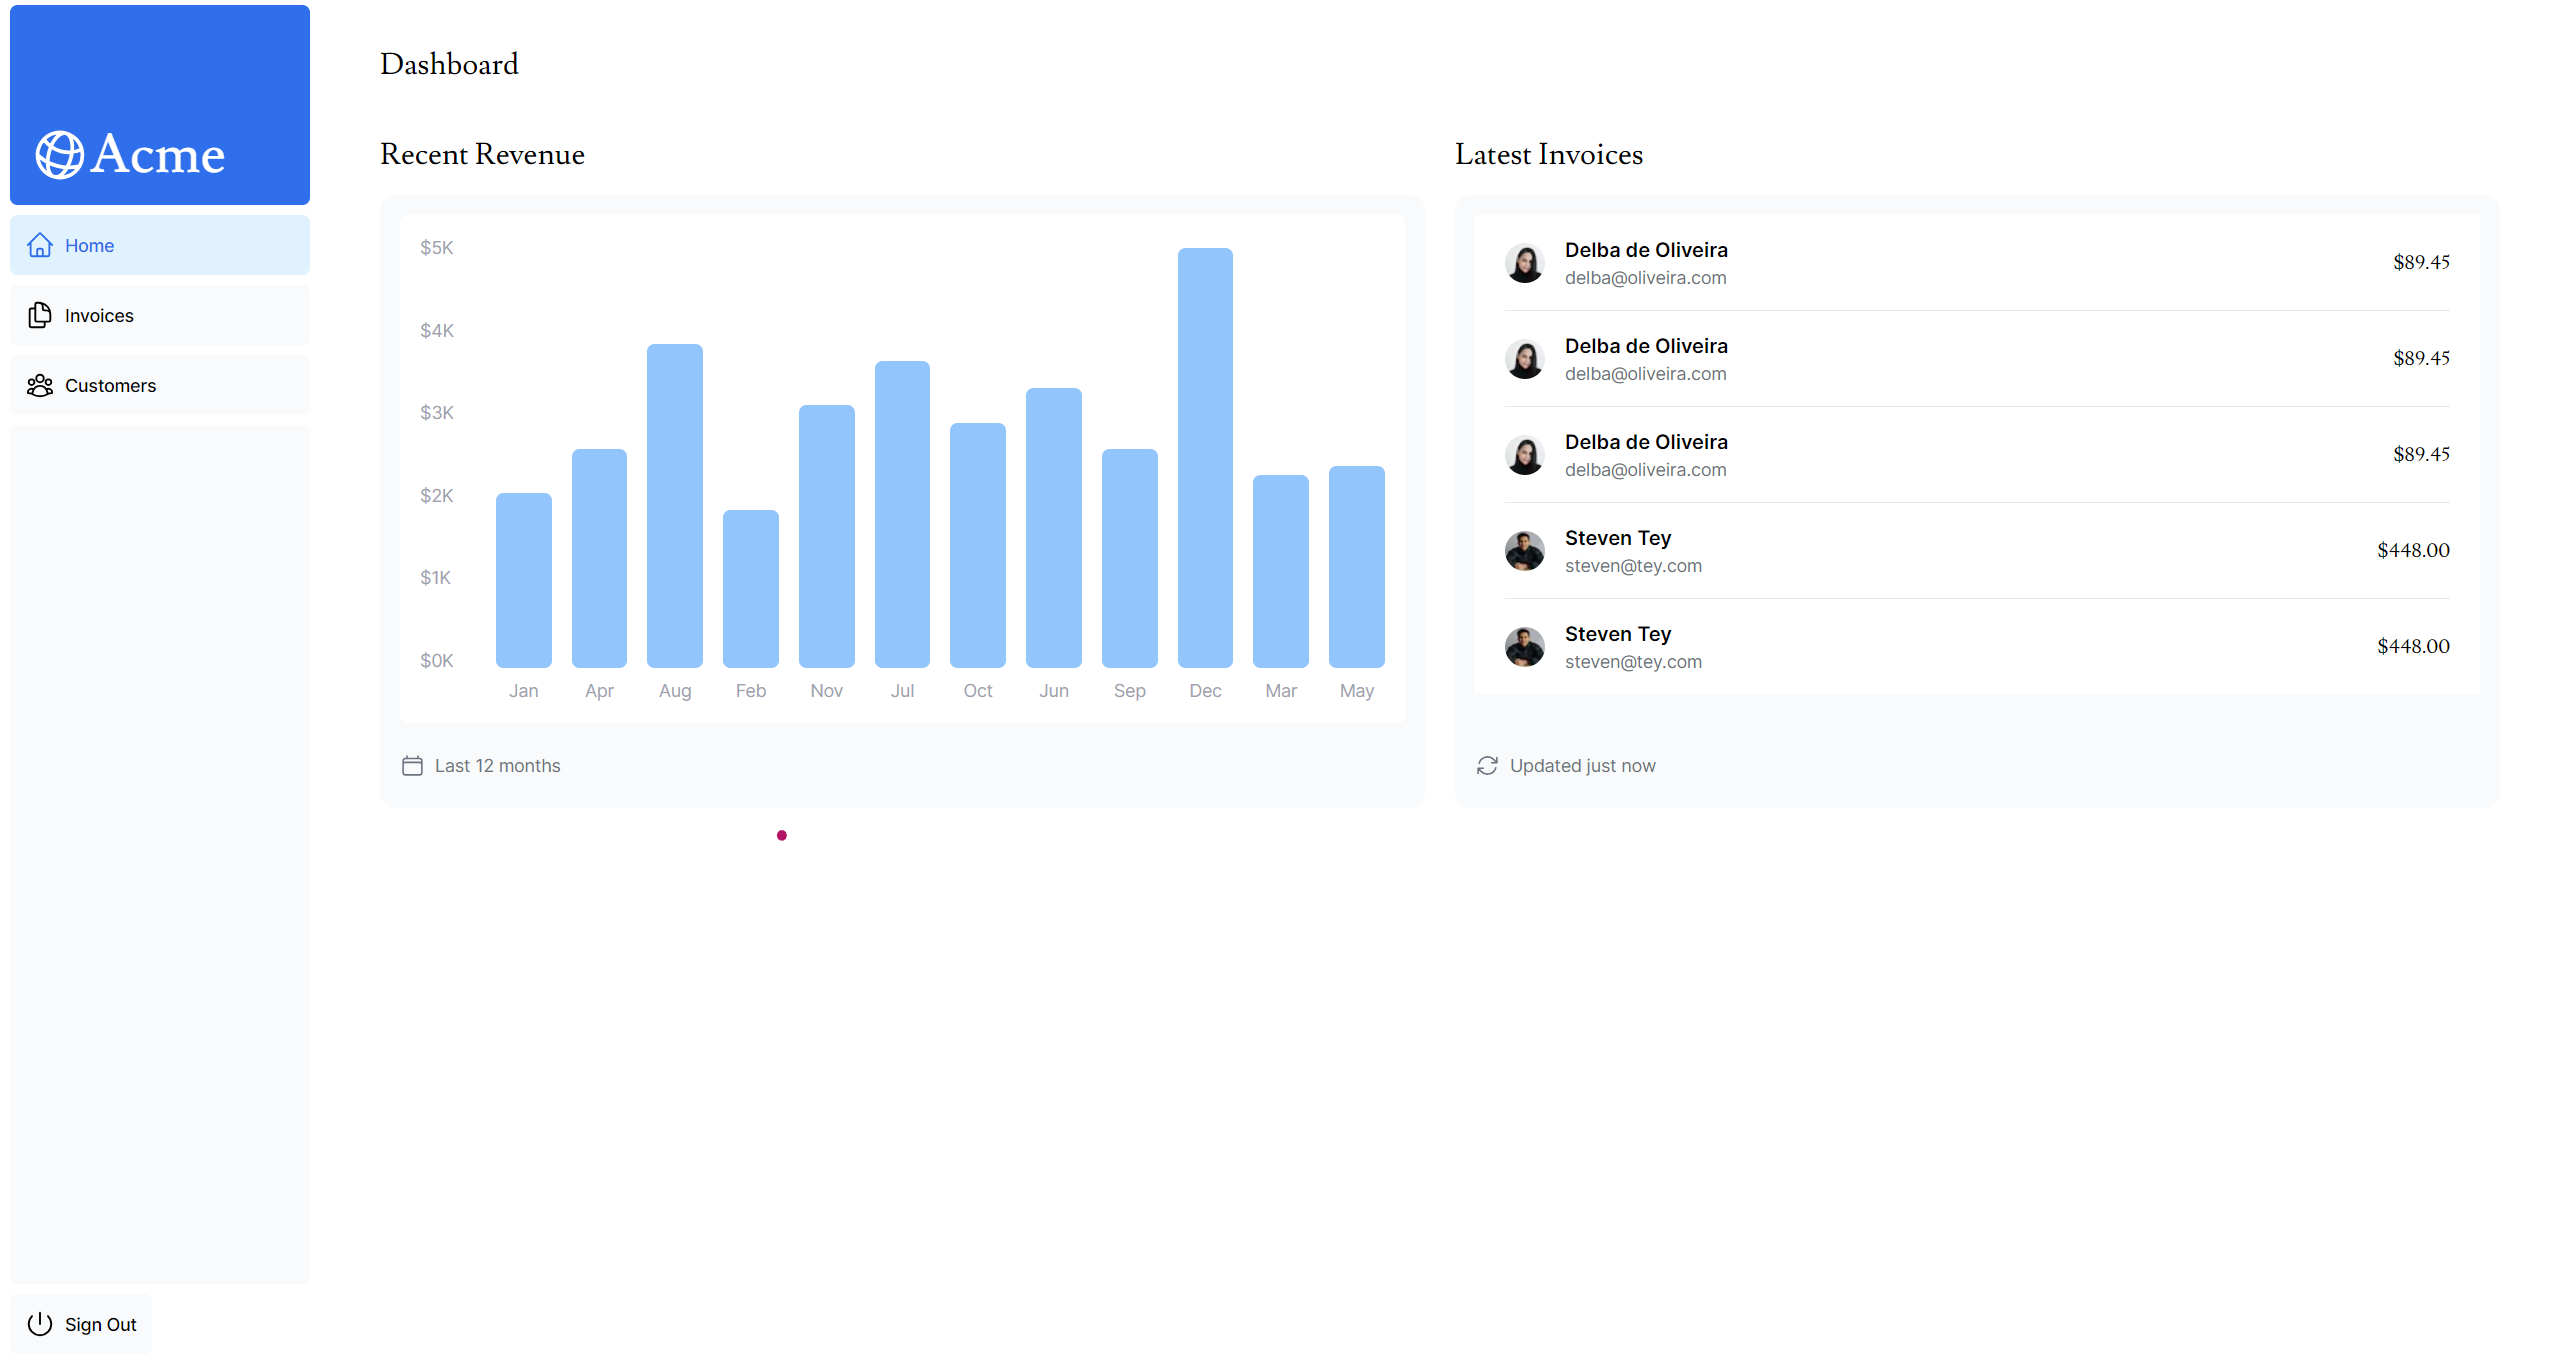
}Step 2: 컴포넌트 구현 (/app/ui/dashboard/latest-invoices.tsx)
import { ArrowPathIcon } from "@heroicons/react/24/outline";
import clsx from "clsx";
import Image from "next/image";
import { lusitana } from "../font";
import { LatestInvoice } from "@/app/lib/definitions";

export default async function LatestInvoices({
  latestInvoices,
}: {
  latestInvoices: LatestInvoice[];
}) {
  return (
    <div className="flex w-full flex-col md:col-span-4 lg:col-span-4">
      <h2 className={`${lusitana.className} mb-4 text-xl md:text-2xl`}>
        Latest Invoices
      </h2>
      <div className="flex grow flex-col justify-between rounded-xl bg-gray-50 p-4">
        <div className="bg-white px-6">
          {latestInvoices.map((invoice, i) => {
            return (
              <div
                key={invoice.id}
                className={clsx(
                  "flex flex-row items-center justify-between py-4",
                  {
                    "border-t": i !== 0,
                  }
                )}
              >
                <div className="flex items-center">
                  <Image
                    src={invoice.image_url}
                    alt={"invoice_img"}
                    className="mr-4 rounded-full"
                    width={32}
                    height={32}
                  />
                  <div className="min-w-0">
                    <p className="truncate text-sm font-semibold md:text-base">
                      {invoice.name}
                    </p>
                    <p className="hidden text-sm text-gray-500 sm:block">
                      {invoice.email}
                    </p>
                  </div>
                </div>
                <p
                  className={`${lusitana.className} truncate text-sm font-medium md:text-base`}
                >
                  {invoice.amount}
                </p>
              </div>
            );
          })}
        </div>
        <div className="flex items-center pb-2 pt-6">
          <ArrowPathIcon className="h-5 w-5 text-gray-500" />
          <h3 className="ml-2 text-sm text-gray-500 ">Updated just now</h3>
        </div>
      </div>
    </div>
  );
}
Step 3: 페이지에서 사용 (/app/dashboard/page.tsx)
import { fetchLatestInvoices, fetchRevenue } from "../lib/data";

export default async function Page() {
  const revenue = await fetchRevenue();
  const latestInvoices = await fetchLatestInvoices();
  console.log("latestInvoices: ", latestInvoices);

  return (
    <main>
      {/* 기존 코드 */}
      <div className="mt-6 grid grid-cols-1 gap-6 md:grid-cols-4 lg:grid-cols-8">
        <RevenueChart revenue={revenue} />
        <LatestInvoices latestInvoices={latestInvoices} />
      </div>
    </main>
  );
}
결과 화면
🎯 8. Card 컴포넌트 데이터 가져오기 (실습)
<Card/> 컴포넌트에 표시될 네 가지 주요 데이터를 가져오는 실습입니다.
표시할 데이터
- ✅ 수집된 송장의 총 금액
- ⏳ 보류 중인 송장의 총 금액
- 📊 총 송장 수
- 👥 총 고객 수
구현 단계
Step 1: Card 컴포넌트 구조 확인 (/app/ui/dashboard/cards.tsx)
export function Card({
  title,
  value,
  type,
}: {
  title: string;
  value: number | string;
  type: "invoices" | "customers" | "pending" | "collected";
}) {
  const Icon = iconMap[type];

  return (
    <div className="rounded-xl bg-gray-50 p-2 shadow-sm">
      <div className="flex p-4">
        {Icon ? <Icon className="h-5 w-5 text-gray-700" /> : null}
        <h3 className="ml-2 text-sm font-medium">{title}</h3>
      </div>
      <p
        className={`${lusitana.className}
          truncate rounded-xl bg-white px-4 py-8 text-center text-2xl`}
      >
        {value}
      </p>
    </div>
  );
}
Step 2: 데이터 가져오기 함수 분석 (/app/lib/data.ts)
export async function fetchCardData() {
try {
// 병렬 처리를 위한 Promise 생성
const invoiceCountPromise = sql`SELECT COUNT(*) FROM invoices`;
const customerCountPromise = sql`SELECT COUNT(*) FROM customers`;
const invoiceStatusPromise = sql`SELECT
SUM(CASE WHEN status = 'paid' THEN amount ELSE 0 END) AS "paid",
SUM(CASE WHEN status = 'pending' THEN amount ELSE 0 END) AS "pending"
FROM invoices`;
// 모든 쿼리를 병렬로 실행
const data = await Promise.all([
invoiceCountPromise,
customerCountPromise,
invoiceStatusPromise,
]);
// 데이터 변환 및 반환
const numberOfInvoices = Number(data[0].rows[0].count ?? "0");
const numberOfCustomers = Number(data[1].rows[0].count ?? "0");
const totalPaidInvoices = formatCurrency(data[2].rows[0].paid ?? "0");
const totalPendingInvoices = formatCurrency(data[2].rows[0].pending ?? "0");
return {
numberOfCustomers,
numberOfInvoices,
totalPaidInvoices,
totalPendingInvoices,
};
} catch (error) {
console.error("Database Error:", error);
throw new Error("Failed to card data.");
}
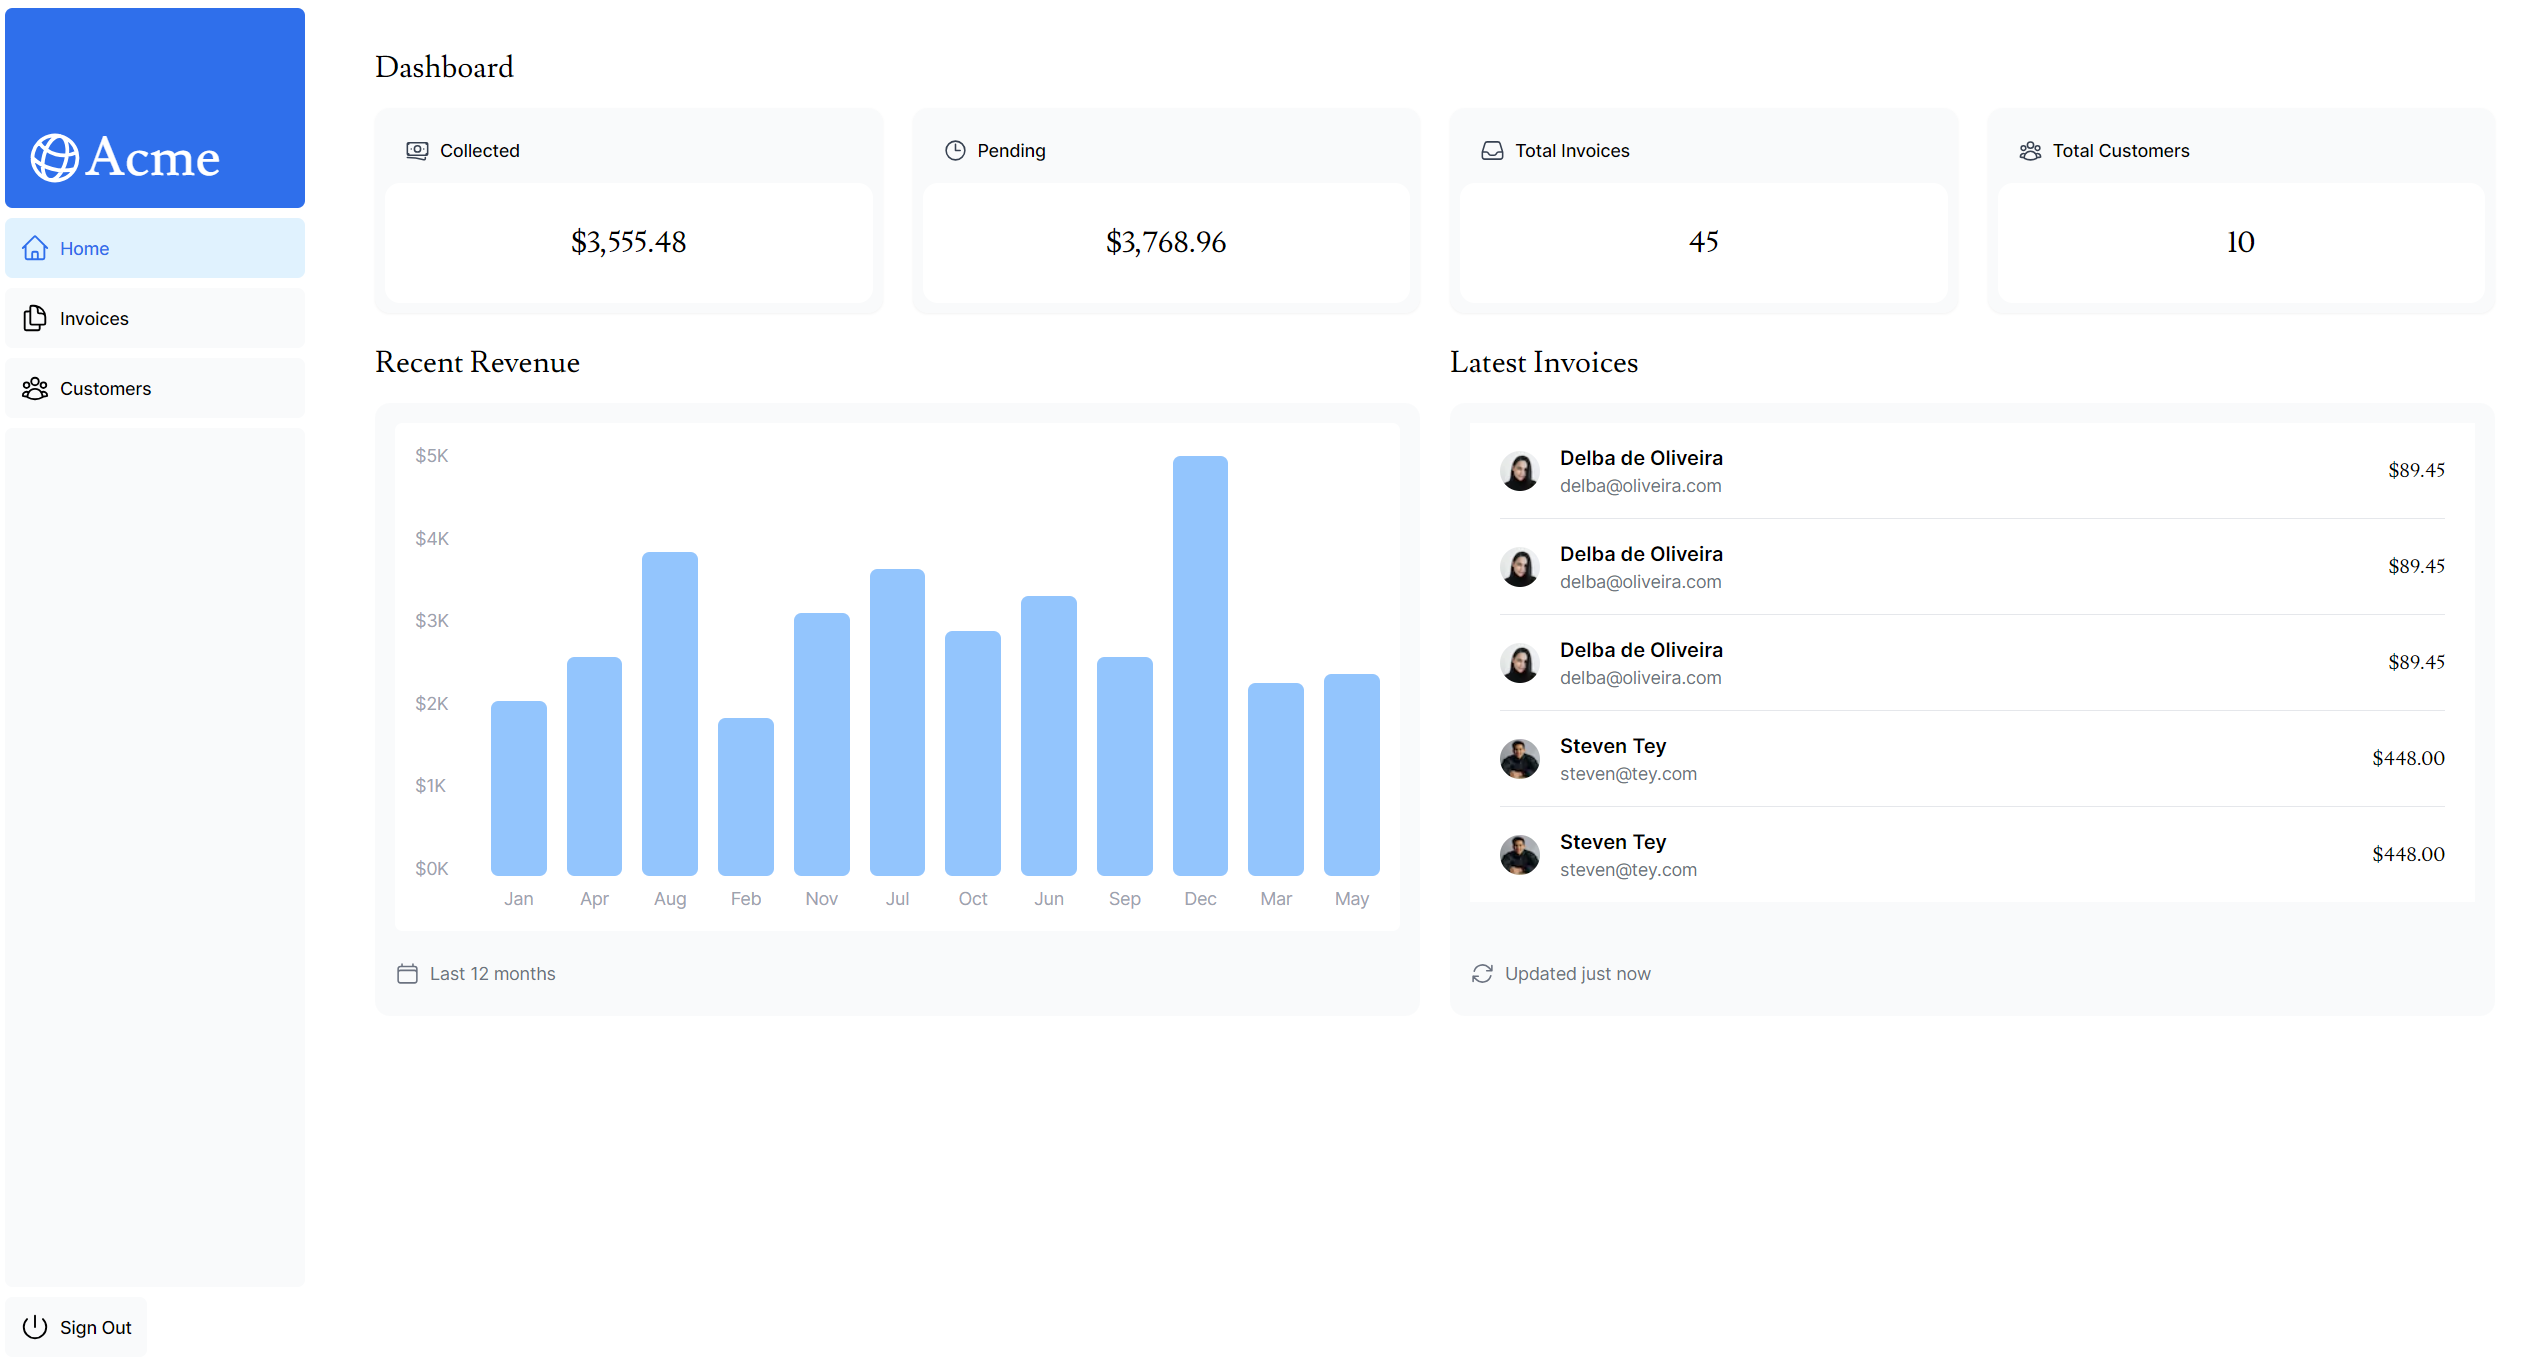
}Step 3: 페이지에서 Card 컴포넌트 사용 (/app/dashboard/page.tsx)
import { Card } from "@/app/ui/dashboard/cards";
import RevenueChart from "@/app/ui/dashboard/revenue-chart";
import LatestInvoices from "@/app/ui/dashboard/latest-invoices";
import { lusitana } from "@/app/ui/font";
import { fetchCardData, fetchLatestInvoices, fetchRevenue } from "../lib/data";

export default async function Page() {
  const revenue = await fetchRevenue();
  const latestInvoices = await fetchLatestInvoices();

  // 객체 해체 할당으로 카드 데이터 가져오기
  const {
    numberOfCustomers,
    numberOfInvoices,
    totalPaidInvoices,
    totalPendingInvoices,
  } = await fetchCardData();

  return (
    <main>
      <h1 className={`${lusitana.className} mb-4 text-xl md:text-2xl`}>
        Dashboard
      </h1>

      {/* Card 컴포넌트들 */}
      <div className="grid gap-6 sm:grid-cols-2 lg:grid-cols-4">
        <Card title="Collected" value={totalPaidInvoices} type="collected" />
        <Card title="Pending" value={totalPendingInvoices} type="pending" />
        <Card title="Total Invoices" value={numberOfInvoices} type="invoices" />
        <Card
          title="Total Customers"
          value={numberOfCustomers}
          type="customers"
        />
      </div>

      {/* 차트 및 리스트 컴포넌트들 */}
      <div className="mt-6 grid grid-cols-1 gap-6 md:grid-cols-4 lg:grid-cols-8">
        <RevenueChart revenue={revenue} />
        <LatestInvoices latestInvoices={latestInvoices} />
      </div>
    </main>
  );
}
최종 결과 화면
⚠️ 9. Request Waterfalls 문제점
현재 구현에서 알아두어야 할 두 가지 중요한 사항이 있습니다:
- Request Waterfalls 생성 - 데이터 요청이 의도치 않게 서로를 차단
- 정적 렌더링 - Next.js의 기본 미리 렌더링으로 인해 데이터 변경이 대시보드에 반영되지 않음
Request Waterfalls란?
Request Waterfalls은 이전 요청의 완료에 의존하는 일련의 네트워크 요청 패턴입니다.
문제가 되는 경우
fetchRevenue() 완료 ➜ fetchLatestInvoices() 시작 ➜ 완료 ➜ fetchCardData() 시작이러한 순차적 실행은 의도치 않게 성능에 영향을 미칠 수 있습니다.
필요한 경우
다음 요청을 시작하기 전에 특정 조건을 충족해야 하는 경우:
- 사용자 ID 획득 ➜ 프로필 정보 가져오기 ➜ 친구 목록 가져오기
🚀 10. Parallel Data Fetching
병렬 처리의 필요성
waterfalls를 피하는 일반적인 방법은 모든 데이터 요청을 병렬로 처리하는 것입니다.
JavaScript의 병렬 처리 방법
Promise.all() 또는 Promise.allSettled() 함수를 사용하여 모든 Promise 작업을 동시에 시작할 수 있습니다.
실제 구현 예제
export async function fetchCardData() {
  try {
    // 🔥 모든 쿼리를 동시에 시작
    const invoiceCountPromise = sql`SELECT COUNT(*) FROM invoices`;
    const customerCountPromise = sql`SELECT COUNT(*) FROM customers`;
    const invoiceStatusPromise = sql`SELECT
         SUM(CASE WHEN status = 'paid' THEN amount ELSE 0 END) AS "paid",
         SUM(CASE WHEN status = 'pending' THEN amount ELSE 0 END) AS "pending"
         FROM invoices`;

    // ✅ Promise.all()로 병렬 처리
    const data = await Promise.all([
      invoiceCountPromise,
      customerCountPromise,
      invoiceStatusPromise,
    ]);

    // 데이터 처리...
  } catch (error) {
    console.error("Database Error:", error);
    throw new Error("Failed to card data.");
  }
}
병렬 처리의 장점과 단점
✅ 장점
- 성능 향상: 모든 fetch 작업을 동시에 시작
- 네이티브 패턴: 다양한 라이브러리나 프레임워크에 적용 가능한 JavaScript 패턴
⚠️ 단점
- 최약점 문제: 하나의 데이터 요청이 느린 경우, 모든 요청이 해당 속도에 맞춰 지연됨
📝 마무리
이 가이드를 통해 Next.js에서 데이터를 효율적으로 가져오고 처리하는 방법을 학습했습니다. Server Components와 병렬 데이터 페칭을 활용하여 성능 최적화된 대시보드를 구현할 수 있습니다.
핵심 포인트 요약
- 🔄 Server Components를 활용한 서버사이드 데이터 페칭
- 🗄️ SQL을 통한 직접적인 데이터베이스 쿼리
- ⚡ 병렬 처리를 통한 성능 최적화
- 🎯 컴포넌트 분리를 통한 관심사 분리
다음 단계에서는 이러한 데이터 페칭 최적화와 캐싱 전략에 대해 더 자세히 알아보겠습니다.