[최종 프로젝트 - React with typescript] Input type_Radio(여러 개의 input을 하나의 State로 관리하기) + text, number, textarea
내배캠React3기-프로젝트
목록 보기
23/27
Input type
- Input type 중 선택지를 제공할 때, checkbox와 radio, select 등을 사용한다.
- radio와 select의 경우 여러 개의 선택지 중 한 가지를 선택해야 할 때 주로 사용하고
- check box는 여러 개 선택지의 중복 선택이나 동의 여부를 묻기 위한 체크 설정과 해제를 하나의 체크박스로 사용해야할 때 주로 사용한다.
Radio
- 오늘은 중복 선택이 아닌 하나의 선택만 필요하니 radio를 사용해보겠다.
- Check Box 사용방법이 궁금하다면 Check Box 사용해보기를 클릭해서 보면 된다.
1. 준비하기
- 일단 하드코딩을 하면 손가락이 아프니😂 내가 필요한 다중 선택지를 배열형태로 선언한다.
(나 같은 경우에는 radio로 받아야하는 항목이 4가지) - jsx 문법 내부에 생성할 경우, 지속적으로 rerendering이 되며 초기화될 수 있으므로 component 윗 부분에 선언해준다.
const shipping_cost = ['배송비 포함', '배송비 별도']
const deal_type = ['택배', '직거래', '협의 후 결정']
const changable = ['가능', '불가능']
const quality = [
  {
    condition: '새상품(미사용)',
    shape: '사용하지 않은 새 상품이에요'
  },
  {
    condition: '사용감 없음',
    shape: '사용은 했지만 눈에 띄는 흔적이나 얼룩이 없어요 / 아주 조금 사용했어요'
  },
  {
    condition: '사용감 적음',
    shape: '눈에 띄는 흔적이나 얼룩이 약간 있어요 / 절반정도 사용했어요'
  },
  {
    condition: '사용감 많음',
    shape: '눈에 띄는 흔적이나 얼룩이 많이 있어요 / 많이 사용했어요'
  },
  {
    condition: '고장/파손 상품',
    shape: '기능 이상이나 외관 손상 등으로 수리가 필요해요'
  },
]- 이 배열에 map 메서드를 사용하여 폼을 만들어주고 input type은 radio로 적어준다.
- label에 htmlFor과 input의 id를 일치시켜준다.
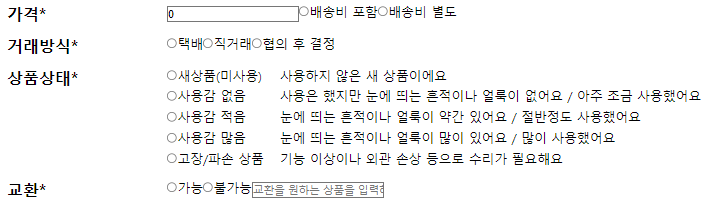
<form onSubmit={handleOnSubmit}>
  <div>
    <h2>가격*</h2>
    <input type='number' placeholder='가격을 입력해주세요' />
    	{shipping_cost.map((shipping_cost, i) =>
           <label key={i} htmlFor={shipping_cost}>
              <input type='radio' id={shipping_cost} />{shipping_cost}
           </label>
        )}
  </div>
  <div>
    <h2>거래방식*</h2>
    {deal_type.map((deal_type, i) =>
       <label key={i} htmlFor={deal_type}>
          <input type='radio' id={deal_type} />{deal_type}
       </label>
     )}
  </div>
  <div>
    <h2>상품상태*</h2>
    <div>
      {quality.map((quality, i) =>
         <label key={i} htmlFor={quality.condition}>
             <input type='radio' id={quality.condition} />{quality.condition}
         </label>
      )}
    </div>
    <div>
      {quality.map((quality) =>
         <p key={quality.shape}>{quality.shape}</p>
      )}
    </div>
  </div>
  <div>
    <h2>교환*</h2>
    {changable.map((changable, i) =>
       <label key={i} htmlFor={changable}>
           <input type='radio' id={changable} />{changable}
       </label>
     )}
    <input type='text'
      placeholder='교환을 원하는 상품을 입력해주세요.' />
  </div>
</form>- 그럼 아래처럼 체크를 할 수 있는 리스트가 나오게 된다.
2. radio에 값 넣기
- 먼저 radio 배열 중 check 된 element를 관리할 useState를 생성해준다.
- check 된 input들의 값이 객체에 차곡차곡 담기도록 로직을 구성해 준다.
import { useState } from 'react'

const [radioCheckedList, setRadioCheckedList] = useState(producsPostsRadioInit);- 해당 element의 기본 값과 type도 지정해준다. (모두 string 배열)
-> 원래는 boolean값도 있었으나, DB에서 true/false보다 명시적으로 보여줄 수 있는 string으로 모두 바꾸게 되었다.
type RadioValue = {
  shipping_cost: string,
  deal_type: string,
  quality: string,
  changable: string
}

const producsPostsRadioInit: RadioValue = {
  shipping_cost: "",
  deal_type: "",
  quality: "",
  changable: ""
}- 기존에 자주 쓰던 하나의 state를 관리하는 onChange함수를 사용하거나 state 4개를 모두 따로 만들었다면 onChange함수도 이렇게 4개가 되었겠지만,
const [shippingCost, setShippingCost] = useState<string>("")
const [dealType, setDealType] = useState<string>("")
const [changable, setChangable] = useState<string>("")
const [quality, setQuality] = useState<string>("")

const handleOnChangeShippingCost = (e: ChangeEvent<HTMLInputElement>) => {
  setShippingCost(e.target.value);
};
const handleOnChangeDealType = (e: ChangeEvent<HTMLInputElement>) => {
  setDealType(e.target.value);
};
const handleOnChangeChangable = (e: ChangeEvent<HTMLInputElement>) => {
  setChangable(e.target.value);
};
const handleOnChangeQuality = (e: ChangeEvent<HTMLInputElement>) => {
  setQuality(e.target.value);
};- radio input 값을 받을 onChange를 아래처럼 선언해준다면 하나의 state로도 4개의 input 값을 관리할 수 있다. (ChangeEvent import는 필수)
import { ChangeEvent, useState } from 'react'
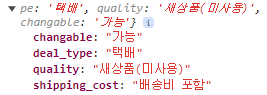
const handleOnChangeRadioTypeValue = (e: ChangeEvent<HTMLInputElement>) => {
const { name, value } = e.target;
setRadioCheckedList({ ...radioCheckedList, [name]: value });
};간단하게 코드 설명을 하자면!
- e.target 에서 name과 value만 뽑아내고
- radioCheckedList를 ... 즉, 스프레드 연산자(spread operator)로 풀어서
- name에 해당하는 value 값을 할당해주는 것이다.
- 이 방법은 input type이 text나 number일 때도 써먹을 수 있다!
- 자 이제 handle 함수를 만들었으니 input에 연결해주는 일만 남았다.
- radio의 check 여부는 checked 속성을 통해 알 수 있으나, 나는 명시적으로 선택한 값의 이름을 잘 알아볼 수 있도록 value 값만 설정했다.
- 해당 로직에 form 태그를 연결하여 handleOnSubmit 함수도 적용해준다.
import { ChangeEvent, FormEvent, useState } from 'react'

const handleOnSubmit = (e: FormEvent<HTMLFormElement>) => {
  e.preventDefault();
}

...

<form onSubmit={handleOnSubmit}>
  <div>
    <h2>가격*</h2>
    <input type='number' placeholder='가격을 입력해주세요'/>
    	{shipping_cost.map((shipping_cost, i) =>
           <label key={i} htmlFor={shipping_cost}>
              <input type='radio' id={shipping_cost}
                name='shipping_cost' value={shipping_cost}
                onChange={handleOnChangeRadioTypeValue} />{shipping_cost}
           </label>
        )}
  </div>
  <div>
    <h2>거래방식*</h2>
    {deal_type.map((deal_type, i) =>
       <label key={i} htmlFor={deal_type}>
          <input type='radio' id={deal_type}
            name='deal_type' value={deal_type}
            onChange={handleOnChangeRadioTypeValue} />{deal_type}
       </label>
     )}
  </div>
  <div>
    <h2>상품상태*</h2>
    <div>
      {quality.map((quality, i) =>
         <label key={i} htmlFor={quality.condition}>
             <input type='radio' id={quality.condition}
               name='quality' value={quality.condition}
               onChange={handleOnChangeRadioTypeValue} />{quality.condition}
         </label>
      )}
    </div>
    <div>
      {quality.map((quality) =>
         <p key={quality.shape}>{quality.shape}</p>
      )}
    </div>
  </div>
  <div>
    <h2>교환*</h2>
    {changable.map((changable, i) =>
       <label key={i} htmlFor={changable}>
           <input type='radio' id={changable}
             name='changable' value={changable}
             onChange={handleOnChangeRadioTypeValue} />{changable}
       </label>
     )}
    <input type='text'
      placeholder='교환을 원하는 상품을 입력해주세요.' />
  </div>
</form>
3. 정말로 값이 찍히는지 확인해보자
- 원하는 값을 체크하고
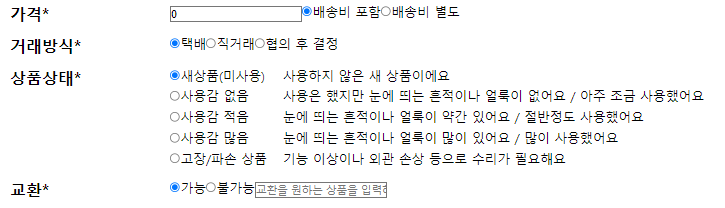
- 객체로 잘 담기는지 확인
4. input type text와 number 똑같이 적용하기
- 앞선 코드에서 보였던 가격의 number type과 원하는 교환상품의 text type도 적용해보자.
- 추가로 textarea는 객체에, 콤마로 구분되는 태그는 배열에 담기도록 관리해보겠다.
- input들의 값이 객체에 담기도록 element를 관리한 useState를 생성해준다.
import { useState } from 'react'

const [textTypeValue, setTextTypeValue] = useState(producsPostsTextInit)- 해당 element의 기본 값과 type도 지정해준다.
type TextValue = {
  price: number,
  exchange_product: string,
  contents: string,
  tags: string[],
}
const producsPostsTextInit: TextValue = {
  price: 0,
  exchange_product: "",
  contents: "",
  tags: [],
}- onChange 함수를 만들어준다.
- 각 해당하는 element를 if문으로 관리해준다.
const handleOnChangeTextTypeValue = (e: ChangeEvent<HTMLInputElement>) => {
  const { name, value, valueAsNumber } = e.target;
  if (name === 'tags') {
    setTextTypeValue({ ...textTypeValue, [name]: [...value.split(',')] });
  } else if (name === 'price') {
    setTextTypeValue({ ...textTypeValue, [name]: valueAsNumber });
  } else {
    setTextTypeValue({ ...textTypeValue, [name]: value });
  }
};- 사실 나는 리팩토링 과정에서 if문을 사용하였고, 태그를 해결하지 못해 팀원의 도움을 받았다.
(왜 기본적인 자바스크립트를 어느정도 이해하고 리액트를 입문하라는 것인지 이해할 수 있었다.)
간단한 코드 설명!
- text - radio와 같은 로직 (input, textarea 모두 같이 적용)
- number - value는 사용자가 input에 숫자를 넣어도 string으로 받게 된다. 그래서 value 대신 valueAsNumber로 받게 되면 문자를 숫자로 바꿀 필요없이 숫자 그대로 받아올 수 있으니 참고하도록 하자!
- 배열로 담기는 tags - 전개구문을 사용하는 것은 똑같은 데, 전개한 후 split를 사용하여 콤마 기준으로 잘라 나오는 값들을 배열에 담기도록 해주었다.
- 만들어준 handle 함수와 input을 연결해주자.
- 해당 로직에 form 태그를 연결하여 handleOnSubmit 함수도 적용해준다.
import { ChangeEvent, FormEvent, useState } from 'react'

const handleOnSubmit = (e: FormEvent<HTMLFormElement>) => {
  e.preventDefault();
}

...

<form onSubmit={handleOnSubmit}>
  <div>
    <h2>가격*</h2>
    <input type='number' name='price'
      value={textTypeValue.price}
      onChange={handleOnChangeTextTypeValue}
      placeholder='가격을 입력해주세요'/>
    	{shipping_cost.map((shipping_cost, i) =>
           <label key={i} htmlFor={shipping_cost}>
              <input type='radio' id={shipping_cost}
                name='shipping_cost' value={shipping_cost}
                onChange={handleOnChangeRadioTypeValue} />{shipping_cost}
           </label>
        )}
  </div>
  <div>
    <h2>교환*</h2>
    {changable.map((changable, i) =>
       <label key={i} htmlFor={changable}>
           <input type='radio' id={changable}
             name='changable' value={changable}
             onChange={handleOnChangeRadioTypeValue} />{changable}
       </label>
     )}
    <input type='text' name='exchange_product'
      value={textTypeValue.exchange_product}
      onChange={handleOnChangeTextTypeValue}
      placeholder='교환을 원하는 상품을 입력해주세요.' />
  </div>
  <div>
    <h2>설명*</h2>
    <textarea value={textTypeValue.contents} name='contents'
      onChange={(e: any) => handleOnChangeTextTypeValue(e)}
      placeholder='설명을 입력해 주세요' />
    <p>0/2000</p>
  </div>
  <div>
    <h2>태그</h2>
    <div>
      <input type='text' name='tags'
        value={textTypeValue.tags} maxLength={9}
        onChange={handleOnChangeTextTypeValue}
        placeholder='태그를 입력해주세요.' />
      <p>콤마(,)로 구분되며 최대 9자까지 입력할 수 있어요.</p>
      <p>사람들이 내 상품을 더 잘 찾을 수 있어요.</p>
      <p>상품과 관련 없는 태그를 입력할 경우, 판매에 제재를 받을 수 있어요.</p>
    </div>
  </div>
</form>
5. 값 체크하기
- 원하는 내용을 작성하고

- 객체과 배열로 각각 잘 담기는지 확인

참고
- radio value값 가져오기
https://stackblitz.com/edit/react-radio-buttons-example?file=src%2FApp.js - 여러 input의 value값을 하나의 state로 관리하기
-> 캠프 수료 중 만난 천재 팀원 🤣 (감사합니다! 모든 프로젝트에서 잘 써먹고 있어요 ㅎㅎ)