Universal Robot in Unity
Unity에서 6 자유도 (6DOF)를 가진 유니버셜 로봇社의 UR5e를 제어해볼 기회가 생겼고, Unity에 그리 익숙치 않다보니 이런 저런 시행착오를 거쳐가고 있습니다.
로봇시장 글로벌 점유율에서 1위를 하고 있는 Universal Robot을 Unity에 표현하고 간단하게 제어를 해보는 시간을 가져봅시다.
Development environment
1. 운영 체제 (OS)
OS: Windows 11
Version: 21H2 (혹은 다른 사용 중인 특정 버전)
bit: 64-bit
2. 통합 개발 환경 (IDE)
Software: Unity
Version: 2021.3 LTS
3. 프로그래밍 언어
Default Language: C#
Version: .NET Framework 4.x (Unity에서 사용하는 버전에 따라 다를 수 있습니다)
4. 에디터 및 도구
Editor: Visual Studio Code
5. 로봇 모델
Manufacturer : Universal Robot
Model : UR5e
Step File로부터 Glb File 얻기
Robot의 부위별 Step file은 Universal Robot 홈페이지에서 받을 수 있습니다.
Unity에서는 glTFast 라는 모듈의 기능을 이용해 *.glb 형식의 파일을 렌더링 할 수 있으므로 Step file을 glb 로 변환해주는 과정이 필수적입니다.
잘 모르시는 분들을 위해 추후 이 과정에 대해 자세히 적겠습니다. 코드와 변환파일은 github에 업로드 하였으니 필요하시면 자유롭게 사용하세요.
Unity에 배치하기 (using glTFast)
원래 glTFast가 유니티에서 정식적으로 지원하던 패키지는 아니였는데 6.x 버전을 기점으로는 정식지원을 합니다. 그래서 Unity 공식문서에서 친절하게 설치방법을 알려줍니다.
-
Install
https://docs.unity3d.com/Packages/com.unity.cloud.gltfast@6.1/manual/installation.html -
Simple Usage
https://github.com/atteneder/glTFast

Usage에서는 유니티 에디터를 이용해 직접적으로 추가하는 방법에 대한 설명입니다. 스크립트를 이용해서 로드하고 싶다면 여기에 자세히 작성되어 있습니다.
이제 해당 모듈을 이용해 아까 변환해두었던 *.glb 를 로드합니다. 앞선 언급처럼 에디터에서 직접 지정해도 되지만, 이렇게 할 경우에 glb 파일의 경로가 변경되는 경우 에디터에서 삽입한 모든 gltf Asset Component에서 경로를 수정해야 하는 귀찮음이 발생할 것 같기에 스크립트에서 로드하겠습니다.
우선 스크립트를 작성하기 전에 앞서서 작성할 스크립트 그리고 스크립트로 인해 생성될 gltf Asset Component를 담을 Empty Object를 만듭니다.
6Dof 이므로 회전할 수 있는 로봇 부위 즉, 관절(이하 링크)은 총 6개입니다. 또한 구조 계층상 가장 상단(로봇의 베이스)에 속하는 첫번째 링크의 회전은 그 아래 링크들의 위치에 영향을 줍니다. 즉, 각 링크의 회전은 자신의 아래 계층에 속한 모든 링크의 위치에 영향을 주게 됩니다.
이러한 구조적인 특성을 그대로 참고하여 Unity에서 표현하기 위해 7개의 Empty Object를 만든 뒤 적절히 이름을 붙여주겠습니다.
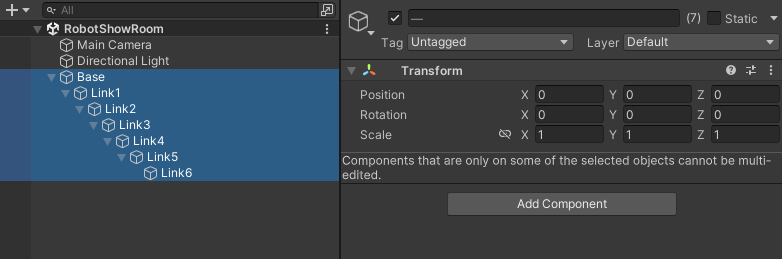
오브젝트 이름을 최상단부터 Base, Link1, Link2, ..., Link6 로 지었습니다.
이제 본격적으로 코드를 작성해보겠습니다.
UniversalRobot.cs
using UnityEngine;
using System.Collections.Generic;

namespace UR.Robot
{
    public enum ModelName
    {
        UR5e = 0,
    }
}

[System.Serializable]
public class UR5eInit
{
    public List<Vector3> LinkPositionParams = new()
        {
                new(0, 0.0991f, 0),
                new(0, 0.0634f, -0.0744f),
                new(-0.425f, 0, 0),
                new(-0.39225f, 0, 0.0215f),
                new(0, -0.0463f, -0.0804f),
                new(0, -0.0534f, -0.0463f),
                new(0, 0, -0.0533f)
        };
} // Robot의 관절 길이값

public class UniversalRobot
{

    public UR.Robot.ModelName ModelName;
    public string IP = "192.167.0.3";
    public List<Vector3> LinkPosition = new();
    public float[] J_Orientation = { 0.750491578f, -1.692969374f, 1.832595715f, -0.767944871f, 0.002443461f, -0.002094395f }; // radian value, 임의의 값임.


    public UniversalRobot(UR.Robot.ModelName modelName)
    {
        this.ModelName = modelName;


        switch (this.ModelName)
        {
            case UR.Robot.ModelName.UR5e:
                UR5eInit ur5eInit = new();
                this.LinkPosition = ur5eInit.LinkPositionParams;
                break;
            // 후에 로봇 모델 추가시 코드 작성하면 됨.
            default:
                break;
        }

    }
}
로봇 객체에 대한 class입니다. 변수에 대해 간단히 설명하면 아래와 같습니다.
-
UR5eInit.LinkPositionParams
각 링크는 자신의 부모 링크로부터 이격된 위치에 있어야 합니다. 당연한 소리지만, 이 값은 모델마다 다르며 불변입니다. -
UniversalRobot.IP
추후 로봇과 연결 시 필요한 로봇의 IP 주소입니다. -
UniversalRobot.J_Orientation
로봇의 회전값을 저장할 배열입니다.
RobotManager.cs
using System.IO;
using UnityEngine;

public class RobotManager : MonoBehaviour
{
    private static RobotManager _instance;

    // 외부에서 인스턴스에 접근할 때 사용할 프로퍼티

    public static RobotManager Instance
    {
        get
        {
            if (_instance == null)
            {
                _instance = FindObjectOfType<RobotManager>();
                if (_instance == null)
                {
                    GameObject manager = new GameObject("@RobotManagers");
                    _instance = manager.AddComponent<RobotManager>();
                }
            }
            return _instance;
        }
    }


    private UniversalRobot _Robot = new(UR.Robot.ModelName.UR5e);

    public UniversalRobot Robot
    {
        get
        {
            return _Robot;
        }
    }

    private void Awake() // This function is called when the object becomes enabled and active ... edit by Joonik
    {
        Application.runInBackground = true;
        Debug.Log("hello");

        // Ensure there is only one instance of GameManager
        if (_instance == null)
        {
            _instance = this;
            DontDestroyOnLoad(gameObject);
        }
        else
        {
            Destroy(gameObject);
        }
    }

}
RobotManager.cs는 싱글톤 패턴으로 작성하였고 흔히 유니티에서 GameManger 싱글톤 객체를 만들때 사용하는 방법을 그대로 차용하였습니다.
RobotManager는 UniversalRobot Class를 선언 및 할당하고 해당 클래스를 통해 각 링크의 회전값을 저장 및 관리합니다. 또한 이후 추가적인 기능을 구현함에 따라 전체적인 로봇의 컨트롤을 담당하게 될 싱글톤 객체입니다.
Base.cs
// Unity
using UnityEngine;

public class Base : MonoBehaviour
{
    void Awake()
    {
        var ResourceDirectoryPath = Application.dataPath + "/Resources/UR/UR5e/" + "arm_0_si30_vpn.glb";
        var gltf = gameObject.AddComponent<GLTFast.GltfAsset>();
        gltf.Url = ResourceDirectoryPath;
    }

    void OnApplicationQuit()
    {
        Destroy(this);
    }
}
Link1.cs
// System
using System;

// Unity
using UnityEngine;

public class Link1 : MonoBehaviour
{
    private RobotManager RM;
    private UniversalRobot robot;

    void Awake()
    {
        var ResourceDirectoryPath = Application.dataPath + "/Resources/UR/UR5e/" + "arm_1_si30_vpn.glb";
        var gltf = gameObject.AddComponent<GLTFast.GltfAsset>();
        gltf.Url = ResourceDirectoryPath;
    }


    void Start()
    {
        RM = RobotManager.Instance;
        robot = RM.Robot;
        transform.localPosition = robot.LinkPosition[0]; // ex. Arm1 -> 0 init position allocated.
    }

    void FixedUpdate()
    {
        try
        {
            float J_Orientation = 0.0f;
            J_Orientation = robot.J_Orientation[0];

            transform.localRotation = Quaternion.Euler(new Vector3(0.0f, -(float)(J_Orientation * Mathf.Rad2Deg), 0.0f));


        }
        catch (Exception e)
        {
            Debug.Log("Exception:" + e);
        }
    }
    void OnApplicationQuit()
    {
        Destroy(this);
    }
}
이처럼 Base.cs와 Link1.cs, Link2.cs, ..., Link6.cs 총 7개를 만듭니다. 앞서 만들어둔 각 베이스, 링크 오브젝트에 붙을 컴포넌트 스크립트 입니다.
-
Awake
glTFast 모듈로 glb 파일을 로드합니다. 또한 RobotManager로부터 회전값을 받아서 자신이 속한 오브젝트의 transform.localRotation을 회전시킵니다. -
Start
RobotManager로부터 받은 robot 객체를 선언 및 초기화하고, UR5e의 링크(관절) 길이 파라미터를 받아서 transform.localPosition에 적용합니다. -
FixedUpdate
RobotManager의 robot 객체 회전값만큼 transform.localRotation에 적용합니다.
이 때 로컬이 아닌 transform.rotation와 같이 월드좌표계를 기준으로 삼는 경우 위치와 회전이 적절치 않은 결과를 낳을 수 있습니다.
RobotControl.cs
// Unity
using UnityEngine;

public struct Orientation
{
    public float link1;
    public float link2;
    public float link3;
    public float link4;
    public float link5;
    public float link6;

}
public class RobotControl : MonoBehaviour
{
    private RobotManager RM;
    private UniversalRobot robot;

    public Orientation orientation = new();


    void Start()
    {
        RM = RobotManager.Instance;
        robot = RM.Robot;

        orientation.link1 = robot.J_Orientation[0];
        orientation.link2 = robot.J_Orientation[1];
        orientation.link3 = robot.J_Orientation[2];
        orientation.link4 = robot.J_Orientation[3];
        orientation.link5 = robot.J_Orientation[4];
        orientation.link6 = robot.J_Orientation[5];

    }

    void Update()
    {
        robot.J_Orientation[0] = orientation.link1;
        robot.J_Orientation[1] = orientation.link2;
        robot.J_Orientation[2] = orientation.link3;
        robot.J_Orientation[3] = orientation.link4;
        robot.J_Orientation[4] = orientation.link5;
        robot.J_Orientation[5] = orientation.link6;
    }
}
RobotControl.cs는 단순히 Roborobot.J_Orientation에 값을 대입하는 코드입니다.
실행 결과
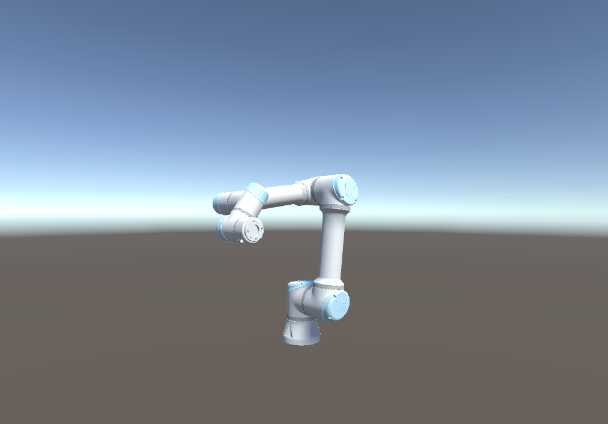
로봇이 정상적으로 렌더링 되었습니다.
회전각도의 임계치나 링크간의 충돌에 대한 예외처리는 되어있지 않기에 로봇이 겹치는 문제가 발생하긴 하지만, 일단은 정상적으로 회전이 잘 되는 모습입니다.
다음 시간에는 해당 Unity 상의 각 링크 값을 실제 UR5e에 전달하여 제어해보겠습니다.
긴글 읽어주셔서 감사합니다.