ROS와 Docker에 대한 지식 부족으로 많은 시행 착오를 겪고, 처음 환경 설정부터 데이터 취득까지의 과정을 정리한다.
작업 환경
- Ubuntu 20.04 LTS
- Docker
- ROS
- ubuntu 버전에 맞는 ROS를 설치한다. 이 글은 ubuntu 20.04에 맞추어 ROS “noetic” 버전을 기준으로 작성되었다.
- ubuntu 20.04 LTS - noetic
- ubuntu 18.04 사용 시, 이 글의 “noetic”을 “melodic”으로 변경하여 설치한다.
- ubuntu 18.04 LTS - melodic
- 사용 중인 ubuntu 버전은
lsb-release -a로 확인 가능하다.
- velodyne VLP16
Docker 컨테이너 생성
docker run -it --gpus all --net=host --privileged --shm-size=16G --env DISPLAY=unix$DISPLAY -v /tmp/.X11-unix:/tmp/.X11-unix:ro --env="QT_X11_NO_MITSHM=1" --name test_ros -v $(pwd):/workspace openpcdet-docker:latest- openpcdet docker 이미지를 사용할 때의 예시며, 사용자가 필요한 docker 이미지를 사용
- docker run -it --gpus all --net=host --privileged --shm-size=16G --env DISPLAY=unix$DISPLAY -v /tmp/.X11-unix:/tmp/.X11-unix:ro --env="QT_X11_NO_MITSHM=1" --name <컨테이너 이름> -v $(pwd):/workspace <도커 이미지>
ROS 설치
- sources.list 설정
sh -c 'echo "deb http://packages.ros.org/ros/ubuntu $(lsb_release -sc) main" > /etc/apt/sources.list.d/ros-latest.list'
- keys 설정
apt install curlcurl -s https://raw.githubusercontent.com/ros/rosdistro/master/ros.asc | apt-key add -- 성공 시 OK 출력
- 설치
apt updateapt install ros-noetic-desktop-full- ubuntu 버전에 맞추어 ROS 버전 변경
apt install ros-<ROS 버전>-desktop-full
- 환경 설정
echo "source /opt/ros/noetic/setup.bash" >> ~/.bashrc source ~/.bashrc
- dependencies 설치
apt install python3-rosdep python3-rosinstall python3-rosinstall-generator python3-wstool build-essentialrosdep init && rosdep update
Catkin 설치
- catkin 패키지 설치
apt-get install ros-noetic-catkin- ubuntu 버전에 맞추어 ROS 버전 변경
- apt-get install ros-<ROS 버전>-catkin
Workspace 생성
- catkin workspace 생성 및 빌드
source /opt/ros/noetic/setup.bashmkdir -p ./catkin_ws/srccd ./catkin_ws/catkin_make
Velodyne VLP16 설정
- LiDAR에 전원 공급
- LiDAR를 컴퓨터 이더넷 포트에 연결
- 설정하는 동안 컴퓨터 Wi-Fi 연결 비활성화
- 설정-네트워크-IP4 세팅
- method를 manual로 변경
- add 클릭
- IP Address: 192.168.0.70으로 설정
- 공식 문서에 따르면 192.168.1.XXX로 설정하나, 2024년 2월 당시에는 192.168.0.70로 설정함
- NetMask: 255.255.255.0
- Gateway: 0.0.0.0
- IP Address: 192.168.0.70으로 설정
- 저장
- 터미널을 통해 컴퓨터와 Lidar 연결
apt-get install net-toolsifconfig eth0 192.168.0.70- 공식 문서에 따르면 192.168.3.100으로 설정하나, 2024년 2월 당시에는 192.168.0.70로 설정함
sudo route add 192.168.0.201 eth0- 공식 문서에 따르면 192.168.1.201으로 설정하나, 2024년 2월 당시에는 192.168.0.201로 설정함
- velodyne dependencies 설치
apt-get install ros-noetic-velodyne- ubuntu 버전에 맞추어 ROS 버전을 변경
- apt-get install ros-<ROS 버전>-velodyne
- VLP16 driver 설치
cd ../catkin_ws/src/ && git clone https://github.com/ros-drivers/velodyne.gitcd .. && rosdep install --from-paths src --ignore-src --rosdistro noetic -y- ubuntu 버전에 맞추어 ROS 버전을 변경
- cd .. && rosdep install --from-paths src --ignore-src --rosdistro <ROS 버전> -y
- ubuntu 버전에 맞추어 ROS 버전을 변경
catkin_make
송수신할 패키지 생성
- 패키지 생성
cd srccatkin_create_pkg vlp16 rospy sensor_msgs- catkin_create_pkg <패키지 이름> [모듈 1][모듈 2] [모듈 3]
- 패키지 빌드
cd .. && catkin_make. devel/setup.bash
코드 작성
- 생성한 패키지로 디렉토리 변경
roscd vlp16- roscd <패키지 이름>
- python 스크립트를 저장할 scripts 폴더 생성
mkdir scriptscd scripts
- python 코드 작성 (예시)
#!/usr/bin/env python3

import rospy
import ros_numpy
import os
import numpy as np
from sensor_msgs.msg import PointCloud2
from time import sleep

class PointCloudSaver:
    def __init__(self):
        rospy.init_node('point_cloud_saver', anonymous=True)
        self.subscriber = rospy.Subscriber('/velodyne_points', PointCloud2, self.point_cloud_callback)

    def point_cloud_callback(self, msg):
        rospy.loginfo("Received a point cloud message")
        pc=ros_numpy.numpify(msg)
        points=np.zeros((pc.shape[0],4))
        points[:,0]=pc['x']
        points[:,1]=pc['y']
        points[:,2]=pc['z']
        points[:,3]=pc['intensity']
        np.save("/workspace/data/000000.npy", points)

if __name__ == '__main__':
    try:
        point_cloud_saver = PointCloudSaver()
        rospy.spin()
    except rospy.ROSInterruptException:
        pass
pip install rosnumpychmod +x get_data.py- chmod +x <파일 이름>
- 빌드
cd ../../../- catkin_ws로 이동
catkin_make
시각화(RVIZ) 설정
- velodyne driver 실행
roslaunch velodyne_pointcloud VLP16_points.launch
- rviz 실행
rosrun rviz rviz -f velodyne
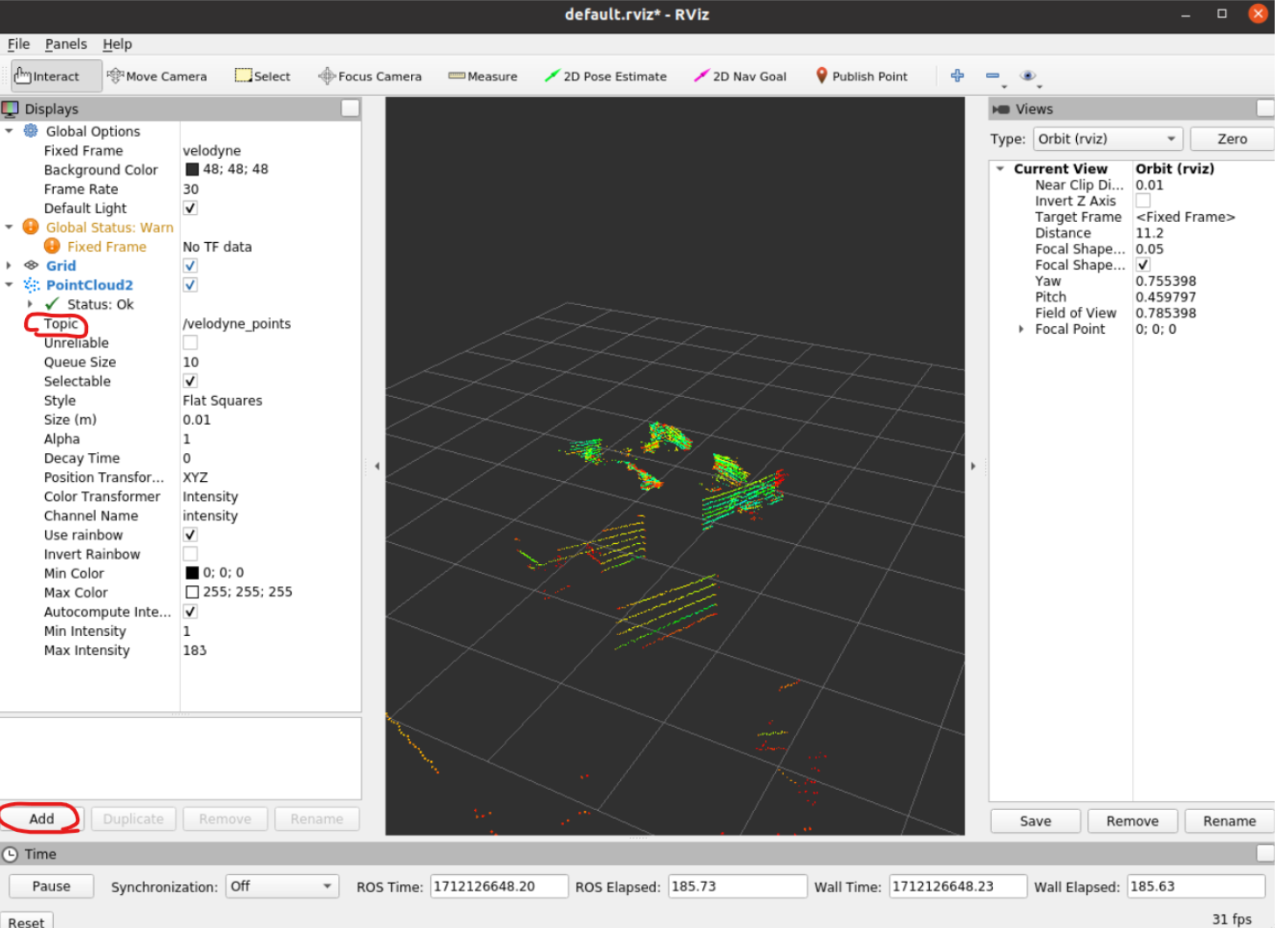
- displays 패널
- add 클릭
- Point Cloud2 선택
- PointCloud2의 Topic 필드
- “/velodyne_points” 작성
실시간 시각화 및 데이터 취득
- 총 세 개의 터미널 필요
- tmux 사용 또는 터미널창 세 개 사용
- 새로 연 터미널 두 개는 'docker exec -it <컨테이너 이름> /bin/bash' 를 통해 docker에 진입
- velodyne driver 실행 (첫 번째 터미널)
roslaunch velodyne_pointcloud VLP16_points.launch- 가장 먼저 실행되어야 함
- 시각화 (두 번째 터미널)
export DISPLAY=:0- 원격 접속을 통하여 호스트 PC에 접속한 경우,
export DISPLAY =<사용 중인 PC IP:0>
- 원격 접속을 통하여 호스트 PC에 접속한 경우,
rosrun rviz rviz -f velodyne
- 데이터 취득 (세 번째 터미널)
cd workspace/catkin_ws/source devel/setup.bashrosrun vlp16 get_data.py- rosrun <패키지 이름> <실행할 파일>

이것저것 공부 중입니다