Vagrant
Vagrant는 개발 환경을 코드로 정의하고 쉽게 관리할 수 있도록 도와주는 도구다.
명령어 스크립트를 이용해 가상 머신(VM)을 자동으로 생성, 설정, 배포할 수 있다.
주요 특징
- 개발 환경 자동화 → VM 생성, 네트워크 설정, 소프트웨어 설치 등을 자동화
- 다양한 가상화 제공자 지원 → VirtualBox, VMware, Hyper-V, AWS 등과 연동
- 환경 일관성 유지 → 여러 개발자가 동일한 환경에서 작업 가능
- 인프라 코드화 → Vagrantfile을 사용해 VM 설정을 코드로 관리
Vagrant 기본 명령어
| 명령어 | 설명 |
|---|---|
vagrant init | Vagrantfile 생성 |
vagrant up | VM 생성 및 실행 |
vagrant ssh | VM에 SSH 접속 |
vagrant halt | VM 중지 |
vagrant destroy | VM 삭제 |
vagrant reload | VM 재시작 (설정 반영) |
Vagrantfile
모든 Vagrant 프로젝트에는 Vagrantfile이 있으며, 여기에 VM 설정을 정의한다.
아래의 경우 메모리와 CPU를 다소 높게 잡은 이유는 ISTIO처럼 많은 리소스 사용이 필요한 경우가 발생했기 때문이다. 자신의 상황에 맞게 조절한다.
Vagrant.configure("2") do |config|
  config.vm.provision "shell", inline: "echo Hello"
  config.vm.define "master" do |master|
    master.vm.box = "bento/ubuntu-20.04"
	master.vm.hostname = "master"
	master.vm.network :private_network, ip: "192.168.56.10"
    master.vm.provider "virtualbox" do |vb|
	    vb.gui = true
        vb.memory = 3072
        vb.cpus = 2
    end
	master.vm.network "forwarded_port", guest: 22, host: "6010", auto_correct: true, id: "ssh"
    #master.vm.synced_folder "./temp", "/vagrant", disabled: false
  end

  (1..4).each do |i|
    config.vm.define "slave#{i}" do |cfg|
      cfg.vm.box = "bento/ubuntu-20.04"
      cfg.vm.provider "virtualbox" do |vb|
        vb.name = "slave#{i}"
        vb.cpus = 2
        vb.memory = 3072
      end
      cfg.vm.host_name = "slave#{i}"
	  cfg.vm.network :private_network, ip: "192.168.56.10#{i}"
      cfg.vm.network "forwarded_port", guest: 22, host: "6010#{i}", auto_correct: true, id: "ssh"
      #cfg.vm.synced_folder "./temp#{i}", "/vagrant", disabled: false
    end
  end
end
활용
SSH 변경 적용
vagrant reload --provision또는
rm -rf ~/.vagrant.d/insecure_private_key
vagrant ssh-keygen
vagrant reload
SSH 연결 확인
PS C:\k8s\ubuntu> vagrant ssh-config
Host master
  HostName 127.0.0.1
  User vagrant
  Port 6010
  UserKnownHostsFile /dev/null
  StrictHostKeyChecking no
  PasswordAuthentication no
  IdentityFile C:/k8s/ubuntu/.vagrant/machines/master/virtualbox/private_key
  IdentitiesOnly yes
  LogLevel FATAL
  PubkeyAcceptedKeyTypes +ssh-rsa
  HostKeyAlgorithms +ssh-rsa
...
위의 ssh-config 명령으로 조회되는 포트로 시스템이 연결 가능해야 한다.
ssh -i ~/.vagrant.d/insecure_private_key vagrant@192.168.56.101 -p 22
ssh -i ~/.vagrant.d/insecure_private_key vagrant@127.0.0.1 -p 6010
ssh -i ~/.vagrant.d/insecure_private_key vagrant@127.0.0.1 -p 60101
ssh 연결 디버깅
ssh 연결시 -vvv 옵션으로 상세 정보를 볼 수 있다.
PS C:\k8s\ubuntu> ssh -vvv slave1
OpenSSH_for_Windows_9.5p1, LibreSSL 3.8.2
debug1: Reading configuration data C:\\Users\\acho/.ssh/config
debug1: C:\\Users\\acho/.ssh/config line 14: Applying options for slave1
debug3: Failed to open file:C:/ProgramData/ssh/ssh_config error:2
debug2: resolve_canonicalize: hostname 127.0.0.1 is address
debug3: ssh_connect_direct: entering
debug1: Connecting to 127.0.0.1 [127.0.0.1] port 60101.
debug3: finish_connect - ERROR: async io completed with error: 10061, io:000002293A4523C0
debug1: connect to address 127.0.0.1 port 60101: Connection refused
ssh: connect to host 127.0.0.1 port 60101: Connection refused
ssh 포트 확인
PS C:\k8s\ubuntu> vagrant port slave1
The forwarded ports for the machine are listed below. Please note that
these values may differ from values configured in the Vagrantfile if the
provider supports automatic port collision detection and resolution.

    22 (guest) => 60101 (host)
vagrant 버전이 최신화되지 않았을 때 아래 명령을 수행했을 때 포트가 나오지 않았으나, 버전업 후 정상적으로 나옴
PS C:\k8s\ubuntu> netstat -ano | findstr :60101
  TCP    0.0.0.0:60101          0.0.0.0:0              LISTENING       14288
vagrant 버전 확인
vagrant 버전이 최신 버전인지 반드시 확인 필요. 아래 처럼 마이너 버전이 틀려 문제가 발생하여 수 시간 소비하고 결국 버전 업을 통해 해결함
PS C:\k8s\ubuntu> vagrant version
Installed Version: 2.4.1
Latest Version: 2.4.3
Virtual Box
Vagrant는 가상 머신(VM)을 자동으로 생성하고 관리하는 도구이며,
VirtualBox는 VM을 실행하는 실제 하이퍼바이저(가상화 소프트웨어)이다.
즉, Vagrant는 VirtualBox 위에서 동작하며, VirtualBox를 통해 VM을 생성한다.
이 과정은 Vagrantfile에 정의된 설정을 기반으로 자동화된다.
Vagrant는 직접 VM을 실행하는 것이 아니라, VirtualBox를 제어하여 VM을 실행하는 역할을 한다.
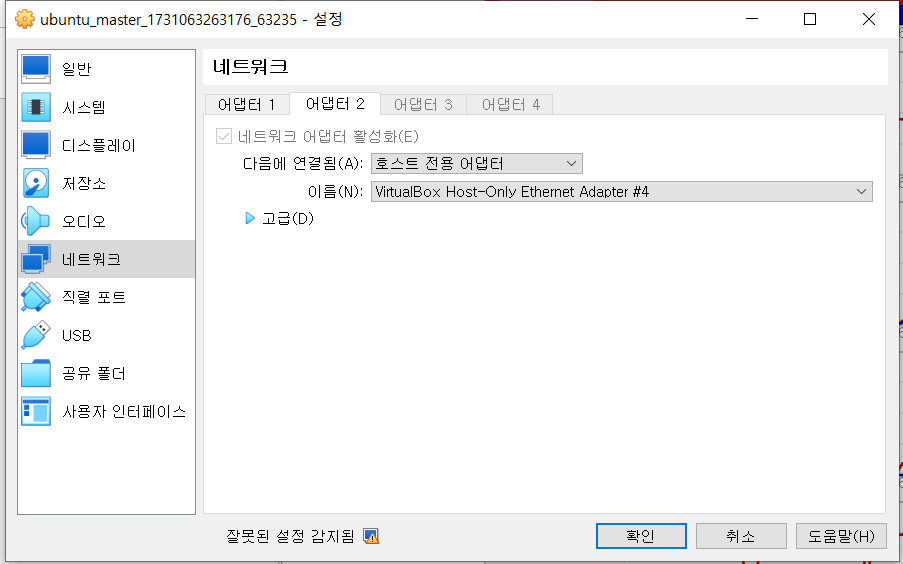
설치 시 유의점
- VirtualBox Installer를 관리자권한으로 실행
- VirtualBox가 실행되어있다면 종료 후, VirtualBox Host-Only Network
- interface를 우클릭 -> 사용안함으로 변경

khagor