Chapter9 윤곽선 검출
-
엣지: 이미지 내에서 밝기가 갑자기 변하는 지점, 객체의 경계, 형태의 변화, 텍스쳐의 변화 등과 관련있음, 이미지의 기본적 특징 추출 시 사용
-
엣지의 주요 특성
-> 밝기의 급격한 변화: 픽셀 간의 밝기가 급격하게 변하는 지점
-> 방향성: 수직, 수평, 대각선 등 특정 방향을 가질 수 있음
-> 콘트라스트: 높을수록 엣지는 더 명확
-> 종류: 계단 엣지, 선 엣지
-> 소벨(sobel), 프리윗(prewitt), 로버츠(roberts), 캐니(canny) -
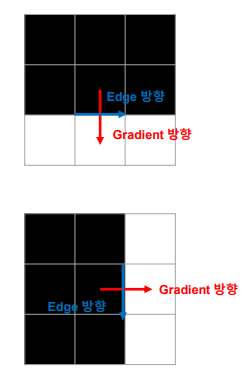
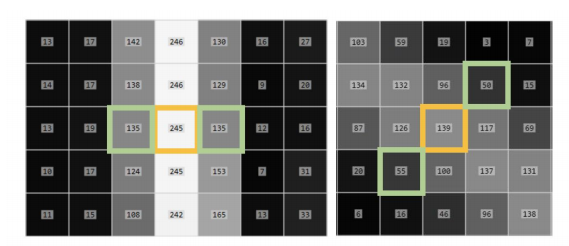
이미지 그래디언트: 이미지 상의 픽셀 강도의 변화율 또는 기울기
-> 크기: 밝기가 얼마나 빠르게 변하는지, 픽셀 강도 변화가 크면 크기가 커짐
-> 방향: 밝기가 가장 빠르게 변하는 방향
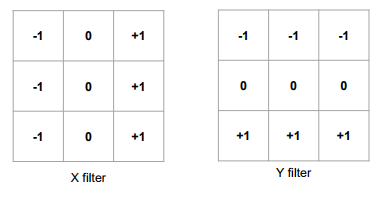
- Prewitt 필터
# 이미지 불러오기
image = cv2.imread('picture_512.png', cv2.IMREAD_GRAYSCALE)

# Prewitt 필터 커널 정의
prewitt_kernel_x = np.array([[-1, 0, 1], [-1, 0, 1], [-1, 0, 1]])
prewitt_kernel_y = np.array([[-1, -1, -1], [0, 0, 0], [1, 1, 1]])

# Prewitt 필터 적용
prewittx = cv2.filter2D(image, -1, prewitt_kernel_x)
prewitty = cv2.filter2D(image, -1, prewitt_kernel_y)

# 엣지 강도 계산을 위한 절댓값
abs_prewittx = np.absolute(prewittx)
abs_prewitty = np.absolute(prewitty)

# 엣지 강도 결과를 8-bit 이미지로 변환
prewittx_8u = np.uint8(abs_prewittx)
prewitty_8u = np.uint8(abs_prewitty)

# 최종 엣지 이미지 생성
edges_prewitt = cv2.bitwise_or(prewittx_8u, prewitty_8u)

# 원본 이미지와 Prewitt 엣지 검출 결과 표시
cv2.imshow('Original Image', image)
cv2.imshow('Prewitt Edges', edges_prewitt)
cv2.waitKey(0)
cv2.destroyAllWindows()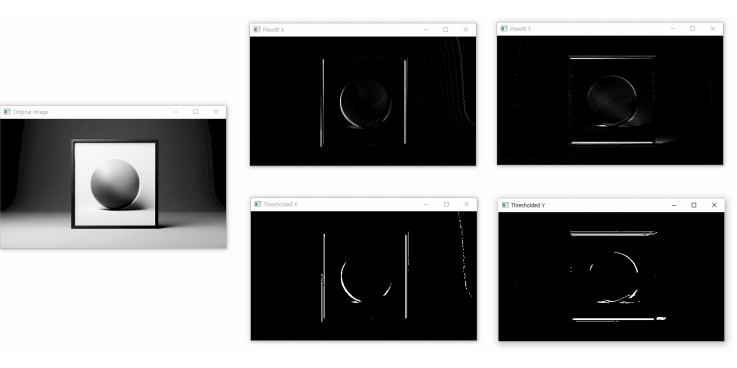
- Sobel 필터
# 이미지 불러오기
image = cv2.imread('picture_512.png', cv2.IMREAD_GRAYSCALE)

# Sobel 필터 적용
sobelx = cv2.Sobel(image, cv2.CV_64F, 1, 0, ksize=3)  # x방향 방향
sobely = cv2.Sobel(image, cv2.CV_64F, 0, 1, ksize=3)  # y방향 방향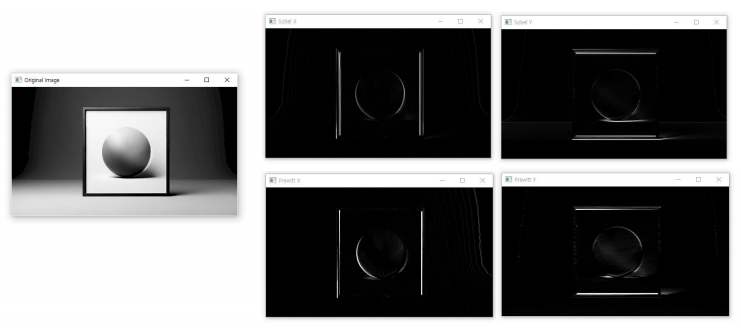
Canny Edge 검출
-
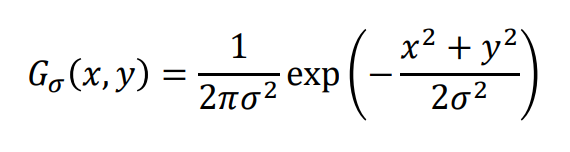
노이즈 제거: 가우시안 필터링 사용
-
그래디언트 계산: 주로 소벨 마스크 사용
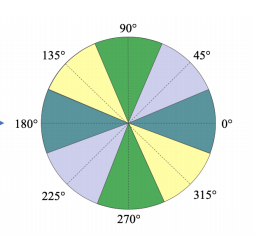
- 비최대 억제: 그래디언트 크기가 국지적 최대값인 픽셀만을 엣지로 유지하는 과정, 엣지를 얇고 선명하게 만드는 데 유용함
-
이중 임계값
-> 그래디언트 크기가 높은 임계값보다 크면 픽셀은 강한 엣지로 간주
-> 그래디언트 크기가 낮은 임계값과 높은 임계값 사이라면 픽셀을 약한 엣지로 간주
-> 그래디언트 크기가 낮은 임계값보다 작으면 픽셀은 엣지가 아닌 것으로 간주되어 제거 -
히스테리시스
-> 약한 엣지 중에서 실제 엣지로 간주할 픽셀을 결정하는 과정
-> 약한 엣지가 강한 엣지와 연결되어 있으면, 실제 엣지의 일부로 간주
-> 엣지의 연속성을 유지하고, 잡음에 의한 가짜 엣지를 제거하는 데 유용함
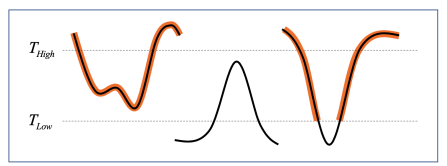
image = cv2.imread('picture_512.png', cv2.IMREAD_GRAYSCALE)
edges = cv2.Canny(image=image, threshold1=100, threshold2=200)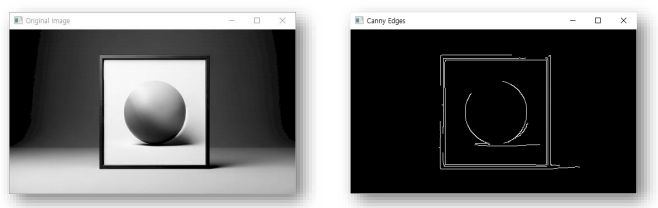
Hough 변환
-
이미지 처리에서 형태를 감지하기 위해 사용
-
직선, 원, 타원과 같은 기하학적 형태 검출에 유용
-
Hough 변환은 엣지 검출 알고리즘을 통해 얻은 엣지 정보를 기반으로 작동
-
강한 엣지 정보를 가진 이미지에서 효과적
-
HoughLines
# 이미지 읽기 및 전처리
src = cv2.imread('picture_512.png')
gray = cv2.cvtColor(image, cv2.COLOR_BGR2GRAY)

# 엣지 검출
edges = cv2.Canny(gray, 50, 150, apertureSize=3)

# Hough 변환을 사용한 직선 검출
lines = cv2.HoughLines(edges, 1, np.pi/180, 100)

# 검출된 직선 그리기
for rho, theta in lines[:, 0]:
    a = np.cos(theta)
    b = np.sin(theta)
    x0 = a * rho
    y0 = b * rho
    x1 = int(x0 + 1000 * (-b))
    y1 = int(y0 + 1000 * (a))
    x2 = int(x0 - 1000 * (-b))
    y2 = int(y0 - 1000 * (a))

    cv2.line(image, (x1, y1), (x2, y2), (0, 0, 255), 2)
- HoughLinesP
src = cv2.imread('picture_512.png')
gray = cv2.cvtColor(src, cv2.COLOR_BGR2GRAY)
edges = cv2.Canny(gray, 50, 150, apertureSize=3)
lines = cv2.HoughLinesP(edges, 1, np.pi/180, 100, minLineLength=50, maxLineGap=10)

if lines is not None:
    for line in lines:
        x1, y1, x2, y2 = line[0]
        cv2.line(src, (x1, y1), (x2, y2), (0, 255, 0), 2)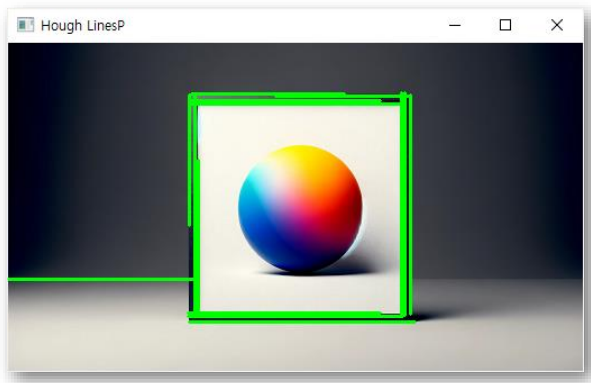
- HoughCircles
# 이미지 읽기 및 전처리
src = cv2.imread('picture_512.png')
gray = cv2.cvtColor(src, cv2.COLOR_BGR2GRAY)

# 가우시안 블러 적용
gray_blurred = cv2.GaussianBlur(gray, (9, 9), 2)

# HoughCircles 함수를 사용하여 원 검출
circles = cv2.HoughCircles(gray_blurred,
                          cv2.HOUGH_GRADIENT,
                          dp=1,
                          minDist=20,
                          param1=50,
                          param2=30,
                          minRadius=0,
                          maxRadius=0)

# 원 그리기
if circles is not None:
    circles = np.uint16(np.around(circles))
    for i in circles[0, :]:
        # 원의 중심 그리기
        cv2.circle(src, (i[0], i[1]), 2, (0, 255, 0), 3)
        # 원의 외곽 그리기
        cv2.circle(src, (i[0], i[1]), i[2], (0, 255, 0), 3)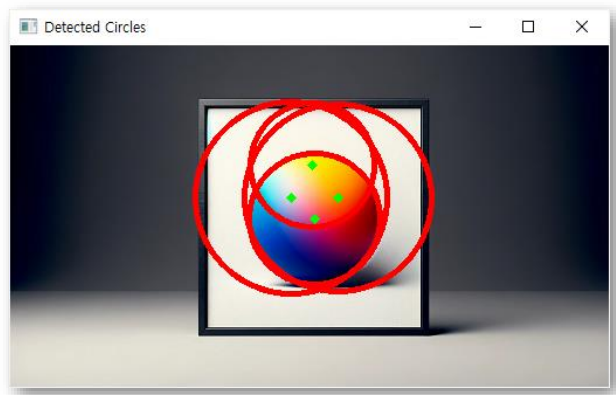
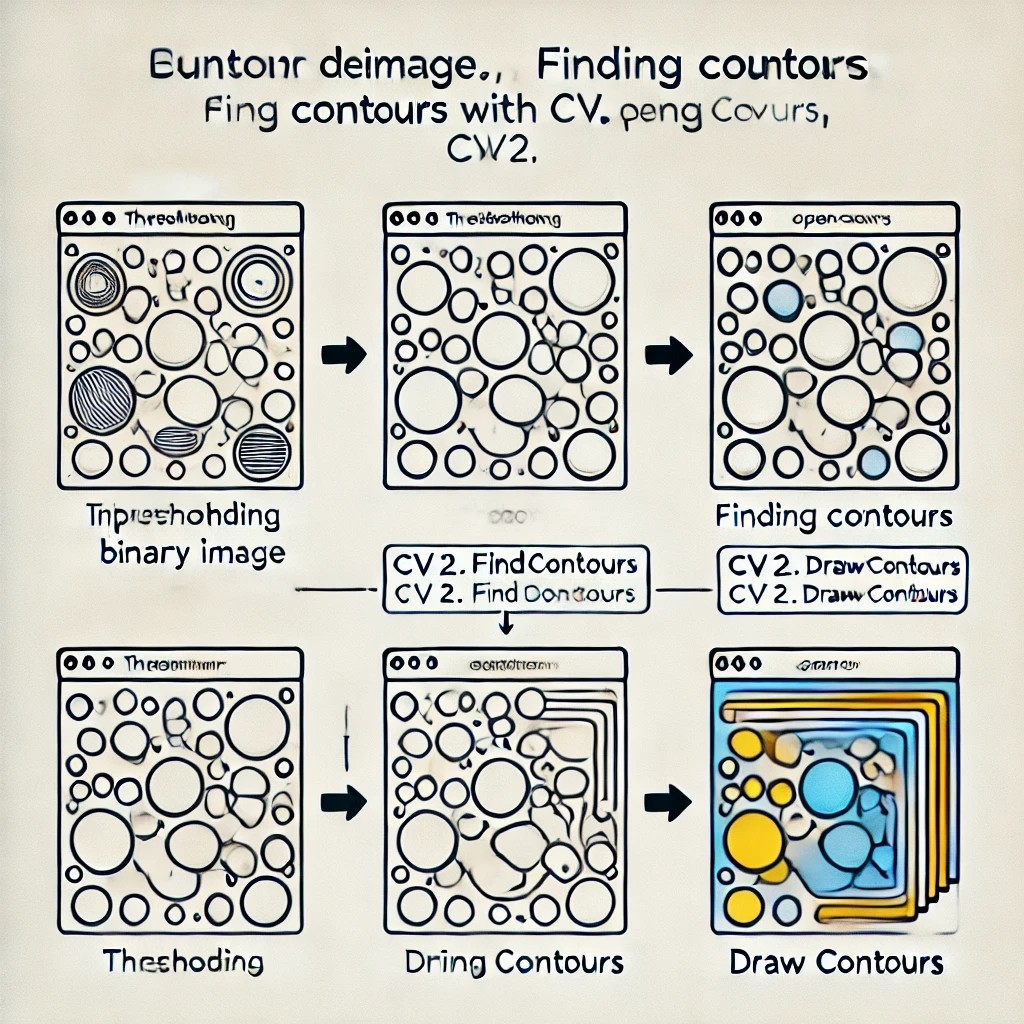
Convex Huil과 Contour분석
- Contour: 같은 엣지 정보끼리 이은 것, 이미지에서 동일한 색상이나 강도를 가진 경계를 따라 연속적인 점들을 연결해 윤곽선 형성

image = cv2.imread('picture_512.png')
gray = cv2.cvtColor(image, cv2.COLOR_BGR2GRAY)
thresh = cv2.threshold(gray, 150, 255, cv2.THRESH_BINARY_INV)
contours, _ = cv2.findContours(thresh, cv2.RETR_TREE, cv2.CHAIN_APPROX_NONE)
cv2.drawContours(image, contours, -1, (0, 255, 0), 3)
-> 그레이스케일, 이진화 이후 윤곽선 따기

- Contour 간략화해서 도형 검출
src = cv2.imread('shape.png')
img_contour = src.copy()
img_gray = cv2.cvtColor(img_contour, cv2.COLOR_BGR2GRAY)
edges = cv2.Canny(img_gray, 30, 200)
contours, _ = cv2.findContours(edges, cv2.RETR_EXTERNAL, cv2.CHAIN_APPROX_SIMPLE)

for cnt in contours:
    perimeter = cv2.arcLength(cnt, True)  # contour 둘레 길이 계산
    epsilon = 0.02 * perimeter
    approx = cv2.approxPolyDP(cnt, epsilon, True)

    cv2.drawContours(img_contour, [approx], 0, (255, 255, 0), 3)


    if len(approx) == 3:
        cv2.putText(img_contour, 'Triangle', (approx[0][0][0], approx[0][0][1]),
                    cv2.FONT_HERSHEY_SIMPLEX, 1, (255, 0, 0), 2)
    elif len(approx) == 4:
        cv2.putText(img_contour, 'Rectangle', (approx[0][0][0], approx[0][0][1]),
                    cv2.FONT_HERSHEY_SIMPLEX, 1, (255, 0, 0), 2)
    else:
        cv2.putText(img_contour, 'Polygon', (approx[0][0][0], approx[0][0][1]),
                    cv2.FONT_HERSHEY_SIMPLEX, 1, (255, 0, 0), 2)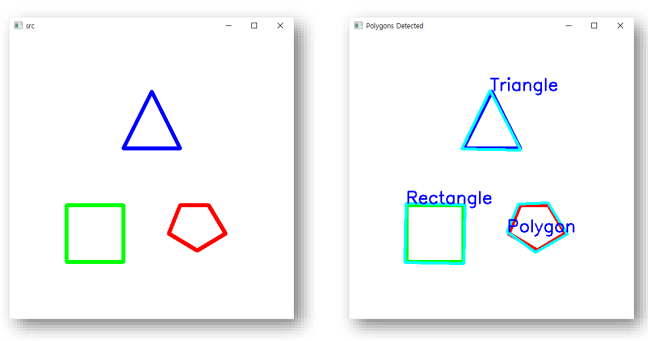
- 주어진 점 집합에 대한 Convex Hull
src = cv2.imread('shape.png')
gray = cv2.cvtColor(src, cv2.COLOR_BGR2GRAY)
_, binary = cv2.threshold(gray, 128, 255, cv2.THRESH_BINARY)
edges = cv2.Canny(binary, 30, 200)
contours, _ = cv2.findContours(edges, cv2.RETR_EXTERNAL, cv2.CHAIN_APPROX_SIMPLE)

convex_hulls = [cv2.convexHull(contour) for contour in contours]
cv2.drawContours(src, convex_hulls, -1, (0, 0, 0), 2)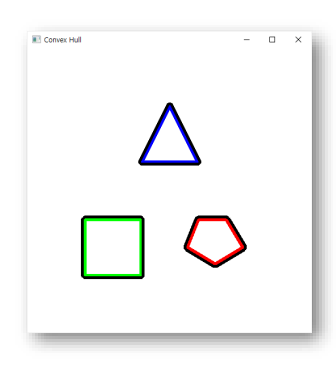
이 글은 제로베이스 데이터 취업 스쿨의 강의 자료 일부를 발췌하여 작성되었습니다
