개요
2-D DTF
푸리에 급수와 푸리에 변환에 대한 내용을 공부하고 난 후 들으면 이해가 쉬울 것이다.
이미지도 하나의 신호로 볼 수 있다. x축과 y축 2-D의 신호인 것이다.
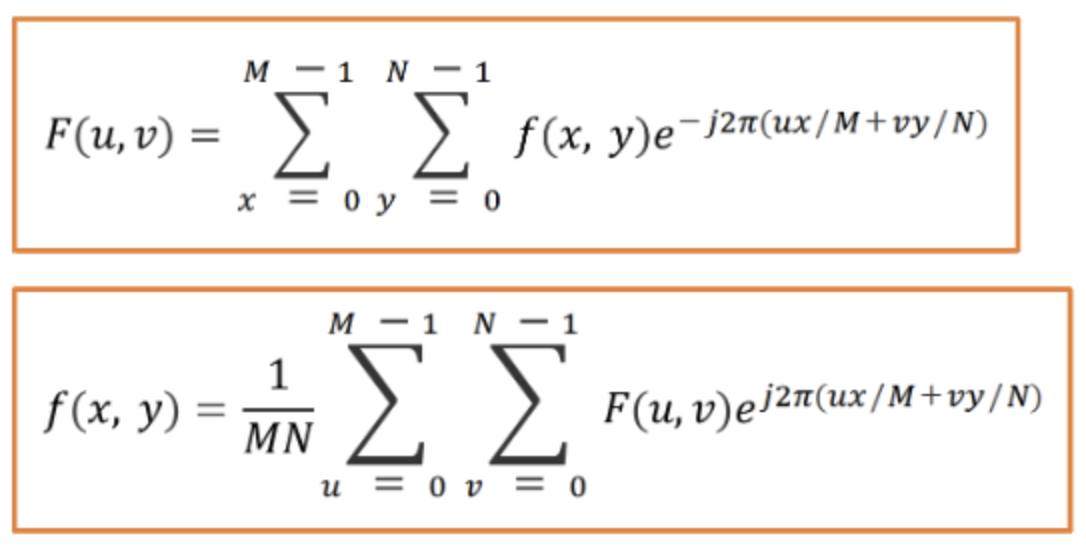
이미지의 크기를 M X N 라고 두면 DFT는 위의 식이, IDFT는 아래의 식이 된다.
Centering
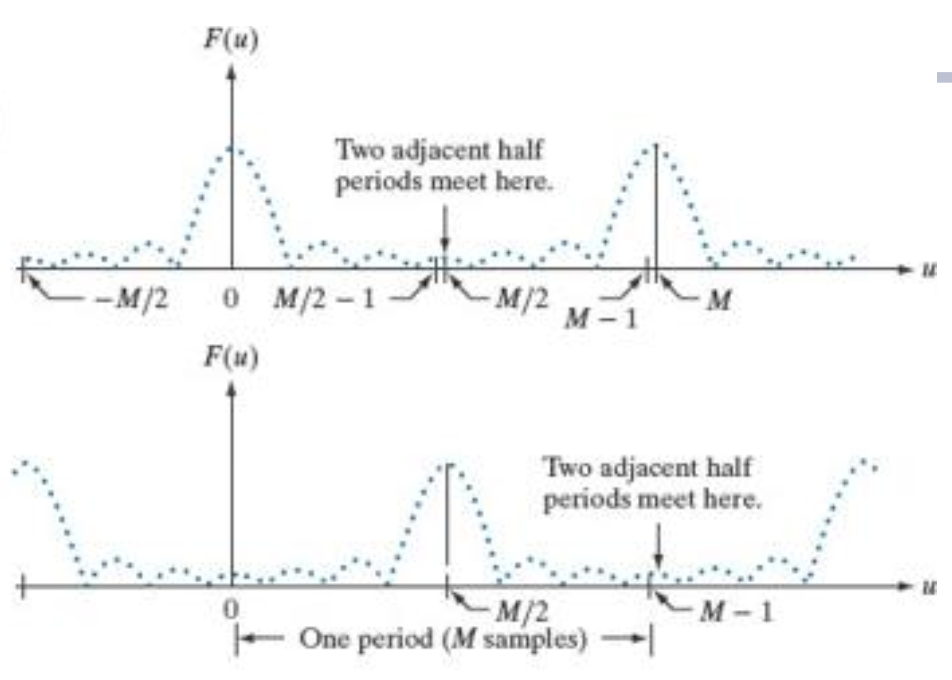
기존의 신호는 Frequency Domain으로 나타내면 위의 그림처럼 나타내진다.
이미지 자체가 Sampling을 한 DFT를 진행하기에 주기 반복이 로 이루어진다.
하지만 계산하기 쉽도록 만큼 평행이동을 시켜 로 주기가 되도록 해준다.
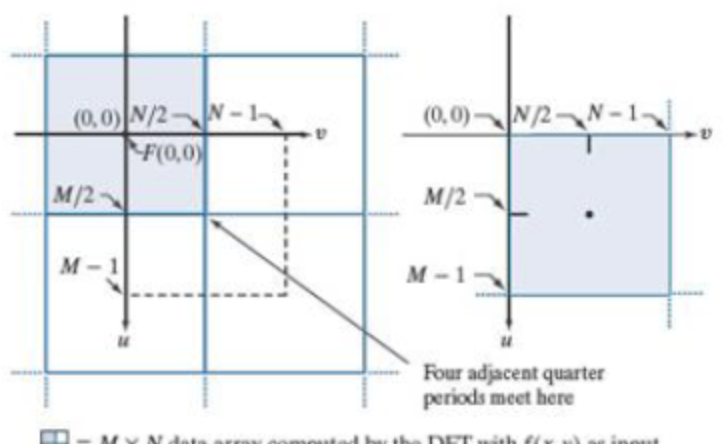
이는 Frequency Domain으로 표현된 것을 이미지처럼 표현하기위해 옮기는 작업이다.
기존의 Frequency Domain은 축으로 , 축으로 의 범위를 가졌지만, Centering을 하게 되면 , 으로 Spatial Domain의 이미지처럼 표현되는 것이다.
Frequency Domain Filtering
개념
이미지를 필터링하는 방법은 Spatial Domain Filtering에서 Kernel Matrix를 만들어 Convolution하는 것이었다.
Spatial Domain에서의 Convolution은 Frequency Domain에서의 곱연산과 같아서 연산이 편해진다.
그래서 Frequency Domain Filter이 탄생한 것이다.

Spatial Domain Image -> Frequency Domain Image는 다음과 같다.
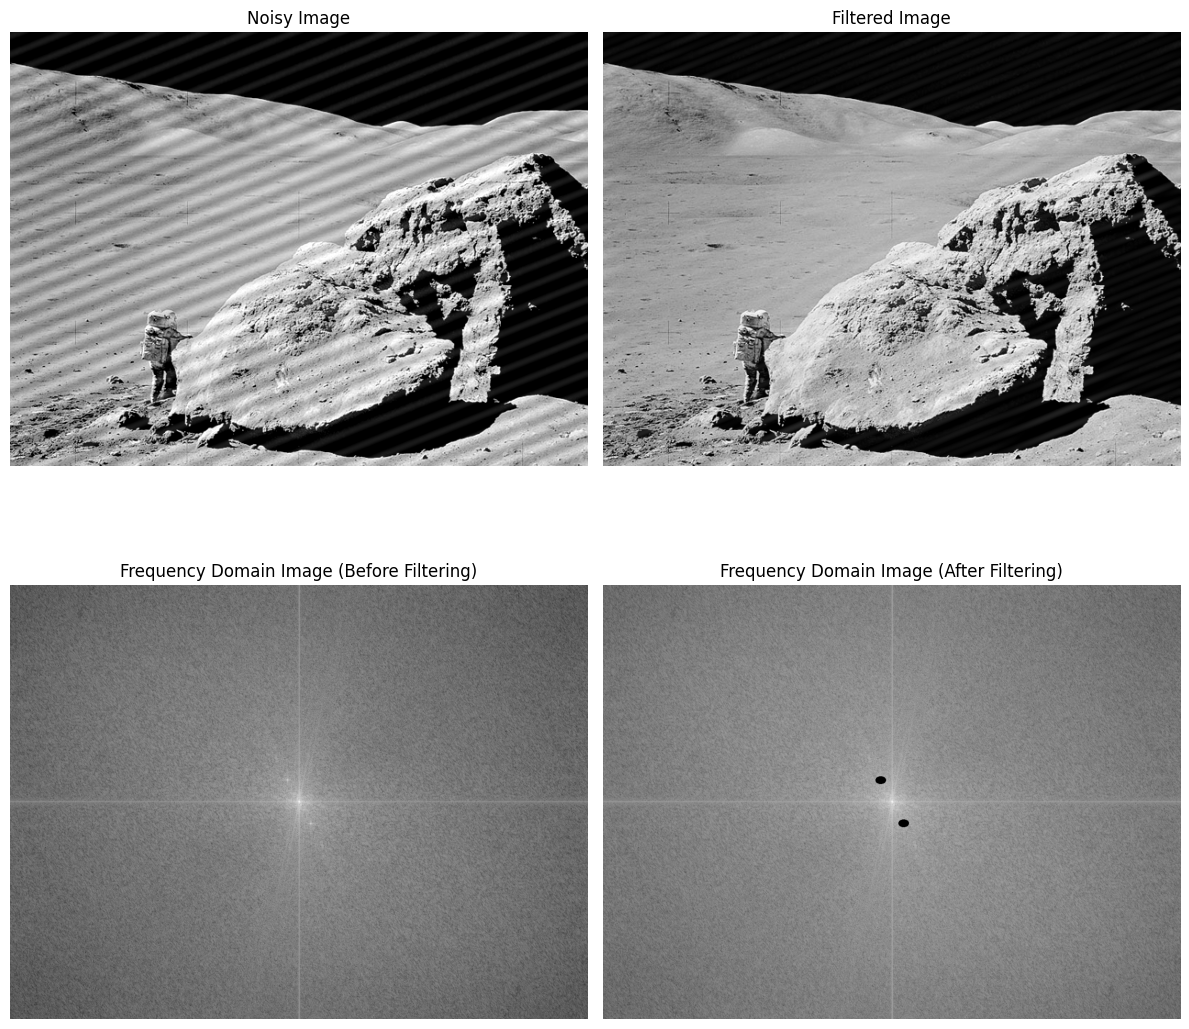
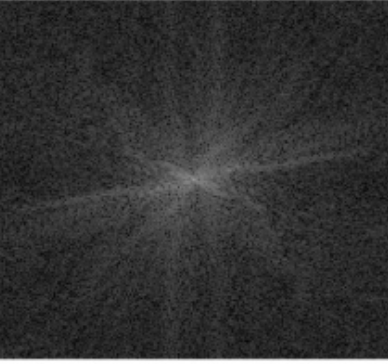
그런데 이미지에 특정 주기의 노이즈가 있다고 하면 다음처럼 된다.
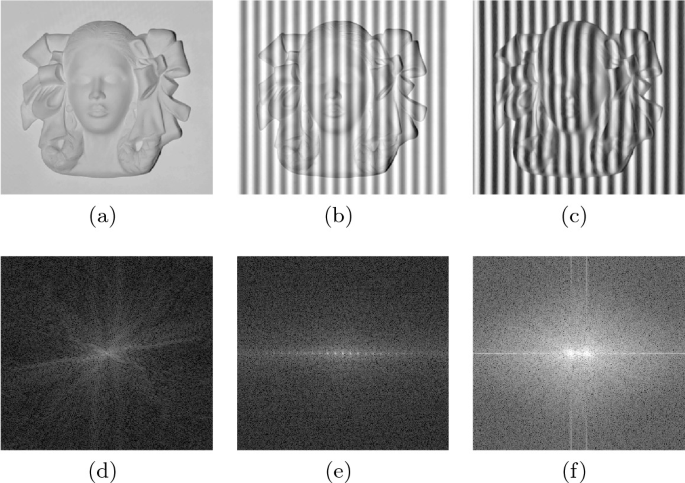
(d)는 원본이지만 (e)나 (f)를 보면 특이하게 밝게 빛나는 부분이 있다.
저런 노이즈를 찾아 직접 삭제하고, 원본이미지에 적용한다는 것이 바로 Frequency Domain Filtering의 원리이다.
Pipeline

1. Spatial Domain Image인 (원본이미지)를 DFT하여 Frequency Domain Image인 를 구한다.
2. 원하는 잡음을 제거하는 을 수행한다.
3. Filtered Frequency Domain Image를 IDFT하여 Filtered Spatial Domain Image인 를 구한다.
그런데 여기서 DFT를 하기 전에 Centering을 해야한다고 했다.
1의 과정은 2단계로 분리가 가능하다.
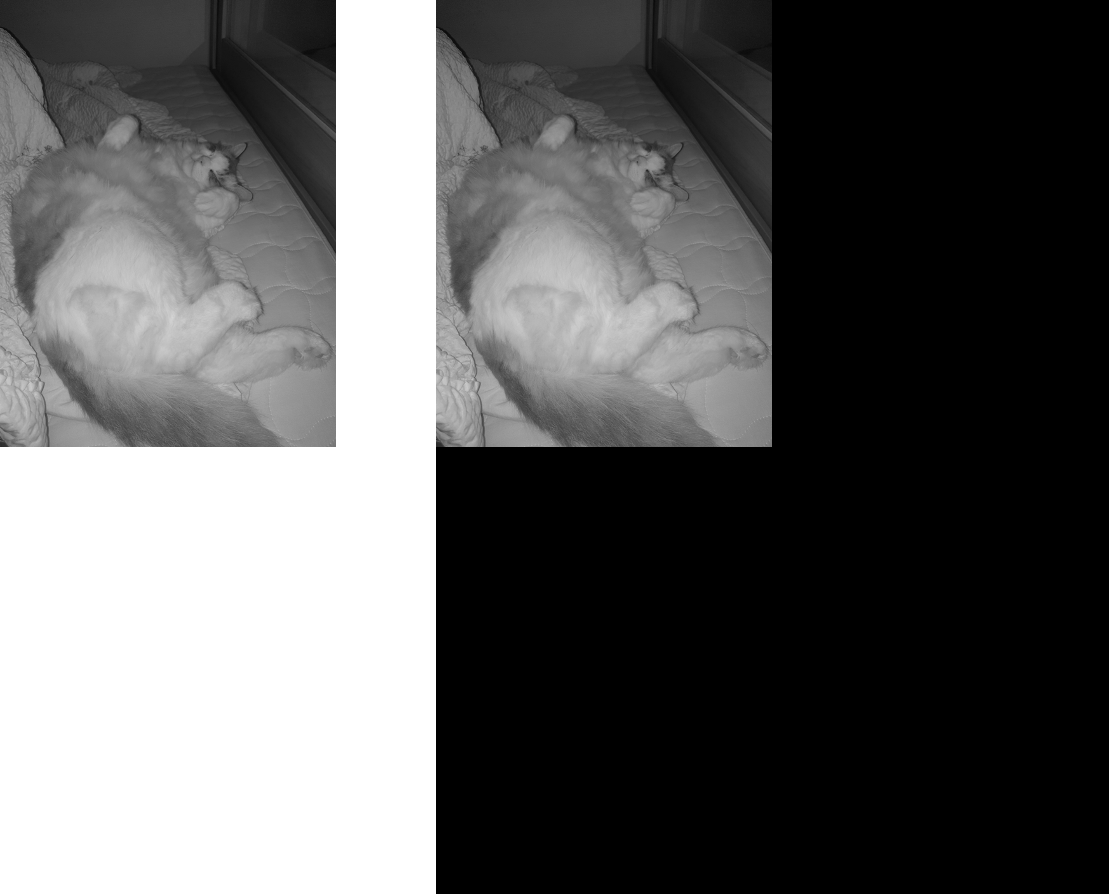
우리집 고양이를 예를 들어보자.
Centering을 하기 위해선 M x N의 이미지를 2M x 2N으로 만들어야한다.
그렇다면 padding을 하고 수행하면 될 것이다. 0-padding, Reflection-padding 원하는 것을 하는데 보통 Zero padding을 많이 한다.
오른쪽 이미지로 만들고 DFT를 수행한 후 Centering을 진행하면 위에서 봤던 Frequency Domain Image가 만들어 질 것이다.
정리하자면 7단계로 나눌 수 있다.
- M x N의 원본 이미지를 2M X 2N로 padding한다.
- DFT를 수행한다.
- Frequency Domain Image를 센터링한다.
- 노이즈를 제거한다.
- Frequency Domain Image의 센터링을 해제한다.
- IDFT를 수행한다.
- 2M x 2N의 이미지를 M x N으로 추출한다.
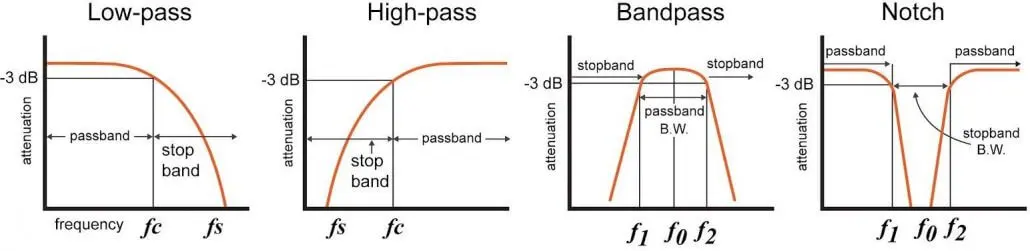
Lowpass Filtering
Ideal
Lowpass Filtering처럼 이미지를 Smooth하는 것이다.
일정 수치 이상의 노이즈만 제거하는 방법이다.
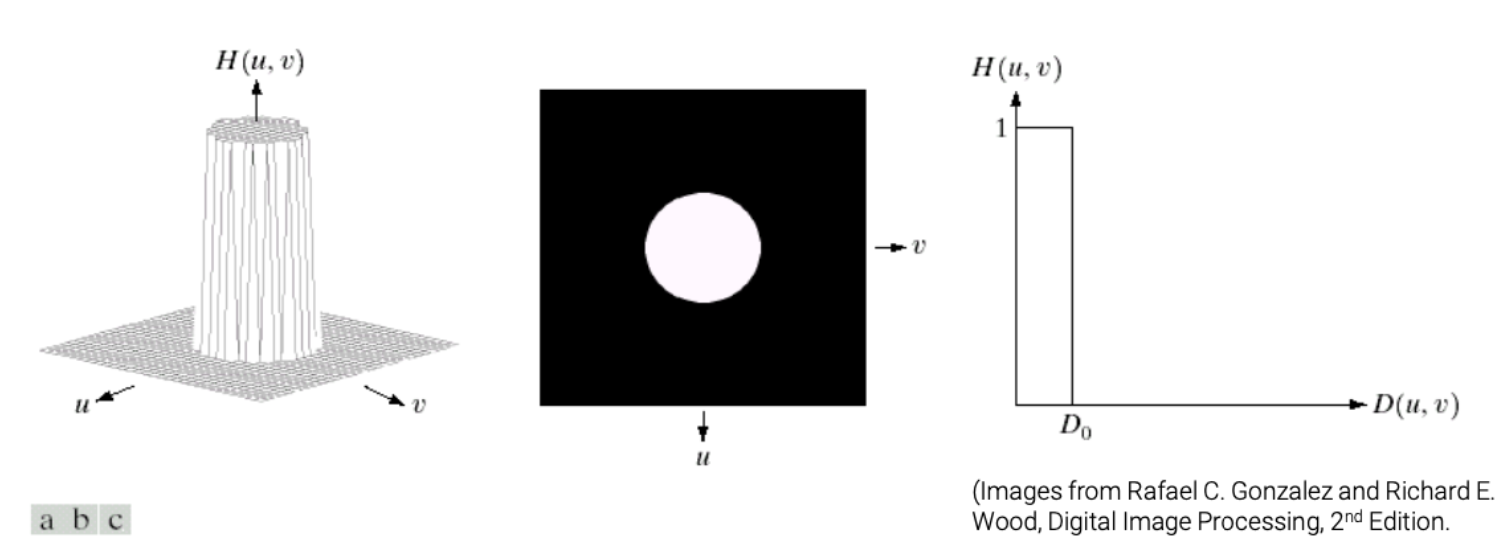
하지만 특정 진동수 이상의 신호를 싹다 잘라버리기 때문에, 급격하게 신호가 변화해서 Spatial Domain Image에서는 Ringing Artifact가 생긴다.
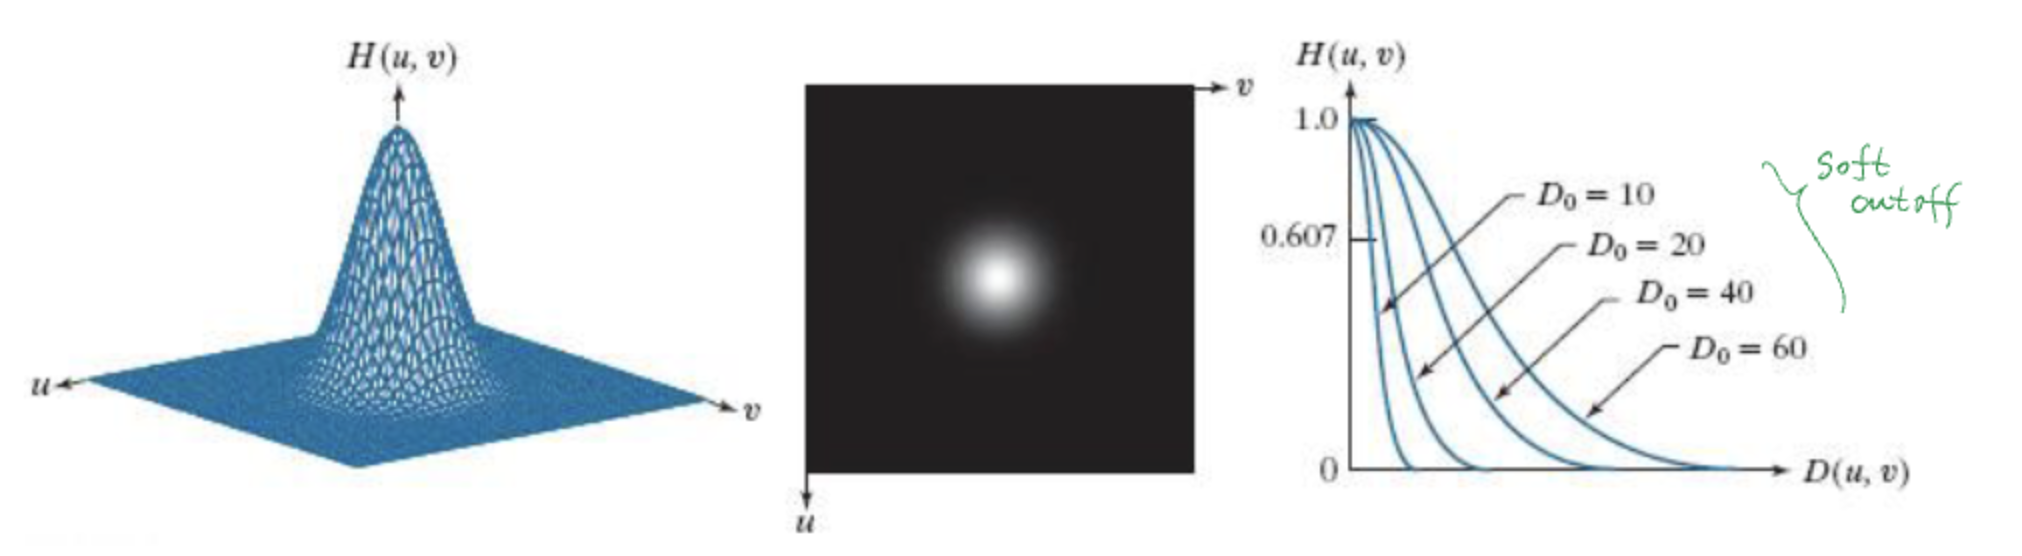
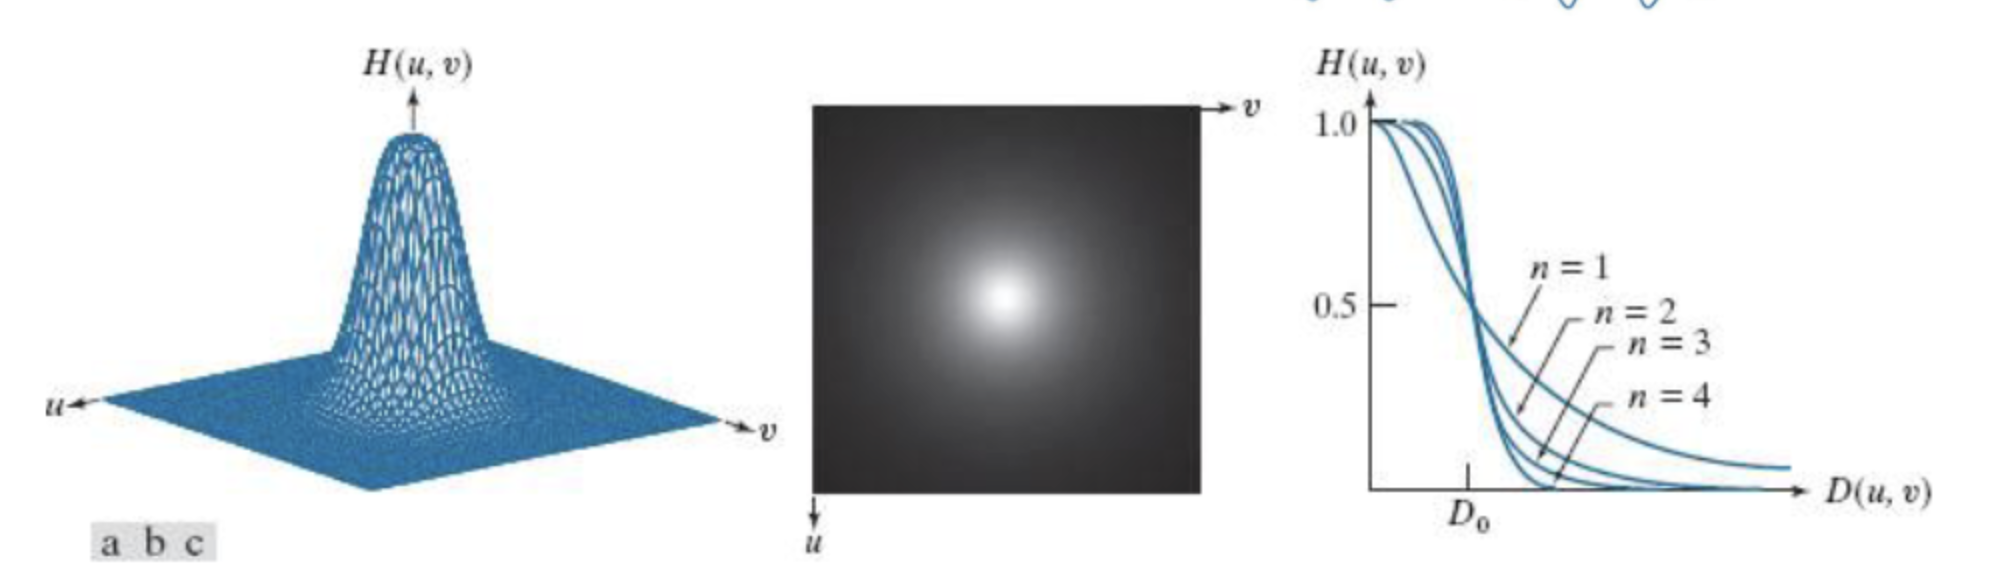
Gaussian
자르는 경계를 Threshold처럼 자르면 Ideal 이지만 부드럽게 곡선으로 자를 수 있다. 이렇게 하면 Ringing Artifact를 최소화할 수 있다.
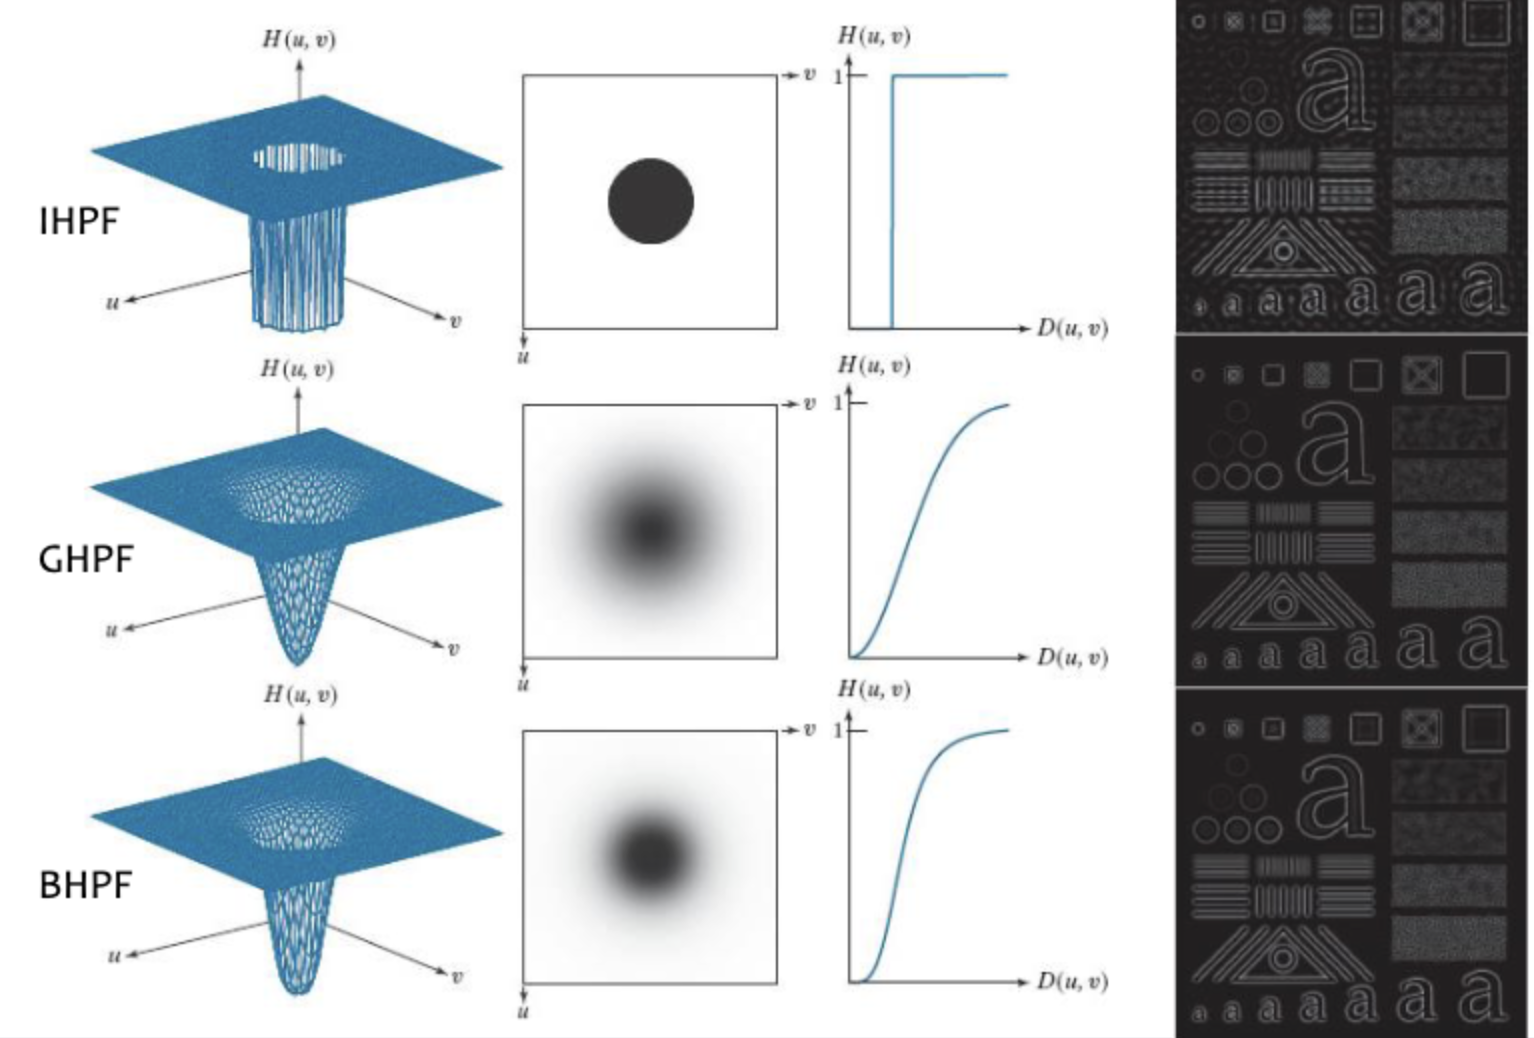
Butterworth
Gaussian말고도 Butterwoth 방법도 있다.
Highpass Filtering
로 더 간단하다.
Lowpass Filter를 구하고 1에서 해당 값을 뺀 것을 필터로 잡으면 된다.
Bandpass Filtering
특정 진동수만 통과시키는 것으로 부터 의 진동수를 통과시키고 싶다면?
밑으로 통과시키는 에 을 통과시키는 을 빼면 된다.
Notch Filtering
노치필터는 Bandpass Filtering과 반대로, 특정 진동수의 영역을 제거하는 필터이다.
를 하면 된다.
실습
FrequencyDomainFilter 객체 생성
Frequency Domain Filter에는 Lowpass, Highpass, Bandpass, Notch가 있으므로 각각의 필터링을 용이하게 하기 위해 Class를 생성한다.
class FrequencyDomainFilter:
    def __init__(self, filter_width: int, filter_height: int):
        self.filter_width = filter_width
        self.filter_height = filter_height
Lowpass Filter 정의
필터의 크기는 클래스의 멤버변수로 설정했으므로 linespace, meshgrid를 통해 이미지 공간을 만든다.
즉 x_coordinates는 [0, 1, 2, ..., filter_height - 1]이 되고,
y_coordinates는 [0, 1, 2, ..., filter_width - 1]이 된다.
이를 Cntering하기 위해 정규화를 진행하고 중심으로 부터 거리를 계산해 각 option마다 필터의 값을 저장하면 된다.
def get_low_pass_filter(self, option: str, frequency_cutoff_range: float):
    height, width = self.filter_height, self.filter_width
    y_axis_values, x_axis_values = np.linspace(0, height-1, height), np.linspace(0, width-1, width)
    [x_coordinates, y_coordinates] = np.meshgrid(x_axis_values, y_axis_values)

    # 각 coordinate의 범위가 -1/2 ~ 1/2가 되도록 변경 (min ~ max frequency range)
    x_coordinates = x_coordinates / width - 0.5
    y_coordinates = y_coordinates / height - 0.5

    # 중심으로부터의 거리를 계산 (frequency의 크기)
    distance_from_center = (x_coordinates ** 2 + y_coordinates ** 2) ** 0.5

    if option == "ideal":
        low_pass_filter = np.where(distance_from_center <= frequency_cutoff_range, 1, 0)
    elif option == "gaussian":
        low_pass_filter = np.exp(-(distance_from_center ** 2) / (2 * (frequency_cutoff_range ** 2)))
    elif option == "butterworth":
        low_pass_filter = 1 / (1 + (distance_from_center / frequency_cutoff_range) ** (2 * 2))
    else:
        raise ValueError(f"Unsupported option '{option}'")

    return low_pass_filter
Highpass Filter 정의
이므로 이 식을 그대로 적용하면 된다.
def get_high_pass_filter(self, option: str, frequency_cutoff_range: float):
    low_pass_filter = self.get_low_pass_filter(option, frequency_cutoff_range)
    high_pass_filter = 1 - low_pass_filter

    return high_pass_filter
Bandpass Filter 정의
Bandpass Filter는 특정 진동수를 통과하는 것이다.
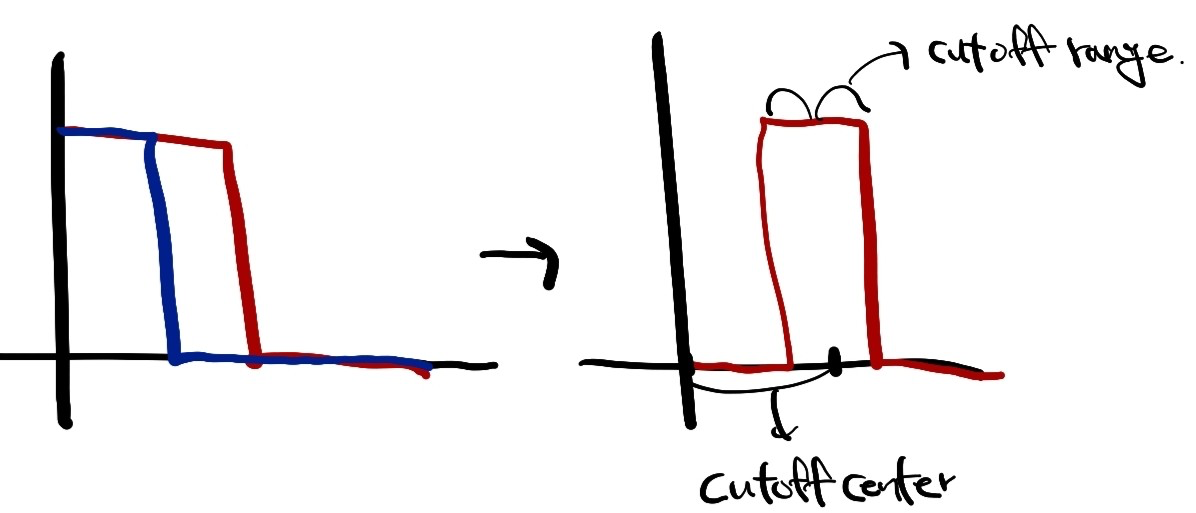
을 하는 방법도 있지만,
cutoff range만큼 평행이동시켜서 Lowpass Filter를 하는 방법도 있다.
그리고 frequency domain은 우함수이기 때문에 점대칭시켜서 적용한다.
cutoff range만큼 평행이동시키기 위해 shift_filter()를 정의한다.
def shift_filter(self, filter, shift_frequency_x, shift_frequency_y, fill_value=0):
    shifted_filter = np.full_like(filter, fill_value)

    shift_x = int(shift_frequency_x * self.filter_width)
    shift_y = int(shift_frequency_y * self.filter_height)

    for i in range(self.filter_height):
        for j in range(self.filter_width):
            new_i = i + shift_y
            new_j = j + shift_x
            if 0 <= new_i < self.filter_height and 0 <= new_j < self.filter_width:
                shifted_filter[new_i, new_j] = filter[i, j]

    return shifted_filter
그리고 이를 활용해 lowpass filter를 만들고 평행이동시킨것을 2번해서 점대칭시켜 더한 것이 bandpass filter가 된다.
def get_band_pass_filter(self, option: str, frequency_cutoff_center: tuple, frequency_cutoff_range: float):
    low_pass_filter = self.get_low_pass_filter(option, frequency_cutoff_range)

    # 중심 주파수 위치로 필터를 이동
    shifted_filter = self.shift_filter(low_pass_filter, frequency_cutoff_center[0], frequency_cutoff_center[1])

    # 원점 기준으로 대칭되는 위치로 필터를 이동
    shifted_filter_symmetric = self.shift_filter(low_pass_filter, -frequency_cutoff_center[0], -frequency_cutoff_center[1])

    # 두 필터를 더하여 band-pass filter 생성
    band_pass_filter = shifted_filter + shifted_filter_symmetric


    return band_pass_filter
Notch Filter 정의
이므로 Highpass Filter처럼 다음과 같다.
def get_notch_filter(self, option: str, frequency_cutoff_center: tuple, frequency_cutoff_range: float):
    band_pass_filter = self.get_band_pass_filter(option, frequency_cutoff_center, frequency_cutoff_range)
    notch_filter = 1 - band_pass_filter

    return notch_filter
Filter를 이미지에 적용
- M x N의 원본 이미지를 2M X 2N로 padding한다.
- DFT를 수행한다.
- Frequency Domain Image를 센터링한다.
- 노이즈를 제거한다.
- Frequency Domain Image의 센터링을 해제한다.
- IDFT를 수행한다.
- 2M x 2N의 이미지를 M x N으로 추출한다.
의 과정을 거친다고 하였으므로 코드로 그대로 만들 수 있다.
def frequency_domain_filtering(image, frequency_domain_filter):
    # 입력 이미지의 크기를 가져옴
    image_height, image_width = image.shape

    # 1. M x N의 원본 이미지를 2M X 2N로 padding한다.
    padded_height, padded_width = 2 * image_height, 2 * image_width
    padded_image = np.zeros((padded_height, padded_width))
    padded_image[:image_height, :image_width] = image

    # 2. DFT를 수행한다.
    padded_frequency_image = np.fft.fft2(padded_image)
    # 3. Frequency Domain Image를 센터링한다.
    frequency_image = np.fft.fftshift(padded_frequency_image)

    # 4. 노이즈를 제거한다.
    filtered_frequency_image = frequency_image * frequency_domain_filter

    # 5. Frequency Domain Image의 센터링을 해제한다.
    filtered_frequency_image = np.fft.ifftshift(filtered_frequency_image)
    # 6. IDFT를 수행한다.
    inverse_transformed_image = np.fft.ifft2(filtered_frequency_image)

    # 7. 2M x 2N의 이미지를 M x N으로 추출한다.
    centered_image = inverse_transformed_image[:image_height, :image_width]

    # 실수값으로 변환 및 0~255 범위로 클리핑
    filtered_image = np.clip(np.real(centered_image), 0, 255).astype('uint8')

    return filtered_image, frequency_image, frequency_domain_filter
적용하기
노이즈가 낀 이미지가 있다고 하자.
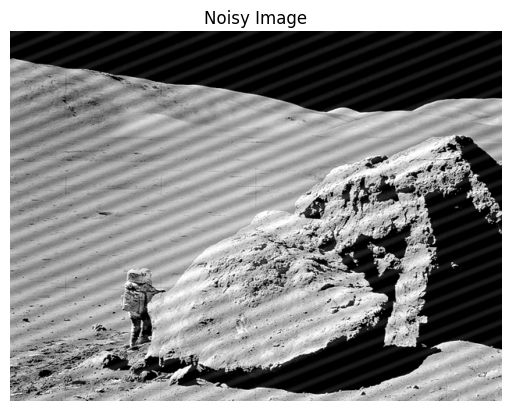
image_width, image_height = noisy_image.shape[1], noisy_image.shape[0]

filter_instance = FrequencyDomainFilter(filter_width = image_width * 2, filter_height = image_height * 2)

filter = filter_instance.get_notch_filter("ideal", frequency_cutoff_center = (0.02, 0.05), frequency_cutoff_range = 0.009)

filtered_image, frequency_image, applied_frequency_filter = frequency_domain_filtering(noisy_image, filter)
특정 진동수의 노이즈를 제거해야하므로 notch_filter를 사용해서 제거가 잘 됨을 확인할 수 있다.