Humanoid(휴머노이드) 프로젝트에서 Dynamixel을 사용하여 팔을 구동하려고 한다. 따라서 전체적으로 Dynamixel을 사용하는 방법을 정리하고 최종적으로 ROS 2를 이용하여 Dynamixel을 사용하는 방법을 정리하려고 한다.
Device
AX-12A
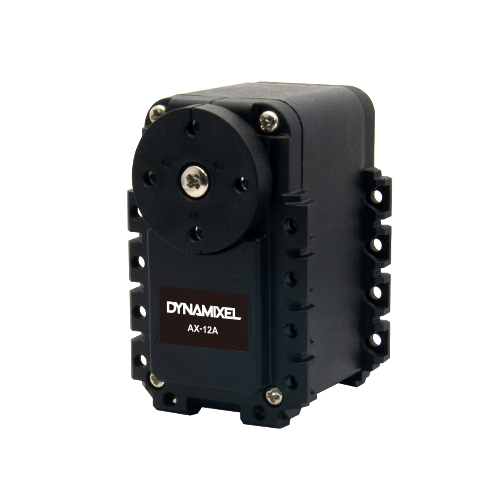
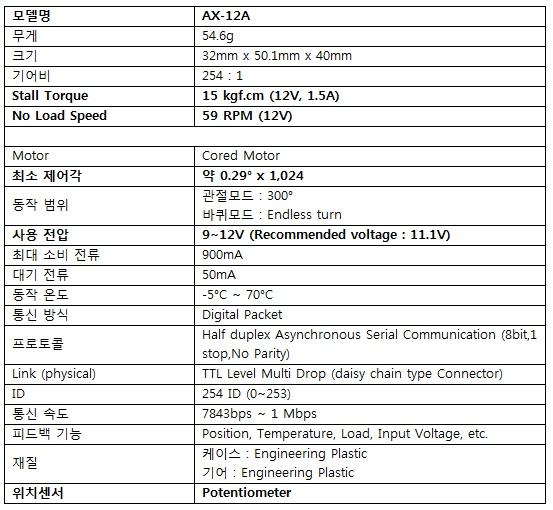
세부 Spec
U2D2란?
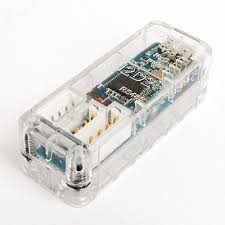 PC의 USB 포트에 Dynamixel 또는 제어기(Controller Board)를 연결하여 직접 제어하는데 사용하는 통신 변환 장치이다.
Dynamixel Wizard 2.0
다양한 운영체제에서 Dynamixel 제품들을 통합 관리할 수 있는 Tool
주요 역할
- 모든 Dynamixel의 펌웨어 업데이트 및 복구
- 다양한 프로토콜 기반으로 Dynamixel의 상태 점검
- 사용에 필요한 모드 및 파라미터 설정 및 목표 지령 생성 가능
지원 운영체제
- 윈도우 7 / 8.1 / 10 (32bit and 64bit)
- 리눅스
* Ubuntu 18.04 (64bit)- Ubuntu 16.04 (64bit)
- Mac OS 10.12 / 10.13 / 10.14 (64bit)
저자는 윈도우 11에서 Wizard 2.0을 사용했다. ROBOTIS Dyanmixel Wizard 2.0 e-Manual에 자세하게 사용법이 나와있으니 찾으면서 사용하면 좋다.
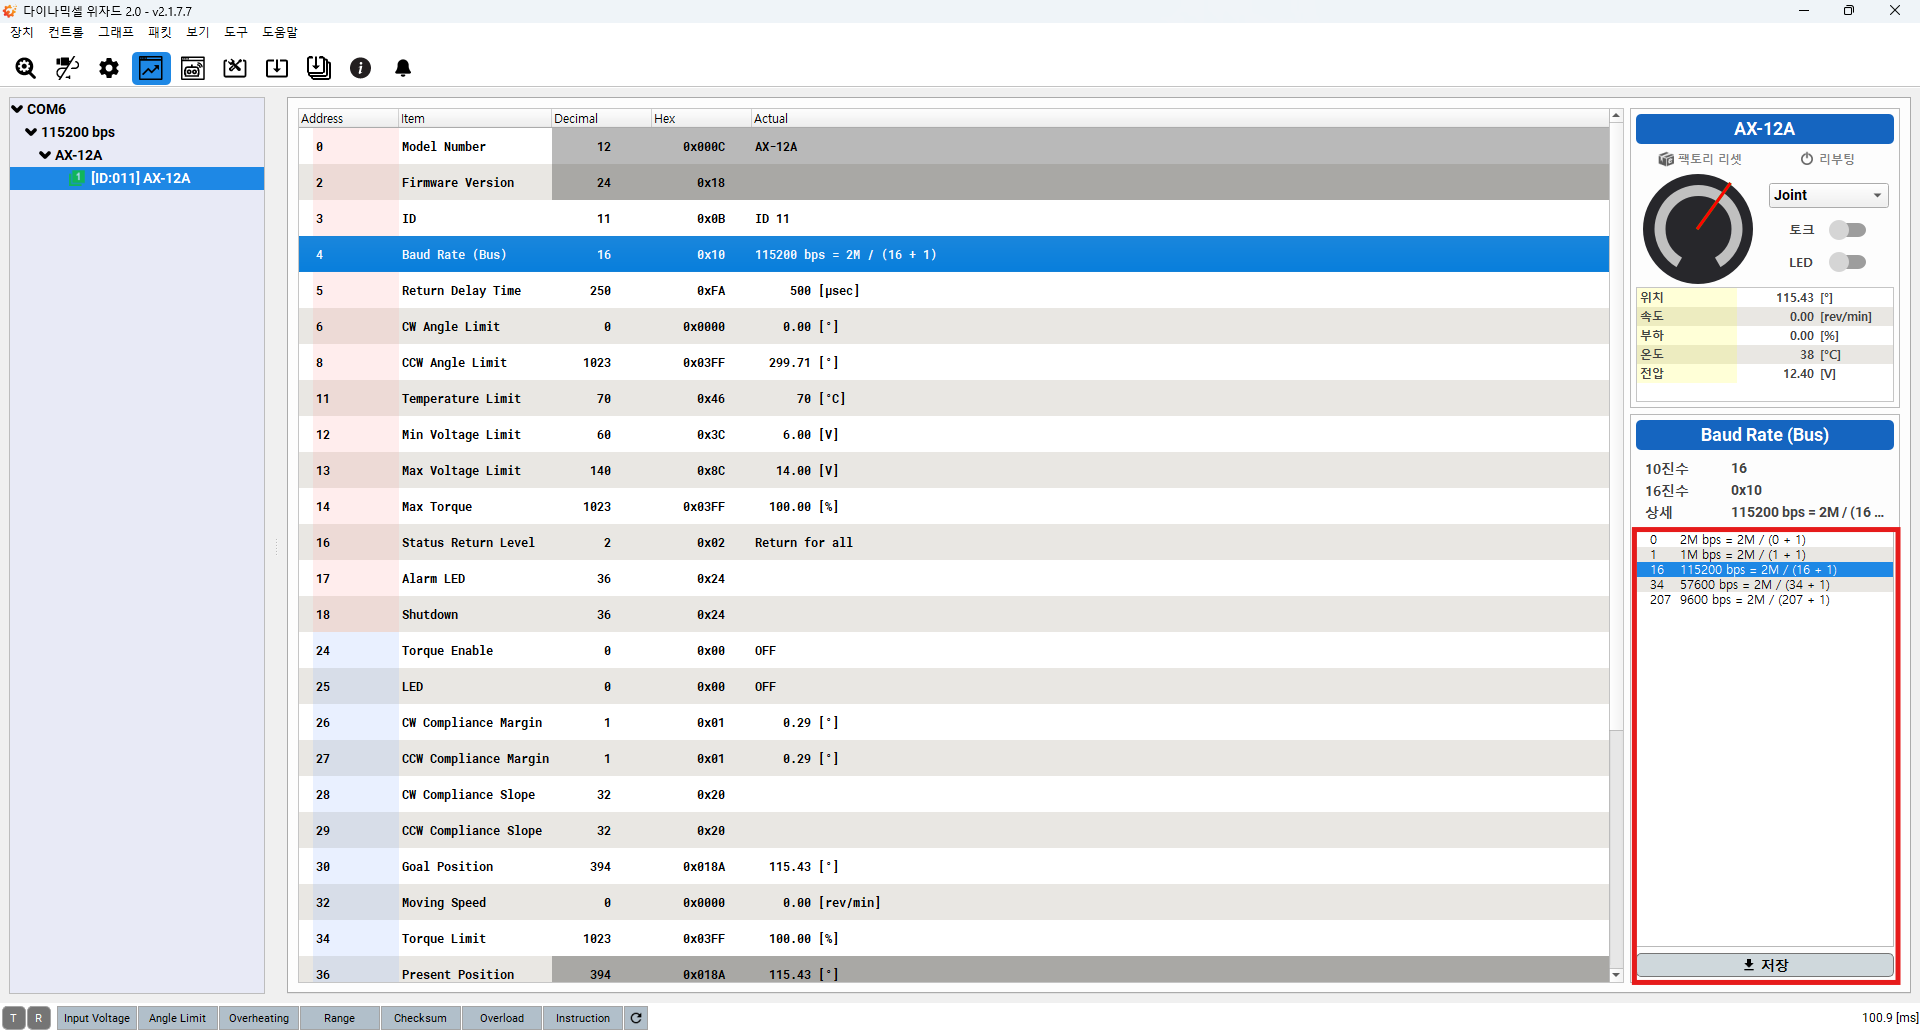
ID 및 Baud Rate 설정
U2D2와 U2D2 Power Hub를 사용하여 Dynamixel AX-12A를 PC에 연결한 후 Wizard에서 장치 검색을 하면 다음과 같은 창이 나온다.

ID 설정
현재 Dynamixel의 ID는 1로 설정되어 있지만, 해당 ID를 Dynamixel에 적혀있는 ID와 동일하게 11로 설정하려고 한다.(ID 충돌 방지를 위해서)
ID를 설정하는 방법은 메인 화면의 ID를 다음과 같이 선택하면 오른쪽 아래 빨간색 박스 부분에 ID 설정 창이 나타난다.
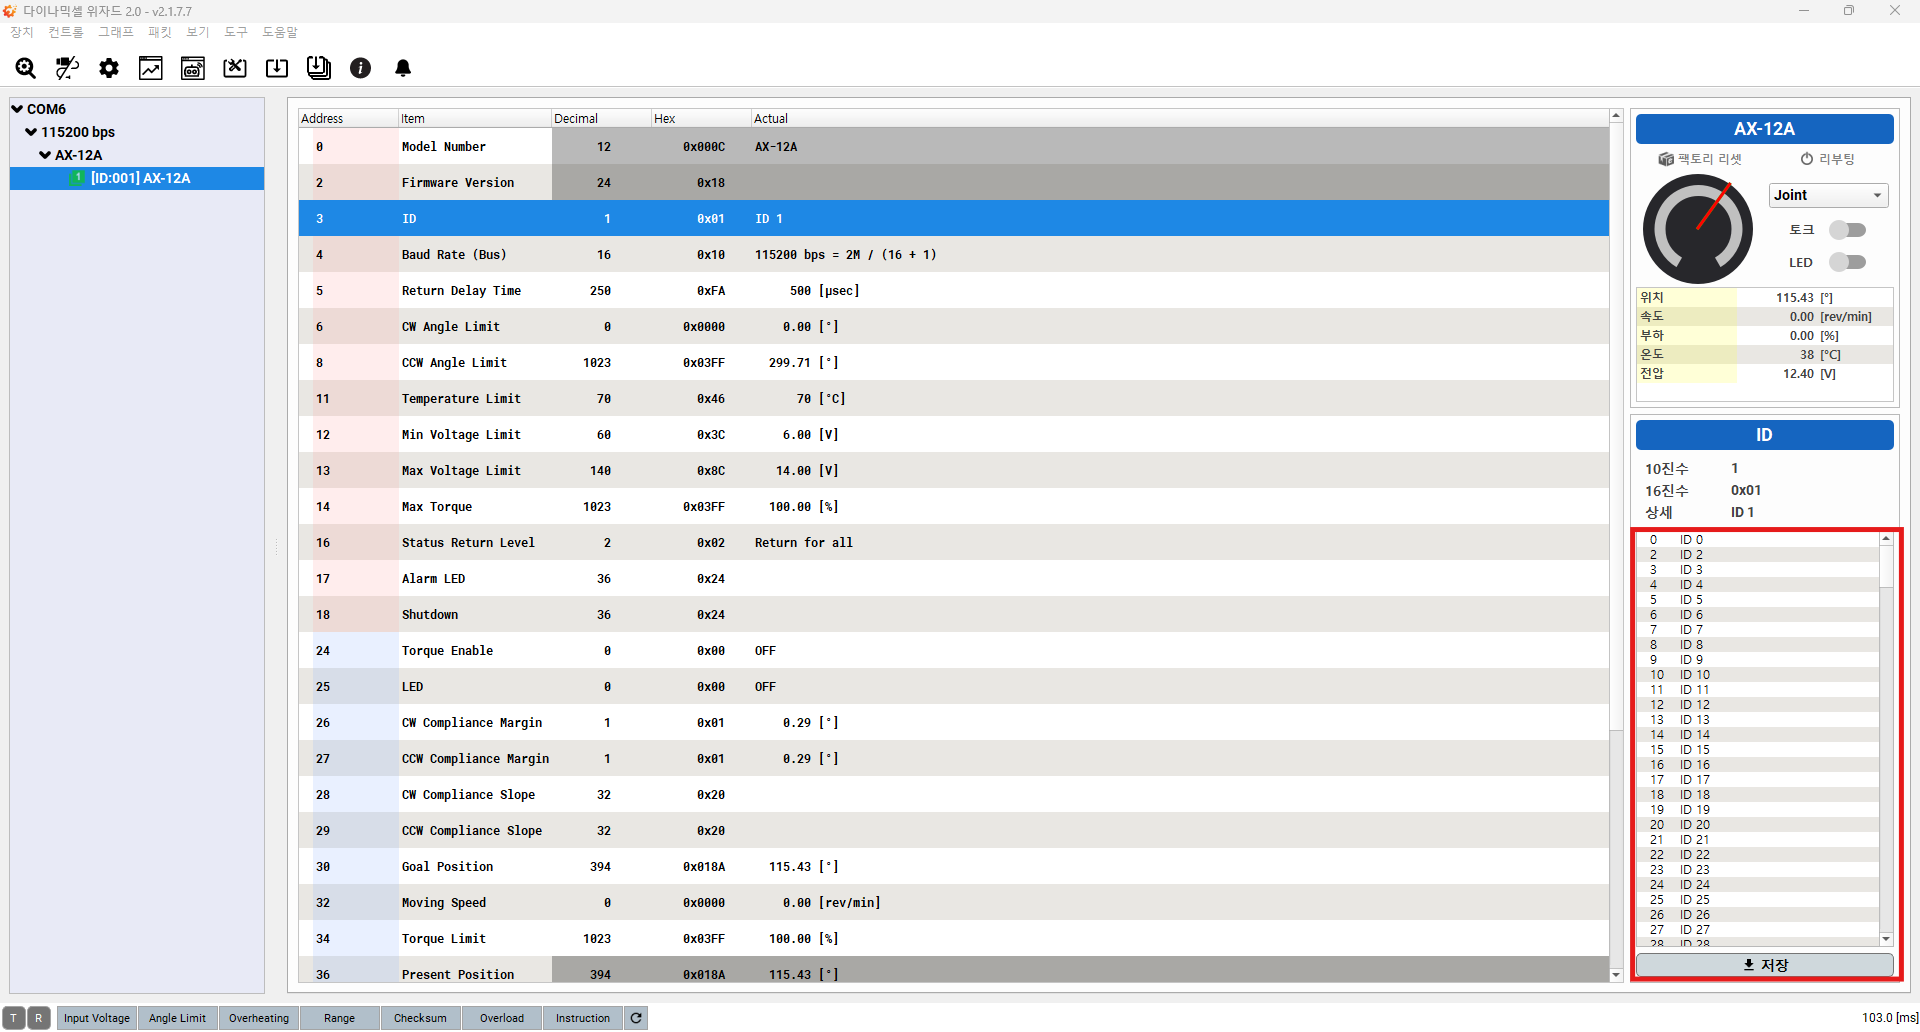
해당 부분에서 설정할 ID 값을 클릭 후에 저장하면 Dynamixel의 ID 값이 변경되는 것을 확인할 수 있다.

Baud Rate 설정
ID 설정과 같이 Dynamixel의 Baud Rate를 설정할 수 있다. Bauad Rate Tab 선택 -> 설정할 Baud Rate 선택 -> 저장

Wizard 구동 영상
ROS 2
Dynamixel Wizard 2.0을 통해서 Dynamixel AX-12A의 펌웨어를 업데이트하고 ID(11, 17)와 Baud Rate(1,000,000 bps)를 새롭게 설정했다.
새롭게 설정된 Dynamixel을 Linux 상에서 Dynamixel ROS 2 Package를 이용해서 구동해보았다.
Enviroment Settings
- Linux : Ubuntu 22.04.05 LTS
- ROS 2 : Humble Version
Dynamixel SDK
Dynamixel SDK e-Manual 페이지에 Linux 상에서 Dynamixel SDK를 설치하는 방법을 설명해주고 있다.
저자는 Option 1을 이용하여 사용하였다.
코드 수정 부분
현재 Dyanmixel SDK를 ROS 2에서 사용하는 가이드라인 및 샘플 코드는 XL430-W250-T에 맞춰져있다.(참고 : Dynamixel Quick Start Guide for ROS2)
따라서 AX-12A에 맞게 Dynaxmiel SDK의 예제 프로그램인 read_write_node의 코드를 수정할 필요가 있다.
- 수정된 코드
// Copyright 2021 ROBOTIS CO., LTD.
//
// Licensed under the Apache License, Version 2.0 (the "License");
// you may not use this file except in compliance with the License.
// You may obtain a copy of the License at
//
//     http://www.apache.org/licenses/LICENSE-2.0
//
// Unless required by applicable law or agreed to in writing, software
// distributed under the License is distributed on an "AS IS" BASIS,
// WITHOUT WARRANTIES OR CONDITIONS OF ANY KIND, either express or implied.
// See the License for the specific language governing permissions and
// limitations under the License.

/*******************************************************************************
// This example is written for DYNAMIXEL X(excluding XL-320) and MX(2.0) series with U2D2.
// For other series, please refer to the product eManual and modify the Control Table addresses and other definitions.
// To test this example, please follow the commands below.
//
// Open terminal #1
// $ ros2 run dynamixel_sdk_examples read_write_node
//
// Open terminal #2 (run one of below commands at a time)
// $ ros2 topic pub -1 /set_position dynamixel_sdk_custom_interfaces/SetPosition "{id: 1, position: 1000}"
// $ ros2 service call /get_position dynamixel_sdk_custom_interfaces/srv/GetPosition "id: 1"
//
// Author: Will Son
*******************************************************************************/

#include <cstdio>
#include <memory>
#include <string>

#include "dynamixel_sdk/dynamixel_sdk.h"
#include "dynamixel_sdk_custom_interfaces/msg/set_position.hpp"
#include "dynamixel_sdk_custom_interfaces/srv/get_position.hpp"
#include "rclcpp/rclcpp.hpp"
#include "rcutils/cmdline_parser.h"

#include "read_write_node.hpp"

// Control table address for X series (except XL-320)
#define ADDR_TORQUE_ENABLE 24
#define ADDR_GOAL_POSITION 30
#define ADDR_PRESENT_POSITION 36

// Protocol version
#define PROTOCOL_VERSION 1.0  // Default Protocol version of DYNAMIXEL X series.

// Default setting
#define BAUDRATE 1000000  // Default Baudrate of DYNAMIXEL X series
#define DEVICE_NAME "/dev/ttyUSB0"  // [Linux]: "/dev/ttyUSB*", [Windows]: "COM*"

dynamixel::PortHandler * portHandler;
dynamixel::PacketHandler * packetHandler;

uint8_t dxl_error = 0;
uint32_t goal_position = 0;
int dxl_comm_result = COMM_TX_FAIL;

ReadWriteNode::ReadWriteNode()
: Node("read_write_node")
{
  RCLCPP_INFO(this->get_logger(), "Run read write node");

  this->declare_parameter("qos_depth", 10);
  int8_t qos_depth = 0;
  this->get_parameter("qos_depth", qos_depth);

  const auto QOS_RKL10V =
    rclcpp::QoS(rclcpp::KeepLast(qos_depth)).reliable().durability_volatile();

  set_position_subscri**텍스트**ber_ =
    this->create_subscription<SetPosition>(
    "set_position",
    QOS_RKL10V,
    [this](const SetPosition::SharedPtr msg) -> void
    {
      uint8_t dxl_error = 0;

      // Position Value of X series is 2 byte data.
      // For AX & MX(1.0) use 2 byte data(uint16_t) for the Position Value.
      uint32_t goal_position = (unsigned int)msg->position;  // Convert int32 -> uint32

      // Write Goal Position (length : 4 bytes)
      // When writing 2 byte data to AX / MX(1.0), use write2ByteTxRx() instead.
      dxl_comm_result =
      packetHandler->write2ByteTxRx(
        portHandler,
        (uint8_t) msg->id,
        ADDR_GOAL_POSITION,
        goal_position,
        &dxl_error
      );

      if (dxl_comm_result != COMM_SUCCESS) {
        RCLCPP_INFO(this->get_logger(), "%s", packetHandler->getTxRxResult(dxl_comm_result));
      } else if (dxl_error != 0) {
        RCLCPP_INFO(this->get_logger(), "%s", packetHandler->getRxPacketError(dxl_error));
      } else {
        RCLCPP_INFO(this->get_logger(), "Set [ID: %d] [Goal Position: %d]", msg->id, msg->position);
      }
    }
    );

  auto get_present_position =
    [this](
    const std::shared_ptr<GetPosition::Request> request,
    std::shared_ptr<GetPosition::Response> response) -> void
    {
      uint16_t present_position = 0;

      // Read Present Position (length : 4 bytes) and Convert uint32 -> int32
      // When reading 2 byte data from AX / MX(1.0), use read2ByteTxRx() instead.
      dxl_comm_result = packetHandler->read2ByteTxRx(
        portHandler,
        (uint8_t) request->id,
        ADDR_PRESENT_POSITION,
        &present_position,
        &dxl_error
      );

      RCLCPP_INFO(
        this->get_logger(),
        "Get [ID: %d] [Present Position: %d]",
        request->id,
        present_position
      );

      response->position = present_position;
    };

  get_position_server_ = create_service<GetPosition>("get_position", get_present_position);
}

ReadWriteNode::~ReadWriteNode()
{
}

void setupDynamixel(uint8_t dxl_id)
{
  // Use Position Control Mode
  dxl_comm_result = packetHandler->write1ByteTxRx(
    portHandler,
    dxl_id,
    ADDR_TORQUE_ENABLE,
    1,
    &dxl_error
  );

  if (dxl_comm_result != COMM_SUCCESS) {
    RCLCPP_ERROR(rclcpp::get_logger("read_write_node"), "Failed to enable torque.");
  } else {
    RCLCPP_INFO(rclcpp::get_logger("read_write_node"), "Succeeded to enable torque.");
  }
}

int main(int argc, char * argv[])
{
  portHandler = dynamixel::PortHandler::getPortHandler(DEVICE_NAME);
  packetHandler = dynamixel::PacketHandler::getPacketHandler(PROTOCOL_VERSION);

  // Open Serial Port
  dxl_comm_result = portHandler->openPort();
  if (dxl_comm_result == false) {
    RCLCPP_ERROR(rclcpp::get_logger("read_write_node"), "Failed to open the port!");
    return -1;
  } else {
    RCLCPP_INFO(rclcpp::get_logger("read_write_node"), "Succeeded to open the port.");
  }

  // Set the baudrate of the serial port (use DYNAMIXEL Baudrate)
  dxl_comm_result = portHandler->setBaudRate(BAUDRATE);
  if (dxl_comm_result == false) {
    RCLCPP_ERROR(rclcpp::get_logger("read_write_node"), "Failed to set the baudrate!");
    return -1;
  } else {
    RCLCPP_INFO(rclcpp::get_logger("read_write_node"), "Succeeded to set the baudrate.");
  }

  setupDynamixel(11);

  rclcpp::init(argc, argv);

  auto readwritenode = std::make_shared<ReadWriteNode>();
  rclcpp::spin(readwritenode);
  rclcpp::shutdown();

  // Disable Torque of DYNAMIXEL
  packetHandler->write1ByteTxRx(
    portHandler,
    11,
    ADDR_TORQUE_ENABLE,
    0,
    &dxl_error
  );

  return 0;
}- 수정해야할 부분
해당 코드는 앞서 말했듯이 AX-12A에 맞게 코드를 수정한 것이다. 그것에따라PROTOCOL_VERSION,BAUDRATE,DEVICE_NAME,ADDR_TORQUE_ENABLE등의 상수를 수정했다.
각각의 상수는 다음과 같은 의미를 지니고 있다.
PROTOCOL_VERSION: Dynamixel 통신 프로토콜 버전BAUDRATE: 통신 속도DEVICE_NAME: 통신 Device 이름ADDR_TORQUE_ENABLE(중요) : Dynamixel 토크 활성화 주소, 컨트롤 테이블 주소
해당 상수는 모터의 제어 테이블을 기반으로 하기 때문에 자신이 사용하는 모터에 대한 컨트롤 테이블 정보가 필요하다!
ROS 2 구동 영상
다음과 같이 코드를 수정한 후에 빌드하여 node를 실행시키면 Dynamixel AX-12A를 ROS 2를 이용하여 구동할 수 있다.
참고 자료
ROBOTIS AX-12A e-Manual : https://emanual.robotis.com/docs/kr/dxl/ax/ax-12a/
ROBOTIS U2D2 e-Manual : https://emanual.robotis.com/docs/kr/parts/interface/u2d2/
ROBOTIS Dynamixel Wizard 2.0 e-Manual : https://emanual.robotis.com/docs/kr/software/dynamixel/dynamixel_wizard2/