Humanoid 프로젝트에서 Dynamixel을 사용하여 6 DOF Manipualtor를 만들어서 구동하려고 하기 때문에, ROS 2 및 Arduino에서 여러 개의 Dynamixel을 구동하는 방법을 살펴본 후, 각각의 장점 및 단점을 파악하려고 한다.
사전 준비
AX-12A
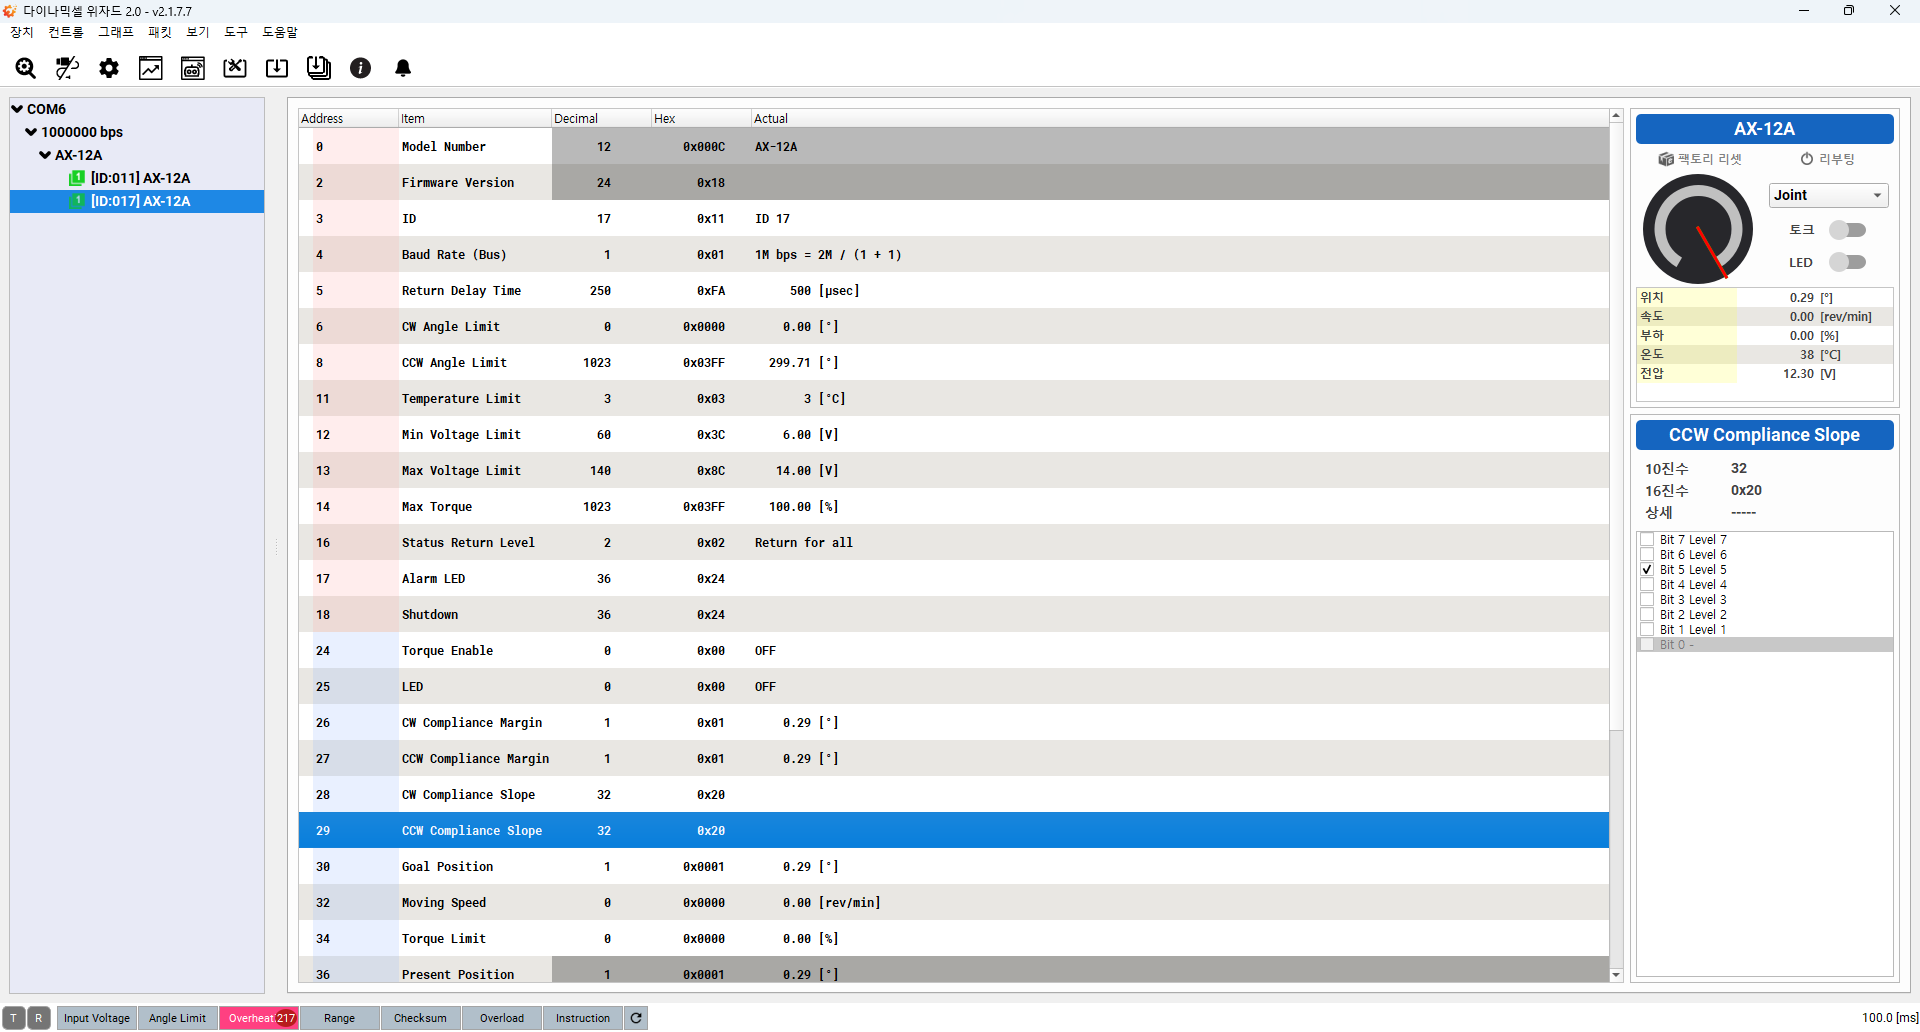
사전에 준비했던 ID 11, 17 Dynamixel을 Dynamixel Wizard 2.0 프로그램을 이용하여 Overheating Error를 방지하기 위해 Temperature Limit값을 확인하였다.
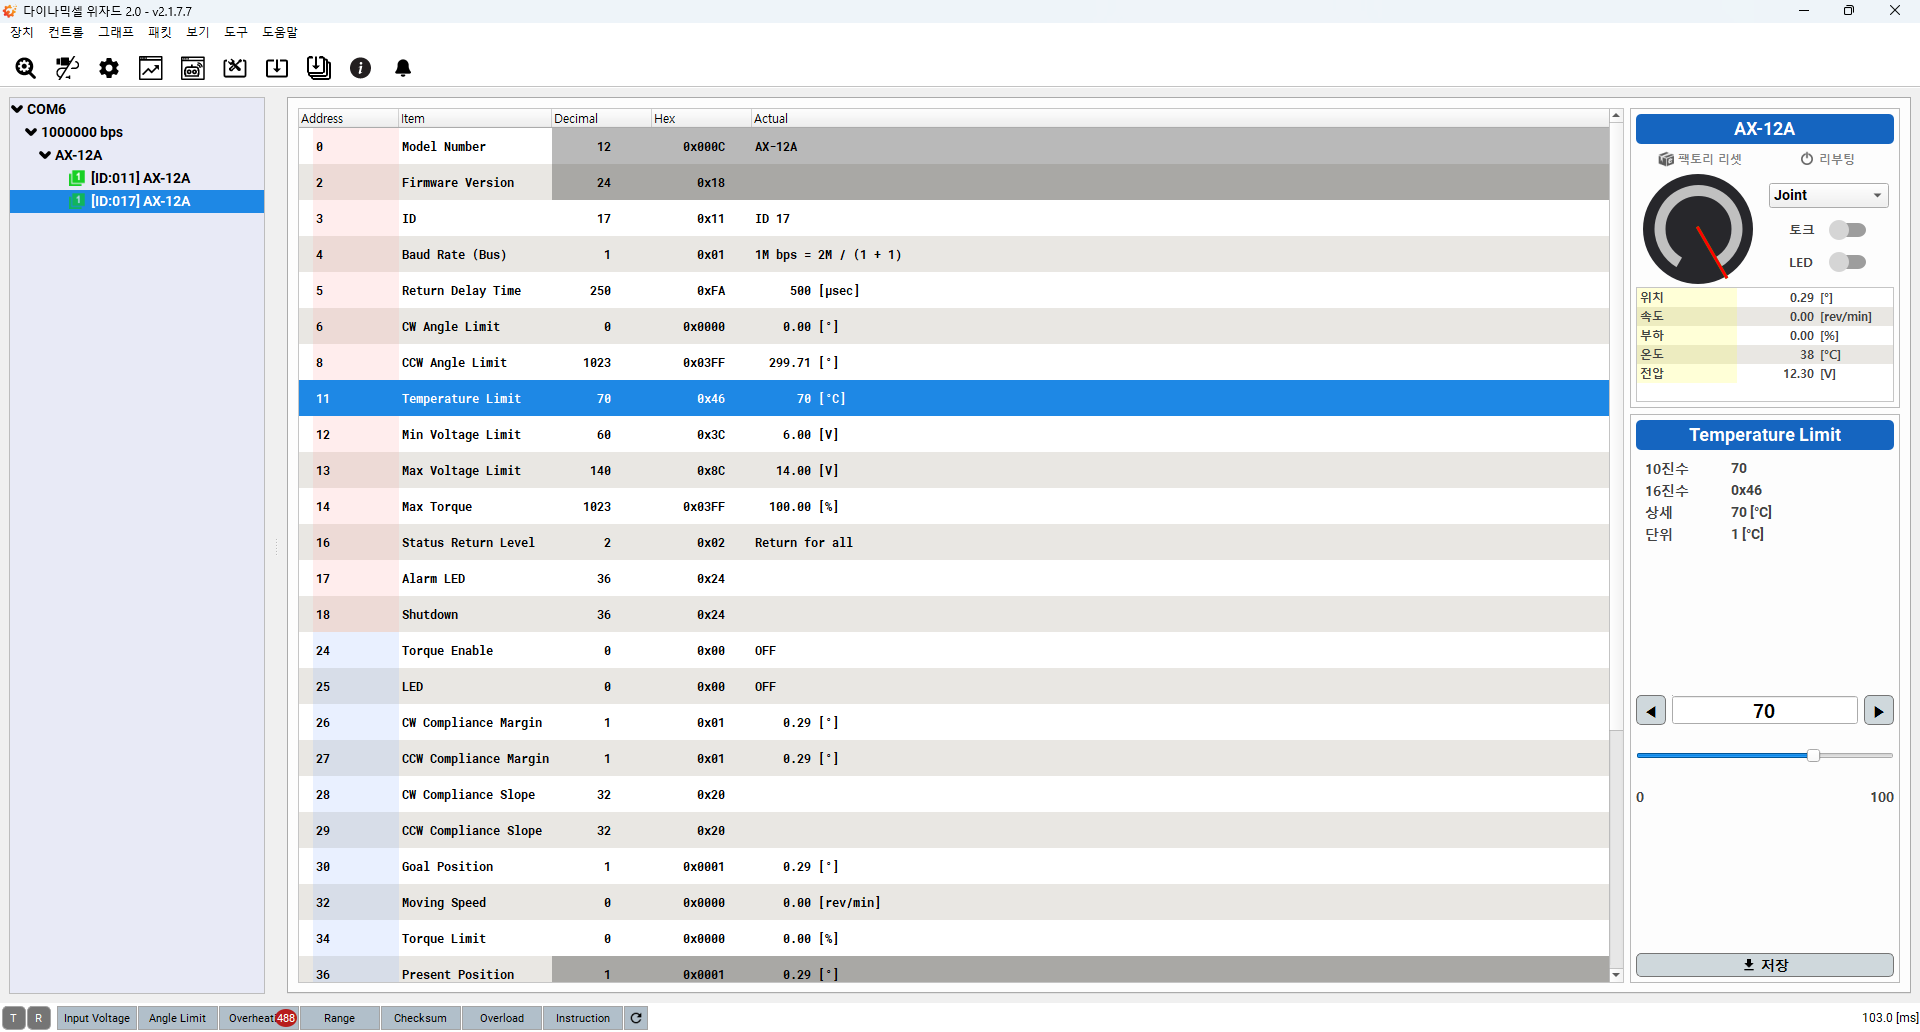
그 결과 ID 17번 Dynamixel에 대해서 Temperature Limit이 3.0으로 설정되어 있어서 AX-12A의 Control Table에 맞게 70.0으로 설정하였다.
- 설정 전
- 설정 후
구동 영상
ROS 2
Enviroment Settings
- Linux : Ubuntu 22.04.05 LTS
- ROS 2 : Humble Version
Dynamixel SDK
코드 수정 부분
Dynamixel SDK를 이용하여 두 개의 Dynamixel을 Setup하고 구동시키기 위해 이전 코드를 개선하였다.
- 추가 부분 : 17번 ID를 가지고 있는 Dynamixel에 대한
setupDynamixel을 진행하고 node가 종료된 후에 17번 Dynamixel에 대하여 Torque를 비활성화하게 하는 코드를 추가
int main(int argc, char * argv[])
{
  ...
  setupDynamixel(11); // Dynamixel AX-12A ID 11번 Settings
  setupDynamixel(17); // Dynamixel AX-12A ID 17번 Setttings

  rclcpp::init(argc, argv);

  auto readwritenode = std::make_shared<ReadWriteNode>();
  rclcpp::spin(readwritenode);
  rclcpp::shutdown();

  // Disable Torque of DYNAMIXEL AX-12A(ID : 11, 17)
  packetHandler->write1ByteTxRx(
    portHandler,
    11,
    ADDR_TORQUE_ENABLE,
    0,
    &dxl_error
  );

  packetHandler->write1ByteTxRx(
    portHandler,
    17,
    ADDR_TORQUE_ENABLE,
    0,
    &dxl_error
  );

  return 0;
}
구동 영상
코드를 수정 후 각각의 Dynamixel에 set_position Topic을 통해서 Motor Position Control를 진행했다.
Troubleshooting
get_position에러 :get_positionService를 이용하여 11, 17번 Motor의 위치를 확인해보았는데 현재 위치값이 정확하게 반환되지 않는다.
Arduino
Device
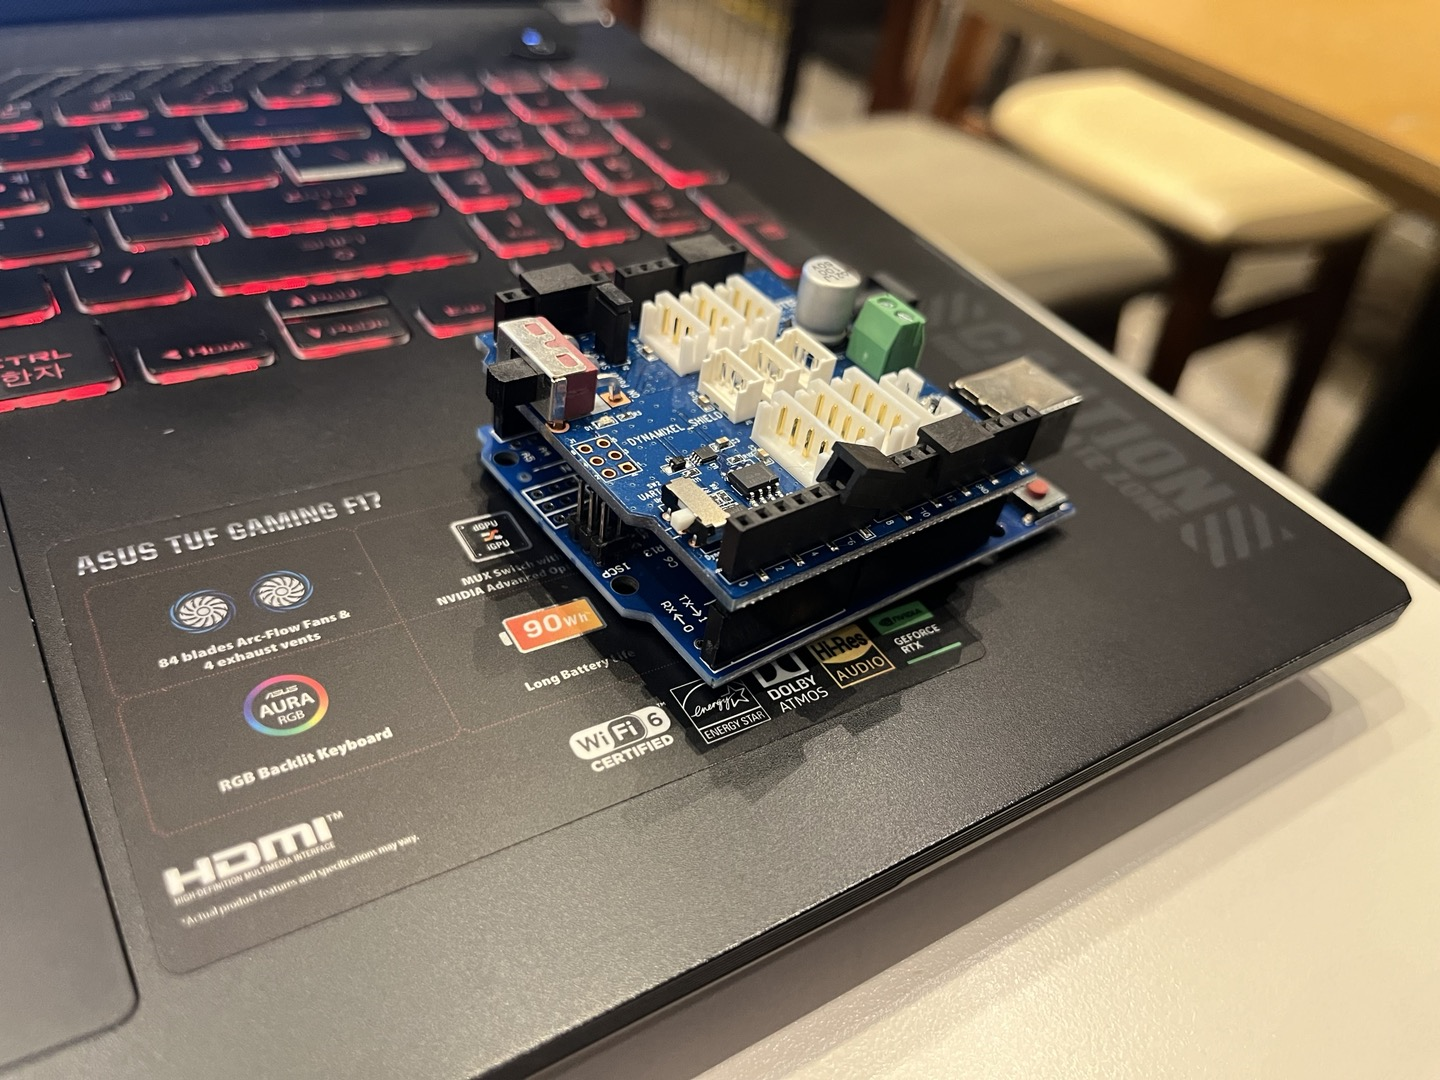
Dynamixel Shield
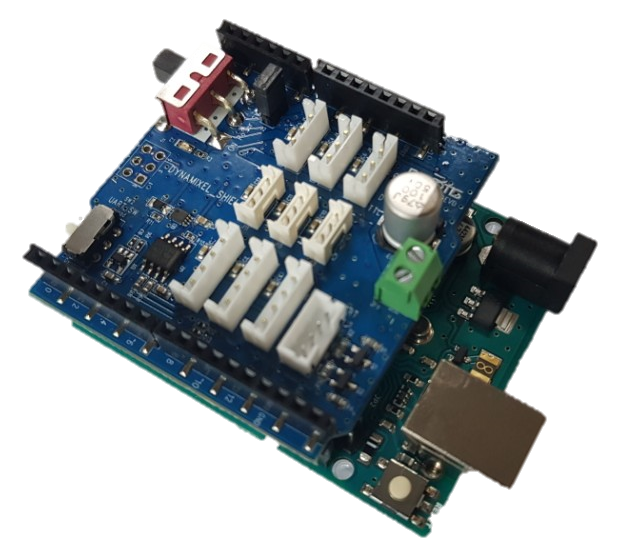 아두이노 보드에서 Dynamixel을 사용하기 위한 Shield 보드이며 Dynamixel Control을 위한 라이브러리 제공.
Arduino Uno
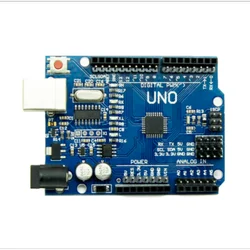 기본적으로 Dynamixel Shield가 Arduino Uno와 결합하여 사용하는 메뉴얼을 제공하고 있어 Arduino Uno와 연결하여 사용
- 실제 연결 사진
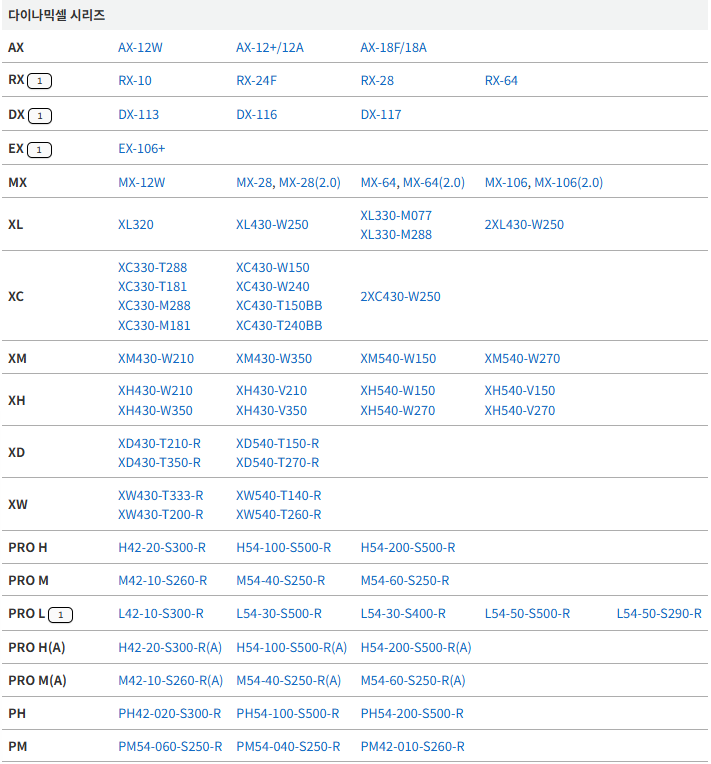
지원되는 Dynamixel
주의할 점
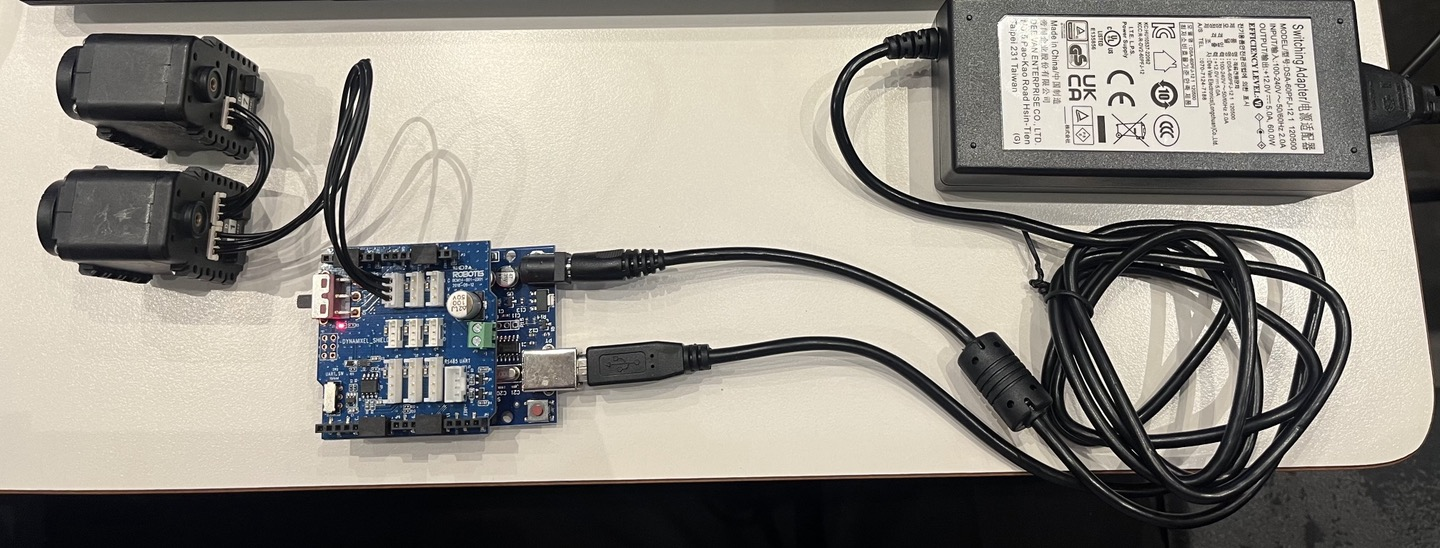
ROBOTIS Dynamixel Shield e-Manual의 전원 연결 방법에 나와있는 것처럼 아두이노 보드의 USB 전원으로는 Dynamixel 전원 연결이 되지 않기 때문에 반드시 외부 전원 연결 필요!!
VIN 전원 공유 방법을 통해 전원 공급!
- 최종 연결 사진
Install Arduino Shield Library
아두이노 IDE를 통해 Dynamixel Shield Library 설치. 저자는 라이브러리 매니저를 활용하여 설치하였다.
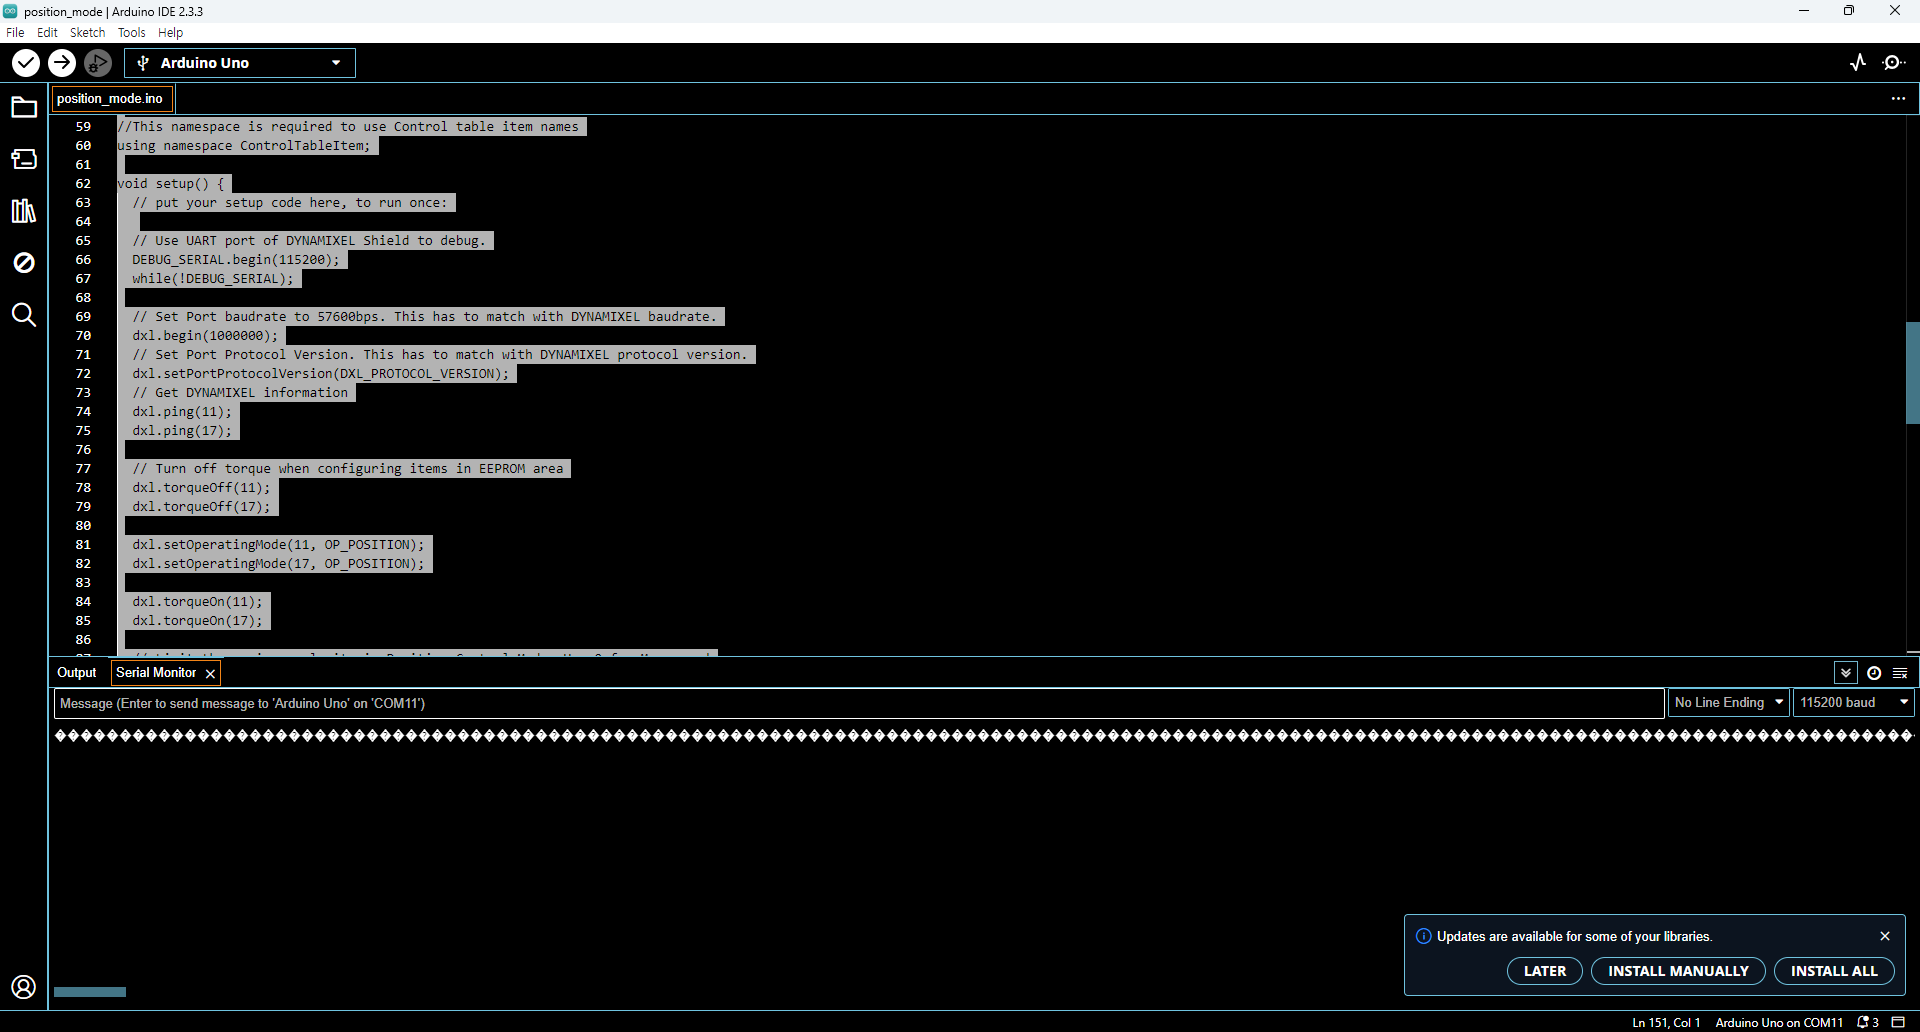
설치한 후 Example의 position_mode를 사용하여 위치 제어를 해보았다.
- 수정된 코드
/*******************************************************************************
* Copyright 2016 ROBOTIS CO., LTD.
*
* Licensed under the Apache License, Version 2.0 (the "License");
* you may not use this file except in compliance with the License.
* You may obtain a copy of the License at
*
*     http://www.apache.org/licenses/LICENSE-2.0
*
* Unless required by applicable law or agreed to in writing, software
* distributed under the License is distributed on an "AS IS" BASIS,
* WITHOUT WARRANTIES OR CONDITIONS OF ANY KIND, either express or implied.
* See the License for the specific language governing permissions and
* limitations under the License.
*******************************************************************************/

#include <Dynamixel2Arduino.h>

// Please modify it to suit your hardware.
#if defined(ARDUINO_AVR_UNO) || defined(ARDUINO_AVR_MEGA2560) // When using DynamixelShield
  #include <SoftwareSerial.h>
  SoftwareSerial soft_serial(7, 8); // DYNAMIXELShield UART RX/TX
  #define DXL_SERIAL   Serial
  #define DEBUG_SERIAL soft_serial
  const int DXL_DIR_PIN = 2; // DYNAMIXEL Shield DIR PIN
#elif defined(ARDUINO_SAM_DUE) // When using DynamixelShield
  #define DXL_SERIAL   Serial
  #define DEBUG_SERIAL SerialUSB
  const int DXL_DIR_PIN = 2; // DYNAMIXEL Shield DIR PIN
#elif defined(ARDUINO_SAM_ZERO) // When using DynamixelShield
  #define DXL_SERIAL   Serial1
  #define DEBUG_SERIAL SerialUSB
  const int DXL_DIR_PIN = 2; // DYNAMIXEL Shield DIR PIN
#elif defined(ARDUINO_OpenCM904) // When using official ROBOTIS board with DXL circuit.
  #define DXL_SERIAL   Serial3 //OpenCM9.04 EXP Board's DXL port Serial. (Serial1 for the DXL port on the OpenCM 9.04 board)
  #define DEBUG_SERIAL Serial
  const int DXL_DIR_PIN = 22; //OpenCM9.04 EXP Board's DIR PIN. (28 for the DXL port on the OpenCM 9.04 board)
#elif defined(ARDUINO_OpenCR) // When using official ROBOTIS board with DXL circuit.
  // For OpenCR, there is a DXL Power Enable pin, so you must initialize and control it.
  // Reference link : https://github.com/ROBOTIS-GIT/OpenCR/blob/master/arduino/opencr_arduino/opencr/libraries/DynamixelSDK/src/dynamixel_sdk/port_handler_arduino.cpp#L78
  #define DXL_SERIAL   Serial3
  #define DEBUG_SERIAL Serial
  const int DXL_DIR_PIN = 84; // OpenCR Board's DIR PIN.
#elif defined(ARDUINO_OpenRB)  // When using OpenRB-150
  //OpenRB does not require the DIR control pin.
  #define DXL_SERIAL Serial1
  #define DEBUG_SERIAL Serial
  const int DXL_DIR_PIN = -1;
#else // Other boards when using DynamixelShield
  #define DXL_SERIAL   Serial1
  #define DEBUG_SERIAL Serial
  const int DXL_DIR_PIN = 2; // DYNAMIXEL Shield DIR PIN
#endif


const uint8_t DXL_ID = 11;
const float DXL_PROTOCOL_VERSION = 1.0;

Dynamixel2Arduino dxl(DXL_SERIAL, DXL_DIR_PIN);

//This namespace is required to use Control table item names
using namespace ControlTableItem;

void setup() {
  // put your setup code here, to run once:

  // Use UART port of DYNAMIXEL Shield to debug.
  DEBUG_SERIAL.begin(115200);
  while(!DEBUG_SERIAL);

  // Set Port baudrate to 57600bps. This has to match with DYNAMIXEL baudrate.
  dxl.begin(1000000);
  // Set Port Protocol Version. This has to match with DYNAMIXEL protocol version.
  dxl.setPortProtocolVersion(DXL_PROTOCOL_VERSION);
  // Get DYNAMIXEL information
  dxl.ping(DXL_ID);

  // Turn off torque when configuring items in EEPROM area
  dxl.torqueOff(DXL_ID);
  dxl.setOperatingMode(DXL_ID, OP_POSITION);
  dxl.torqueOn(DXL_ID);

  // Limit the maximum velocity in Position Control Mode. Use 0 for Max speed
  dxl.writeControlTableItem(PROFILE_VELOCITY, DXL_ID, 30);
}

void loop() {
  // put your main code here, to run repeatedly:

  // Please refer to e-Manual(http://emanual.robotis.com/docs/en/parts/interface/dynamixel_shield/) for available range of value.
  // Set Goal Position in RAW value
  dxl.setGoalPosition(DXL_ID, 1000);

  int i_present_position = 0;
  float f_present_position = 0.0;

  while (abs(1000 - i_present_position) > 10)
  {
    i_present_position = dxl.getPresentPosition(DXL_ID);
    DEBUG_SERIAL.print("Present_Position(raw) : ");
    DEBUG_SERIAL.println(i_present_position);
  }
  delay(1000);

  // Set Goal Position in DEGREE value
  dxl.setGoalPosition(DXL_ID, 5.7, UNIT_DEGREE);

  while (abs(5.7 - f_present_position) > 2.0)
  {
    f_present_position = dxl.getPresentPosition(DXL_ID, UNIT_DEGREE);
    DEBUG_SERIAL.print("Present_Position(degree) : ");
    DEBUG_SERIAL.println(f_present_position);
  }
  delay(1000);
}
수정된 부분
DXL_ID: Dynamixel Wizard로 설정한 ID값에 맞게11로 설정DXL_PROTOCOL_VERSION: AX-12A의 경우1.0버전을 사용하므로1.0으로 설정dxl.begin(1000000);: Dynamixel의 BaudRate에 맞게1,000,000으로 설정
구동 영상
Dynamixel 2개 구동
위의 코드 내에 17번 Dynamixel에 대한 부분을 추가하여 2개를 동시에 제어하는 아두이노 코드를 사용하여 동시 제어해보았다.
- 수정된 코드
/*******************************************************************************
* Copyright 2016 ROBOTIS CO., LTD.
*
* Licensed under the Apache License, Version 2.0 (the "License");
* you may not use this file except in compliance with the License.
* You may obtain a copy of the License at
*
*     http://www.apache.org/licenses/LICENSE-2.0
*
* Unless required by applicable law or agreed to in writing, software
* distributed under the License is distributed on an "AS IS" BASIS,
* WITHOUT WARRANTIES OR CONDITIONS OF ANY KIND, either express or implied.
* See the License for the specific language governing permissions and
* limitations under the License.
*******************************************************************************/

#include <Dynamixel2Arduino.h>

// Please modify it to suit your hardware.
#if defined(ARDUINO_AVR_UNO) || defined(ARDUINO_AVR_MEGA2560) // When using DynamixelShield
  #include <SoftwareSerial.h>
  SoftwareSerial soft_serial(7, 8); // DYNAMIXELShield UART RX/TX
  #define DXL_SERIAL   Serial
  #define DEBUG_SERIAL soft_serial
  const int DXL_DIR_PIN = 2; // DYNAMIXEL Shield DIR PIN
#elif defined(ARDUINO_SAM_DUE) // When using DynamixelShield
  #define DXL_SERIAL   Serial
  #define DEBUG_SERIAL SerialUSB
  const int DXL_DIR_PIN = 2; // DYNAMIXEL Shield DIR PIN
#elif defined(ARDUINO_SAM_ZERO) // When using DynamixelShield
  #define DXL_SERIAL   Serial1
  #define DEBUG_SERIAL SerialUSB
  const int DXL_DIR_PIN = 2; // DYNAMIXEL Shield DIR PIN
#elif defined(ARDUINO_OpenCM904) // When using official ROBOTIS board with DXL circuit.
  #define DXL_SERIAL   Serial3 //OpenCM9.04 EXP Board's DXL port Serial. (Serial1 for the DXL port on the OpenCM 9.04 board)
  #define DEBUG_SERIAL Serial
  const int DXL_DIR_PIN = 22; //OpenCM9.04 EXP Board's DIR PIN. (28 for the DXL port on the OpenCM 9.04 board)
#elif defined(ARDUINO_OpenCR) // When using official ROBOTIS board with DXL circuit.
  // For OpenCR, there is a DXL Power Enable pin, so you must initialize and control it.
  // Reference link : https://github.com/ROBOTIS-GIT/OpenCR/blob/master/arduino/opencr_arduino/opencr/libraries/DynamixelSDK/src/dynamixel_sdk/port_handler_arduino.cpp#L78
  #define DXL_SERIAL   Serial3
  #define DEBUG_SERIAL Serial
  const int DXL_DIR_PIN = 84; // OpenCR Board's DIR PIN.
#elif defined(ARDUINO_OpenRB)  // When using OpenRB-150
  //OpenRB does not require the DIR control pin.
  #define DXL_SERIAL Serial1
  #define DEBUG_SERIAL Serial
  const int DXL_DIR_PIN = -1;
#else // Other boards when using DynamixelShield
  #define DXL_SERIAL   Serial1
  #define DEBUG_SERIAL Serial
  const int DXL_DIR_PIN = 2; // DYNAMIXEL Shield DIR PIN
#endif

const float DXL_PROTOCOL_VERSION = 1.0;

Dynamixel2Arduino dxl(DXL_SERIAL, DXL_DIR_PIN);

//This namespace is required to use Control table item names
using namespace ControlTableItem;

void setup() {
  // put your setup code here, to run once:

  // Use UART port of DYNAMIXEL Shield to debug.
  DEBUG_SERIAL.begin(115200);
  while(!DEBUG_SERIAL);

  // Set Port baudrate to 57600bps. This has to match with DYNAMIXEL baudrate.
  dxl.begin(1000000);
  // Set Port Protocol Version. This has to match with DYNAMIXEL protocol version.
  dxl.setPortProtocolVersion(DXL_PROTOCOL_VERSION);
  // Get DYNAMIXEL information
  dxl.ping(11);
  dxl.ping(17);

  // Turn off torque when configuring items in EEPROM area
  dxl.torqueOff(11);
  dxl.torqueOff(17);

  dxl.setOperatingMode(11, OP_POSITION);
  dxl.setOperatingMode(17, OP_POSITION);

  dxl.torqueOn(11);
  dxl.torqueOn(17);

  // Limit the maximum velocity in Position Control Mode. Use 0 for Max speed
  dxl.writeControlTableItem(PROFILE_VELOCITY, 11, 30);
  dxl.writeControlTableItem(PROFILE_VELOCITY, 17, 30);
}

void loop() {
  // put your main code here, to run repeatedly:

  // Please refer to e-Manual(http://emanual.robotis.com/docs/en/parts/interface/dynamixel_shield/) for available range of value.
  // Set Goal Position in RAW value
  dxl.setGoalPosition(11, 1000);
  dxl.setGoalPosition(17, 1000);

  int i_present_position_11 = 0;
  int i_present_position_17 = 0;
  float f_present_position_11 = 0.0;
  float f_present_position_17 = 0.0;

  while (abs(1000 - i_present_position_11) > 10)
  {
    i_present_position_11 = dxl.getPresentPosition(11);
    DEBUG_SERIAL.print("Present_Position(raw)");
    DEBUG_SERIAL.print(11);
    DEBUG_SERIAL.print("ID : ");
    DEBUG_SERIAL.println(i_present_position_11);
  }

  delay(1000);

  while (abs(1000 - i_present_position_17) > 10)
  {
    i_present_position_17 = dxl.getPresentPosition(17);
    DEBUG_SERIAL.print("Present_Position(raw)");
    DEBUG_SERIAL.print(17);
    DEBUG_SERIAL.print("ID : ");
    DEBUG_SERIAL.println(i_present_position_17);
  }

  delay(1000);

  // Set Goal Position in DEGREE value
  dxl.setGoalPosition(11, 5.7, UNIT_DEGREE);
  dxl.setGoalPosition(17, 5.7, UNIT_DEGREE);

  while (abs(5.7 - f_present_position_11) > 2.0)
  {
    f_present_position_11 = dxl.getPresentPosition(11, UNIT_DEGREE);
    DEBUG_SERIAL.print("Present_Position(degree) : ");
    DEBUG_SERIAL.print(11);
    DEBUG_SERIAL.print("ID : ");
    DEBUG_SERIAL.println(f_present_position_11);
  }
  delay(1000);

  while (abs(5.7 - f_present_position_17) > 2.0)
  {
    f_present_position_17 = dxl.getPresentPosition(17, UNIT_DEGREE);
    DEBUG_SERIAL.print("Present_Position(degree) : ");
    DEBUG_SERIAL.print(17);
    DEBUG_SERIAL.print("ID : ");
    DEBUG_SERIAL.println(f_present_position_17);
  }
  delay(1000);
}
구동 영상
Troubleshooting
- Arduino Dynamixel Shield를 이용했을 때,
DebugSerial이 쓰레기값을 출력 : Arduino와 컴퓨터 통신 간에 Serial 통신을 할 수 없다. 해당 문제를 해결할 필요가 있어보인다.
참고자료
ROBOTIS Dynamixel Shield e-Manual : https://emanual.robotis.com/docs/kr/parts/interface/dynamixel_shield/