
CPU로 추론하는 법은 이전 포스트 참조
라마3
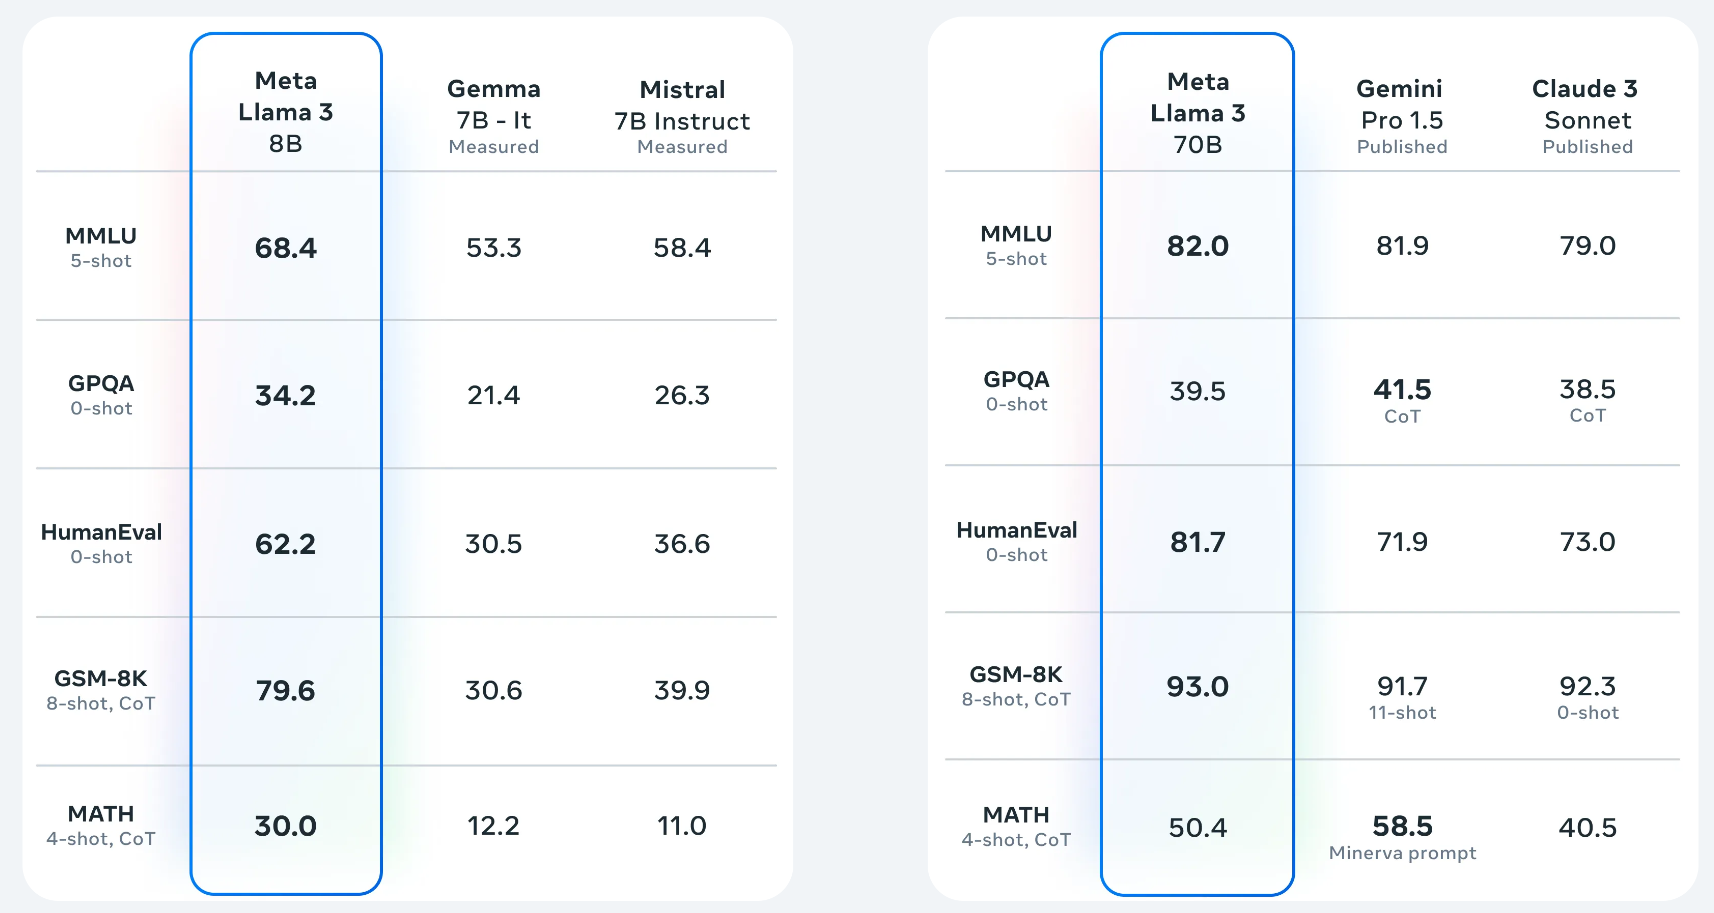
24년 4월에 Meta에서 공개한 LLM이다. 지난 모델과 비교해서 엄청난 성능 향상을 보여준다
그리고 여전히 상업적 사용을 허락하는 라이센스이다!
라마2와 비교
| Category | Benchmark | Llama 3 8B | Llama2 7B | Llama2 13B | Llama 3 70B | Llama2 70B |
|---|---|---|---|---|---|---|
| General | MMLU (5-shot) | 66.6 | 45.7 | 53.8 | 79.5 | 69.7 |
| AGIEval English (3-5 shot) | 45.9 | 28.8 | 38.7 | 63.0 | 54.8 | |
| CommonSenseQA (7-shot) | 72.6 | 57.6 | 67.6 | 83.8 | 78.7 | |
| Winogrande (5-shot) | 76.1 | 73.3 | 75.4 | 83.1 | 81.8 | |
| BIG-Bench Hard (3-shot, CoT) | 61.1 | 38.1 | 47.0 | 81.3 | 65.7 | |
| ARC-Challenge (25-shot) | 78.6 | 53.7 | 67.6 | 93.0 | 85.3 | |
| Knowledge reasoning | TriviaQA-Wiki (5-shot) | 78.5 | 72.1 | 79.6 | 89.7 | 87.5 |
| Reading comprehension | SQuAD (1-shot) | 76.4 | 72.2 | 72.1 | 85.6 | 82.6 |
| QuAC (1-shot, F1) | 44.4 | 39.6 | 44.9 | 51.1 | 49.4 | |
| BoolQ (0-shot) | 75.7 | 65.5 | 66.9 | 79.0 | 73.1 | |
| DROP (3-shot, F1) | 58.4 | 37.9 | 49.8 | 79.7 | 70.2 |
라마2 등 다른 모델들과 마찬가지로 https://chat.lmsys.org/ 에서 써볼 수 있다
LLaMA.C++로 라마3 실행하기 (Intel Arc GPU)
CPU로 추론하는 법은 이전 포스트 참조
사전환경
- OS : Windows 11
- Arc GPU driver version : 31.0.101.5599
- python (conda) : 3.11
1. Intel Arc GPU Driver 설치
여기에서 Intel GPU Driver를 설치한다.
본 게시글은 버전 31.0.101.5599을 사용했다
아마 Intel Arc Control도 같이 설치될텐데 모니터링에 유용하다
2. Miniconda3 설치
많은 호환성 문제가 예상되기에, 가상환경 사용을 추천한다. 이미 Anaconda 등 가상환경이 있다면 스킵
2-(1) conda 설치
여기에서 Windows용을 설치한다
2-(2) conda 초기화
재부팅하거나 cmd창에서 아래와 같이 초기화를 진행한다
cd %USERPROFILE%\miniconda3\condabin
conda init
새로 cmd창을 열어서 conda 명령어를 사용했을 때, Command 설명이 떠야한다
conda
usage: conda-script.py [-h] [-v] [--no-plugins] [-V] COMMAND ...

conda is a tool for managing and deploying applications, environments and packages.
...
3. llama.cpp 환경 구성 (with IPEX-LLM)
IPEX-LLM은 Intel CPU/GPU에서 LLM을 구동할 수 있도록 도와주는 PyTorch 라이브러리이다
Miconda3를 이용하면 간단하게 가상환경에서 사용해 볼 수 있다
3-(1) 가상환경 생성 및 설치하기
cmd창에 아래 커맨드를 가능하면 한 줄씩 입력한다
conda create -n llm-cpp python=3.11
conda activate llm-cpp
pip install --pre --upgrade ipex-llm[cpp]
3-(2) GPU 가속 환경변수 설정
set SYCL_CACHE_PERSISTENT=13-(3) llama.cpp 초기화
cmd창을 관리자 권한으로 열고, 원하는 폴더에서 아래 커맨드를 입력한다. 여기에서는 다운로드 폴더에 받았다.
cd %USERPROFILE%\Downloads
mkdir llama-cpp
cd llama-cpp
init-llama-cpp
4. 모델 다운로드
llama.cpp는 gguf 확장자를 지원하기에 변환이 필요한데
편의를 위해 이미 변환 & 양자화된 모델을 다운로드할 수 있다
Llama-3-8B 다운로드
- 기본 모델
Llama-3-8B-Instruct 다운로드
- 채팅 형식의 입출력에 최적화된 모델
적당한 모델을 아까 llama-cpp폴더에 다운로드하자
이 글에서는 Meta-Llama-3-8B-Instruct.Q8_0.gguf을 사용했다.
5. 추론하기
예제 입력
.\main -m Meta-Llama-3-8B-Instruct.Q8_0.gguf -n 256 -ngl 33 -p "<|begin_of_text|><|start_header_id|>system<|end_header_id|>You are an expert in AI code assistance<|eot_id|><|start_header_id|>user<|end_header_id|>Write a simple example Python code.<|eot_id|><|start_header_id|>assistant<|end_header_id|>""예제 출력
Here is a simple Python code that calculates the area and perimeter of a rectangle:

\`\`\`
# Define the length and width of the rectangle
length = 5
width = 3

# Calculate the area
area = length * width

# Calculate the perimeter
perimeter = 2 * (length + width)

# Print the results
print("The area of the rectangle is:", area)
print("The perimeter of the rectangle is:", perimeter)
\`\`\`

In this code, we first define the length and width of the rectangle. Then, we calculate the area by multiplying the length and width, and the perimeter by multiplying the sum of the length and width by 2. Finally, we print the results. [end of text]
파라미터
-n: 추론할 토큰 수-ngl: 로드할 gpu 레이어 수 (최대한 크게써도 무방)-p: 프롬프트
자세한 설명은 여기 참조
라마3 프롬프팅 가이드
원하는 답변을 얻기 위해서는 어느정도 프롬프팅이 필요한데
Llama-3 모델에서는 미리 정해진 토큰으로 더 명확하게 프롬프팅을 할 수 있다
예를 들어 예제는 아래와 같이 start_header_id, end_header_id, eot_id로 구분해주고 있다
<|begin_of_text|>
<|start_header_id|>system<|end_header_id|>
You are an expert in AI code assistance<|eot_id|>

<|start_header_id|>user<|end_header_id|>
Write a simple example Python code.<|eot_id|>
<|start_header_id|>assistant<|end_header_id|>
이를 이용해 few-shot 프롬프팅이 가능하다. 더 자세한 설명은 여기 참조
LLM 빌드환경 고찰
※ 하드웨어별 테스트 결과 비교
모델 : Llama-3 8B (Q5_K_M)
| 구분 | CPU(10900KF) | MAC M1 Pro | GPU (RTX3080) | GPU (A770) |
|---|---|---|---|---|
| 초당 토큰 수(t/s) | 7 | 18 | 87 | 26 |
x86 (Windows/Linux)
- NVIDIA GPU를 사자 (LLM 서빙에는 RTX3090 24GB가 신이라고한다)
- 호환성 문제로 고통받는걸 즐기는게 아니라면 AMD/Intel GPU는 제발 거르자
- CPU Inference는 너무 느리다
Mac OS
- 맥이 의외로 빠른 이유는 GPU로 작동하기 때문으로 보인다
- 요즘 맥은 통합메모리를 사용하는데, 예를 들면 192GB 메모리 맥을 사면 대부분을 GPU 메모리로 활용할 수 있다. 이는 x86 시스템에서는 도달하기 힘든 용량이다
- LLM은 높은 VRAM이 요구되기 때문에 의외로 큰 장점이다. (70B 모델의 용량은 무려 140GB가 넘는다)
- 과거보다 지원이 확대되어서 그런지 개인적으로는 딥러닝/LLM 빌드에 큰 불편함을 못느꼈다
- 속도를 포기하고 VRAM 용량 확보 + 개발 편의를 원한다면 맥도 고려할만한 선택지인 것 같다
클라우드
- 런팟같은 클라우드 서비스를 고려해보자 (
하지만 낭만이 없죠?)
여담 : Intel Arc GPU는 Windows용?
처음엔 편의를 위해 Ubuntu로 진행했다. 하지만
쓰레기같은Intel GPU로 LLM을 빌드하기 위해 수십가지의 호환성 오류를 만났다.
드라이버 업데이트 날짜가 작년인 것을 보고 눈치챘어야 했는데..그래도 커뮤니티에서 Ubuntu로 성공했다는 글을 보고 커널 버전을 맞추니 작동했다!
아마6.5.0.35또는 이전 버전을 사용해야하는 듯 하다.그런데 Windows 환경에서 빌드해보니 한번에 성공했다. IPEX-LLM은 경험상 Windows에 더 최적화되어 있는 듯 하다. 그래도 열심히 올라오는 커밋들을 보면 언젠간 쓸만해질 것 같다. 물론 새로운 아키텍처가 나오면 NVIDIA GPU 없이는 힘들 것 같다..