Medium Daily Digest 를 구독중인데
Cypress 글을 많이 봤더니
추천글에 Cypress 관련 글이 많았다.
그중에 Publish your Cypress Test Report with GitHub Actions가 있어
글을 읽으면서 따라해보기로 했다.
단계별로 자세하게 나와있어서 금방 따라할 수 있었다.
Github Actions를 처음 사용해봐서 관련 내용은 좀더 추가하여 정리해본다.
Github Actions로 cypress report 발행하기
1. 프로젝트 생성 & Cypress 설치
cypress-report-test 라는 폴더를 만들고
cypress를 설치 후 open으로 실행한다.
$ mkdir cypress-report-test
$ cd cypress-report-test

$ npm init

$ npm i -D cypress
$ npx cypress open
2. Cypress 테스트 작성
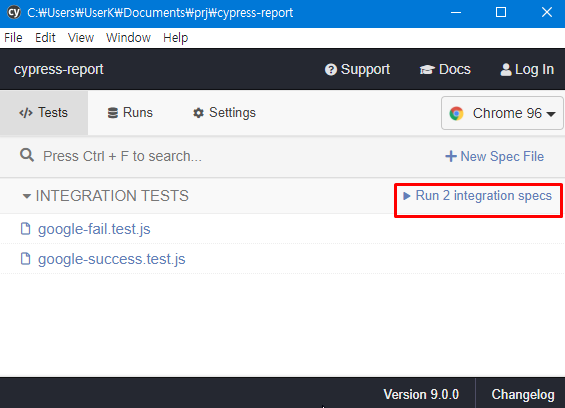
처음에 cypress를 실행하면 기본파일들과 설정파일 등이 생성되는데
cypress/integration의 예시 파일들은 사용하지 않으므로 삭제한다.
integration 하위에 테스트 파일을 생성하고 코드를 작성한다.
간단한 구글 검색 테스트 코드이고
각각 성공/실패하는 경우이다.
작성후에는 run 버튼을 클릭하여 실행해본다.
// google-success.test.js

describe('Google success search', () => {

    it('Successfully loads Google.com', () => {
        cy.visit('https://www.google.com')
    })

    it('Search for a video', () => {
        cy.get('[name="q"]')
        .type('never gonna give you up youtube')
        .should('have.value', 'never gonna give you up youtube')
        .type('{enter}')
    })
  })
// google-fail.test.js
describe('Google fail search', () => {
it('Successfully loads Google.com', () => {
cy.visit('https://www.google.com')
})
it('Search for something strange', () => {
cy.get('[name="q"]')
.type('anqqaxc a57k2..')
.should('have.value', 'anqqaxc a57k2..')
.type('{enter}')
})
it('Expect more than 1000 results', () => {
cy.get('[id="result-stats"]').contains('100 results')
})
})3. Github workflow 작성
Github Actions를 사용해 Github Pages에 HTML 리포트를 생성하도록 자동화해보자.
프로젝트를 Github Repository에 연결하고
루트 폴더에서 .github/workflows 폴더를 생성 후,
cypress-report.yaml 파일을 만든다.
코드내용은 아래에서 하나씩 살펴본다.
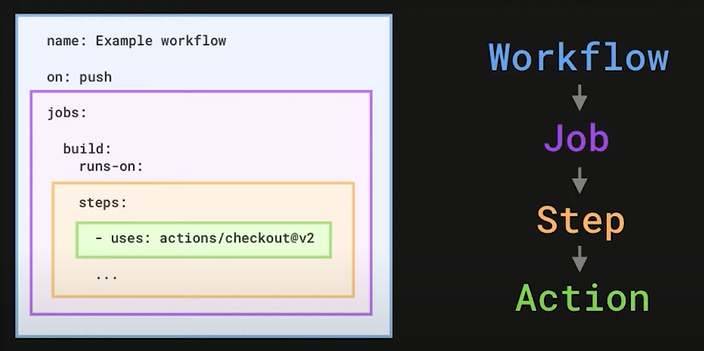
Github Actions 란?
- Github의 CI/CD 도구로, Travis CI, Jenkins 와 같은 역할을 한다.
- 레포지토리에서 소프트웨어 개발 워크플로우 실행을 자동화해준다.
- Workflow는 YAML 문법으로 작성한다.
👉자세한 설정이 궁금하면 workflow syntax for GitHub Actions 참고하기
GitHub Actions 소개 영상 참고
name: Create Cypress report
on:
  push:
    branches:
      - 'master'

jobs:

  cypress-e2e-chrome88:
    name: Run on Chrome 88
    runs-on: ubuntu-18.04
    container: cypress/browsers:node14.17.0-chrome88-ff89
    steps:
      - uses: actions/checkout@v2

      - name: Install a project with a clean slate
        run: |
          npm ci
          $(npm bin)/cypress cache path
          $(npm bin)/cypress cache list
          $(npm bin)/cypress verify

      - name: Run Cypress tests
        run: npm run test:chrome
        continue-on-error: true

      - name: Copy test execution videos
        run: |
          mkdir public
          cp -r cypress/videos public/videos

      - name: Merge test results into one
        run: npm run report:merge

      - name: Generate HTML report
        run: npm run report:generate

      - name: Deploy report page
        uses: peaceiris/actions-gh-pages@v3
        with:
          github_token: ${{ secrets.GITHUB_TOKEN }}
          publish_dir: ./public
          user_name: 'github-actions[bot]'
          user_email: 'github-actions[bot]@users.noreply.github.com'
🎈 name, on
GitHub Actions workflow의 이름과
어떤 조건(이벤트 트리거)에서 실행할 것인지 작성한다.
on.push.<branches>구조를 통해
master 브랜치에 새로운 커밋이 푸시될때 실행되도록 했다.
name: Create Cypress report
on:
  push:
    branches:
- 'master'- 스케쥴링 cron 설정, cron 생성
매일 한번씩 테스트를 추가로 진행하고 싶을 경우
스케쥴 설정을 추가할 수 있다.
cron: '0 8 1-31 * *'을 설정하면 매일 8 am UTC 에 실행된다.(시간은 UTC 기준)
name: Create Cypress report
on:
push:
branches:
- 'master'
schedule:
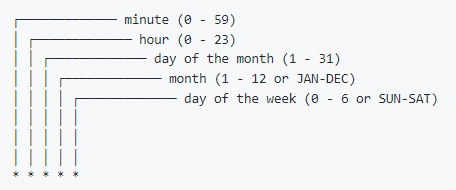
- cron: '0 8 1-31 * *'cron
cron은 유닉스 계열 컴퓨터 운영체제의 시간기반 job 스케줄러이다.
job을 고정된 시간, 날짜, 간격에 주기적으로 실행할 수 있도록 스케쥴링 할 때 cron을 사용한다.
cron syntax는 공백으로 분리한 5개의 field를 사용한다.
🎈 job
cypress-e2e-chrome88 job 한개만 정의했다.
host runner는 ubuntu-18.04를 사용하고
Docker container는 cypress/browsers 에서 실행한다.
다른 브라우저 환경에서 실행하고 싶다면 container 변경할 수 있고
Cypress’s Docker Hub account에서 확인할 수 있다.
jobs:

  cypress-e2e-chrome88:
    name: Run on Chrome 88
    runs-on: ubuntu-18.04
    container: cypress/browsers:node14.17.0-chrome88-ff89
job
workflow는 리눅스 가상머신이나 docker 컨테이너 위에서 실행할 수 있다.
job을 통해 workflow를 실행할 가상환경을 설정한다.
runs-on필드에 따라 가상 호스트가 생성된다.
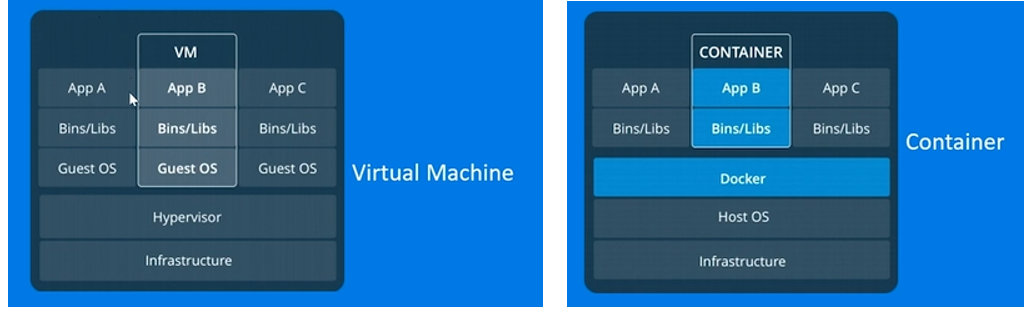
container
VM보다 가벼운 형식으로 애플리케이션을 pack, ship, run
컨테이너는 (OS격리 아닌)프로세스 격리를 기반으로 하는 애플리케이션 전달 메커니즘
container, docker 소개 영상 참고
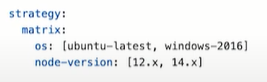
매트릭스 빌드
strategy:키워드를 사용하여 여러 운영 체제, 플랫폼 및 언어 버전을 동시에 테스트하기 위한 빌드 매트릭스를 구성 할 수 있다.runs-on: ${{matrix.os}} strategy: matrix: os: [ubuntu-16.04, ubuntu-18.04] node: [8,10,12]
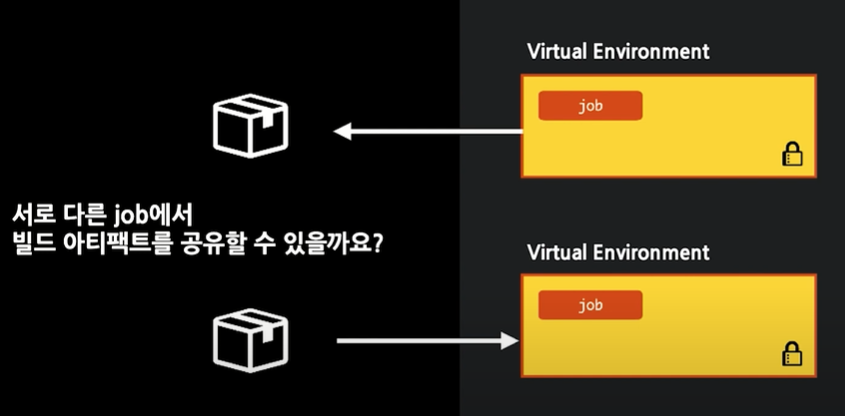
job 여러개 실행 시
job은 서로다른 가상환경에서 병렬적으로 실행된다.
빌드 아티팩트를 공유하려면 Built-in 아티팩트 스토리지로 접근할 수 있다.
사용할 아티팩트를 업로드하고, 필요한 곳에서 다운로드,needs키로 선행되어야 하는 종속성 추가
영상 참고
🎈 steps
master브랜치 코드를 체크아웃하여 실행준비를 한다.
즉, 우리의 코드를 가상머신에 복사하는 것으로 자세한 내용은 checkout 참고
- uses: actions/checkout@v2- 테스트 실행에 필요한 파일을 설치한다.
- name: Install a project with a clean slate
    run: |
      npm ci
      $(npm bin)/cypress cache path
      $(npm bin)/cypress cache list
      $(npm bin)/cypress verify
npm ci
npm ci 는 ci환경세팅을 위해 만들어졌고 package.lock.json을 사용해서 라이브러리를 설치한다.
npm install의 경우, package.json을 사용하는데^1.1.0처럼 버전의 범위를 표기하기 때문에
협업시에 버전오류가 생길 수 있다. 반면, package.lock.json 은 정확한 버전이 명시되어 있다.
npm ci는 기존 node_modules를 삭제하고 다시 실행하기 때문에,
node_modules가 없었을 경우,npm i보다 2-3배 빠르지만, 아니라면 더 느리다.
참고 블로그
Cypress CLI
cypress cache path: Cypress를 설치한 경로 확인
cypress cache list: Cypress를 설치 목록 확인
cypress verify: Cypress 설치되었고, 실행가능한지 확인
- 웹브라우저에서 테스트를 할 수 있다.
continue-on-errorflag는 true로 설정해야
테스트가 실패해도 다른 workflow steps를 실행한다.
(실패시에도 레포트 생성)
- name: Run Cypress tests
  run: npm run test:chrome
  continue-on-error: true
이 때 npm run test:chrome을 실행하기 위해서는
package.json파일에 스크립트를 추가해줘야 한다.
"scripts": {
  "test:chrome": "cypress run --browser chrome"
}
또 mochawesome 리포트를 생성하기 위해
몇가지 추가 작업이 필요하다.
-
mochawesome 설치
$ npm install --save-dev mocha cypress-multi-reporters mochawesome -
cypress.json설정 추가
{
    "reporter": "cypress-multi-reporters",
    "reporterOptions": {
        "configFile": "reporter-config.json"
    }
}reporter-config.json파일 생성- cypress.json과 같은 위치
- html 옵션이 false 인 이유는,
mochawesome-merge라이브러리로 JSON 리포트들을 하나의 파일로 합쳐줄 것이기 때문
{
    "reporterEnabled": "mochawesome",
    "mochawesomeReporterOptions": {
        "reportDir": "cypress/results/json",
        "overwrite": false,
        "html": false,
        "json": true
    }
}./cypress/support/index.js파일에 비디오 파일 설정 추가- 각 테스트 결과마다 비디오 파일을 추가한다.
- 비디오는 Cypress에서 생성해줌
import './commands'
import addContext from 'mochawesome/addContext'

Cypress.on("test:after:run", (test, runnable) => {

    let videoName = Cypress.spec.name
    videoName = videoName.replace('/.js.*', '.js')
    const videoUrl = 'videos/' + videoName + '.mp4'

    addContext({ test }, videoUrl)
});- public 폴더를 생성한다. 리포트에 필요한 모든 assets를 저장.
테스트 결과 비디오를 public 폴더에 복사
- name: Copy test execution videos
  run: |
    mkdir public
cp -r cypress/videos public/videos- 테스트 리포트 merge
cypress run --browser chrome을 통해 테스트를 실행하면 다수의 JSON 리포트가 생성된다. 이를 하나롤 합쳐준다.
- name: Merge test results into one
  run: npm run report:merge
이 때 npm run report:merge를 실행하려면
또 추가 작업이 필요하다.
mochawesome-merge설치
$ npm install --save-dev mochawesome-mergepackage.json에 스크립트 추가
"scripts": {
  ... ,
  "report:merge": "mochawesome-merge cypress/results/json/*.json > index.json"
}- 이제 하나로 합쳐진 index.json 리포트 파일을 통해 HTML 리포트 생성한다.
- name: Generate HTML report
  run: npm run report:generate
여기서도 추가작업이 필요하다.
mochawesome-report-generator설치
$ npm install --save-dev mochawesome-report-generatorpackage.json스크립트 추가
"scripts": {
  ... ,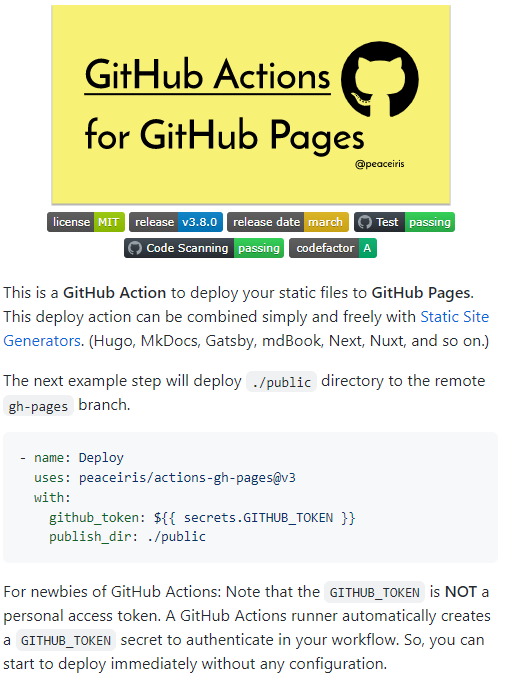
"report:generate": "marge index.json --reportDir public --assetsDir public/assets --reportPageTitle index.html"}- 마지막으로 정적페이지 생성하기
마켓플레이스에서 GitHub Pages action을 사용한다.
- name: Deploy report page
  uses: peaceiris/actions-gh-pages@v3
  with:
    github_token: ${{ secrets.GITHUB_TOKEN }}
    publish_dir: ./public
    user_name: 'github-actions[bot]'
    user_email: 'github-actions[bot]@users.noreply.github.com'
./public 폴더내용을 gh-pages 브랜치에 배포해준다.
github_token은 personal access token이 이 아니고 GitHub Actions runner가 자동으로 생성해준다.(처음에 이걸 모르고 토큰을 설정해줬었다)
설정없이 즉시 배포를 할 수 있다!
추가로, 페이지 배포시 새로운 커밋이 발생할 때
내 이름이 default로 되기 때문에
user_name, user_email 을
github-actions[bot]으로 변경했다.
4. gh-pages 생성
github repo에서 settings ➡ pages 를 들어간 후,
gh-pages 브랜치를 소스로 설정해준다.

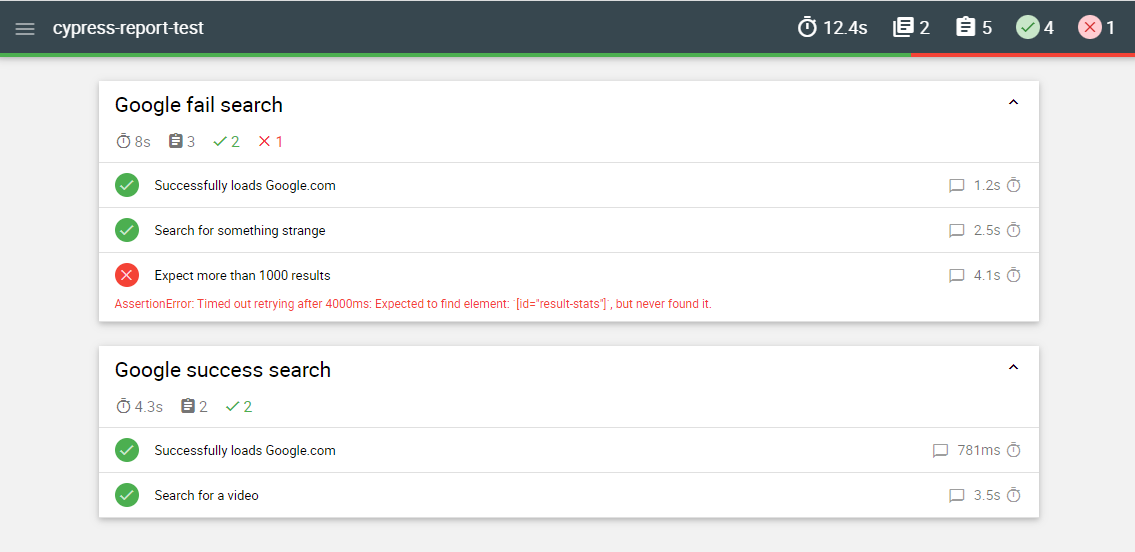
5. 실행 확인
코드를 커밋하고 푸시하면 작성한 github-action이 실행될 것이다!
생성된 리포트 페이지는 위에서 배포한 주소에서 확인 가능하다.
http://{GITHUB_ACCOUNT_NAME}.github.io/{PROJECT_NAME}
다음 글에서는 테스트가 실패했을 때
slack 알림 보내는 방법을 정리해보겠다.
추가로 읽어보기