
노트정리 스터디를 이끌어주시는 신석님께서 notbookLM을 사용하시는 것을 보여줬는데 사용해보면 좋을듯하다
https://notebooklm.google.com/
이쪽은 신석님(신식이심^^)께서 만들어내신 output
https://elixirrkc-my.sharepoint.com/:b:/g/personal/3dt001_dataschool_msai_kr/IQA-QSLHMHY5Rac3Sb_Gqd0eAfW8i2oemvYq1FnweGnT1do?e=9oZ2Id
주신 팁
- 개인 블로그는 넣지 않는다
- 우아한테크코스, REDHAT, AWS, MS 등 신뢰도 높은 곳의 자료만 넣는다
⚙️CD/CI
Computer Engineering 목적 / DevOps, 자동화, 배포
데이터 잘 저장, Flow 잘 잡기에 초점
Basic
CI/CD의 정의와 역사
✅문제
Legacy
- FTP Upload
- 잘못된 Script 수행
- 금요일 배포 금지
- 돈 많은 회사는 오버페이 하고 휴일에 노동시키기도..
Integration Hell
- Merge Conflict 해결 문제
- 옆사람보다 먼저 merge 강박
- merge conflict 해결은 나중에 merge한 사람이 해결하는 것이 관례(당연)
- 테스트 다 했는데?
- 보통 개발자는 본인이 작업한 코드만 테스트
- 머지 후 테스트에서 버그 발생
Keyword
- 노가다 작업
- 환경 설정 불일치
- ex)모듈 버전 불일치
- 긴박한 Rollback
✅해결법: 빌드와 배포의 재정의
✨Trend: CD는 이제 단순 "배포"를 넘어 "릴리즈 엔지니어링"으로 진화중
CI(Continuous Integration)
- 배포 및 테스트 완전 자동화
CD(Continuous Delivery)
- 프로덕션 준비 상태 상시 유지
- 커밋하면 다 모아서 사람이 버튼 눌러서 배포
CD(Continuous Deployment)
- 완전자동화(No Human Intervention)
- 커밋하면 바로 배포
✅Deliver vs Deployment
Continuous Delivery(지속적 제공)
- 코드를 언제든 배포할 수 있는 상태
- 최종 배포는 사람이 승인
Auto Build → Auto Test → Human Approve → DeployContinuous Deployment(지속적 배포)
- 테스트를 통과하면 사람의 개입 없이 자동으로 프로덕션까지 배포
Auto Build → Auto Test → Auto Deploy✅개발 프로세스의 진화
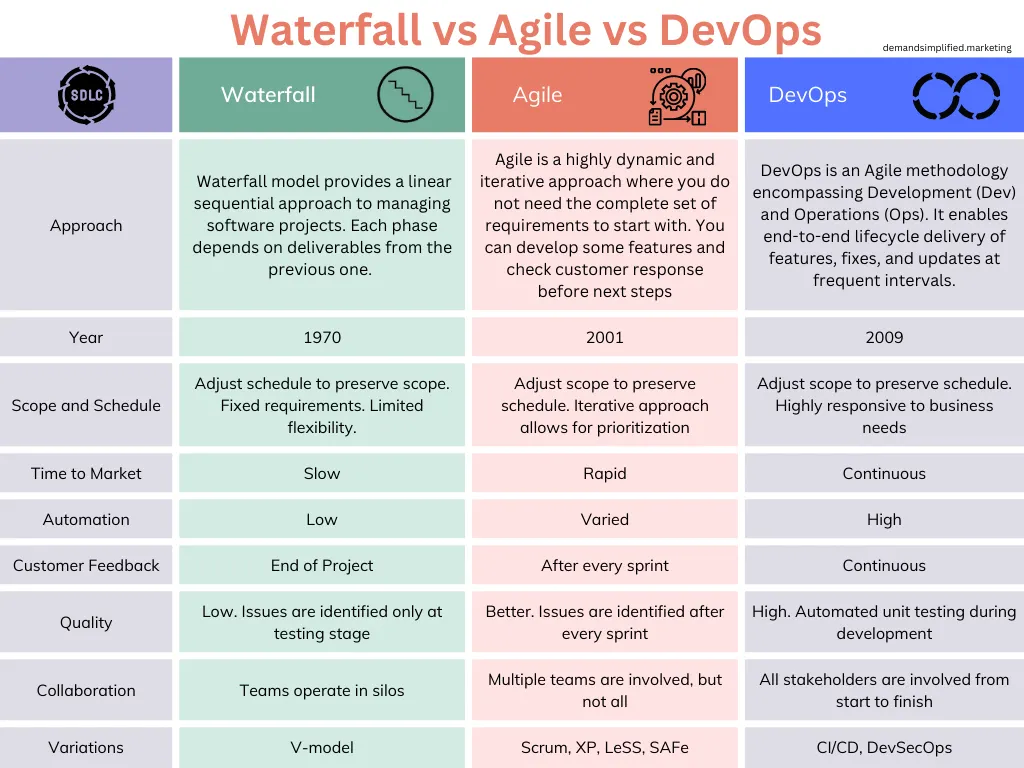 https://abhaykarthik.medium.com/waterfall-vs-agile-vs-devops-sdlc-models-8cc11b1a6edc
Waterfall
- 몇 달에 한 번, 거대한 배포
- 실패 시 위험도↑
- QA Test → 배포 → End to End Release
- 그 사이에 뭐가 바뀌면 반영이 힘듦
Agile
- 개발 주기 빨라짐
- 운영팀과의 벽
- 요구사항이 바뀌면 바로 피드백이 들어갔으면 함에서 생김
- 작게 시작
- Sprint(2~3주 단위의 개발)
- 2주 단위로 안 잘리는 큰 기능은 분할해서라도 짧게 만든다
| 구분 | Scrum | Kanban | XP |
|---|---|---|---|
| 성격 | 애자일 프레임워크 | 작업 흐름 관리 방식 | 애자일 개발 방법론 |
| 핵심 초점 | 스프린트 기반 일정 관리 | 작업 흐름(Flow) 최적화 | 코드 품질 및 개발 실천 |
| 반복 주기 | 고정된 스프린트 (1~4주) | 없음 (연속적 흐름) | 매우 짧은 반복 |
| 역할 | Product Owner, Scrum Master, 개발팀 | 명확한 역할 없음 | 명확한 역할 없음 |
| 계획 방식 | 스프린트 계획 회의 | 필요 시 수시 계획 | 짧은 주기의 계획 |
| 변경 대응 | 스프린트 종료 후 반영 | 즉시 반영 가능 | 즉시 반영 가능 |
| 주요 기법 | 데일리 스크럼, 회고 | WIP 제한, 칸반 보드 | TDD, 페어 프로그래밍 |
| 장점 | 목표·일정 명확, 협업 강화 | 유연성 높음, 도입 쉬움 | 품질 향상, 버그 감소 |
| 단점 | 규칙이 엄격, 초기 적응 필요 | 일정 예측 어려움 | 숙련도·비용 부담 |
| 적합한 경우 | 기능 단위 개발, 팀 협업 중요 | 운영·유지보수, 잦은 변경 | 품질이 중요한 개발 |
DevOps
- 개발과 운영의 통합
- 자동화를 통해 하루에 수십번 배포 가능
✅Continuous Integration(CI)
1. Code Commit
- 개발자가 코드를 중앙 저장소에 푸시
2. Build
- 자동으로 코드를 컴파일하고 빌드
3. Test
- 유닛 테스트 수행
- 무결성 검증
- 모든 func을 테스트하진 않는다(source code coverage)
- 테스트코드가 많다고 좋은건 아니다(수행시간 문제)
- 테스트코드는 sequntial이 아닌 parallel 하게 돌아가야 함
DevOps 문화와 DORA 지표
✅DevOps Infinity Loop
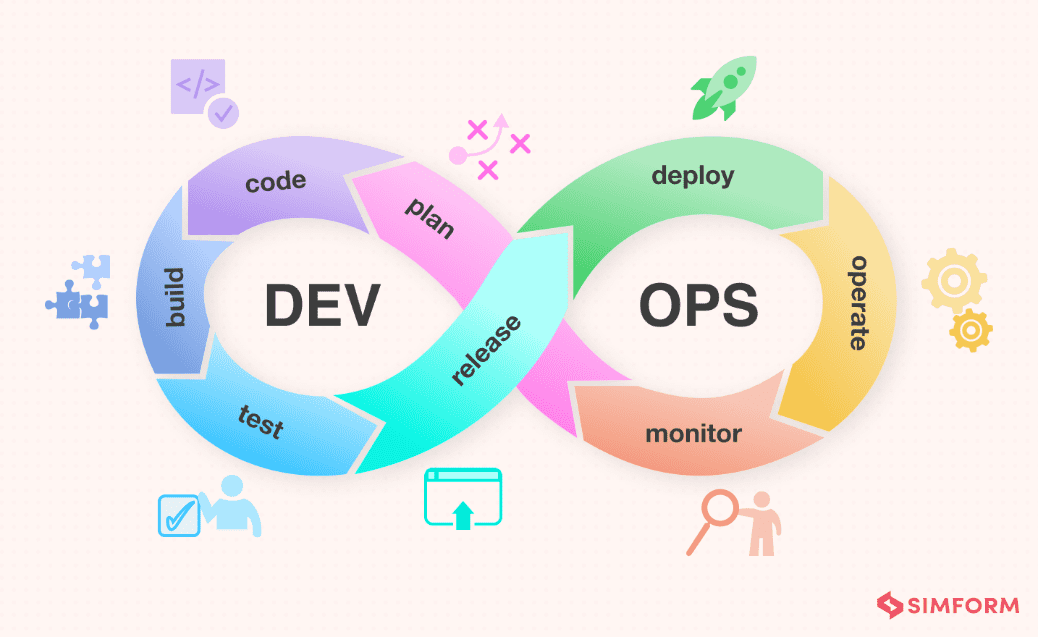 https://www.manageengine.com/products/service-desk/itsm/devops-lifecycle-and-pipeline.html
- DevOps는 순환하는 루프
- 이 과정이 6개월 정도로 길면 waterfall
- Dev: Plan, Code, Build, Test
- Ops: Release, Deploy, Operate, Monitor
- operate 하면서 monitoring이 일어난다
모니터링 결과(피드백)은 다시 다음 계획(Plan)에 반영
- operate 하면서 monitoring이 일어난다
✅성공의 측정: DORA Metrics
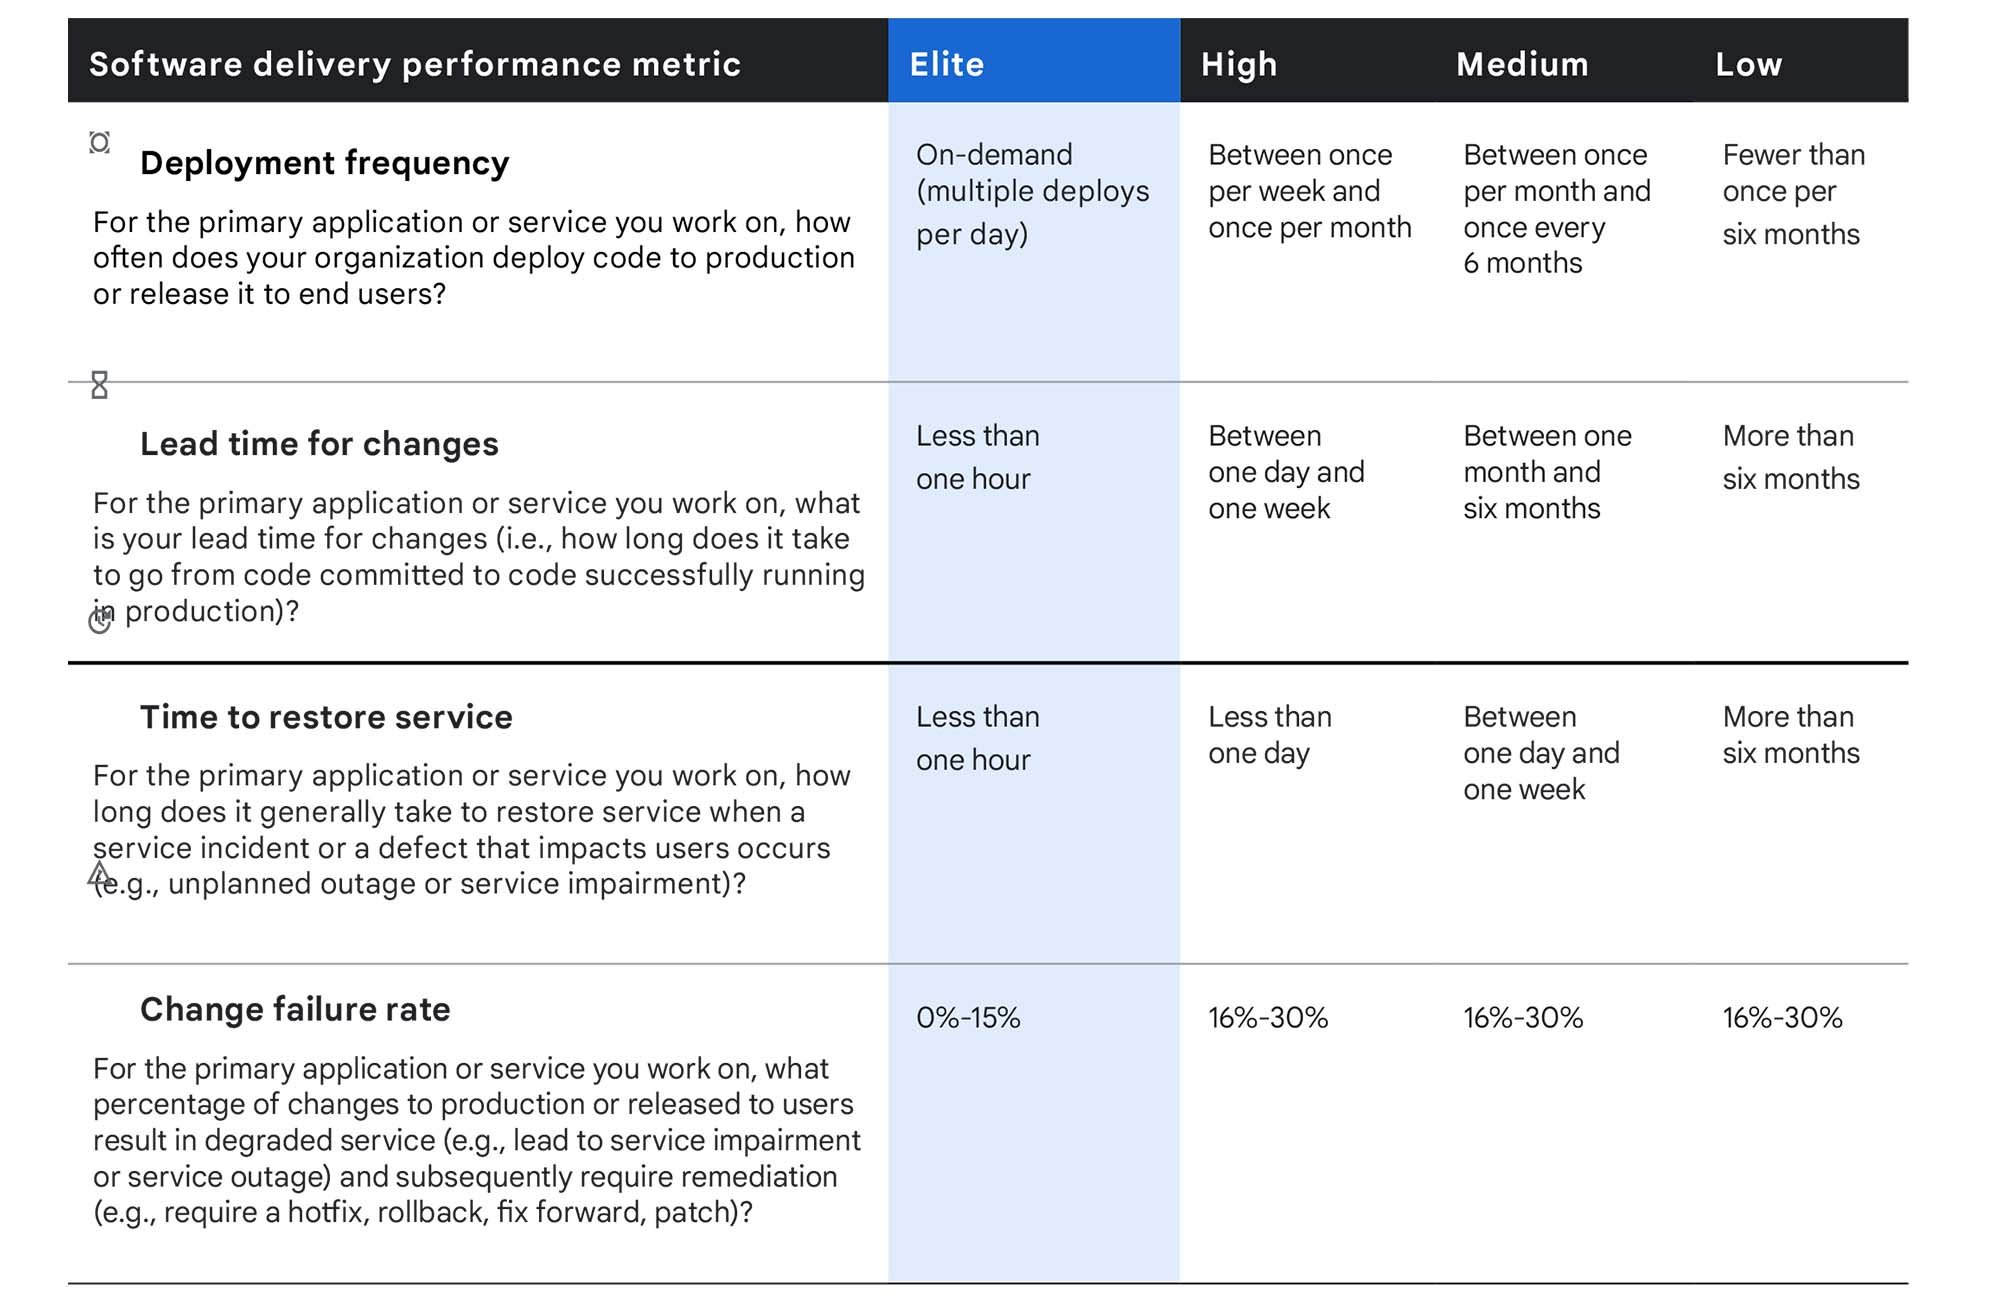
1. Deployment Frequency
- 얼마나 자주 배포하는가?
2. Lead Time for Changes
- 커밋부터 배포까지 얼마나 걸리는가?
3. Time to Restore Service
- 장애 시 복구 시간
4. Change Failure Rate
- 배포 실패율
속도(1,2)와 안정성(3,4)는 Trade-off가 아닌, 함께 가는 것
---
⚙️Deep Dive CI
Git 전략(Branching)
- CI쪽에 연관
✅ Git Flow vs Github Flow
Git Flow
- 복잡한 feature, develop, release 브랜치 관리
- 긴 배포 주기에 적합
Github Flow (좀 더 CI에 적합)
- 모든 개발자가 main(trunk) 브랜치에 작게, 자주 병합
- 병합 충돌 최소화
- CI/CD 파이프라인 핵심 전략
- Feature Flag와 함께 사용
빌드와 테스트 자동화
✅CI 파이프라인의 해부

- 사람의 개입 없이 Linear하게 흘러가야 함
- 앞으로 갈수록 버그 해결 cost가 싸다
- Integration Test때 버그 처리보다 Unit Test에서 버그 처리하는것이 더 낫다
- Webhook
- 웹상에서 갈고리 만든다?
- 서비스간 이벤트 발생을 연결시켜주는 통로
- 알아야하는 입장에서 webhook을 염
- 보통 http
- 엔드 유저가 사용하지는 않음
- git에서 push
- 빌드를 하는 서버(another service)에서 push되면 그 내용을 알아야 함
- webhook을 빌드(테스트)서버에서 열어서 git쪽에 트리거하라고 알려줌
✅빌드
소스 코드를 실행 가능한 아티팩트로 변환하는 과정
1. Dependency Install
- 외부 라이브러리 다운로드
- ex)
npm install,pip install
2. Compilation
- 코드를 기계어로 변환
- ex)
javac,go build - ex) py 파일을 실행하면 __pycache__파일 아래 pyc 파일이 생성됨, 이는 기계어 파일
- 보안을 중시한다면, 패키징 자체를 compiled 되어있는 pyc 파일만으로 패키징하는 경우도 있음
- 소스코드를 까보면 안되니까
3. Packaging
- 실행 환경까지 포함하여 패키징(컨테이너화)
- ex)
docker build
✅ 테스트 자동화 피라미드
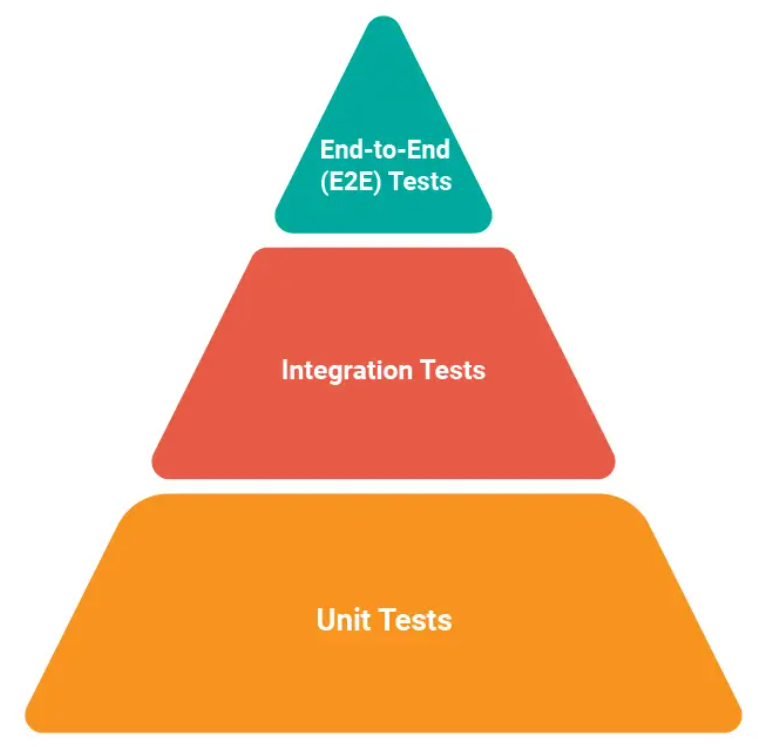 https://www.headspin.io/blog/the-testing-pyramid-simplified-for-one-and-all
Unit Test(70%)
- 함수 단위 검증
- 가장 빠르고 저렴함
Integration Tests(20%)
- 모듈 간 상호작용 검증(DB 연결 등)
E2E Tests(10%)
- 사용자 관점의 전체 시나리오 검증
- 느리고 비쌈
QA 엔지니어랑 친하게 지내는 것이 좋다.
커뮤니케이션을 활발하게 하는 것이 바람직하다.
✅정적 코드 분석
코드를 실행하지 않고 품질을 검사하는 단계
Linting
- 코드 스타일과 문법 오류를 잡음
- ex) ESLint, Pylint
Formatting
- 코드 포맷을 통일
- ex) Black, GoFmt
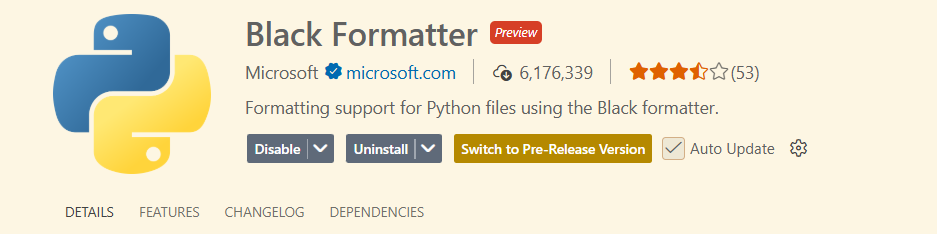
- Black은 VSCode 확장프로그램으로 사용 가능. 자동으로 포맷팅 적용해줌
SAST
- Static Application Security Test
- 보안 취얀점을 미리 스캔
- ex) SonarQube
---
⚙️Hands-on
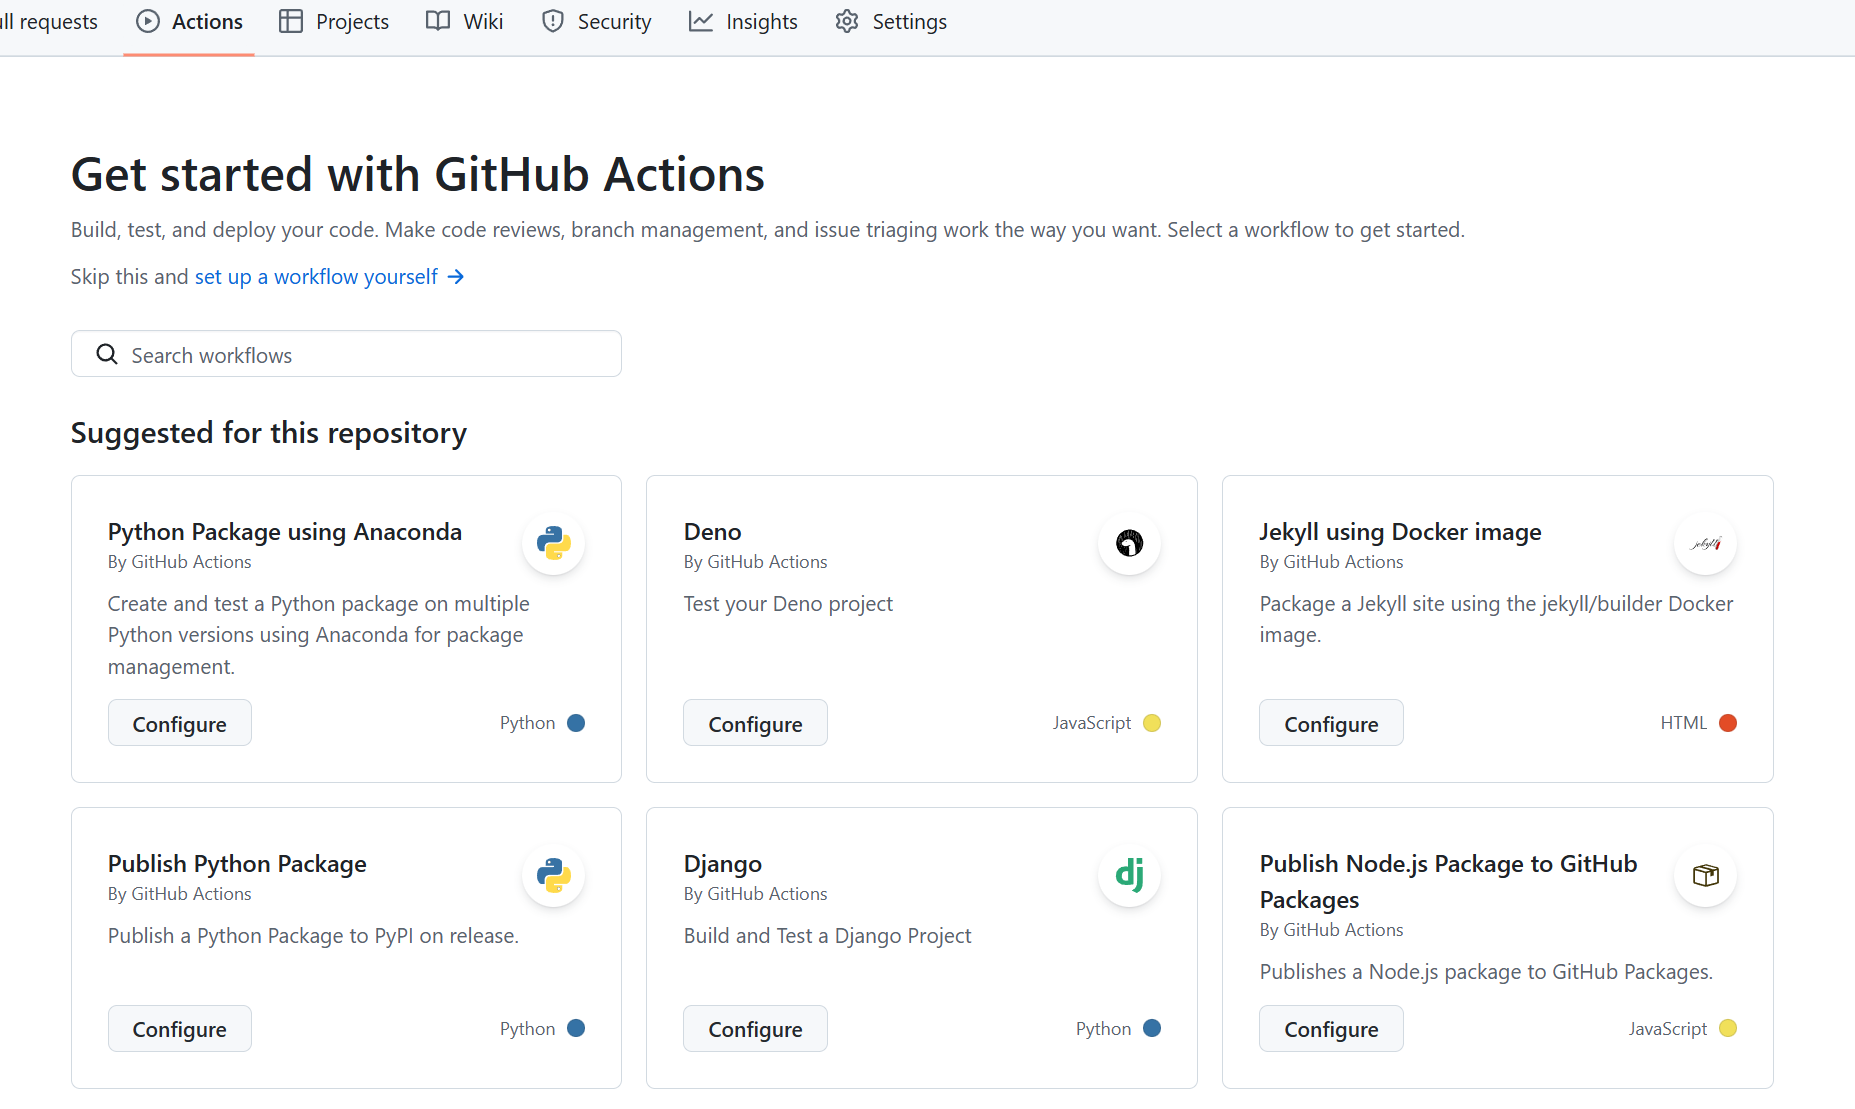
Github Actions
✅Github Actions 사용 이유
- 접근성: 코드가 있는 곳(Github)에서 바로 파이프라인 관리
- 무료: Public Repo 무료, Private도 넉넉한 무료시간 제공
- 생태계: Marketplace에 수천개의 미리 만들어진 Action 존재
- YAML: 읽기 쉬운 설정 파일 문법
*젠킨스: Github Actions와 비슷하지만, 내가 셋업을 해야할게 무척 많음. 요즘은 클러스터 서비스 이용
파이프라인
✅핵심 개념
Workflow
- 자동화 전체 프로세스
- yml 파일 하나
-하나가 Array의 elem
Event
- 워크플로우를 실행시키는 트리거(Push, PR 등)
Job
- 같은 Runner에서 실행되는 단계들의 묶음
- 같은 서버, 머신 등등
Step
- Job 안에서 실행되는 개별 커맨드나 Action
✅워크플로우
https://docs.github.com/ko/actions
워크플로 트리거 문서
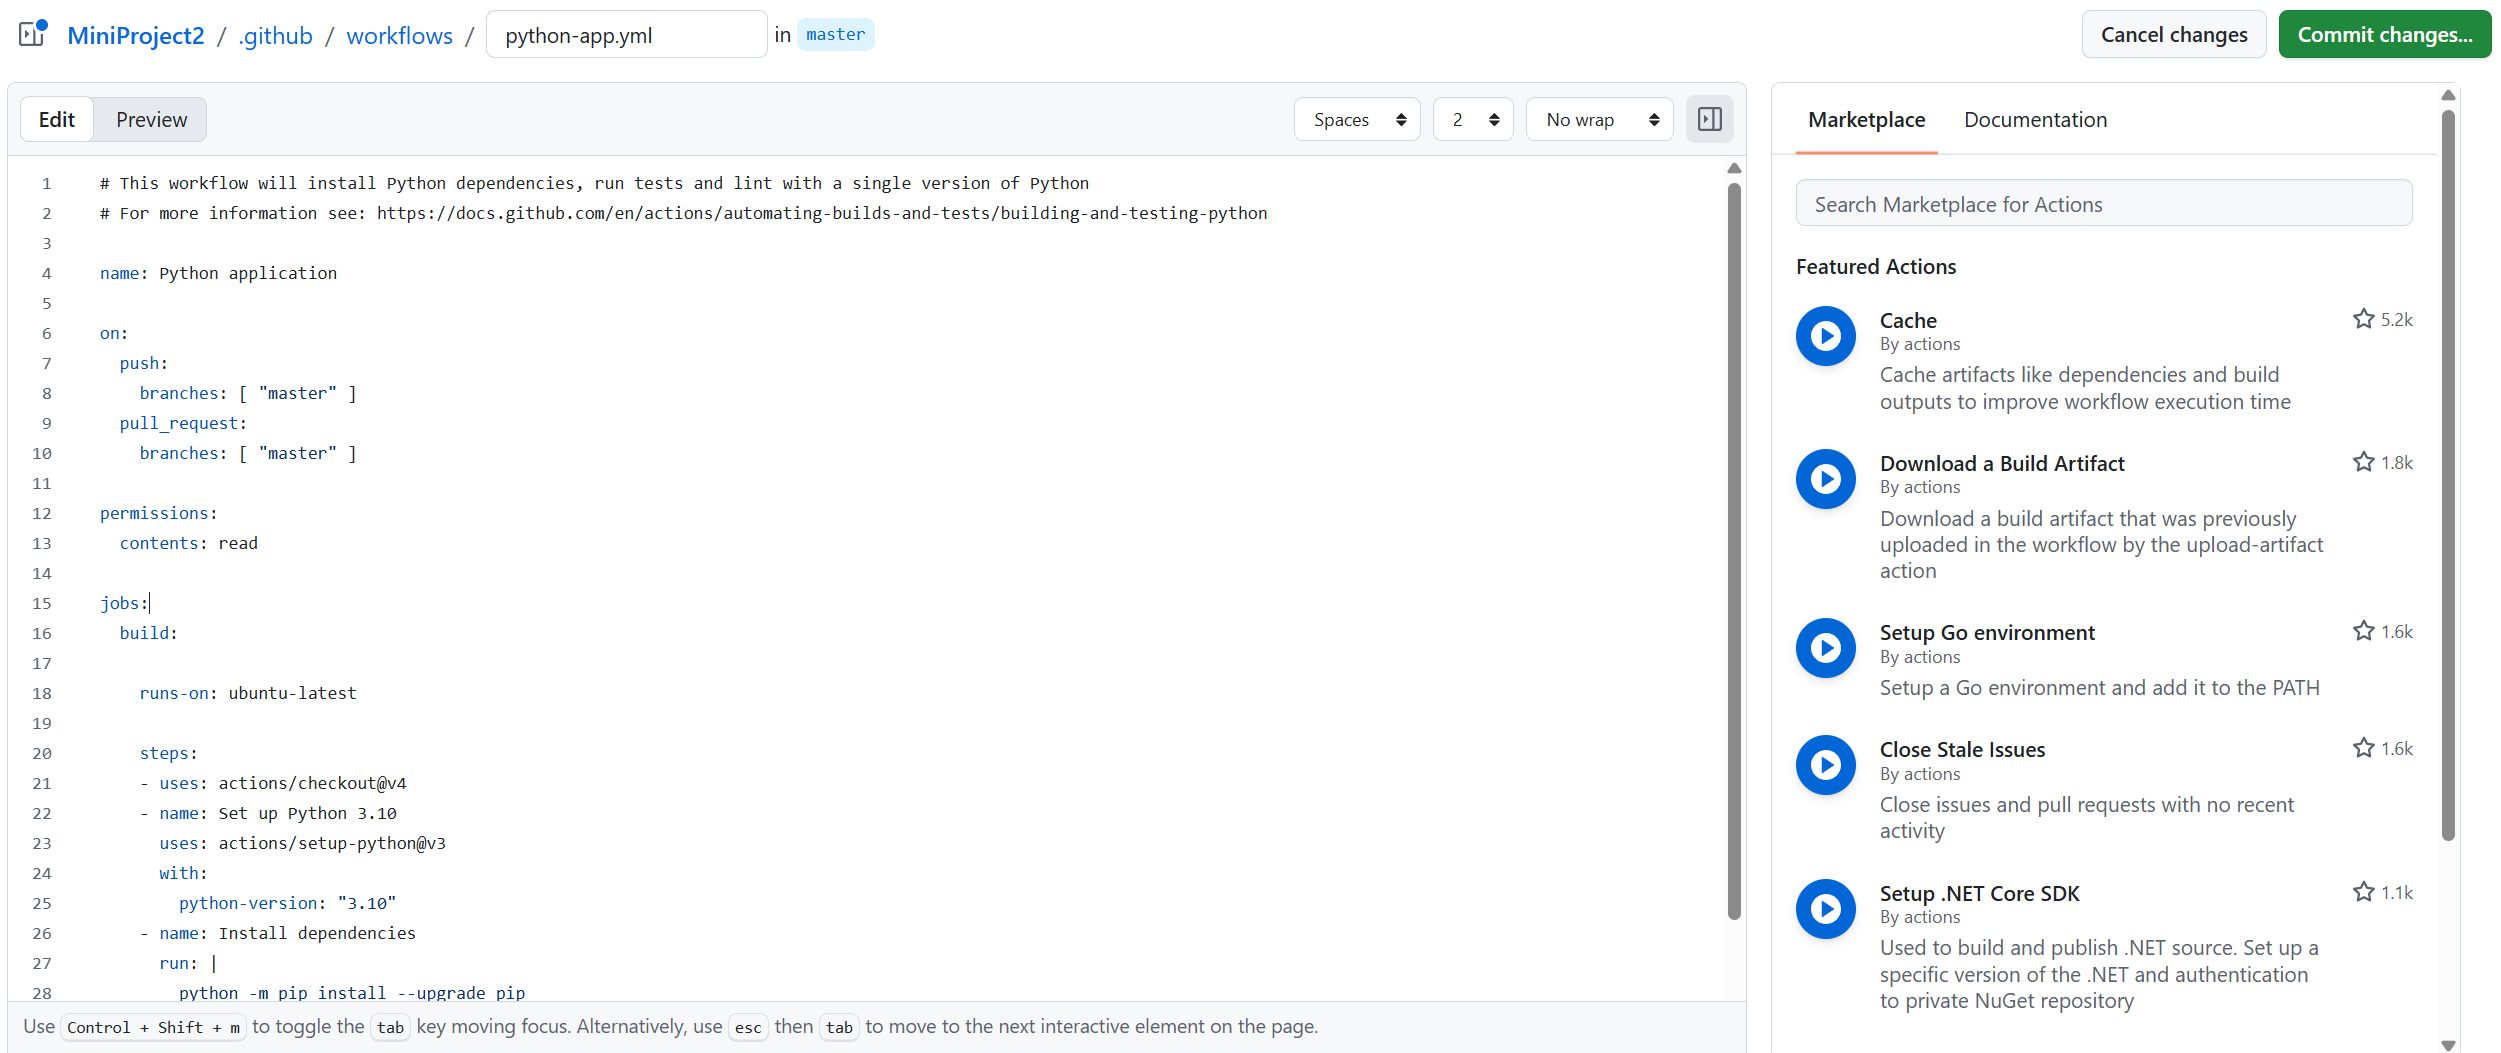
# This workflow will install Python dependencies, run tests and lint with a single version of Python
# For more information see: https://docs.github.com/en/actions/automating-builds-and-tests/building-and-testing-python

name: Python application

on:
  push:
    branches: [ "master" ]
  pull_request:
    branches: [ "master" ]

permissions:
  contents: read

jobs:
  build:

    runs-on: ubuntu-latest

    steps:
    - uses: actions/checkout@v4
    - name: Set up Python 3.10
      uses: actions/setup-python@v3
      with:
        python-version: "3.10"
    - name: Install dependencies
      run: |
        python -m pip install --upgrade pip
        pip install flake8 pytest
        if [ -f requirements.txt ]; then pip install -r requirements.txt; fi
    - name: Lint with flake8
      run: |
        # stop the build if there are Python syntax errors or undefined names
        flake8 . --count --select=E9,F63,F7,F82 --show-source --statistics
        # exit-zero treats all errors as warnings. The GitHub editor is 127 chars wide
        flake8 . --count --exit-zero --max-complexity=10 --max-line-length=127 --statistics
    - name: Test with pytest
      run: |
        pytest
- 실행 위치(컨테이너) 설정 가능(여기서는 ubuntu)
- 워크플로우 파일은 하나에 전부 쓸 수도 있고, 여러 파일로 쪼개서 관리하는 것도 가능
예시
name: My First CI
#1. Trigger: 언제 실행할 것인가?
on: [push]

jobs:
	build:
    	#2. Runner: 어디서 실행할 것인가?
        runs-on: ubuntu-latest

        #3. Steps: 무엇을 실행할 것인가?
        steps:
        	- uses: actions/checkout@v3 # 코드 가져오기
            - name: Run Script
              run: echo "hello world" #스크립트 실행, 소스코드랑은 상관 X
    test: ...(생략)
✅속도 최적화: 캐싱(Caching)
- 매번 npm install을 하면 시간이 오래 걸리므로, 의존성 파일을 캐싱하여 빌드 속도를 높임
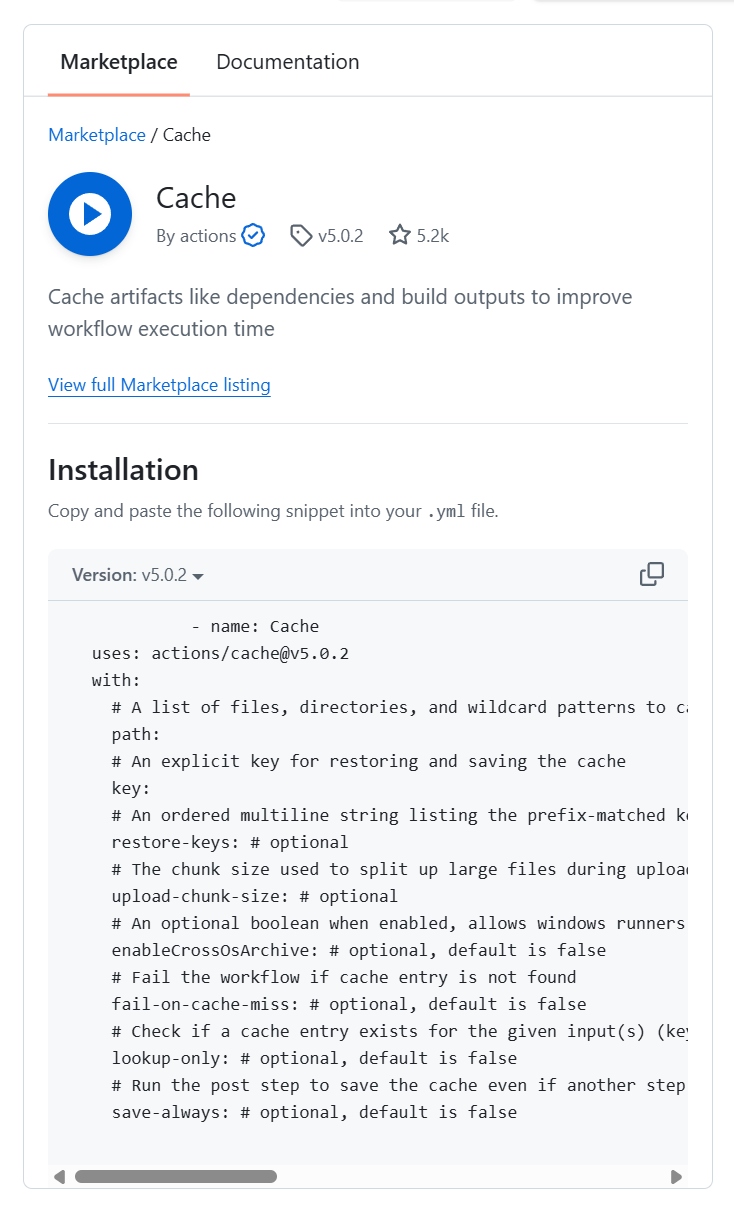
            - name: Cache
  uses: actions/cache@v5.0.2
  with:
    # A list of files, directories, and wildcard patterns to cache and restore
    path:
    # An explicit key for restoring and saving the cache
    key:
    # An ordered multiline string listing the prefix-matched keys, that are used for restoring stale cache if no cache hit occurred for key. Note `cache-hit` returns false in this case.
    restore-keys: # optional
    # The chunk size used to split up large files during upload, in bytes
    upload-chunk-size: # optional
    # An optional boolean when enabled, allows windows runners to save or restore caches that can be restored or saved respectively on other platforms
    enableCrossOsArchive: # optional, default is false
    # Fail the workflow if cache entry is not found
    fail-on-cache-miss: # optional, default is false
    # Check if a cache entry exists for the given input(s) (key, restore-keys) without downloading the cache
    lookup-only: # optional, default is false
    # Run the post step to save the cache even if another step before fails
    save-always: # optional, default is false
예시
steps:
	- uses: actions/cache@v3
      with:
    	path: ~/.npm #여기 있는 파일을 캐싱
        key: ${{ runner.os }}-node-${{ hashFiles('**/package-lock.json)') }} #os에 따라 인스톨되는 캐싱 이름이 달라지기 때문에 키를 이렇게 잡음
✅비밀 변수 관리(Secrets)
- 요즘엔 개발자들도 비밀 변수를 생성할때 이외에는 다시 못 보도록 하는 추세
https://docs.github.com/ko/actions/how-tos/write-workflows/choose-what-workflows-do/use-secrets
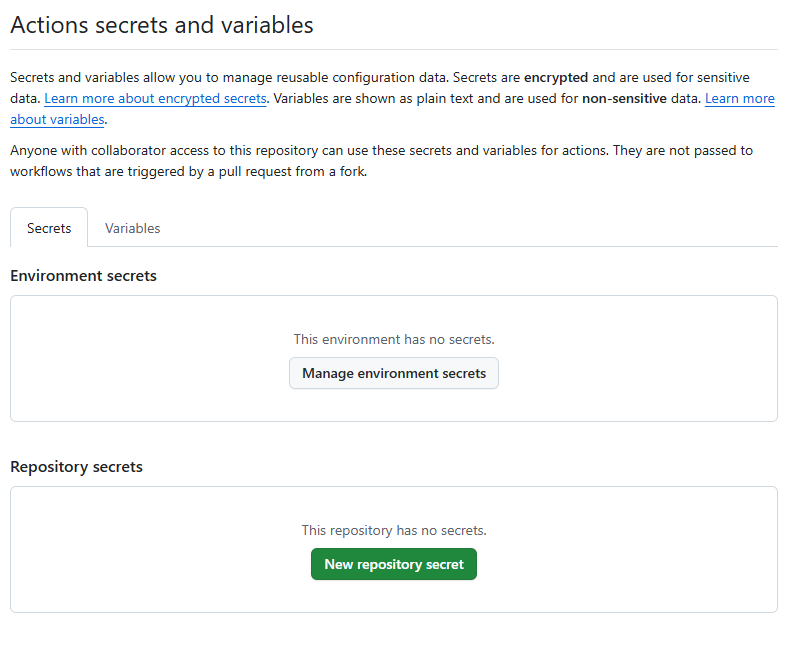
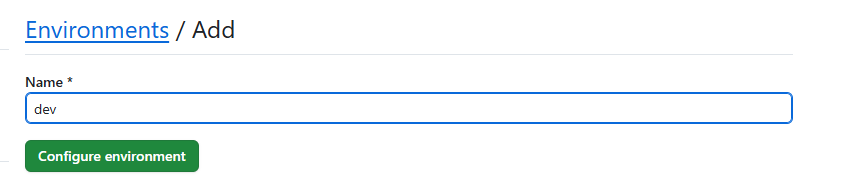
Repository secrets


Environment secrets
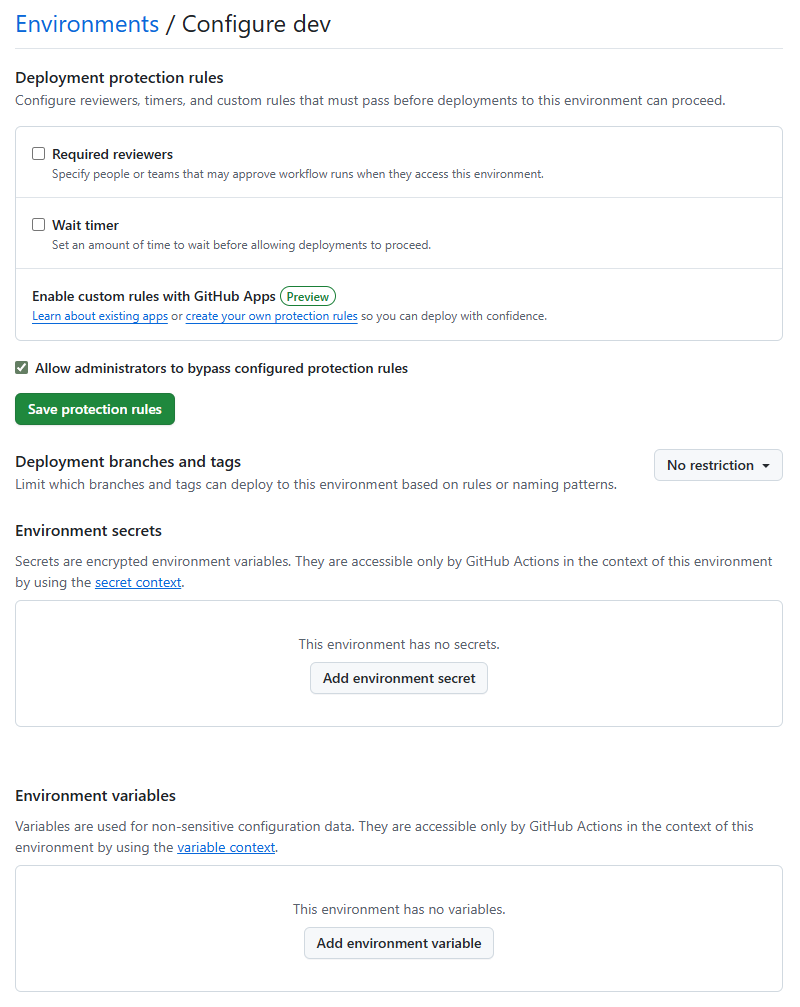
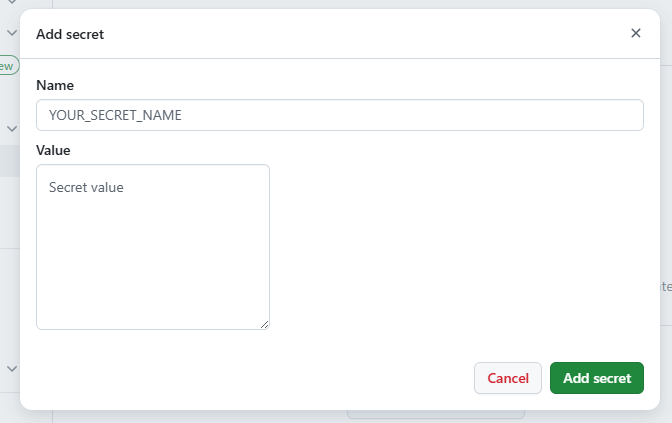
- API Key, DB Password는 하드코딩 X
- Github Secrets에 저장 → 환경변수로 주입받아 사용
env:
	API_KEY: ${{ secrets.MY_API_KEY }}
steps:
	- name: Login to DockerHub
	  uses: docker/login-action@v2
	  with:
		username: ${{ secrets.DOCKER_USER }}
		password: ${{ secrets.DOCKER_PASSWORD }}
---
⚙️CD & Trends
2025 최신 트렌드 (GitOps, AI)
✅GitOps: 배포 패러다임 변화
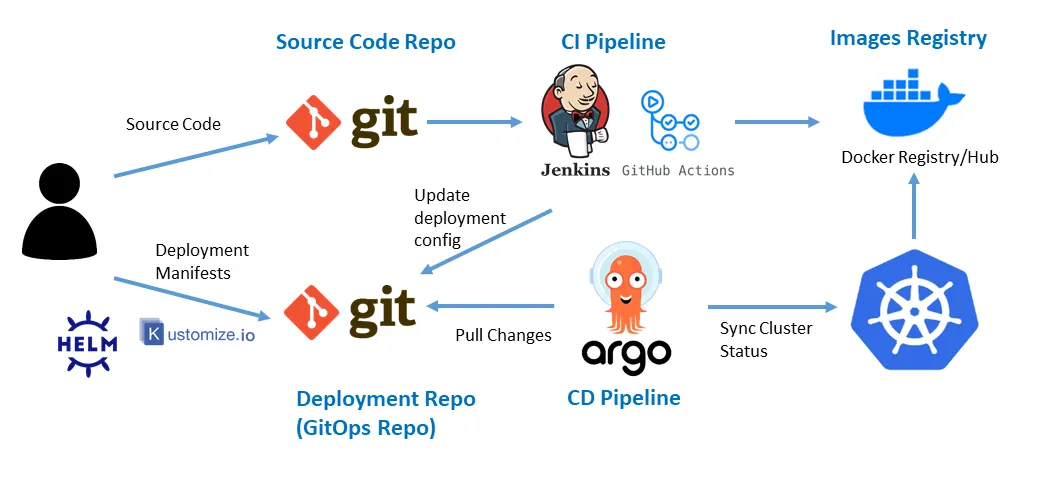 https://medium.com/@kalimitalha8/implementing-gitops-with-argocd-a-step-by-step-guide-b79f723b1a43
- 밑의 Deployment Repo는 Deploy를 위한 저장소
Push vs Pull
- 기존(push): CI가 kubectl apply를 수행하여 변경된 배포를 밀어 넣는 방식
- 이미지 태깅
- GitOps(pull): ArgoCD같은 에이전트가 클러스터 안에서 Git 저장소를 감시하다가, 변경사항이 생기면 스스로 Sync
- 보안성 향상(CI 서버에게 클러스터 접근 권한 불필요) *클러스터: kubernetes같은게 돌아가는 배포 서버
- Self-Healing(자동 복구) → git 버전관리에서 이전 버전 불러오기
- 배포에 있어 독립적 → flexible
- 수동 배포도 가능
배포 전략
✅Infrastructure as Code(IaC)
서버를 코드로 관리
| 구분 | Terraform | Ansible |
|---|---|---|
| 분류 | Infrastructure as Code (IaC) | Configuration Management / Automation |
| 주요 목적 | 인프라 생성·변경·삭제 | 서버 설정·배포·운영 자동화 |
| 관리 대상 | 서버, 네트워크, 로드밸런서, DB, 클라우드 리소스 | OS 설정, 패키지 설치, 서비스 설정, 앱 배포 |
| 상태 관리 | 상태 파일(.tfstate)로 리소스 상태 관리 | 별도 상태 파일 없음 |
| 주요 언어 | HCL (HashiCorp Configuration Language) | YAML |
| 에이전트 필요 여부 | 불필요 | 불필요 (SSH 기반) |
| 실행 방식 | plan → apply 단계적 실행 | Playbook 즉시 실행 |
| 멱등성 | 기본적으로 멱등성 보장 | 모듈 단위로 멱등성 보장 |
| 대표 사용 사례 | AWS EC2, VPC, GCP, Azure 리소스 생성 | Nginx 설치, 사용자 생성, 앱 배포 |
| 멀티 클라우드 | 매우 강력 | 제한적 |
kubernetes 쓰면서 terraform 사용 가능(kuberenetes 클러스터 자체 생성)
AWS에 EC2 3대 만들고
VPC 만들고
EKS 클러스터 만들고
를 코드로 만들어서 관리하는 것
- Idempotency(멱등성): 몇 번을 실행해도 결과는 같아야 함
- Immutable Infrastructure: 서버를 고치기X 교체O
✅Blue/Green Deployment
무중단 배포의 정석
현재 운영 중인 버전(Blue)와 동일한 신규 버전(Green)을 동시에 띄워놓고 트래픽만 전환하는 방식
- 장점: 즉시 롤백 가능 + 다운타임X
- 단점: 리소스 비용 2배(기존 + 신규)
✅Canary Deployment
소수의 사용자에게만 먼저 신규 버전을 배포하여 문제가 없는지 확인 후 점진적 확대
- 장점: 버그 발생 시 피해 범위 최소화
- 단점: 트래픽 라우팅 설정이 복잡함
참고: Pod를 1코어에서도 소수점단위로 설정해서 사용 가능
✅Rolling Update
- Kubernetes의 기본 방식
- 새로운 저벚의 Application Pod 하나 배포
- 새로 배포된 버전이 정상 동작, 준비된 상태 → 이전 버전 Pod 하나 삭제
- 위 과정 반복
- Graceful Shutdown 필수
- Pod를 죽였을 때, 죽이기 전 Pod에 할당된 리퀘스트는 모두 실행되어야 함(바로 죽지 않음)
- 설정에 따라 배포 방식 조정 가능
Future Trends
✅DevSecOps
Shift left: 보안 검사를 파이프라인의 왼쪽으로 이동(앞에서 실행할수록 비용 ↓)
SCA(Software Composition Analysis)
- 라이브러리 취약점 분석(Log4j 방지)
- webhook같은것도 post보단 get 을 선호
해킹 방법 중, 비밀번호를 전송할때까지 간격을 확인해서 비밀번호의 길이를 유추해내는 방법이 있다. 이를 위해 서버에서는 홀딩해뒀다가 일정 시간이 지나고 전송하는 방식을 취하기도 한다.
Container Scan
- 도커 이미지 취약점 스캔(Trivy, Docker Scout)
SBOM(Software Bill of Materials)
- 소프트웨어 자재 명세서 관리
Image Signing
- Sigstore 등을 이용해 아티팩트에 서명
✅Platform Engineering & AI
Internal Developer Platform(IDP)
- 개발자가 인프라를 몰라도 Backstage 같은 포털에서 버튼만 누르면 환경 구성 완료
- 검증된 Template으로 빠르게 시작 가능
- ex) 취직했을 때 필요한 플러그인 등 개발 환경을 한번에 깔기 가능
AI in DevOps
- Github Copilot을 이용한 파이프라인 코드 작성
- 에러 로그 자동 분석 및 수정 제안
- 과거 데이터를 학습해 테스트를 최적화하거나 불필요한 수행 제거
✅GreenOps:Sustainability
- 친환경적 컴퓨팅
- 불필요한 빌드와 테스트는 전기를 낭비, 탄소 배출 ↑
- 빌드 시간↓ = 비용 ↓ = 탄소 ↓
- ARM 아키텍처(AWS Graviton 등) Runner 사용
- 주말/야간에 비개발 환경 자동 종료
결론
1. Start Small
- 거창한 파이프라인 < 빌드와 테스트 자동화
2. Automate Everything
- 두 번 이상 반복 작업은 스크립트화
3. Keep Learning
- 도구는 계속 변함
- 원리에 집중
N8N같은 자동화툴도 있음
YAML파일이 많다면?
yaml파일이 많을때, 템플릿화를 하고싶다면 Helm이나 kustomize를 사용하면 된다
---
⚙️Web Crawling
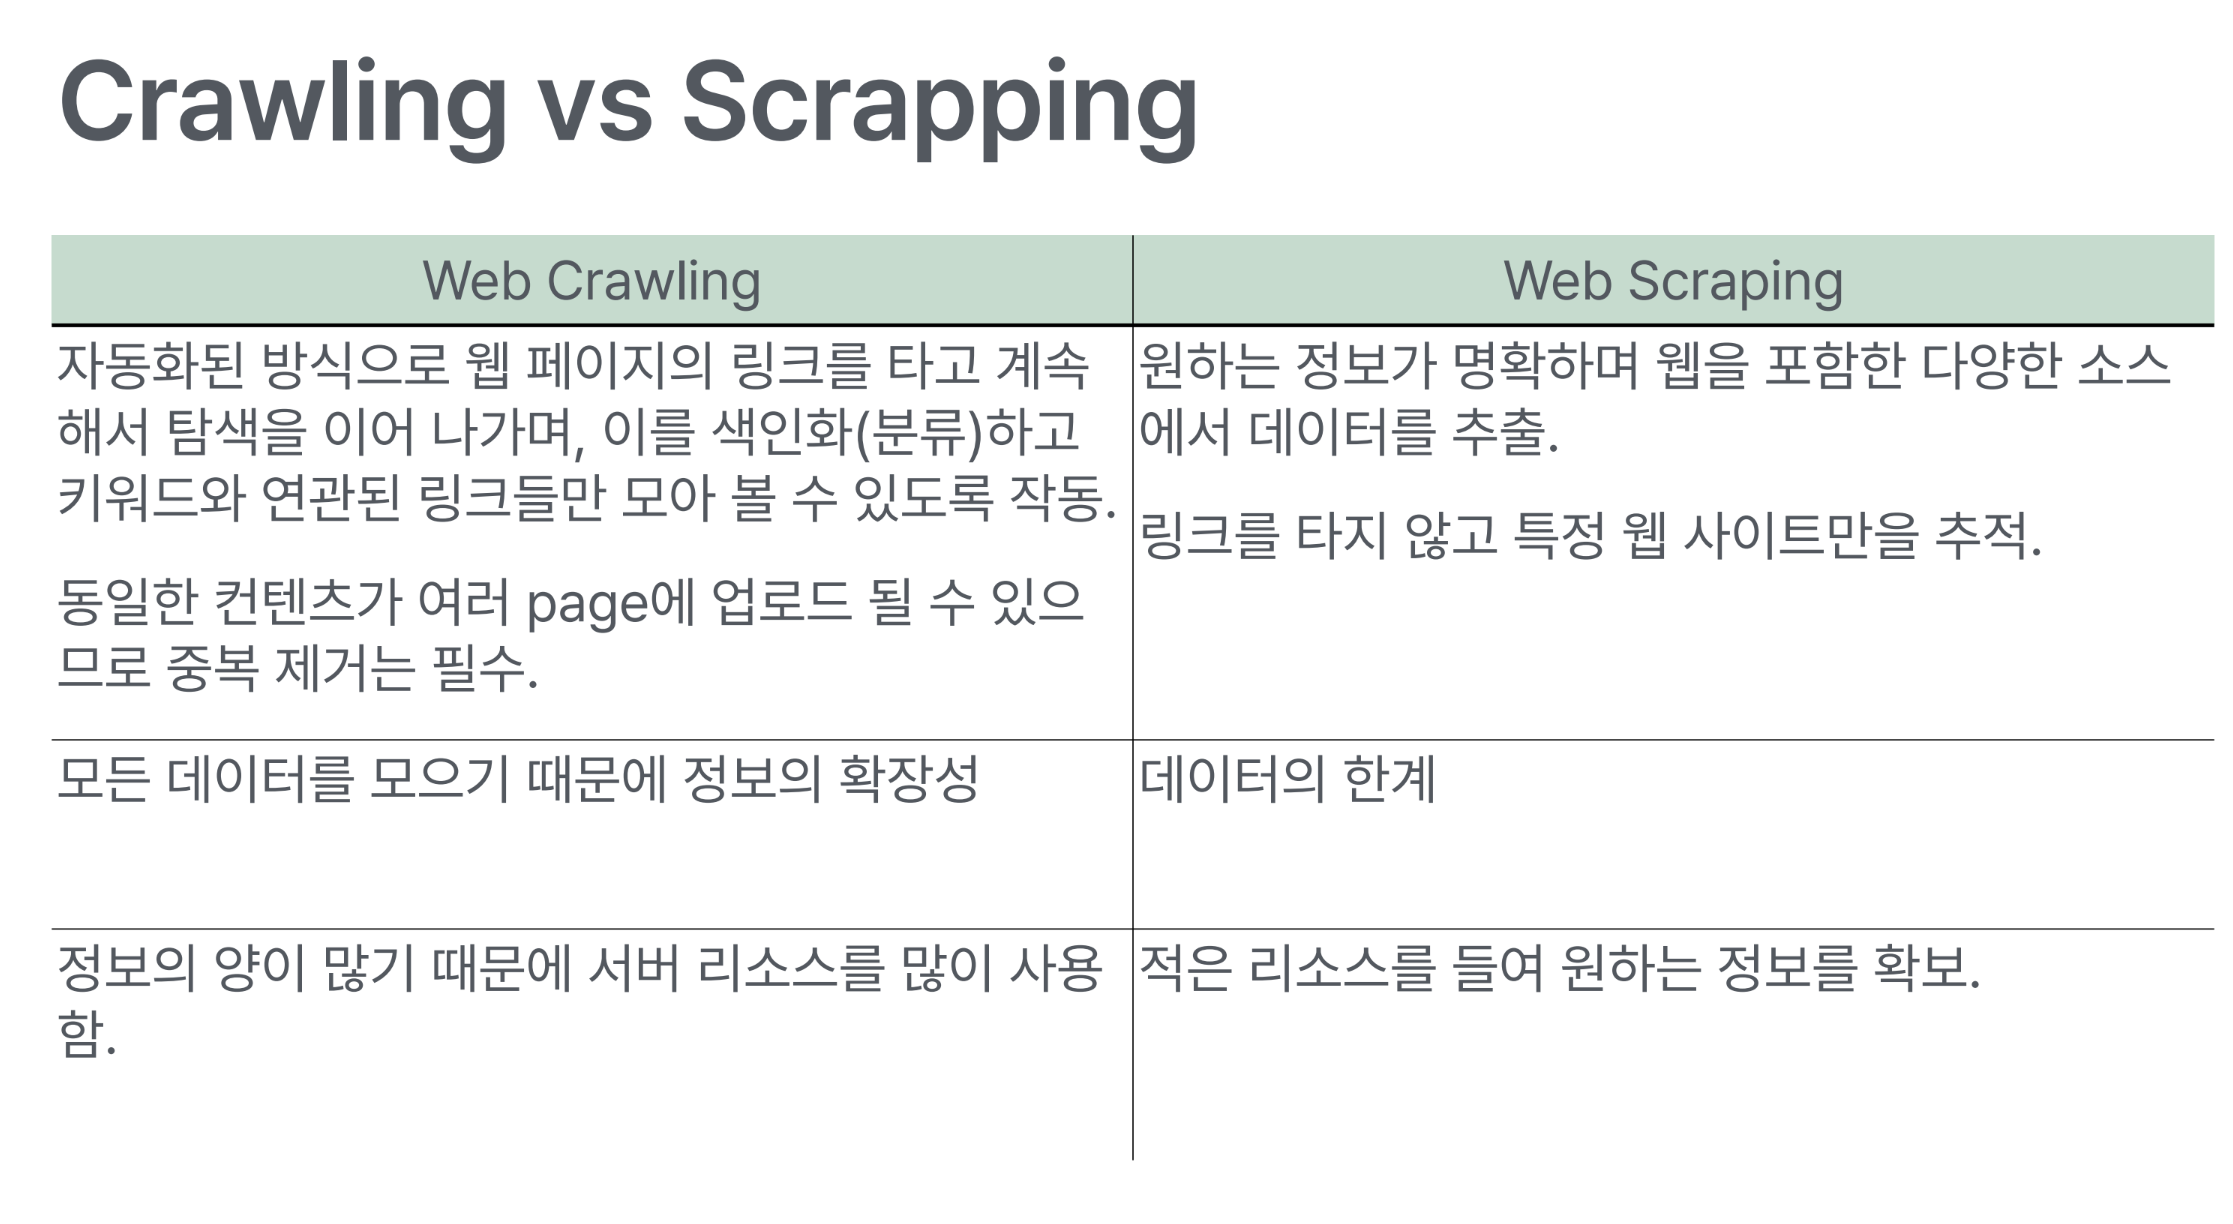
웹 데이터 수집
✅주의사항
법적
- 웹 사이트 콘텐츠는 대부분 저작권 보호
- 무단 크롤링은 저작권법과 부정경쟁방지법 위반 가능
기술적
- 대상 웹 서버에 부담이 되지 않도록 크롤링 간격 조정
- robots.txt에 명시된 크롤링 규칙 준수
윤리적
- 기술적 제한 우회 X
- 무단 데이터 사용 X
✅robots.txt
한계
- 크롤러의 동작을 강제로 제어할 수 X
- 크롤러 자체가 지침 준수해야 함
- 크롤러마다 구문을 다르게 해석, 특정 지침 이해 못할수도
- 다른 Web page에서 연결된 경우 색인 생성
- 위치: http://www.example.com/robots.txt
- 해석 방법: https://developers.google.com/crawling/docs/robots-txt/robots-txt-spec?hl=ko
User-agent: *
Disallow: /
Allow : /$
Allow : /.well-known/privacy-sandbox-attestations.json
✅Static Page와 Dynamic Page를 나누는 기준
- 변하지 않는 HTML page는 static인가?
- HTML에 javascript가 포함되어 있는 경우는?
→ javascript가 수행되면 보여지는 페이지는 static하지 않다.
- HTML에 javascript가 포함되어 있는 경우는?
- Server에서 프로그램으로 작성된 HTML page는 dynamic인가?
- 서버 단에서 꾸미면 dynamic이라고 한다
클라이언트 입장에서 보어야 한다. → 동일한 페이지를 받았을 때, 그 내용이 어떻게 표현되는가에 따름
✅사용 Package
synchronous
requests
- http request를 보내고 받는 package
BeautifulSoup
- html 문서 파싱
- 데이터 추출
selenium
- Web browser를 열어 해당 Page 로드
- 웹 요소로부터 데이터 추출
✅requests
http request를 보내고 그 응답을 받아 처리할 수 있도록 한다
- Method마다 그에 맞는 parameter를 받음
- http response 를 REsponse instance로 만들어준다
import requests

URL = ‘https://jsonplaceholder.typicode.com/posts'
response = requests.get(url) # HTTP 요청 및 응답객체 생성

print(response.status_code) # HTTP 상태 코드
print(response.text) # 응답 본문 ( Unicode )
print(response.content) # 응답 본문 ( Bytes )
print(response.json()) # JSON 응답을 파싱
✅Beautiful Soup
HTML/XML에서 데이터를 읽어오는 Python Library
https://www.crummy.com/software/BeautifulSoup/bs4/doc/
- 다만, json을 사용하여 데이터를 처리해 표시하는 웹을 크롤링하는것에는 애로사항이 있다.(이쪽은 Selenium을 쓰자)
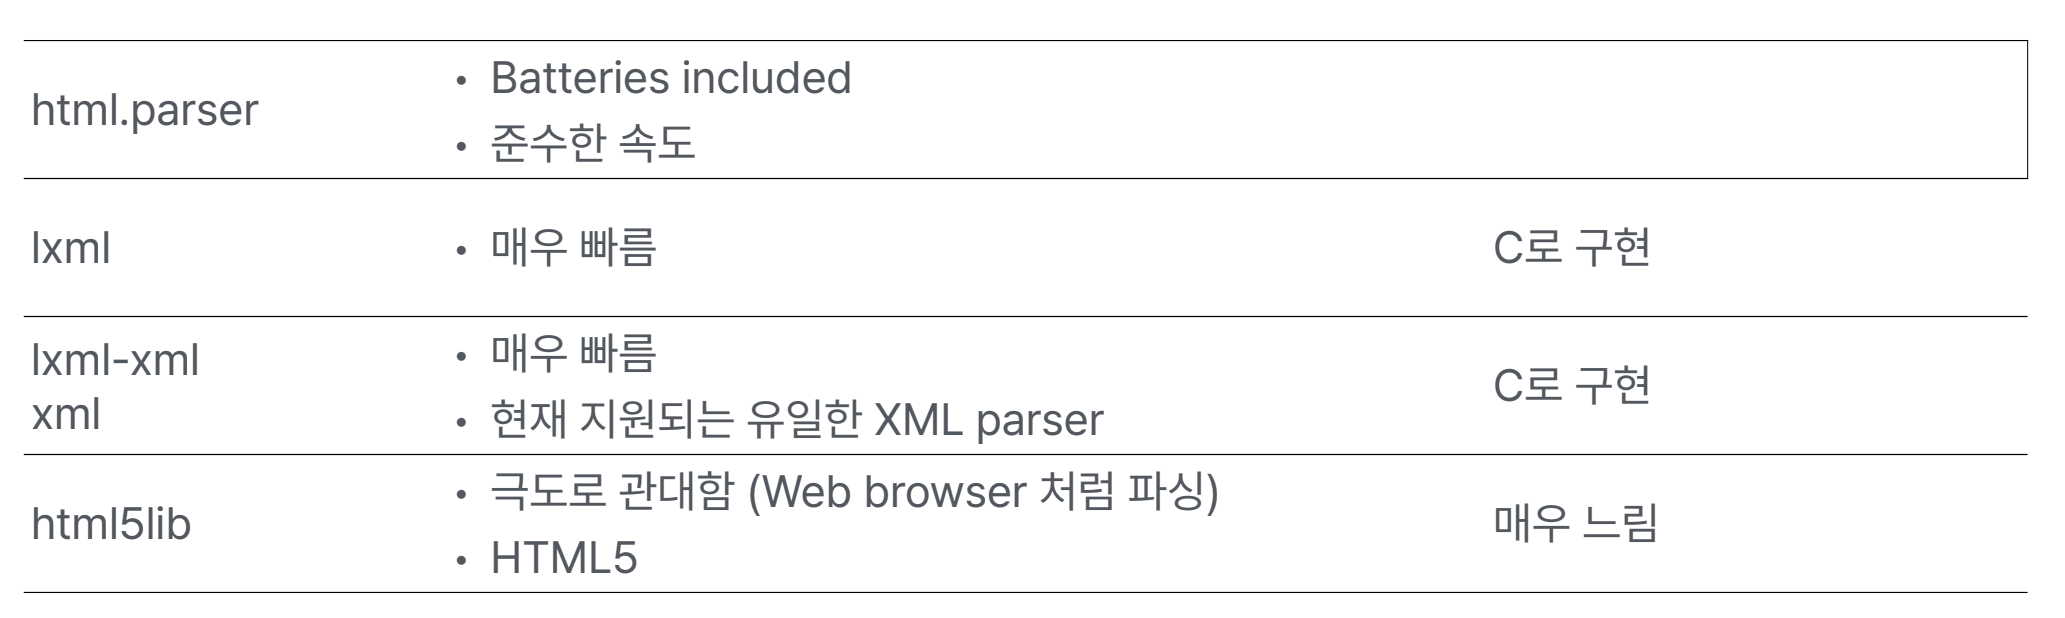
Parser를 지정하여 사용할 수 있다
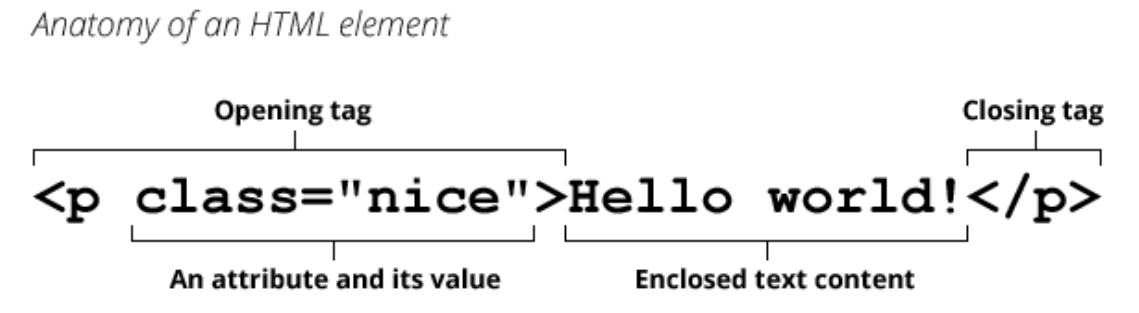
✅HTML element 구성
✅Beautiful Soup Tag/Element 찾기
find / find_all 방식
- tag, attribute, text 로 찾기
- Tag tree를 순회하면서 조건에 맞는 첫번째, 혹은 모든 태그 반환
- 주어진 인자를 조합해 필터링
- 간단한 태그/속성 탐색에 적합. 속도가 select보다 빠를 수 있다.
select / select_all 방식
- CSS 선택자 문법으로 찾기: https://www.w3schools.com/cssref/css_selectors.php
- SoupSieve package를 사용해 구현
- 복잡한 선택을 할 때 유용
Sample Document
html_doc = """<html><head><title>The Dormouse's story</title></head>
<body>
<p class = "title"><b> The Dormouse's story</b></p>

<p class="story">Once upon a time there were  three little sisters; and their names were
<a href="http://example.com/elsie" class="sister" id="link1">Elsie</a>,
<a href="http://example.com/lacie" class="sister" id="link2">Lacie</a> and
<a href="http://example.com/tillie" class="sister" id="link3">Tillie</a>;
and they lived at the bottom of a well.</p>

<p class="story">...</p>
"""

from bs4 import BeautifulSoup
soup = BeautifulSoup(html_doc, 'html.parser')
✅Find 방식
soup.find("title")
soup.title
#<title>The Dormouse's story</title>

soup.title.name
#u'title'

soup.title.stirng
#u'The Dormouses's story'

soup.title.parent.name
#u'head'

soup.p
# <p class="title"><b>The Dormouse's story</b></p>

soup.p['class']
#u'title'soup.a
#<a class="sister" href="http://example.com/elsie" id="link1">Elsie</a>
soup.find_all('a', class_='sister')
# [<a href="http://example.com/elsie" class="sister" id="link1">Elsie</a>,
# <a href="http://example.com/lacie" class="sister" id="link2">Lacie</a>,
# <a href="http://example.com/tillie" class="sister" id="link3">Tillie</a>]
soup.find(id="link3")
# <a href="http://example.com/tillie" class="sister" id="link3">Tillie</a>
soup.find_all("a")
soup("a")✅CSS selector 방식
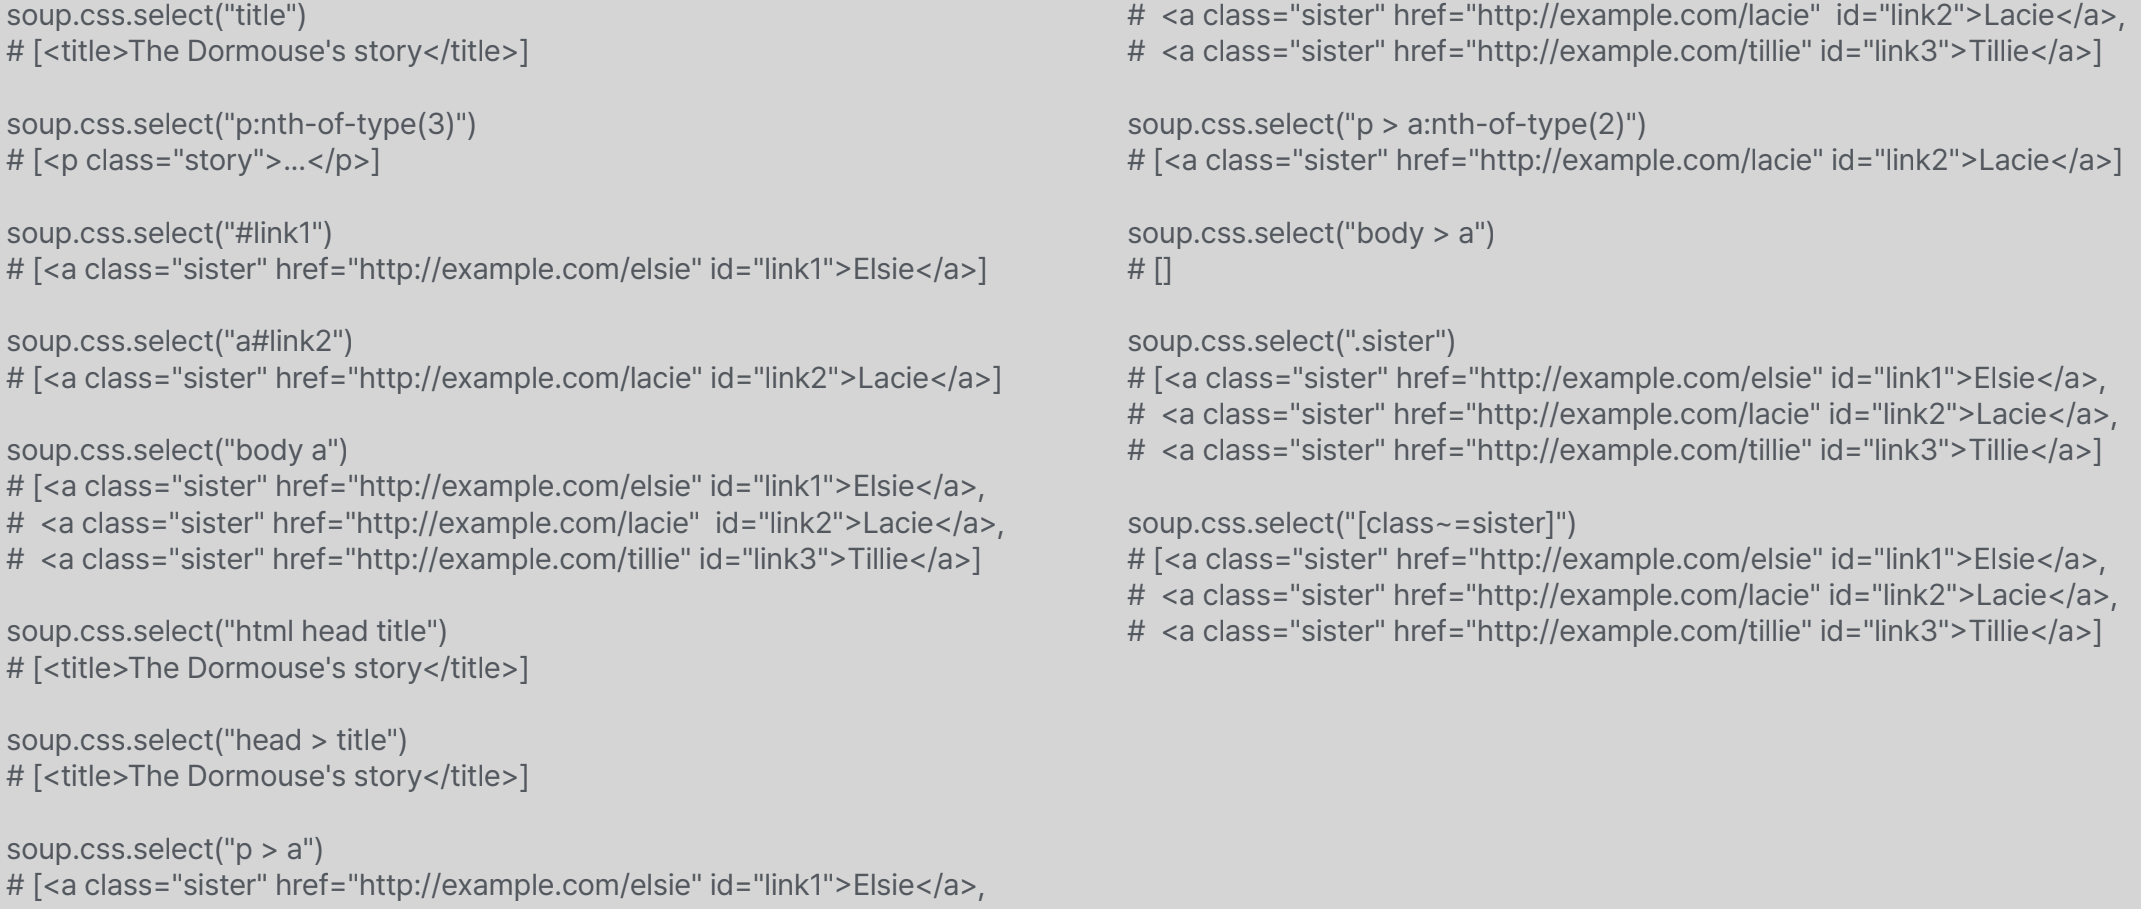
- ("p:nth-of-type(3)"): p태그로 있는것 중 3번째
- ("html head title"): 이 밑에 있는 전부
- ("head > title"): head의 child중 title 가져오기