
Selenium
웹 애플리케이션의 테스트(웹 GUI 자동화)를 자동화하기 위한 오픈 소스 프레임워크
혹은 동적 웹 크롤링 및 데이터 수집
https://www.selenium.dev/selenium/docs/api/py/index.html
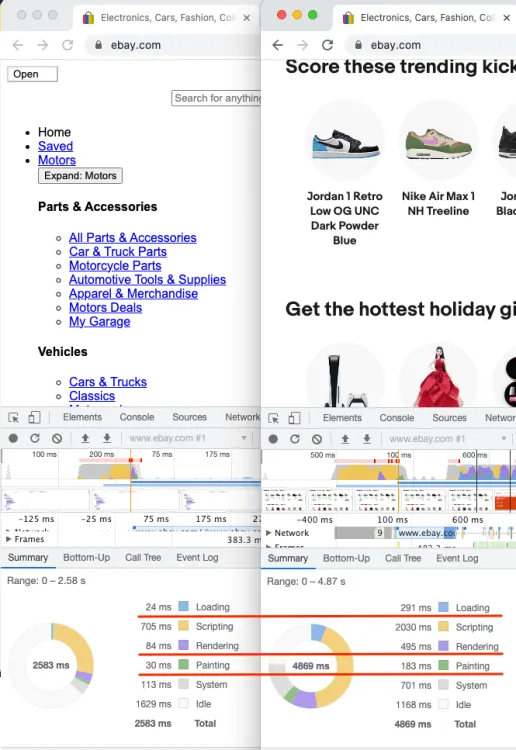
- Headless Browser를 사용하여 작업
- JS로 구성되는 Web site를 다룰 수 있음
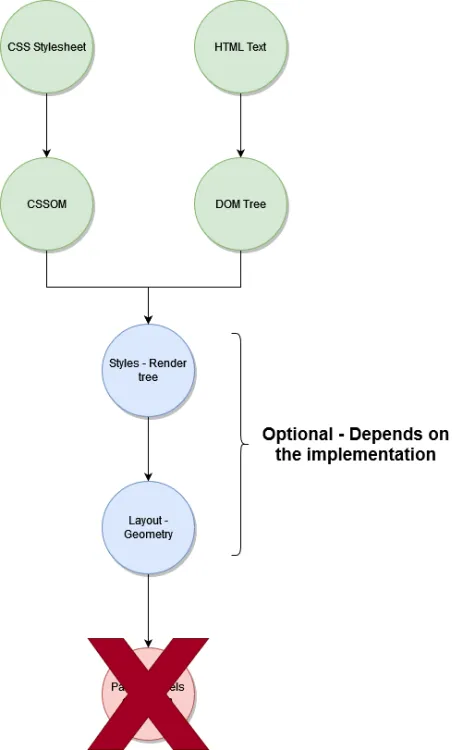
Headless Browser
 https://www.zenrows.com/blog/headless-browser-scraping#headless-browser-scraping
- rendering step 스킵 → 빠름
DOM은 HTML 문서를 트리 구조의 객체 모델로 표현해 자바스크립트 등으로 조작하게 하는 문서 객체 모델이고, CSSOM은 CSS 스타일 규칙을 트리 구조의 객체 모델로 만든 CSS 객체 모델
Selenium 사용법
- 여전히 id와 class가 중요하게 사용되긴 함
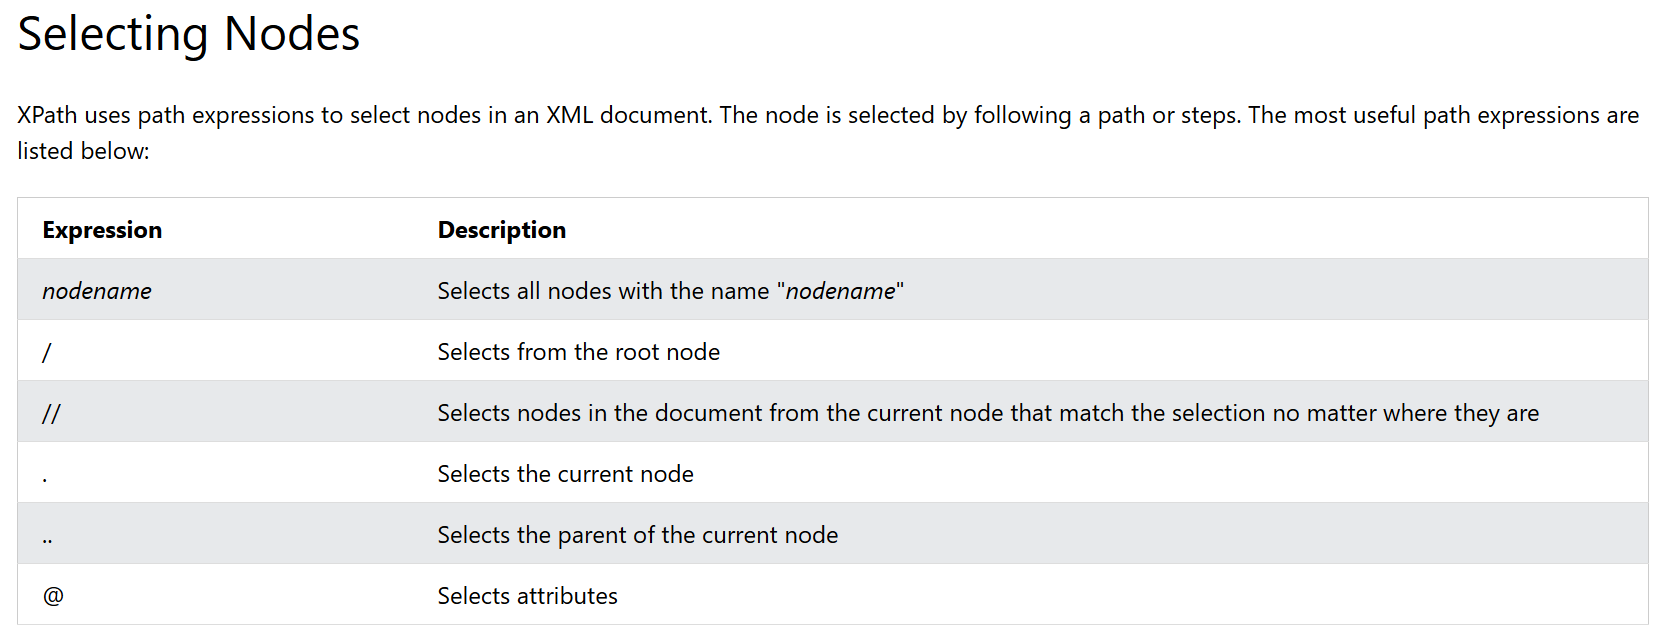
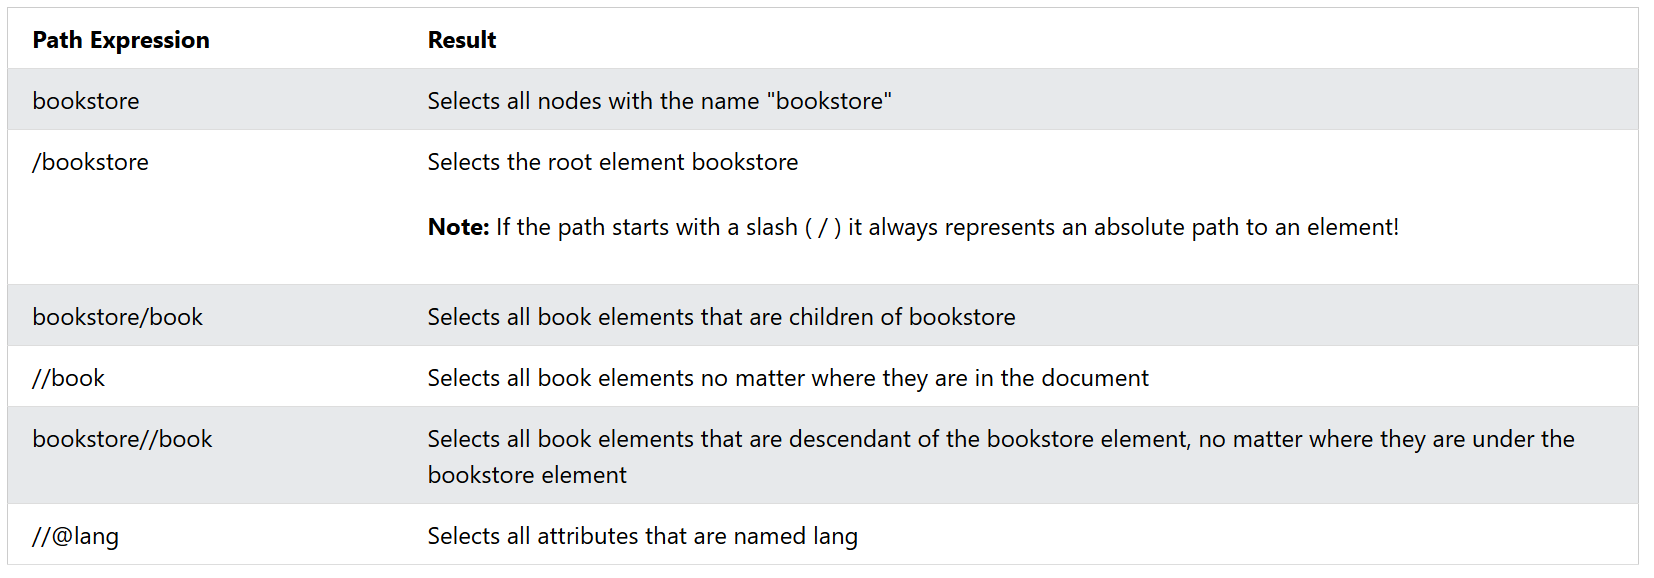
XPath: XML Path Language
<?xml version="1.0" encoding="UTF-8"?>

<bookstore>

<book>
  <title lang="en">Harry Potter</title>
  <price>29.99</price>
</book>

<book>
  <title lang="en">Learning XML</title>
  <price>39.95</price>
</book>

</bookstore>
Selecting Nodes
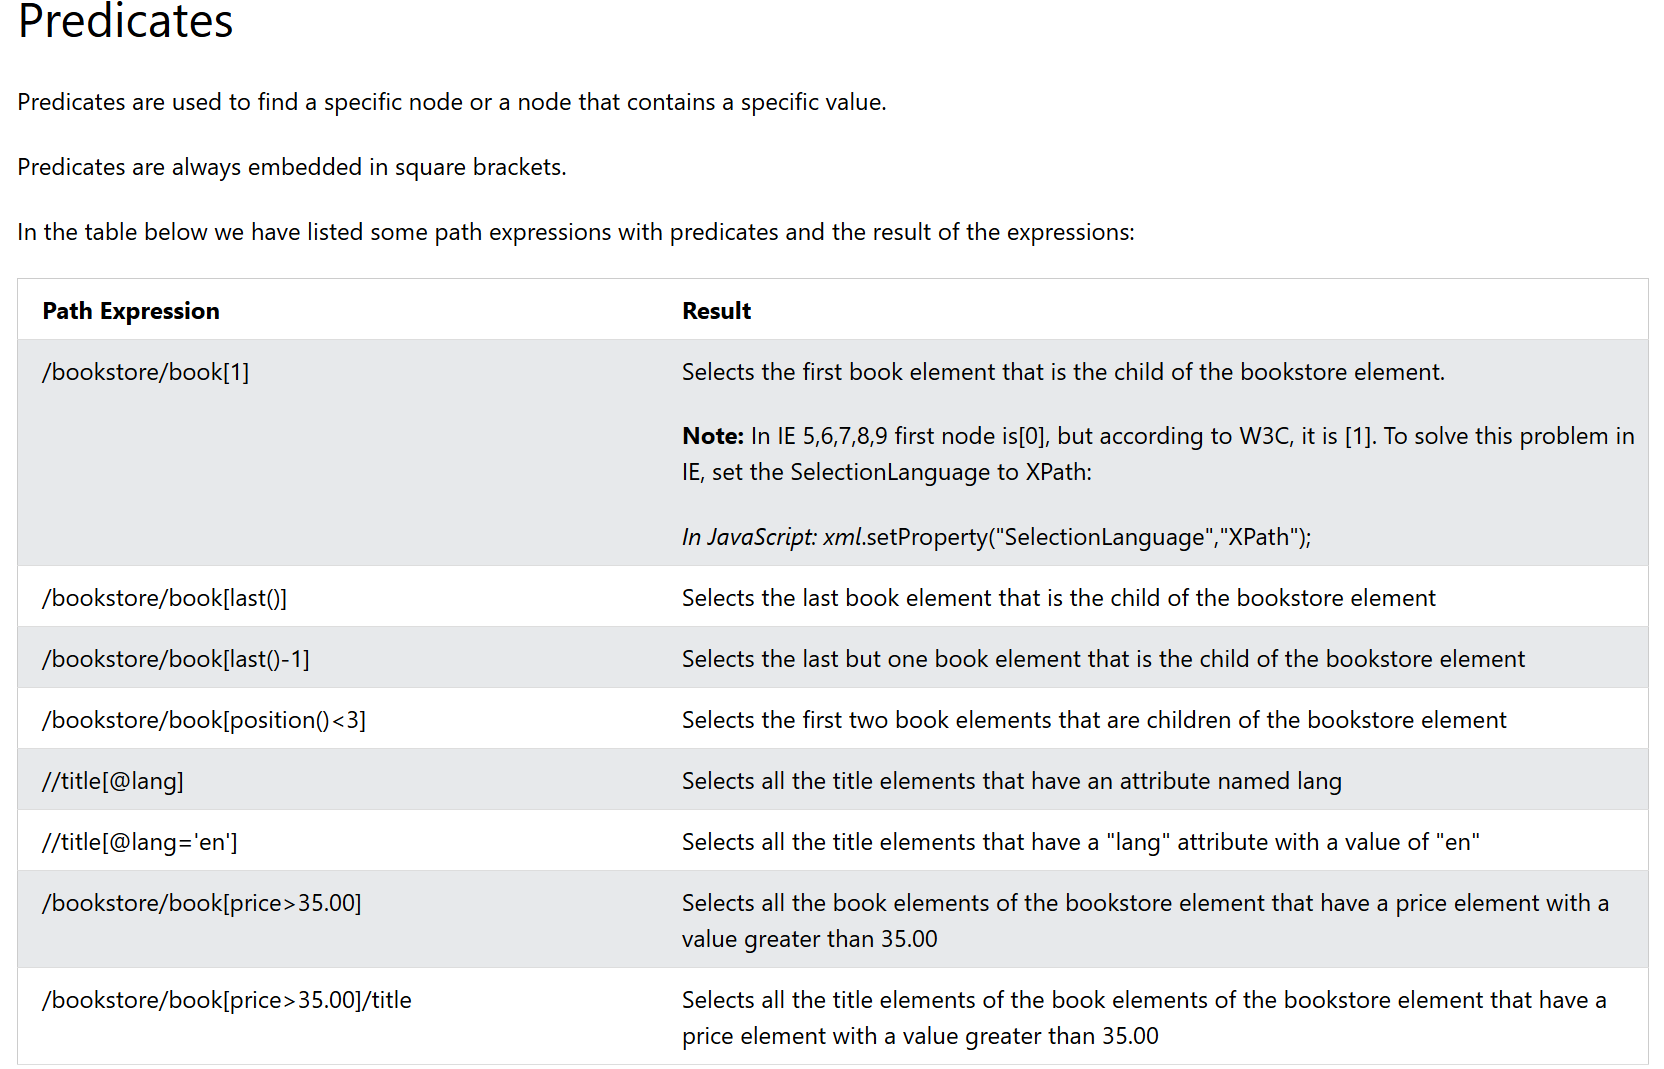
Predicates
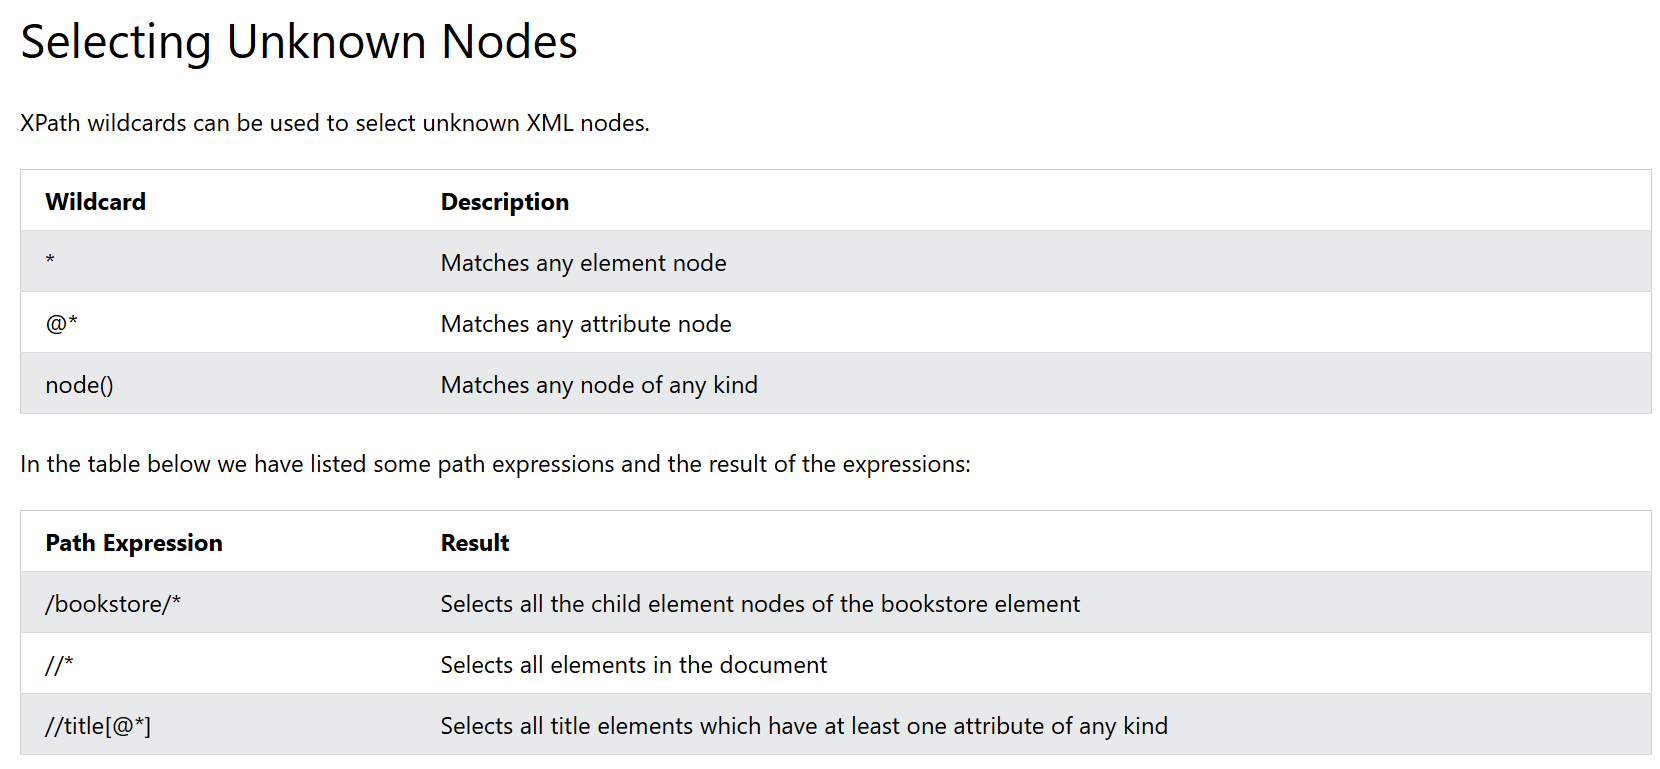
Selecting Unknown Nodes
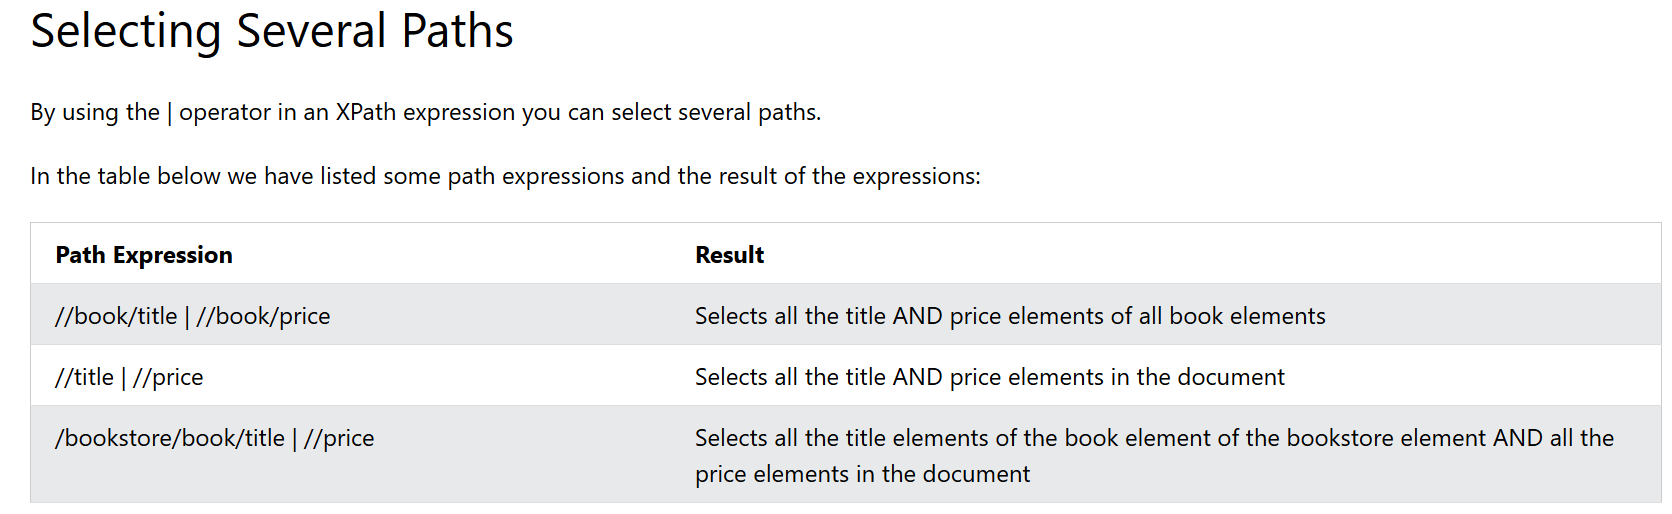
Selecting Several Paths
Web Scraping Tutorial
1. Build a basic scraper
# import the required library
from selenium import webdriver

# initialize an instance of the chrome driver (browser)
driver = webdriver.Chrome()

# visit your target site
driver.get("https://www.scrapingcourse.com/ecommerce/")

# output the full-page HTML
print(driver.page_source)

# release the resources allocated by Selenium and shut down the browser
driver.quit()
2. Set up Headless Mode
# import the required library

from selenium import webdriver


# instantiate a Chrome options object

options = webdriver.ChromeOptions()


# set the options to use Chrome in headless mode

options.add_argument("--headless=new")


# initialize an instance of the Chrome driver (browser) in headless mode

driver = webdriver.Chrome(options=options)


# ...
3. Extract Specific Data From the page
find_elements
- CSS Selectors:
ID,CLASS_NAME, `CSS_SELECTOR) - XPath:
XPATH - Direct selectors:
NAME,LINK_TEXT,PARTIAL_LINK_TEXT,TAG_NAME
# import the required libraries
from selenium import webdriver
from selenium.webdriver.common.by import By

# instantiate a Chrome options object
options = webdriver.ChromeOptions()

# set the options to use Chrome in headless mode
options.add_argument("--headless=new")

# initialize an instance of the chrome driver (browser) in headless mode
driver = webdriver.Chrome(
    options=options,
)

# visit your target site
driver.get("https://www.scrapingcourse.com/ecommerce")

product_data = {
    "Url": driver.find_element(
        By.CSS_SELECTOR, ".woocommerce-LoopProduct-link"
    ).get_attribute("href"),
    "Image": driver.find_element(By.CSS_SELECTOR, ".product-image").get_attribute(
        "src"
    ),
    "Name": driver.find_element(By.CSS_SELECTOR, ".product-name").text,
    "Price": driver.find_element(By.CSS_SELECTOR, ".price").text,
}

# print the extracted data
print(product_data)

# release the resources allocated by Selenium and shut down the browser
driver.quit()
3-2. Scrape Multiple Elements With Selenium
# import the required libraries
from selenium import webdriver
from selenium.webdriver.common.by import By

# instantiate a Chrome options object
options = webdriver.ChromeOptions()

# set the options to use Chrome in headless mode
options.add_argument("--headless=new")

# initialize an instance of the chrome driver (browser) in headless mode
driver = webdriver.Chrome(
    options=options,
)

# visit your target site
driver.get("https://www.scrapingcourse.com/ecommerce")

# extract all the product containers
products = driver.find_elements(By.CSS_SELECTOR, ".product")

# declare an empty list to collect the extracted data
extracted_products = []

# loop through the product containers
for product in products:

    # extract the elements into a dictionary using the CSS selector
    product_data = {
        "name": product.find_element(By.CSS_SELECTOR, ".product-name").text,
        "price": product.find_element(By.CSS_SELECTOR, ".price").text,
        "URL": product.find_element(
            By.CSS_SELECTOR, ".woocommerce-LoopProduct-link"
        ).get_attribute("href"),
        "image": product.find_element(By.CSS_SELECTOR, ".product-image").get_attribute(
            "src"
        ),
    }

    # append the extracted data to the extracted_product list
    extracted_products.append(product_data)

# print the extracted data
print(extracted_products)

# release the resources allocated by Selenium and shut down the browser
driver.quit()
4. Export Data to CSV
# import the required libraries
from selenium import webdriver
from selenium.webdriver.common.by import By
import csv

# instantiate a Chrome options object
options = webdriver.ChromeOptions()

# set the options to use Chrome in headless mode
options.add_argument("--headless=new")

# initialize an instance of the chrome driver (browser) in headless mode
driver = webdriver.Chrome(
    options=options,
)

# visit your target site
driver.get("https://www.scrapingcourse.com/ecommerce")

# extract all the product containers
products = driver.find_elements(By.CSS_SELECTOR, ".product")

# declare an empty list to collect the extracted data
extracted_products = []

# loop through the product containers
for product in products:

    # extract the elements into a dictionary using the CSS selector
    product_data = {
        "Url": product.find_element(
            By.CSS_SELECTOR, ".woocommerce-LoopProduct-link"
        ).get_attribute("href"),
        "Image": product.find_element(By.CSS_SELECTOR, ".product-image").get_attribute(
            "src"
        ),
        "Name": product.find_element(By.CSS_SELECTOR, ".product-name").text,
        "Price": product.find_element(By.CSS_SELECTOR, ".price").text,
    }

    # append the extracted data to the extracted_product list
    extracted_products.append(product_data)

print(extracted_products)

# specify the CSV file name
csv_file = "products.csv"

# write the extracted data to the CSV file
with open(csv_file, mode="w", newline="", encoding="utf-8") as file:
    # write the headers
    writer = csv.DictWriter(file, fieldnames=["Url", "Image", "Name", "Price"])
    writer.writeheader()
    # write the rows
    writer.writerows(extracted_products)

# confirm that the data has been written to the CSV file
print(f"Data has been written to {csv_file}")

# release the resources allocated by Selenium and shut down the browser
driver.quit()
실습
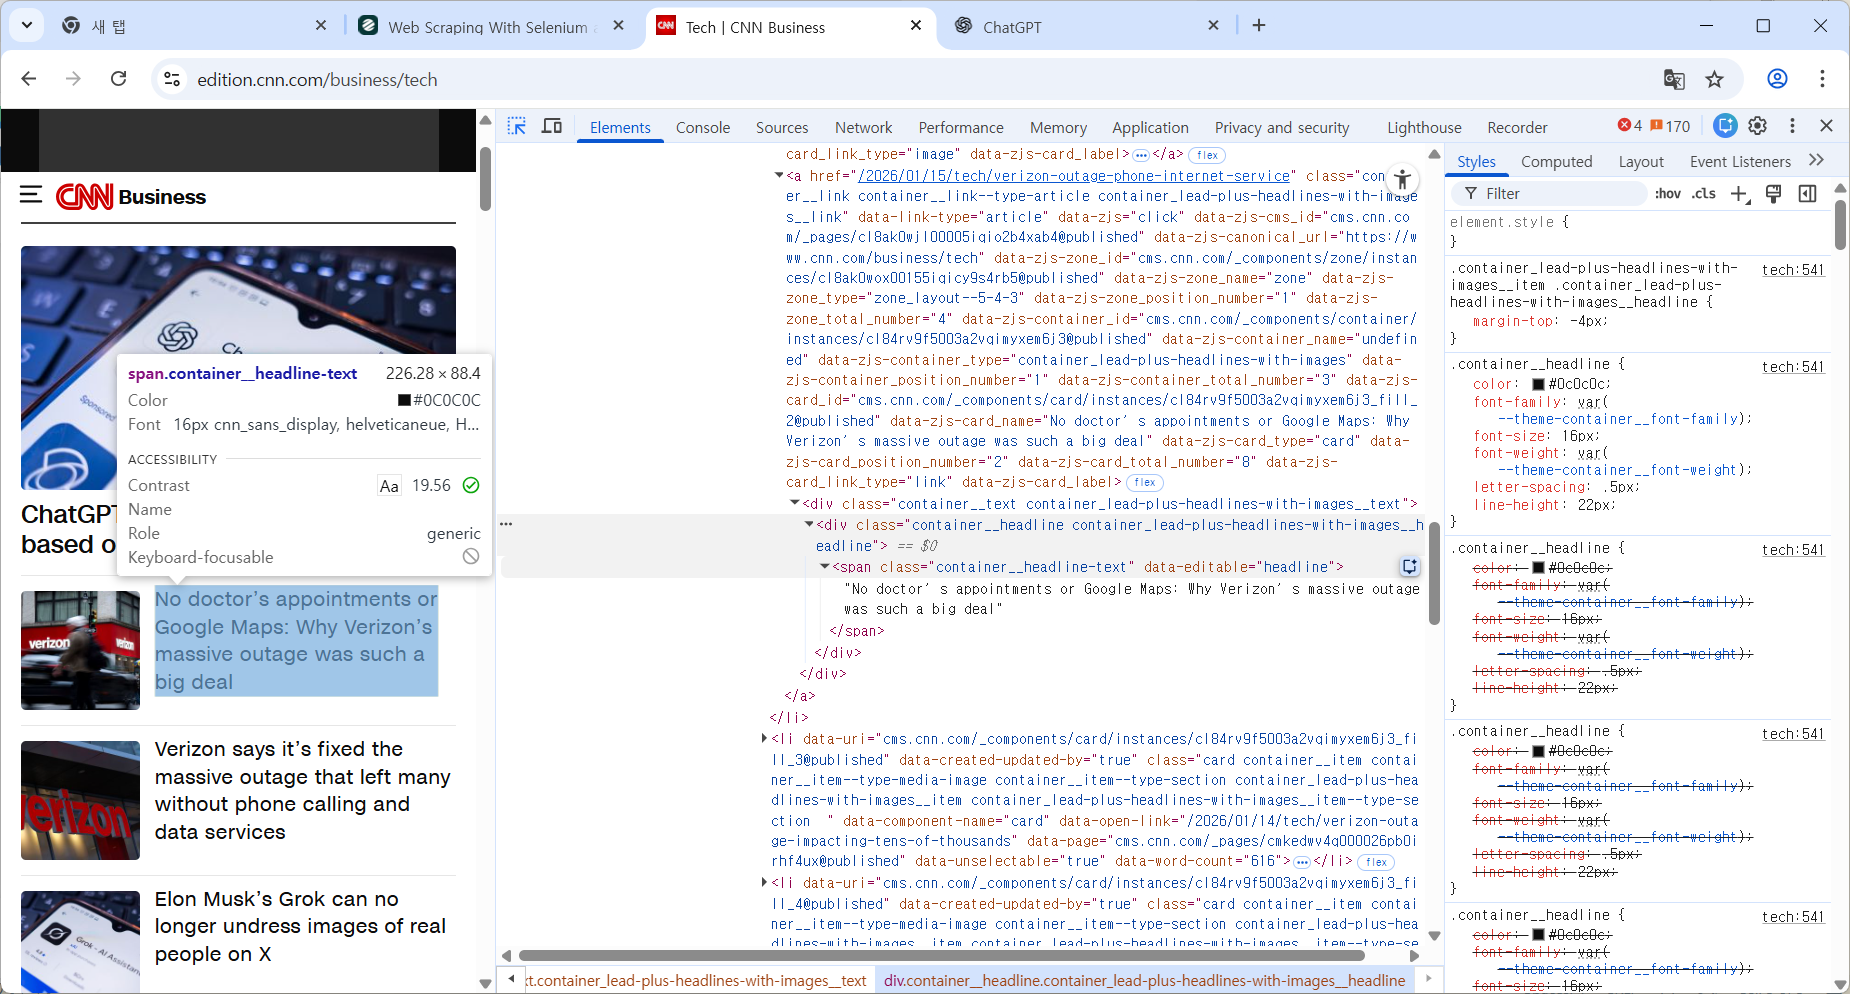
1. Selenium으로 CNN Tech 기사 제목 가져오기
1-1. html구조 확인
1-2. 코드 작성
from selenium import webdriver
from selenium.webdriver.common.by import By

options = webdriver.ChromeOptions()
options.add_argument("--headless=new")

driver = webdriver.Chrome(
    options=options,
)

driver.get("https://edition.cnn.com/business/tech")
print(driver.page_source)

titles = driver.find_elements(
    By.CSS_SELECTOR,
    "span.container__headline-text"
)

for t in titles:
    print(t.text)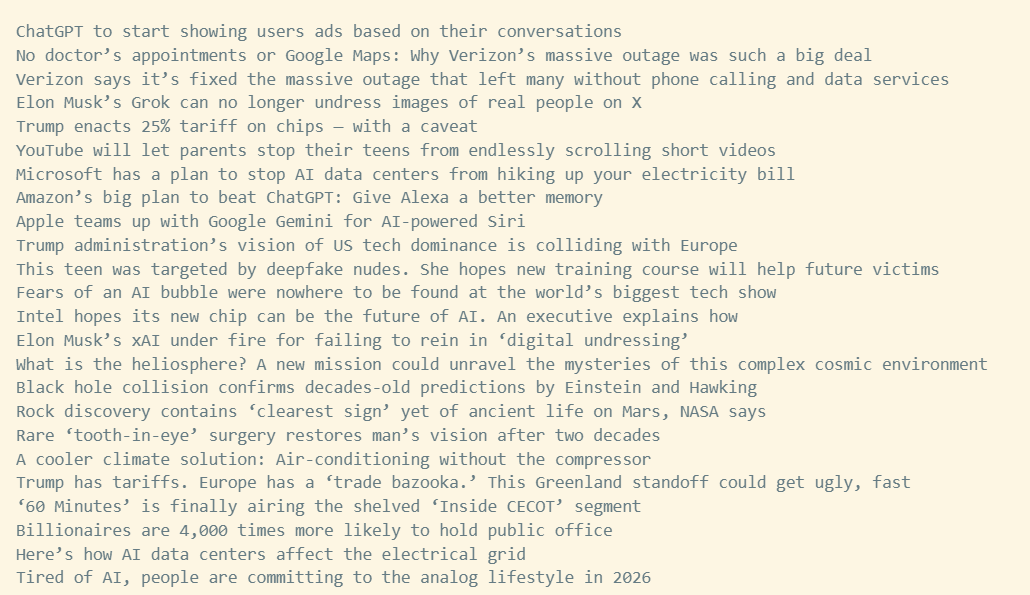
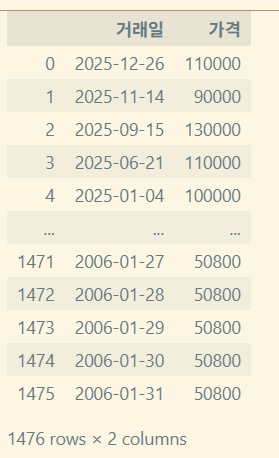
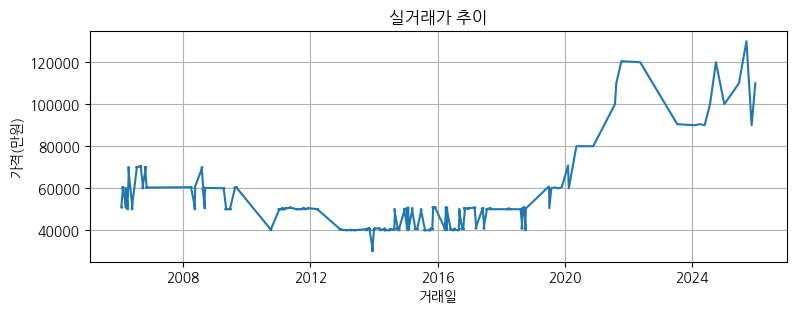
2. 부동산 가격 추이 정보 가져와서 matplotlib 그래프 그리기
2-1. html 구조 확인
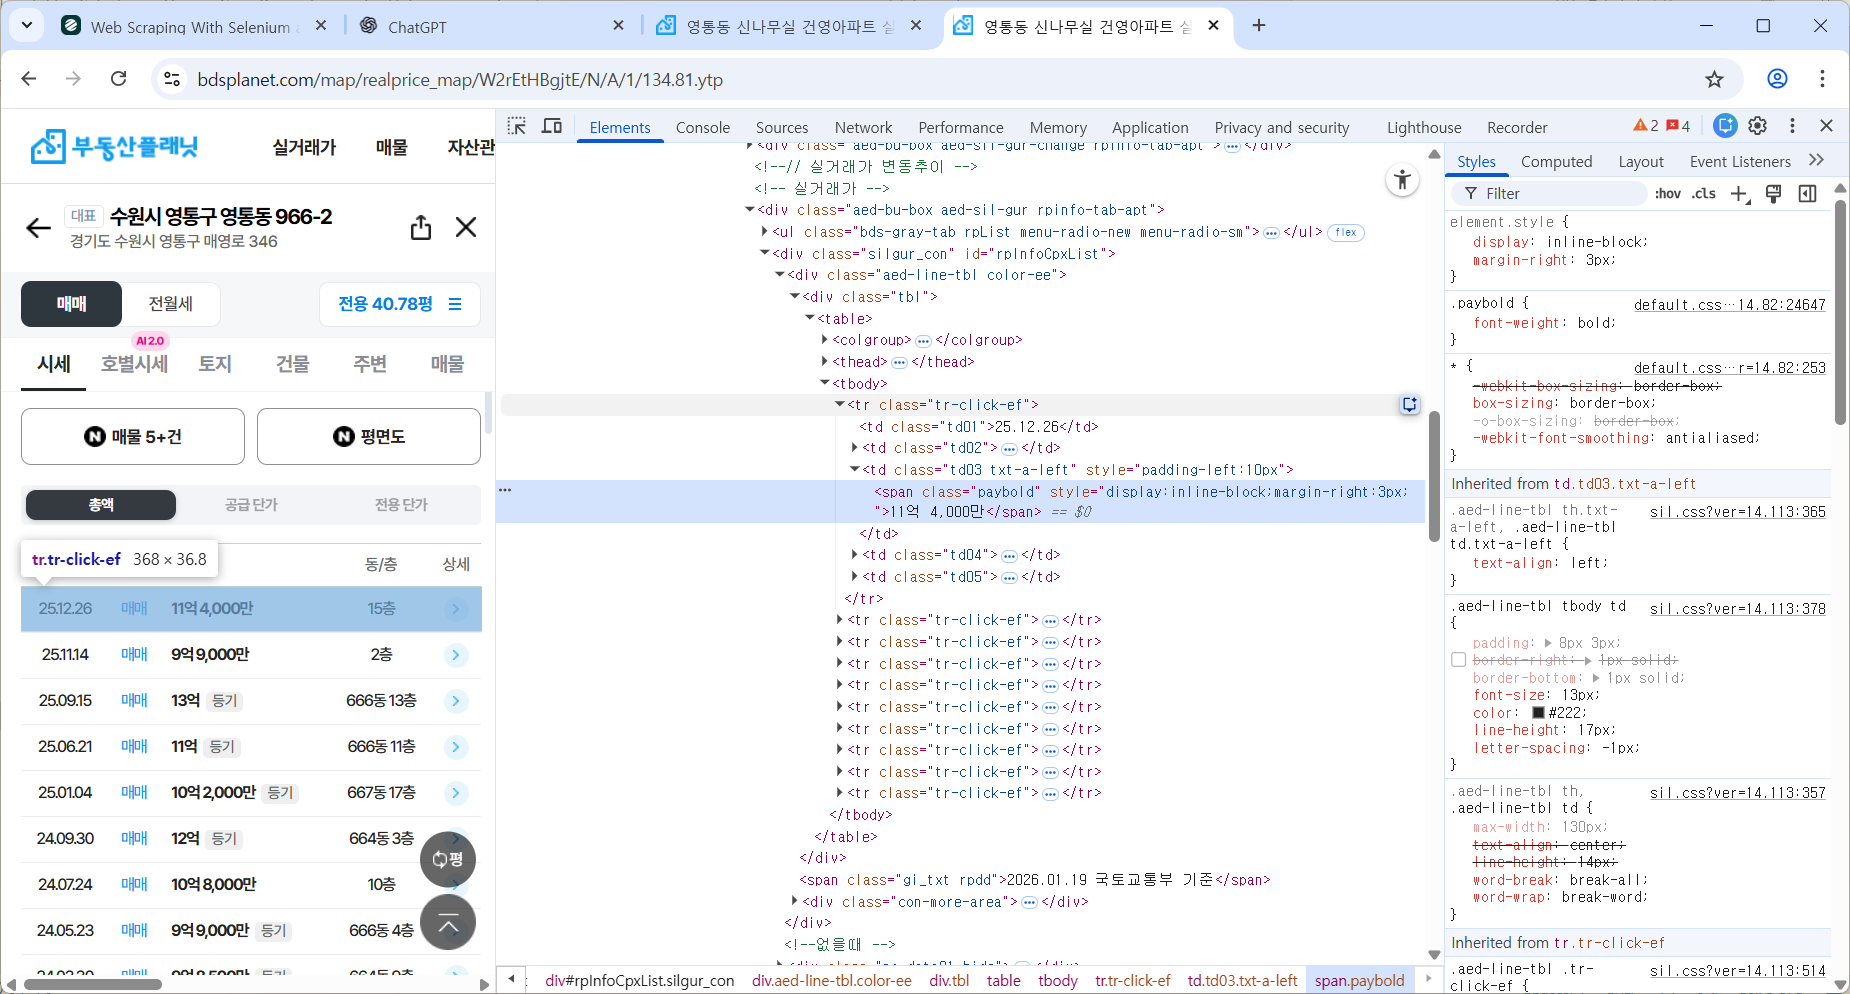
실거래가 더 보기 눌러 전부 가져오기
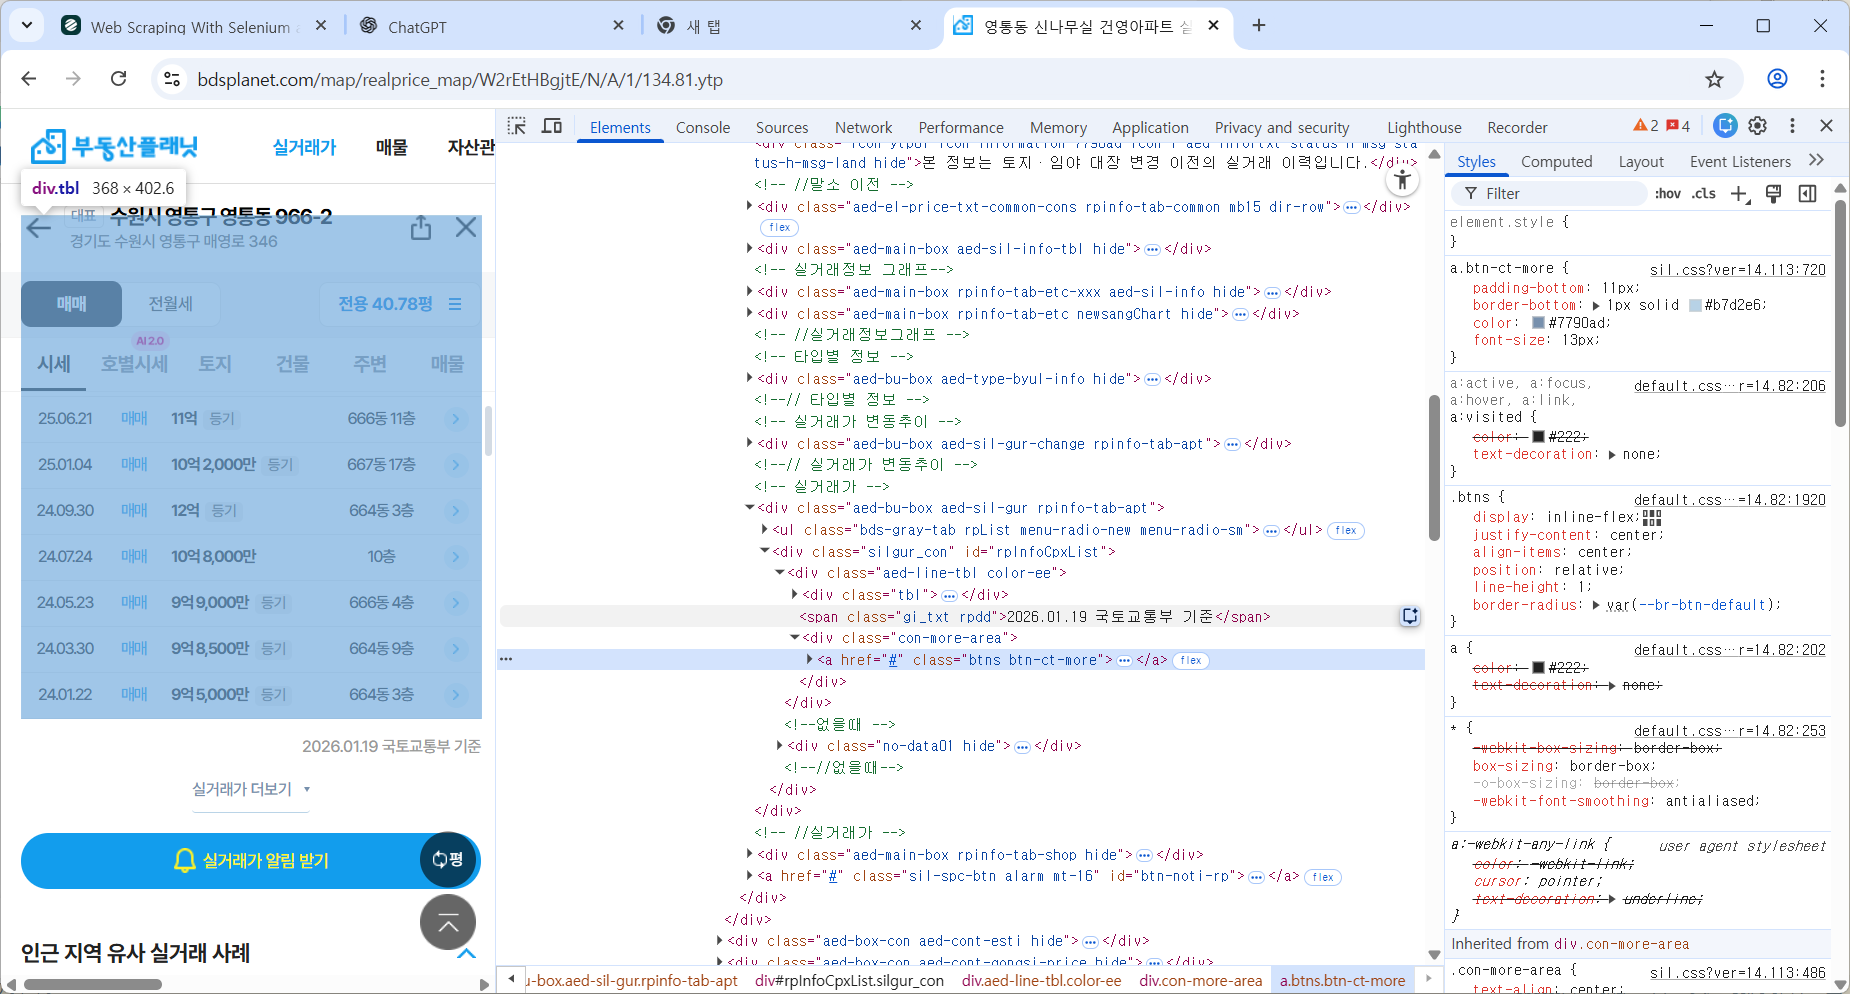
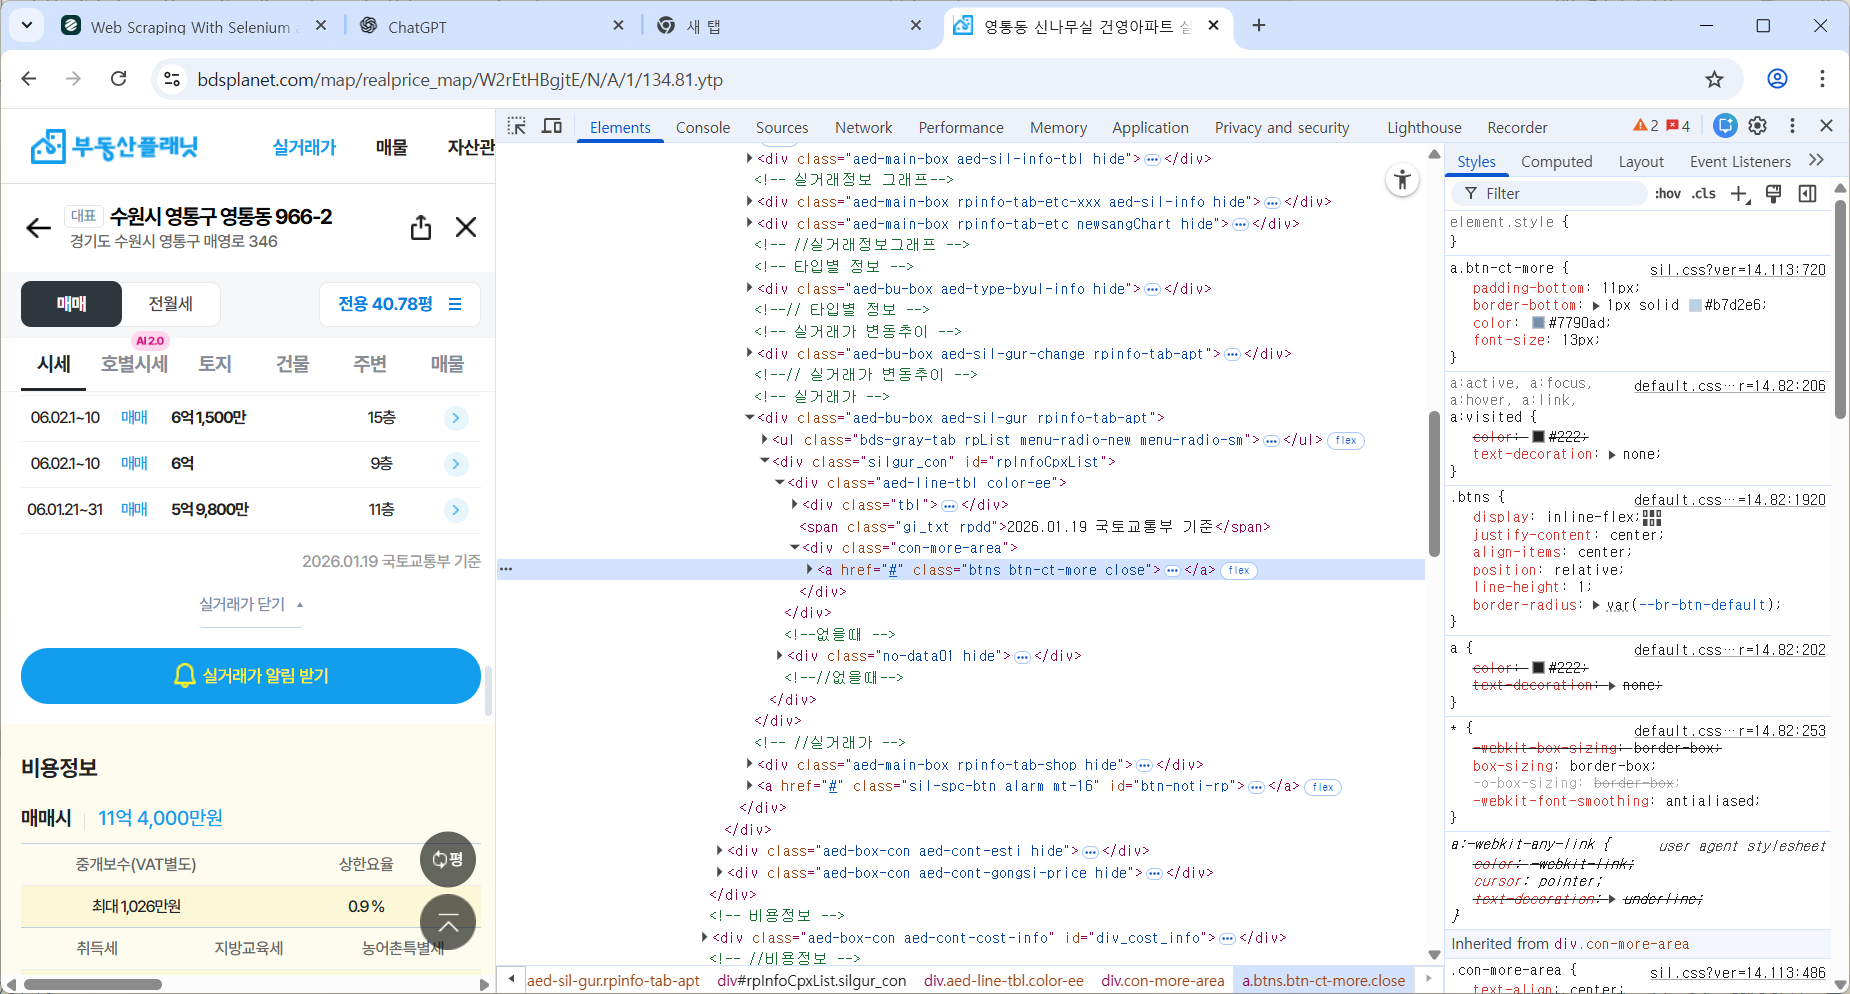
버튼이 close 클래스로 변하는 것을 이용한다.
2-2. 코드 작성
https://github.com/RudinP/MicrosoftDataSchool-WebCrawling
텍스트 데이터 전처리
기본 텍스트 정제와 정규화
정제(cleaning)
노이즈 데이터를 제거
- 등장 빈도가 적은 단어
- 길이가 짧은 단어(한국어에서는 X)
- 불용어
정규화(Normalization)
표현 방법이 다른 단어들을 통합시켜서 같은 단어로 만듦
- 규칙 기반: US=USA, 서울=서울시=서울특별시
- 대/소문자 통합
- 표제어 추출(Lemmatization): am → be, having → have
- 어간 추출(Stemming): am → am, having → hav
불용어(Stopword)
자주 등장하지만 분석을 하는데 있어서 큰 도움이 되지 않는 단어들
https://raw.githubusercontent.com/stopwords-iso/stopwords-ko/refs/heads/master/stopwords-ko.txt
- I, my, me, over
- 조사, 접미사
#불용어 제거 방법
result = [word for word in word_tokens if not word in stop_words]
정규식
https://docs.python.org/3/library/re.html
- 정규식을 이용한 특정 패턴 제거
- 공백, 특수 문자, 숫자
- XML, HTML 등의 tag
- 기타 정형화된 문서에서 원치않는 정보 제거
한글 형태소 분석기 라이브러리
KoNLPy
https://github.com/konlpy/konlpy
- 더 이상 업데이트가 없다.
- Wrapper: Java 기반 외부 분석기 사용
- 품사 tagging 및 어근 추출
- 여러 내부 엔진 사용
- Hannanum
- Kkma
- Komoran: 여러 어절을 하나의 품사로 분석 가능
- Mecab: mecab-ko project, 설치 어려움
- Okt: twitter에서 시작
KSS
- korean Sentence Splitter로 시작
- Korean Stirng processing Suite가 최종 버전
- 실제 현장에서는 딱히
- 빠른 속도를 원한다면 Mecab 설치 권장
Kiwi (Korean Intelligent Word Identifier)
https://github.com/bab2min/Kiwi?tab=readme-ov-file
- C++
- Python wrapper: kiwipiepy
https://github.com/bab2min/kiwipiepy
Okt 사용 예제
>>> from konlpy.tag import Okt
>>> okt = Okt()

>>> print(okt.morphs(u'단독입찰보다 복수입찰의 경우'))
['단독', '입찰', '보다', '복수', '입찰', '의', ‘경우']

>>> print(okt.nouns(u'유일하게 항공기 체계 종합개발 경험을 갖고 있는 KAI는'))
['항공기', '체계', '종합', '개발', ‘경험']

>>> print(okt.phrases(u'날카로운 분석과 신뢰감 있는 진행으로'))
['날카로운 분석', '날카로운 분석과 신뢰감', '날카로운 분석과 신뢰감 있는 진행', '분석', '신뢰', ‘진행']

>>> print(okt.pos(u'이것도 되나욬ᄏᄏ'))
[('이', 'Determiner'), ('것', 'Noun'), ('도', 'Josa'), ('되나욬', 'Noun'), ('ᄏᄏ',
'KoreanParticle')]
>>> print(okt.pos(u'이것도 되나욬ᄏᄏ', norm=True))
[('이', 'Determiner'), ('것', 'Noun'), ('도', 'Josa'), ('되나요', 'Verb'), ('ᄏᄏ',
'KoreanParticle')]
>>> print(okt.pos(u'이것도 되나욬ᄏᄏ', norm=True, stem=True))
[('이', 'Determiner'), ('것', 'Noun'), ('도', 'Josa'), ('되다', 'Verb'), ('ᄏᄏ',
'KoreanParticle')]
Wordcloud
https://amueller.github.io/word_cloud/generated/wordcloud.WordCloud.html#wordcloud.WordCloud
- 단어의 빈도수를 시각적으로 표현
- 빈도수가 높은 단어일수록 크게 표시
- 사용 예시
- SNS 분석
- 고객 의견 시각화
- 뉴스 기사 주요 키워드 추출
- 여론 조사/리뷰 데이터 분석
# Generate a word cloud image
wordcloud = WordCloud().generate(text)

# Display the generated image:
# the matplotlib way:
import matplotlib.pyplot as plt
plt.imshow(wordcloud, interpolation='bilinear')
plt.axis(“off")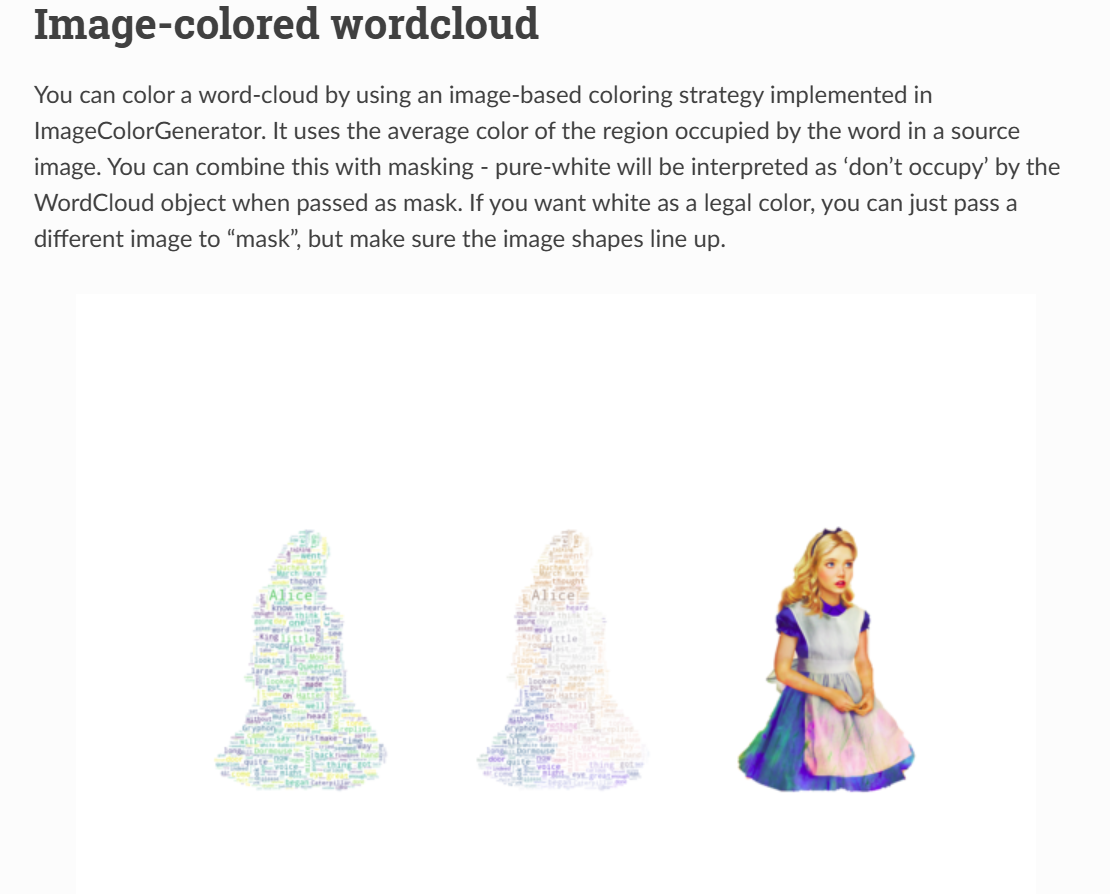
from os import path
from PIL import Image
import numpy as np
import matplotlib.pyplot as plt
import os

from wordcloud import WordCloud, STOPWORDS, ImageColorGenerator

# get data directory (using getcwd() is needed to support running example in generated IPython notebook)
d = path.dirname(__file__) if "__file__" in locals() else os.getcwd()

# Read the whole text.
text = open(path.join(d, 'alice.txt')).read()

# read the mask / color image taken from
# http://jirkavinse.deviantart.com/art/quot-Real-Life-quot-Alice-282261010
alice_coloring = np.array(Image.open(path.join(d, "alice_color.png")))
stopwords = set(STOPWORDS)
stopwords.add("said")

wc = WordCloud(background_color="white", max_words=2000, mask=alice_coloring,
               stopwords=stopwords, max_font_size=40, random_state=42)
# generate word cloud
wc.generate(text)

# create coloring from image
image_colors = ImageColorGenerator(alice_coloring)

# show
fig, axes = plt.subplots(1, 3)
axes[0].imshow(wc, interpolation="bilinear")
# recolor wordcloud and show
# we could also give color_func=image_colors directly in the constructor
axes[1].imshow(wc.recolor(color_func=image_colors), interpolation="bilinear")
axes[2].imshow(alice_coloring, cmap=plt.cm.gray, interpolation="bilinear")
for ax in axes:
    ax.set_axis_off()
plt.show()
실습
뉴스 기사를 Web Scraping하여 불용어를 제거하고 명사를 대상으로 word cloud 작성하기
- 어떤 형태소 분석기를 사용할것인가
- 간단한 문장으로 형태소 분석기 동작 확인
- Web scraping으로 URL을 가져오는 routine과 형태소르 분석하여 명사의 수를 count 하는 부분 분리
- 표시할 명사의 개수 제한
주제
테크데일리 기사 본문 Scrap 후 WordCloud화하기
원래 초반 강사님께서 테크 관련 뉴스기사를 해외 기사에서 보라고 하셨기에, 앞선 웹크롤링 실습에서 CNN의 테크분야 기사를 크롤링해오는 실습을 진행했었다.
하지만 영어로는 한글 형태소 분석이 불가능했기에 국내 테크데일리 뉴스기사의 주요 기사의 본문들을 가져와 워드클라우드화하는것으로 정하였다.
0. 단계 설정
형태소 분석기는 업데이트가 없는 konlpy보다는 Kiwi를 택했다.
데이터스크랩(웹크롤링, Selenium) → 형태소 분석(Kiwi) → 워드클라우드 생성(WordCloud, matplotlib) 로 단계를 분할해 생각했다.
1. 데이터스크랩
- 주요 기사 div를 찾는다
- 기사별 링크를 타고 들어간다
- 본문을 긁어온다.
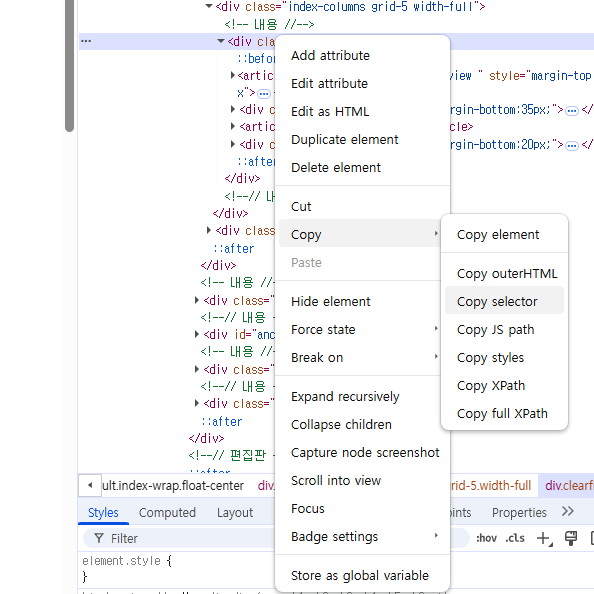
copy selector을 이용하여 ChatGPT에게 질문하여 가져올 수 있도록 했다.
def dataScrap():
    options = webdriver.ChromeOptions()
    options.add_argument("--headless")
    driver = webdriver.Chrome(options=options)

    driver.get("https://www.techdaily.co.kr/")

    section = WebDriverWait(driver, 5).until(
        EC.presence_of_element_located((By.CSS_SELECTOR,
            "#cus-idx-default > div:nth-child(3) > div.index-columns.grid-5.width-full > div > article:nth-child(3) > section"))
    )

    links_elements = section.find_elements(By.TAG_NAME, "a")
    links = list({a.get_attribute("href") for a in links_elements})

    articles = []
    for link in links:
        driver.get(link)

        article = WebDriverWait(driver, 3).until(
            EC.presence_of_element_located((By.ID, "article-view-content-div"))
        )

        articles.append(article.text)

    driver.quit()
    return articles
2. 형태소 분석
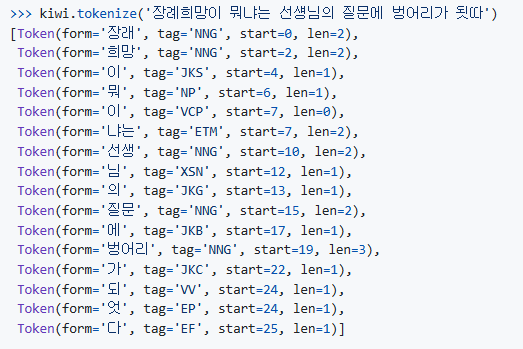
github 레포지터리의 예시를 보고 파싱했다.
오늘 배운 정규식을 이용하여 tag가 명사인 토큰들만 가져오는 방안을 택했다.
lamda를 이용하고싶었으나, 평탄화작업까지 하기에는 가독성이 떨어져 ChatGPT에게 평탄화, 불용어 처리 작업까지 해서 results를 리턴하도록 리팩토링 부탁했다.
def make_tokens(data):
    kiwi = Kiwi()
    results = []

    for item in data:
        forms = [
            t.form
            for t in kiwi.tokenize(item)
            if re.match(NOUN_TAG, t.tag)
            and t.form not in STOPWORDS
        ]
        results.extend(forms)

    return results
3. WordCloud 생성
frequency 기준으로 생성하도록 했다.
처음에 import WordCloud가 안되길래 왜지? 했는데 from wordcloud import WordCloud가 맞는 구문이었다.
또한 plt.imshow에서 이미지를 보여주는 건줄 알았는데, 이는 메모리에 저장해둔 상태이므로 plt.show까지 해야 화면에 출력되는 것을 알았다.
def make_Wordcloud(words):
    counter = Counter(words)

    wc = WordCloud(
        font_path=font_path,
        background_color='white',
        width=800,
        height=400
    )

    wc.generate_from_frequencies(counter)
    plt.imshow(wc, interpolation="bilinear")
    plt.axis("off")
    plt.show()
전체 코드
from selenium import webdriver
from selenium.webdriver.common.by import By
from selenium.webdriver.support.ui import WebDriverWait
from selenium.webdriver.support import expected_conditions as EC
from kiwipiepy import Kiwi
from collections import Counter
from wordcloud import WordCloud
import re
import matplotlib.pyplot as plt

NOUN_TAG = '^N+'
STOPWORDS = {'이', '것', '수', '등'}
font_path = 'C:/Windows/Fonts/malgun.ttf'

def dataScrap():
    options = webdriver.ChromeOptions()
    options.add_argument("--headless")
    driver = webdriver.Chrome(options=options)

    driver.get("https://www.techdaily.co.kr/")

    section = WebDriverWait(driver, 5).until(
        EC.presence_of_element_located((By.CSS_SELECTOR,
            "#cus-idx-default > div:nth-child(3) > div.index-columns.grid-5.width-full > div > article:nth-child(3) > section"))
    )

    links_elements = section.find_elements(By.TAG_NAME, "a")
    links = list({a.get_attribute("href") for a in links_elements})

    articles = []
    for link in links:
        driver.get(link)

        article = WebDriverWait(driver, 3).until(
            EC.presence_of_element_located((By.ID, "article-view-content-div"))
        )

        articles.append(article.text)

    driver.quit()
    return articles


def make_tokens(data):
    kiwi = Kiwi()
    results = []

    for item in data:
        forms = [
            t.form
            for t in kiwi.tokenize(item)
            if re.match(NOUN_TAG, t.tag)
            and t.form not in STOPWORDS
        ]
        results.extend(forms)

    return results

def make_Wordcloud(words):
    counter = Counter(words)

    wc = WordCloud(
        font_path=font_path,
        background_color='white',
        width=800,
        height=400
    )

    wc.generate_from_frequencies(counter)
    plt.imshow(wc, interpolation="bilinear")
    plt.axis("off")
    plt.show()

data = dataScrap()
words = make_tokens(data)
make_Wordcloud(words) 
https://github.com/RudinP/MicrosoftDataSchool-WordCloudPractice
마치며
어떤분께서는 이전에 워드프레스 등으로 작업했던 아이디어를 이어서 그를 확장하며 기능을 추가하는 단계까지 나아가셨다고 한다. 하나를 길게 이어가는 컨셉을 배워야겠다고 느꼈다.
그렇게되면 나는 인스타그램에서 #맛집 으로 검색했을 때, 단어를 긁어와서 음식과 지역으로 분류한 워드클라우드를 생성할 수 있지 않을까 생각했다.
이미 테크 기사 워드클라우드 생성하기로 정해서 진행을 했지만, 다음에 작업하게된다면 이쪽 아이디어도 괜찮을듯했다.