[MicrosoftDataSchool] 54일차 - Databricks MLflow 실험 관리, Feature Store, LLM, 이미지 분류 & 캡셔닝
Microsoft Data School 3기
실습 3: MLflow 실험 관리 심화
MLflow로 ML 실험을 체계적으로 기록하고 관리하는 방법
- Part A: 자동 로깅의 마법 (autolog)
- Part B: 커스텀 로깅 (파라미터, 메트릭, 아티팩트)
- Part C: 모델 시그니처 & 입력 예제
Part A: 자동 로깅
import mlflow
import mlflow.sklearn
from sklearn.model_selection import train_test_split
from sklearn.ensemble import RandomForestClassifier
from sklearn.metrics import f1_score, accuracy_score
import pandas as pd

# 데이터 준비
CATALOG = "3dt016_databricks"
SCHEMA = "wine"

wine_df = spark.table(f"{CATALOG}.{SCHEMA}.wine_quality_lab").toPandas()
X = wine_df.drop(["is_good_quality", "quality"], axis=1, errors="ignore")
y = wine_df["is_good_quality"]

X_train, X_test, y_train, y_test = train_test_split(X, y, test_size=0.2, random_state=42)
print(f"학습: {len(X_train)}개, 테스트: {len(X_test)}개")
autolog()
# 자동 로깅 활성화
mlflow.autolog()

# 실험 이름 설정
mlflow.set_experiment("/Users/" + spark.sql("SELECT current_user()").first()[0] + "/wine_quality_mlflow_lab")

# 모델 학습 — autolog이 자동으로 모든 것을 기록합니다!
with mlflow.start_run(run_name="autolog_rf_baseline"):
    rf = RandomForestClassifier(n_estimators=100, max_depth=5, random_state=42)
    rf.fit(X_train, y_train)

    y_pred = rf.predict(X_test)
    print(f"F1 Score: {f1_score(y_test, y_pred):.4f}")
    print(f"Accuracy: {accuracy_score(y_test, y_pred):.4f}")
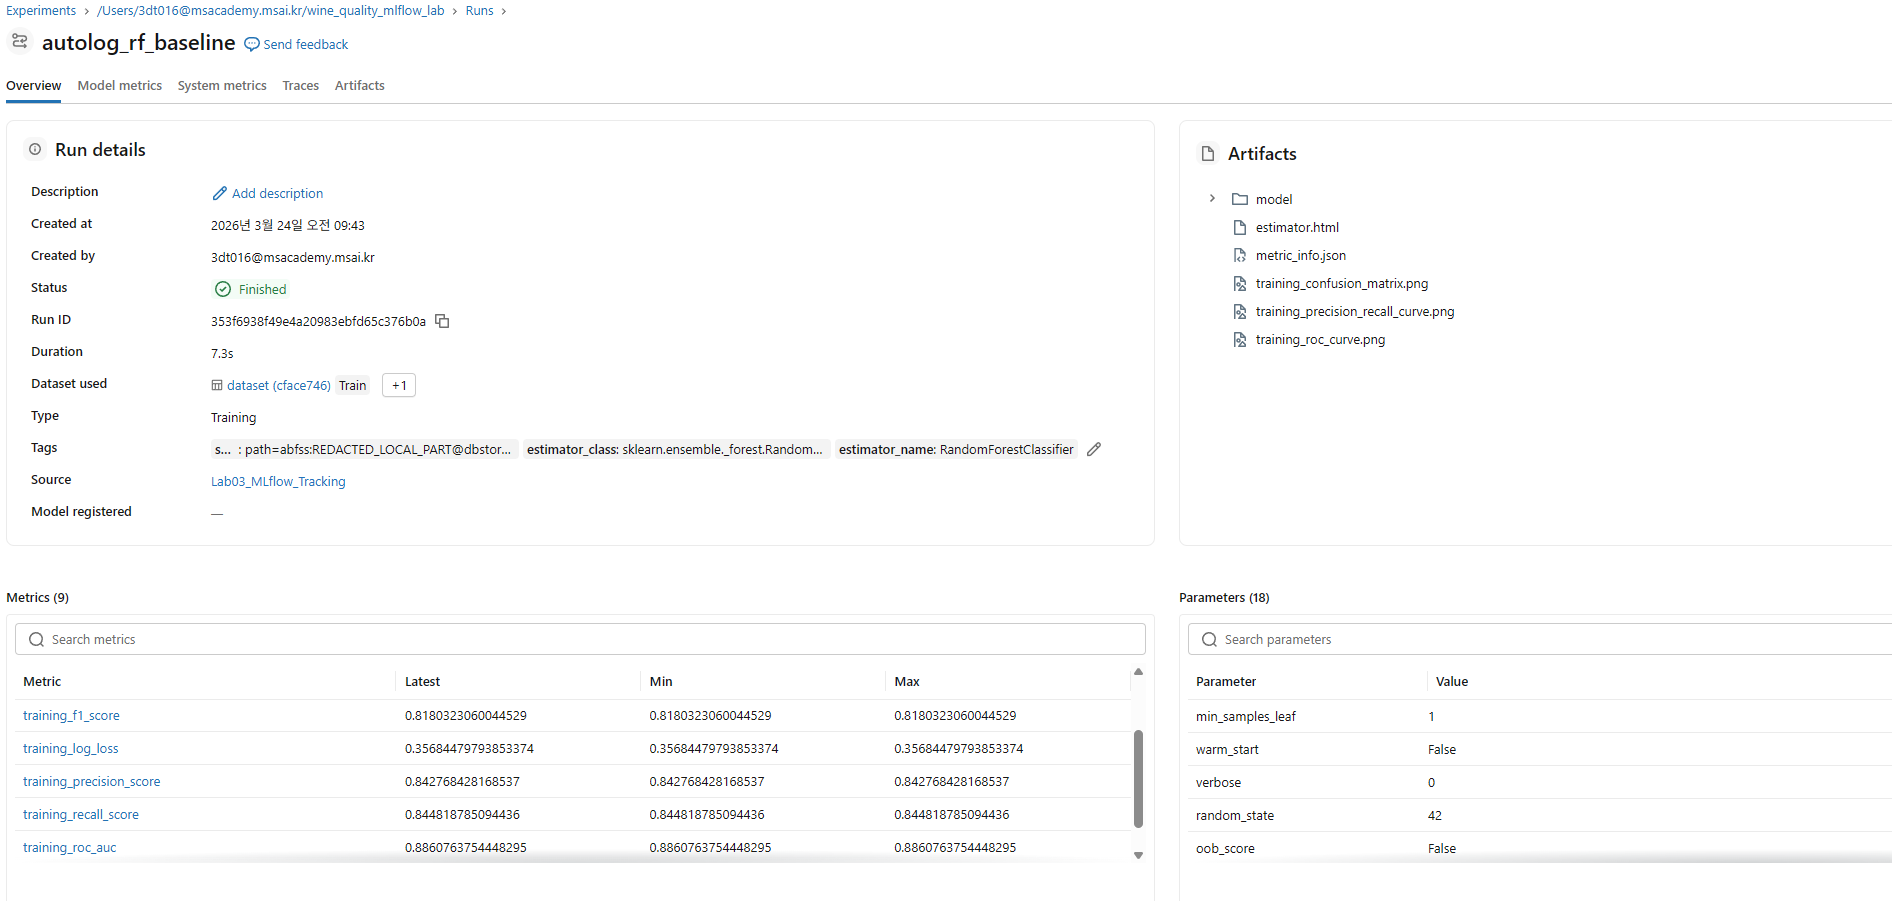
💡 Experiments UI
- 왼쪽 메뉴 → Experiments → 방금 생성된 실험 클릭
- 자동 기록된 항목: 하이퍼파라미터, 메트릭, 학습된 모델, Feature Importance
여러 모델 비교 실험
from sklearn.ensemble import GradientBoostingClassifier
from sklearn.linear_model import LogisticRegression

models = {
    "rf_shallow": RandomForestClassifier(n_estimators=50, max_depth=3, random_state=42),
    "rf_deep": RandomForestClassifier(n_estimators=200, max_depth=10, random_state=42),
    "gb_default": GradientBoostingClassifier(n_estimators=100, random_state=42),
    "lr_baseline": LogisticRegression(max_iter=1000, random_state=42),
}

for name, model in models.items():
    with mlflow.start_run(run_name=name):
        model.fit(X_train, y_train)
        y_pred = model.predict(X_test)
        print(f"{name}: F1={f1_score(y_test, y_pred):.4f}")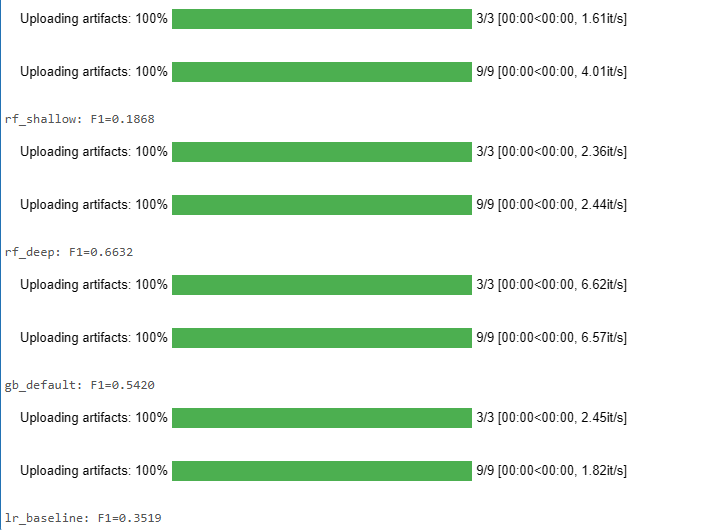
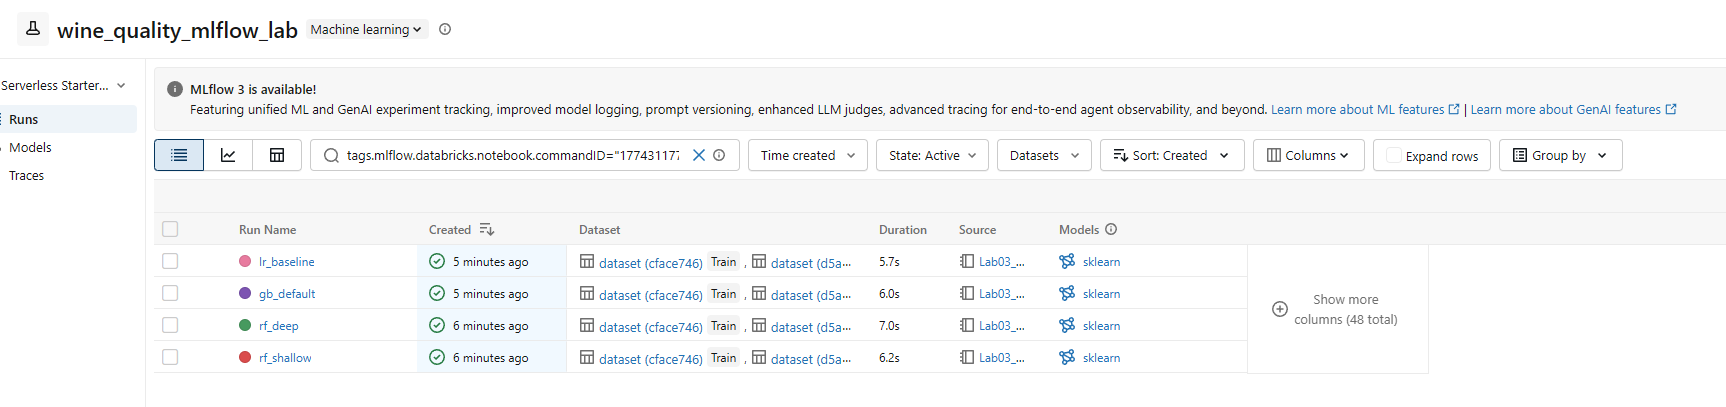
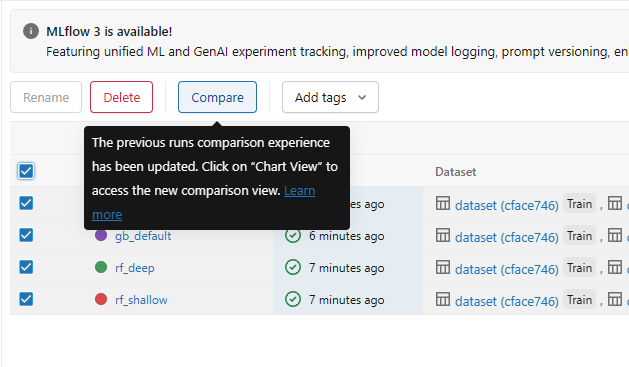
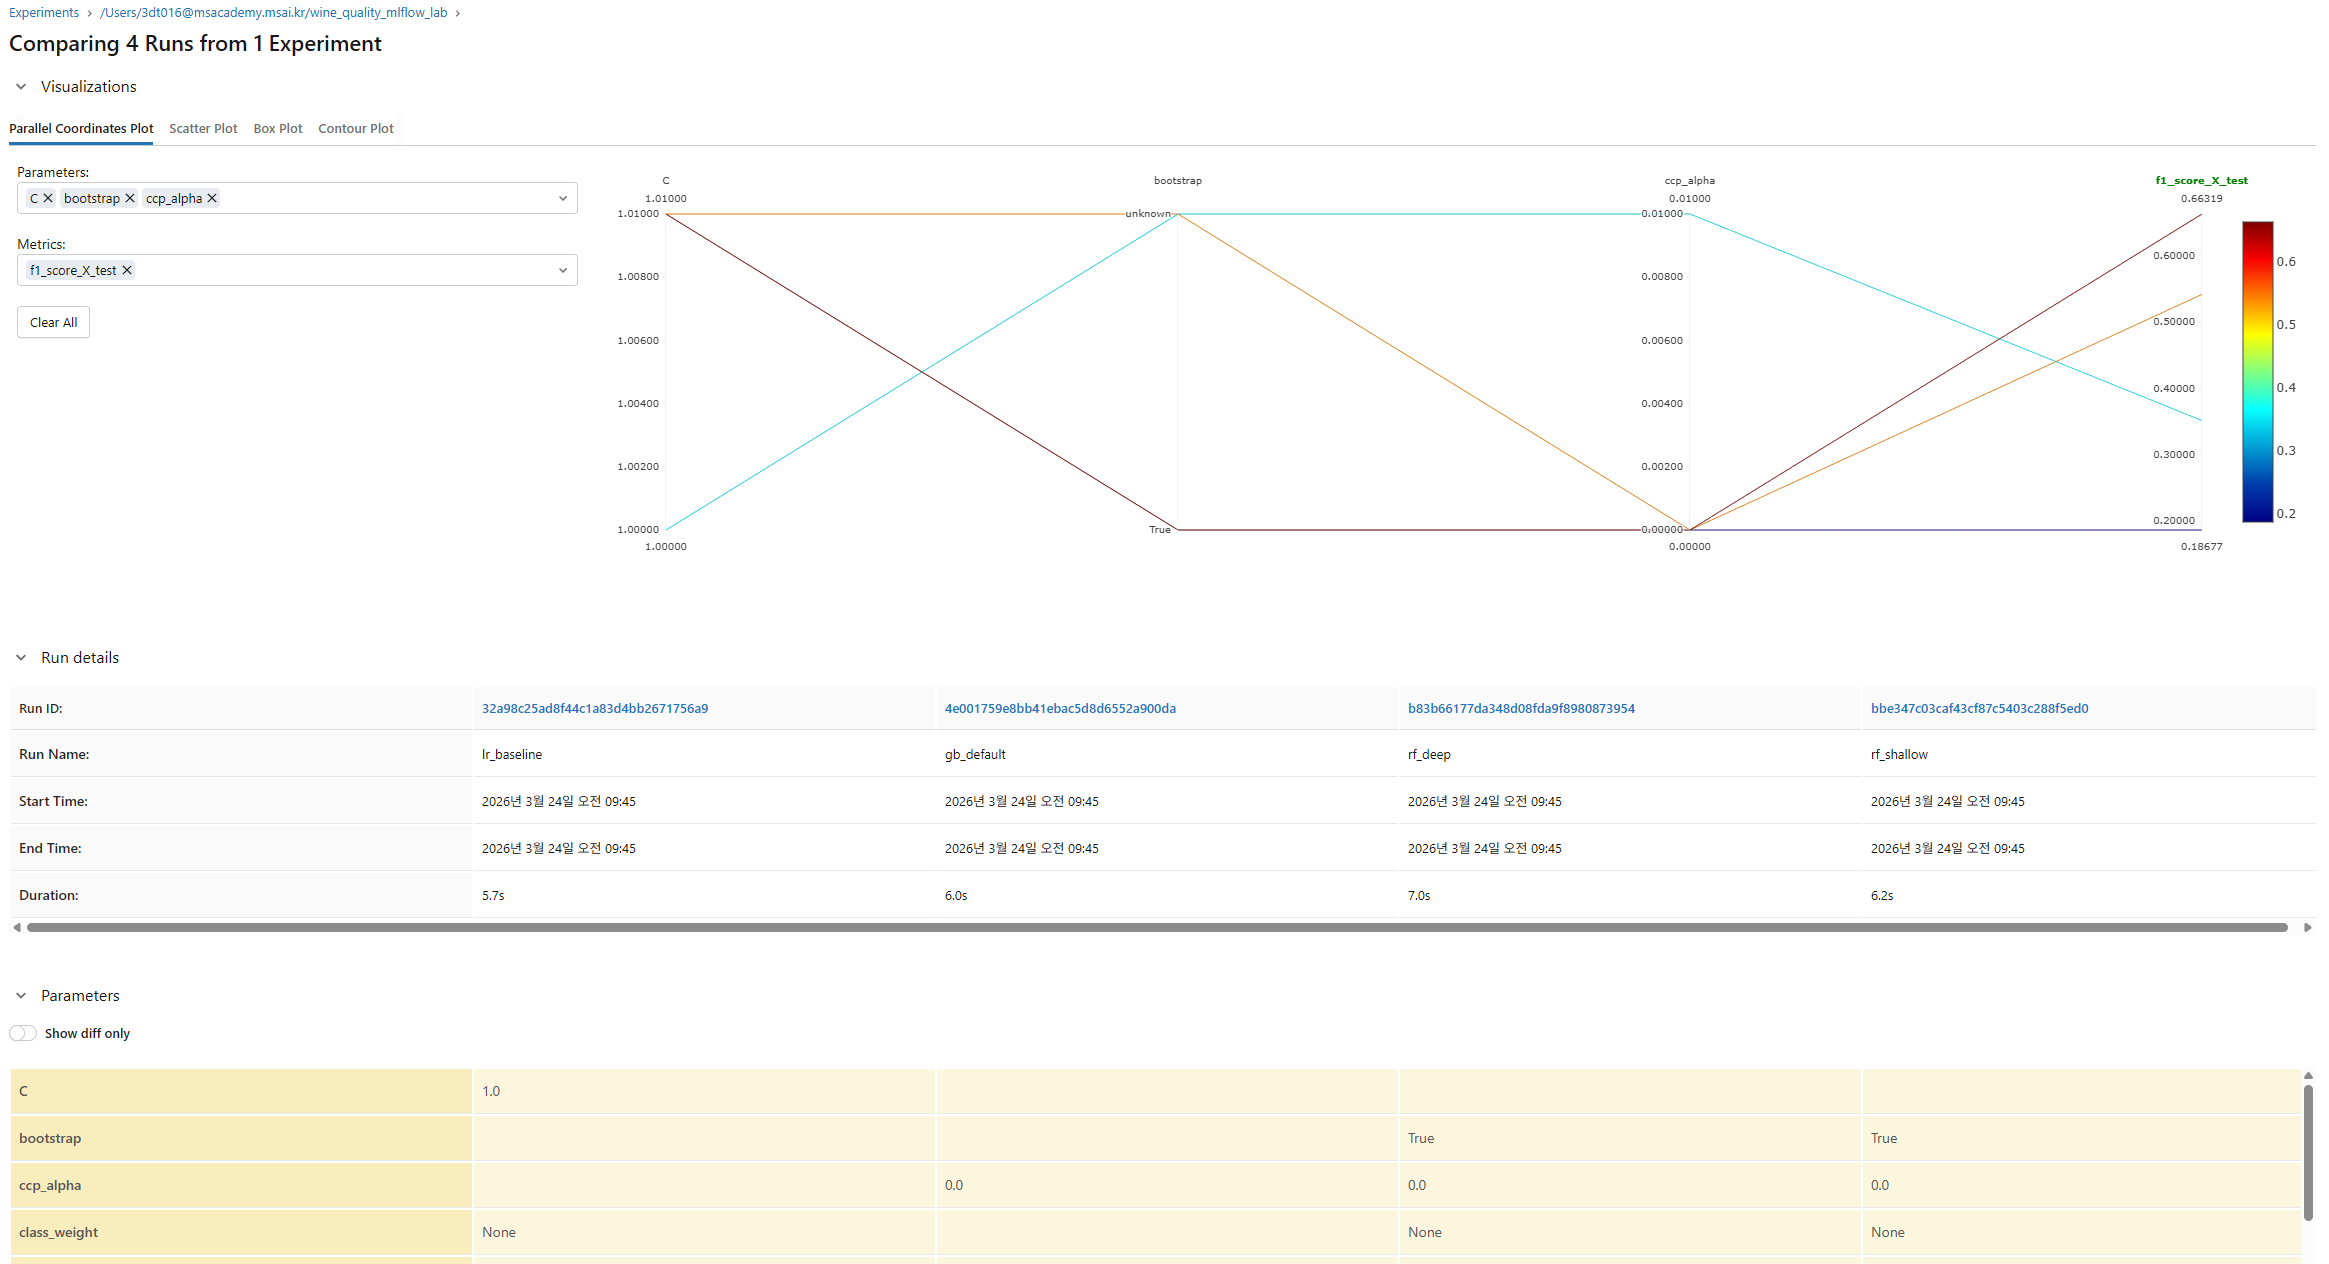
Experiments UI에서 런을 비교
- 여러 런을 체크박스로 선택
- "Compare" 버튼 클릭
- 파라미터-메트릭 차트에서 패턴 발견하기
Part B: 커스텀 로깅
import matplotlib.pyplot as plt
from sklearn.metrics import confusion_matrix, ConfusionMatrixDisplay, roc_curve, auc
import numpy as np

mlflow.autolog(disable=True)  # 커스텀 로깅을 위해 자동 로깅 끄기

with mlflow.start_run(run_name="custom_logging_demo"):
    # 1️⃣ 커스텀 파라미터 로깅
    params = {
        "n_estimators": 150,
        "max_depth": 7,
        "min_samples_split": 5,
        "data_version": "v1.0",  # 데이터 버전도 추적!
        "feature_count": X_train.shape[1],
    }
    mlflow.log_params(params)

    # 2️⃣ 모델 학습
    rf = RandomForestClassifier(**{k: v for k, v in params.items()
                                   if k in ["n_estimators", "max_depth", "min_samples_split"]},
                                random_state=42)
    rf.fit(X_train, y_train)
    y_pred = rf.predict(X_test)
    y_prob = rf.predict_proba(X_test)[:, 1]

    # 3️⃣ 커스텀 메트릭 로깅
    metrics = {
        "f1_score": f1_score(y_test, y_pred),
        "accuracy": accuracy_score(y_test, y_pred),
        "positive_ratio": y_test.mean(),
    }
    mlflow.log_metrics(metrics)

    # 4️⃣ 아티팩트 로깅 — 혼동행렬
    fig, ax = plt.subplots(figsize=(6, 5))
    cm = confusion_matrix(y_test, y_pred)
    disp = ConfusionMatrixDisplay(cm, display_labels=["보통", "좋음"])
    disp.plot(ax=ax, cmap="Blues")
    ax.set_title("Wine Quality Confusion Matrix")
    fig.savefig("/tmp/confusion_matrix.png", dpi=150, bbox_inches="tight")
    mlflow.log_artifact("/tmp/confusion_matrix.png")
    plt.close()

    # 5️⃣ 아티팩트 로깅 — ROC 커브
    fpr, tpr, _ = roc_curve(y_test, y_prob)
    roc_auc = auc(fpr, tpr)

    fig, ax = plt.subplots(figsize=(6, 5))
    ax.plot(fpr, tpr, color='#FF3621', lw=2, label=f'AUC = {roc_auc:.3f}')
    ax.plot([0, 1], [0, 1], 'k--', lw=1)
    ax.set_xlabel('False Positive Rate')
    ax.set_ylabel('True Positive Rate')
    ax.set_title('ROC Curve')
    ax.legend()
    fig.savefig("/tmp/roc_curve.png", dpi=150, bbox_inches="tight")
    mlflow.log_artifact("/tmp/roc_curve.png")
    plt.close()

    # 6️⃣ 태그로 실험 분류
    mlflow.set_tags({
        "team": "data_school_3기",
        "task": "wine_quality_classification",
        "stage": "experiment",
    })

    # 7️⃣ 모델 로깅
    mlflow.sklearn.log_model(rf, "model")

    print(f"✅ 커스텀 로깅 완료!")
    print(f"   F1: {metrics['f1_score']:.4f}")
    print(f"   AUC: {roc_auc:.4f}")
Part C: 모델 시그니처 & 입력 예제
모델의 "사용 설명서"를 함께 기록
from mlflow.models import infer_signature

mlflow.autolog(disable=True)

with mlflow.start_run(run_name="model_with_signature"):
    rf = RandomForestClassifier(n_estimators=150, max_depth=7, random_state=42)
    rf.fit(X_train, y_train)
    y_pred = rf.predict(X_test)

    # 시그니처 자동 추론: 입력/출력 스키마를 모델에 기록
    signature = infer_signature(X_train, y_pred)

    # 입력 예제: 모델 테스트에 사용할 샘플 데이터
    input_example = X_test.head(3)

    mlflow.sklearn.log_model(
        rf,
        "model",
        signature=signature,
        input_example=input_example,
    )

    print("✅ 시그니처 포함 모델 로깅 완료!")
    print(f"\n📋 시그니처 정보:")
    print(signature)
# 저장된 모델 로드 & 예측 테스트
run_id = mlflow.last_active_run().info.run_id
loaded_model = mlflow.pyfunc.load_model(f"runs:/{run_id}/model")

# 시그니처 확인
print("모델 시그니처:", loaded_model.metadata.signature)

# 예측 테스트
sample = X_test.head(5)
predictions = loaded_model.predict(sample)
print(f"\n예측 결과: {predictions}")
시그니처: 모델 입출력 스키마
| 기능 | 코드 | 용도 |
|---|---|---|
| 자동 로깅 | mlflow.autolog() | 빠른 실험, 기본 추적 |
| 파라미터 | mlflow.log_param(key, value) | 하이퍼파라미터, 설정값 |
| 메트릭 | mlflow.log_metric(key, value) | 성능 수치 |
| 아티팩트 | mlflow.log_artifact(path) | 차트, 데이터 파일 |
| 태그 | mlflow.set_tag(key, value) | 실험 분류, 메타데이터 |
| 시그니처 | infer_signature(X, y) | 모델 입출력 스키마 |
실습 4: Feature Store & 배치 추론
Feature Store 를 사용하면 피처 재사용 + 학습-서빙 일관성 + 리니지 추적이 자동
- Feature Store 에 피처 테이블을 생성하고 중앙에서 관리하는 방법
- FeatureLookup 으로 학습 데이터셋을 자동 구성하는 방법
- fe.log_model()로 Feature Store 연동 모델을 로깅하는 방법
- fe.score_batch()와 Spark UDF 로 대규모 배치 추론을 수행하는 방법
이론
피처(Feature)의 정의
머신러닝에서 피처(Feature)란 모델이 예측을 위해 사용하는 입력 변수
- 원본 피처 (Raw Features): 원본 데이터의 컬럼 그대로. 예) alcohol, pH, density
- 파생 피처 (Derived Features): 원본 피처를 조합/변환하여 생성. 예)
free_sulfur_ratio = free_SO2 / total_SO2
Feature Store 가 필요한 이유
기존 문제점
- 피처 중복 개발: 팀마다 같은 피처를 다르게 계산하는 문제. 같은 데이터로 다른 결과가 나올 가능성 존재
- 학습-서빙 스큐 (Training-Serving Skew): 학습 때와 실제 서비스 때 피처 계산 로직이 달라서 성능이 저하되는 문제
- 리니지 부재: 어떤 피처가 어떤 모델에 사용되었는지 추적이 어려움
- 재사용 불가: 한번 만든 피처를 다른 프로젝트에서 쓰기 어려움
→ Feature Store을 사용하면 문제 해결. 피처를 중앙 저장소에 한 번 정의하고, 학습과 서빙 모두에서 같은 피처를 사용하게 만듦
학습-서빙 스큐 (Training-Serving Skew)
학습 시에는 df['a'] / df['b']로 계산하고, 서빙 시에는 조금 다른 로직으로 계산하면 모델 성능이 저하
→ Feature Store 의 해결책: 피처 계산 로직을 한 번만 정의하고, 학습(create_training_set)과 추론(score_batch) 모두 같은 Feature Store 에서 피처를 가져옴
Unity Catalog Feature Store
Databricks 의 Feature Store 는 Unity Catalog 에 통합되어 있음
피처 테이블은 일반 Delta 테이블과 동일하지만, 추가로 Primary Key 와 메타데이터가 등록되어 피처 조회/리니지 추적이 가능
| 구성요소 | 설명 |
|---|---|
| FeatureEngineeringClient | Feature Store와 상호작용하는 클라이언트 |
| fe.create_table() | 피처 테이블을 생성하고 등록 |
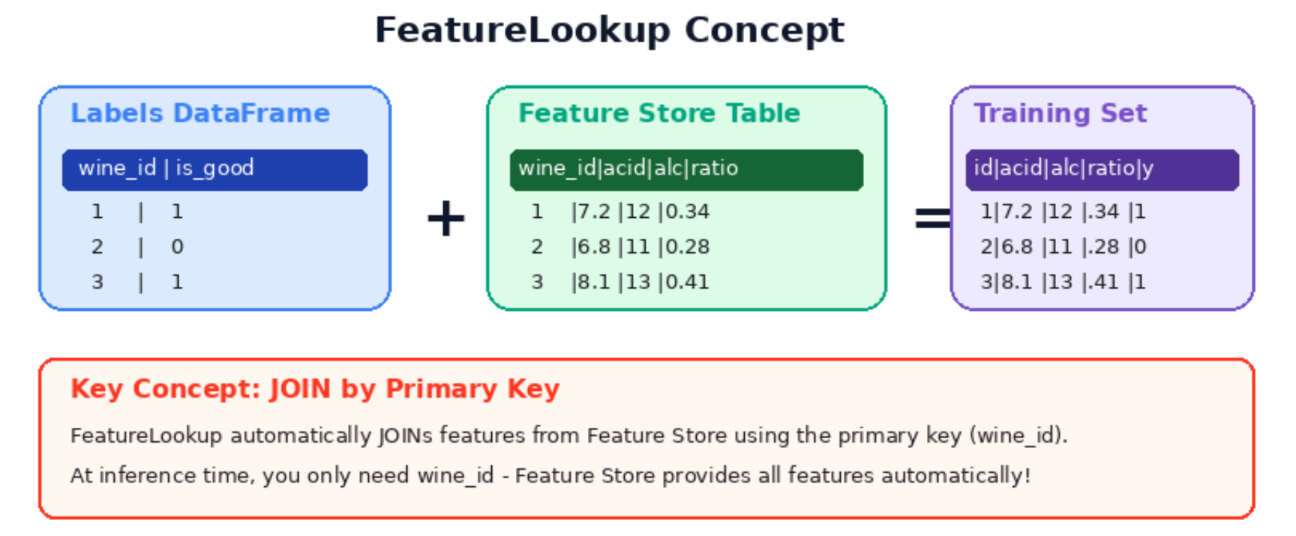
| FeatureLookup | Primary Key로 피처를 자동 조회하는 설정 |
| fe.create_training_set() | 라벨 DF + 피처 자동 JOIN으로 학습셋 생성 |
| fe.log_model() | 모델 + Feature Store 연동 정보를 함께 로깅 |
| fe.score_batch() | ID만 주면 피처 자동 조회 + 예측 |
아키텍처
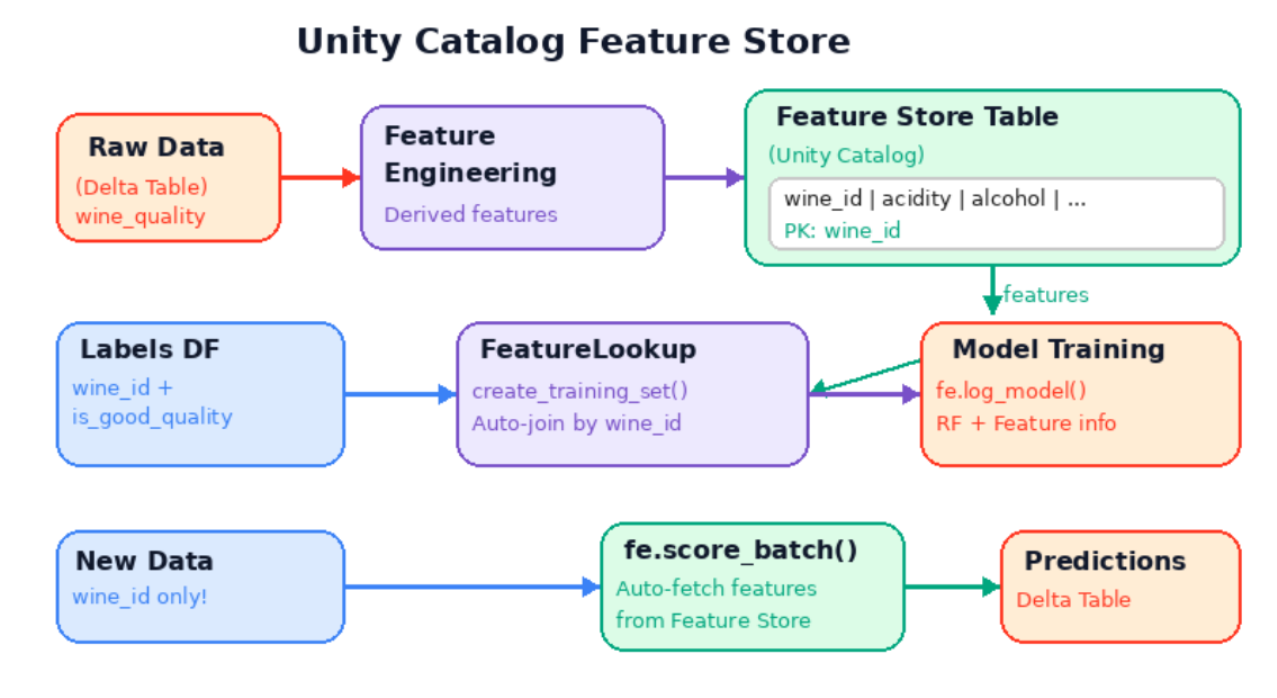
- 위쪽 (피처 생성): 원본 데이터에서 피처 엔지니어링을 거쳐 Feature Store 테이블에 저장
- 중간 (학습): Labels DF 와 Feature Store 를 FeatureLookup 으로 JOIN 하여 학습 데이터셋 생성 → 모델 학습
- 아래쪽 (추론): wine_id 만 있는 새 데이터 → score_batch()가 자동으로 피처 조회 + 예측
실습
Step 1: Feature Engineering — 피처 테이블 생성
from pyspark.sql import functions as F
from databricks.feature_engineering import FeatureEngineeringClient

fe = FeatureEngineeringClient()

CATALOG = "3dt016_databricks"
SCHEMA = "wine"

# 원본 데이터 로드
wine_raw = spark.table(f"{CATALOG}.{SCHEMA}.wine_quality_lab")
Primary key 생성
# 고유 키(primary key) 추가 — Feature Store 필수!
wine_with_id = wine_raw.withColumn("wine_id", F.monotonically_increasing_id())

display(wine_with_id.limit(5))- 실무에서는 user_id, product_id, order_id 등 비즈니스 키를 사용. 추론 시 이 키만 있으면Feature Store 가 자동으로 피처를 찾아줌
파생 피처 생성
# 피처 엔지니어링: 새로운 피처 생성
wine_features = wine_with_id.select(
    "wine_id",
    "fixed_acidity",
    "volatile_acidity",
    "citric_acid",
    "residual_sugar",
    "chlorides",
    "free_sulfur_dioxide",
    "total_sulfur_dioxide",
    "density",
    "pH",
    "sulphates",
    "alcohol",
    # 파생 피처들
    (F.col("free_sulfur_dioxide") / F.col("total_sulfur_dioxide")).alias("free_sulfur_ratio"),
    (F.col("fixed_acidity") * F.col("alcohol")).alias("acidity_alcohol_interaction"),
    # NaN 방지: alcohol이 0인 경우 대비
    F.when(F.col("alcohol") != 0, F.col("residual_sugar") / F.col("alcohol"))
     .otherwise(0.0).alias("sugar_alcohol_ratio"),
).fillna(0)  # NaN을 0으로 채움

display(wine_features.limit(5))
Step 2: Feature Store 테이블 등록
# Feature Store 테이블 생성
FEATURE_TABLE = f"{CATALOG}.{SCHEMA}.wine_features_lab"

try:
    fe.create_table(
        name=FEATURE_TABLE,
        primary_keys=["wine_id"],
        df=wine_features,
        description="와인 품질 예측을 위한 피처 테이블 (3기 실습)",
    )
    print(f"✅ Feature Store 테이블 생성 완료: {FEATURE_TABLE}")
except Exception as e:
    if "already exists" in str(e).lower():
        # 이미 존재하면 덮어쓰기
        fe.write_table(name=FEATURE_TABLE, df=wine_features, mode="overwrite")
        print(f"✅ Feature Store 테이블 업데이트 완료: {FEATURE_TABLE}")
    else:
        raise e
Step 3: Feature Store에서 피처 조회하여 모델 학습

학습 데이터셋 생성
from databricks.feature_engineering import FeatureLookup
import mlflow

# 라벨 데이터 (wine_id + target만 포함)
labels_df = wine_with_id.select("wine_id", "is_good_quality")

# Feature Lookup 정의
feature_lookups = [
    FeatureLookup(
        table_name=FEATURE_TABLE,
        lookup_key="wine_id",
    )
]

# 학습 데이터셋 생성 (Feature Store에서 자동으로 피처를 조회!)
# exclude_columns: wine_id는 조회 키일 뿐, 학습 피처가 아님!
training_set = fe.create_training_set(
    df=labels_df,
    feature_lookups=feature_lookups,
    label="is_good_quality",
    exclude_columns=["wine_id"],
)

training_df = training_set.load_df()
display(training_df.limit(5))- FeatureLookup 은 Feature Store 에서 피처를 자동으로 조회(JOIN)하는 설정. Labels DataFrame(wine_id + target)과 Feature Store 테이블을 Primary Key 로 자동 매칭
모델 학습 및 Feature Store 연동 로깅
# 모델 학습 + Feature Store 연동 로깅
from sklearn.ensemble import RandomForestClassifier
from sklearn.model_selection import train_test_split
from sklearn.metrics import f1_score
from mlflow.models import infer_signature

mlflow.set_experiment("/Users/" + spark.sql("SELECT current_user()").first()[0] + "/wine_feature_store_lab")

# Pandas 변환
train_pdf = training_df.toPandas()
X = train_pdf.drop(["is_good_quality"], axis=1)
y = train_pdf["is_good_quality"]
X_train, X_test, y_train, y_test = train_test_split(X, y, test_size=0.2, random_state=42)

with mlflow.start_run(run_name="feature_store_rf"):
    rf = RandomForestClassifier(n_estimators=150, max_depth=7, random_state=42)
    rf.fit(X_train, y_train)

    y_pred = rf.predict(X_test)
    f1 = f1_score(y_test, y_pred)
    mlflow.log_metric("f1_score", f1)
fe.log_model() — Feature Store 연동 로깅
- 일반 mlflow.sklearn.log_model() 대신 fe.log_model()을 사용
- 이렇게 하면 모델에 어떤 Feature Store 테이블의 어떤 피처를 사용했는지 기록됨
    # Feature Store 연동 모델 로깅
    fe.log_model(
        model=rf,
        artifact_path="model",
        flavor=mlflow.sklearn,
        training_set=training_set,
        registered_model_name=f"{CATALOG}.{SCHEMA}.wine_quality_model_lab",
    )

print(f"✅ Feature Store 연동 모델 학습 완료! F1: {f1:.4f}")- training_set 을 함께 로깅하면, 나중에 fe.score_batch()로 추론할 때 모델이 어떤 피처를 필요로
하는지 자동으로 알 수 있음 - ID 만 주면 나머지는 자동!
Step 4: 배치 추론 — Spark UDF로 대용량 예측
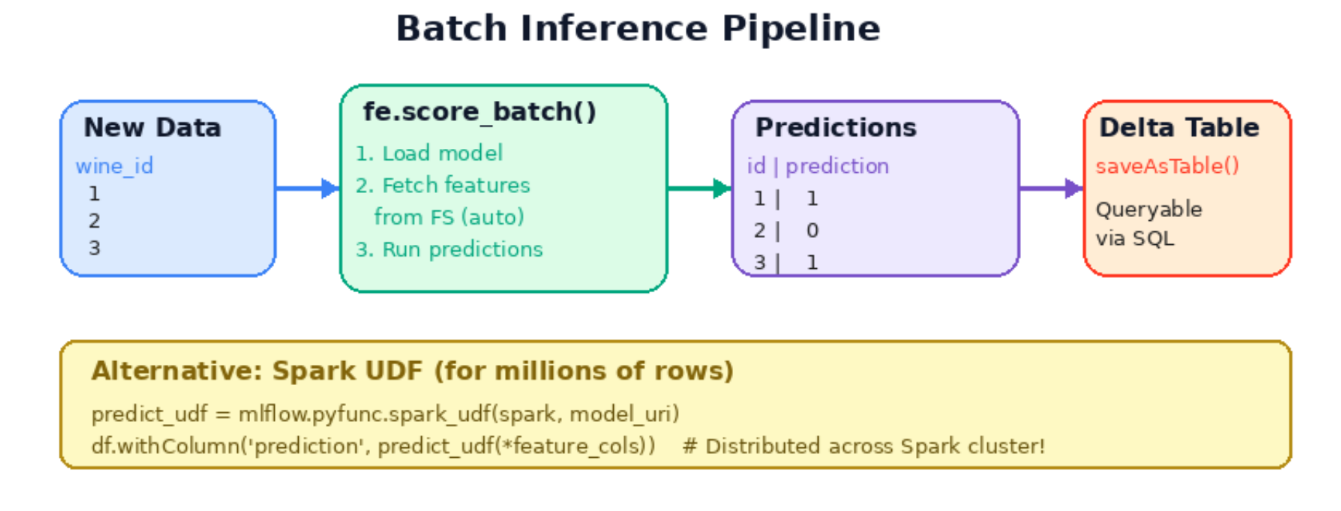
fe.score_batch() — 피처 자동 조회 + 예측
# 새로운 데이터가 들어왔다고 가정
# (실제로는 같은 데이터를 사용하지만, 실무에서는 새로운 배치 데이터)
new_data = wine_with_id.select(F.col("wine_id").cast("long")).limit(100)

# 등록된 모델의 최신 버전 자동 조회
from mlflow import MlflowClient
client = MlflowClient(registry_uri="databricks-uc")
model_name = f"{CATALOG}.{SCHEMA}.wine_quality_model_lab"
versions = client.search_model_versions(f"name='{model_name}'")
if versions:
    latest_version = max(int(v.version) for v in versions)
    print(f"✅ 모델 '{model_name}' 최신 버전: {latest_version}")
else:
    latest_version = 1
    print(f"⚠️ 모델 버전을 찾을 수 없어 기본값 1 사용")

# Feature Store 기반 배치 추론
# wine_id만 있으면 자동으로 Feature Store에서 피처를 조회하여 예측!
try:
    predictions = fe.score_batch(
        model_uri=f"models:/{model_name}/{latest_version}",
        df=new_data,
    )
    display(predictions.select("wine_id", "prediction"))
except Exception as e:
    print(f"⚠️ score_batch 오류: {e}")
    print("→ Feature Store 테이블과 모델을 처음부터 다시 생성해주세요 (Step 1부터 재실행)")
    print("→ 또는 아래 Spark UDF 방식을 사용해주세요")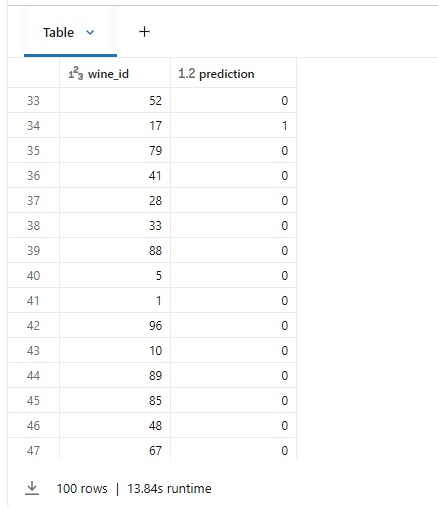
Spark UDF — 대용량 분산 추론
# sklearn 모델을 직접 Spark pandas_udf로 변환 — 분산 환경에서 수백만 건도 OK!
import pandas as pd
from pyspark.sql.types import IntegerType

# Step 3에서 학습한 rf 모델을 직접 사용 (Feature Store 래퍼 없이)
feature_cols = [c for c in X.columns]

@F.pandas_udf(IntegerType())
def predict_udf(*cols):
    X_input = pd.concat(cols, axis=1)
    X_input.columns = feature_cols
    X_input = X_input.fillna(0)
    return pd.Series(rf.predict(X_input))

# 전체 데이터에 대해 예측 수행
result_df = (
    wine_features
    .withColumn("prediction", predict_udf(*[F.col(c) for c in feature_cols]))
)

display(result_df.select("wine_id", "prediction").limit(10))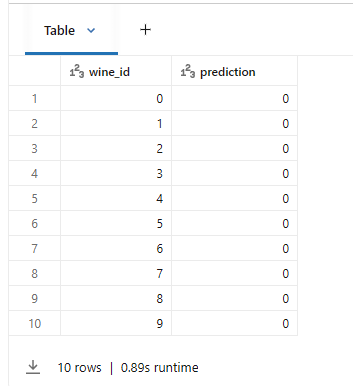
| 방식 | 장점 | 적합한 경우 |
|---|---|---|
| fe.score_batch() | ID만으로 자동 피처 조회 | 범용 배치 추론 |
| Spark UDF | Spark 클러스터 분산 처리 | 수백만 건 + 대용량 |
결과 저장
# 추론 결과를 Delta 테이블로 저장
result_df.select("wine_id", "prediction").write.mode("overwrite").saveAsTable(
    f"{CATALOG}.{SCHEMA}.wine_predictions_lab"
)

print(f"✅ 배치 추론 결과 저장 완료: {CATALOG}.{SCHEMA}.wine_predictions_lab")
print(f"   총 {result_df.count():,}건 예측 완료")
참고
cosmos db 데이터파티셔닝 해시함수
→ 높은 카디널리티를 가질 때 해시펑션을 이용
실습 6: LLM on Databricks
Databricks에서 LLM을 저비용으로 활용하는 방법
- Databricks 에서 LLM 을 API 로 호출하는 방법 (별도 GPU 서버 불필요)
- ai_query() SQL 함수로 데이터 파이프라인에 AI 를 통합하는 방법
- Vector Search + LLM 을 결합한 RAG 패턴으로 사내 문서 기반 Q&A 구축
이론
- LLM 은 대규모 언어 모델(Large Language Model)의 약자로, 대량의 텍스트 데이터를 학습하여 인간의 언어를 이해하고 생성할 수 있는 AI 모델 Transformer 아키텍처를 기반으로 하며, 수십억~수천억 개의 파라미터로 구성
- 토큰(Token): LLM 이 텍스트를 처리하는 최소 단위. 영어 기준 1 단어 약1.3 토큰, 한국어는 1 글자가 1~2 토큰.
- 프롬프트(Prompt): LLM 에게 주는 입력 텍스트. System/User/Assistant 역할로 구분
- Temperature: 0 에 가까울수록 일관된 답변, 1 에 가까울수록 창의적인 답변을 생성
- max_tokens: 응답의 최대 길이를 제한. 비용 제어의 핵심
- 할루시네이션(Hallucination): LLM 이 사실이 아닌 내용을 그럴듯하게 생성하는 현상. RAG 로 완화 가능.
Databricks의 LLM 접근 방식
| 방식 | 설명 | 용도 |
|---|---|---|
| Foundation Model API | Databricks가 호스팅하는 LLM을 API로 호출 | 개발/프로토타입 |
| External Models | 외부 API (OpenAI, Anthropic 등)를 통합 | 특정 모델 선호 시 |
| Model Serving | 커스텀 모델을 엔드포인트로 배포 | 파인튜닝 모델 서빙 |
임베딩과 벡터 검색
- 임베딩은 텍스트를 고차원 및터 공간의 숫자 배열(벡터)로 변환하는 기술
- 의미가 비슷한 텍스트는 벡터 공간에서 가까이 위치
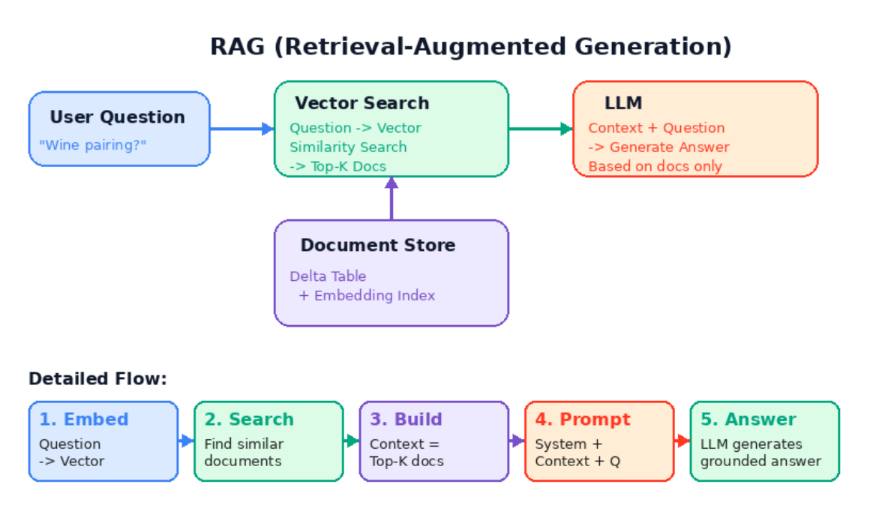
RAG(Retrieval-Augmented Generation)
- RAG 는 검색 증강 생성의 약자로, LLM 의 가장 큰 한계인 할루시네이션을 해결하는 핵심 패턴
실습: 환경설정
CATALOG = "3dt016_databricks"
SCHEMA = "wine"

# LLM 모델 엔드포인트 (사용 가능한 모델로 변경)
LLM_MODEL = "databricks-meta-llama-3-3-70b-instruct"

print(f"📌 카탈로그: {CATALOG}.{SCHEMA}")
print(f"📌 LLM 모델: {LLM_MODEL}")
Part A: Foundation Model API 기본 호출
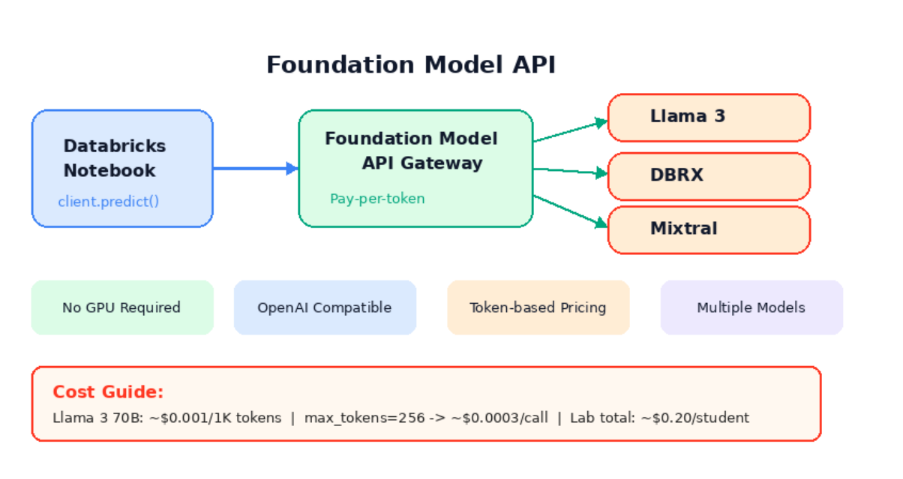
- Databricks Foundation Model API 는 Databricks 가 호스팅하는 LLM 을 REST API 로 제공하는 서비스
- GPU 서버를 직접 구축하거나 모델을 배포할 필요 없이, API 호출만으로 LLM 을 사용 가능
import mlflow.deployments

# Databricks Foundation Model API 클라이언트
client = mlflow.deployments.get_deploy_client("databricks")

# LLM에 질문하기
response = client.predict(
    endpoint=LLM_MODEL,
    inputs={
        "messages": [
            {"role": "system", "content": "You are a helpful data science assistant. Answer in Korean."},
            {"role": "user", "content": "머신러닝에서 과적합(overfitting)이 무엇이고, 어떻게 방지하나요? 간단히 설명해주세요."}
        ],
        "max_tokens": 256,
        "temperature": 0.7,
    }
)

print("🤖 LLM 응답:")
print(response['choices'][0]['message']['content'])
| 모델 | 특징 | 용도 |
|------|------|------|
| Llama 3.3 70B | Meta의 오픈소스 모델, 영어 최적화 | 범용 (이 실습에서 사용) |
| DBRX | Databricks 자체 개발 모델 | 범용 (비활성화 환경 있음) |
| Mixtral | Mistral AI의 MoE 모델 | 빠른 추론 |
| BGE Large EN | 임베딩 모델 | Vector Search 용 |
프롬프트 엔지니어링
# Few-shot 프롬프트 예시: 와인 설명 생성
response = client.predict(
    endpoint=LLM_MODEL,
    inputs={
        "messages": [
            {"role": "system", "content": """You are a sommelier. Given wine chemical properties, write a tasting note.

Examples:
- Alcohol 12.5%, Residual sugar 5g → "Medium-bodied dry wine. Clean finish."
- Alcohol 9.0%, Residual sugar 45g → "Light-bodied sweet wine. Rich fruit aroma."
"""},
            {"role": "user", "content": "Alcohol 11.8%, Residual sugar 1.2g, Acidity 0.32, pH 3.18 — Describe this wine."}
        ],
        "max_tokens": 128,
    }
)

print("🍷 Sommelier AI:")
print(response['choices'][0]['message']['content'])
- 참고: Llama3 모델은 영어 출력이 안정적
Part B: AI Functions — SQL로 AI 하기
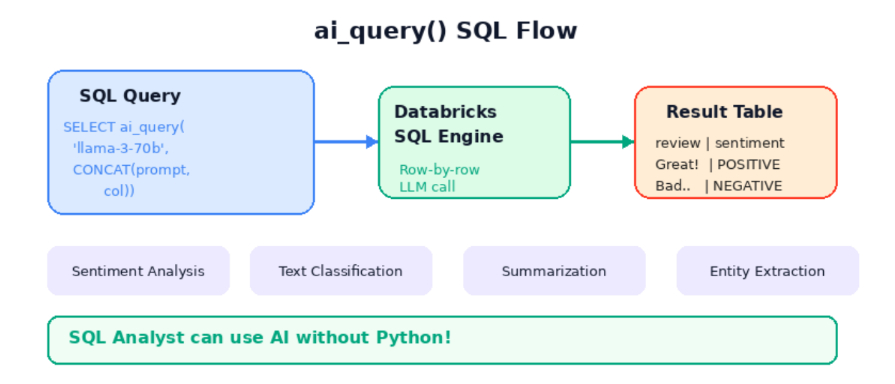
- ai_query()는 Databricks SQL 에서 제공하는 빌트인 함수
- SQL 쿼리 안에서 직접 LLM 을 호출
기본 문법
SELECT
column_name,
ai_query(
'model-name', -- 사용할 LLM 모델
CONCAT('prompt: ', column_name) -- 프롬프트 + 데이터 컬럼
) AS result
FROM my_table
모델명, 프롬프트(CONCAT 으로 컬럼 결합), 테이블명.
데이터 생성
# 샘플 고객 리뷰 데이터 생성
from pyspark.sql import Row
reviews = spark.createDataFrame([
Row(review_id=1, text="This wine is absolutely fantastic! Best purchase ever.", rating=5),
Row(review_id=2, text="Terrible. Cork taint ruined the entire bottle. Waste of money.", rating=1),
Row(review_id=3, text="Decent for the price. Nothing special but drinkable.", rating=3),
Row(review_id=4, text="Wonderful aroma and balanced flavors. Would buy again!", rating=5),
Row(review_id=5, text="Too acidic for my taste. Not recommended.", rating=2),
])
reviews.write.mode("overwrite").saveAsTable(f"{CATALOG}.{SCHEMA}.wine_reviews_lab")
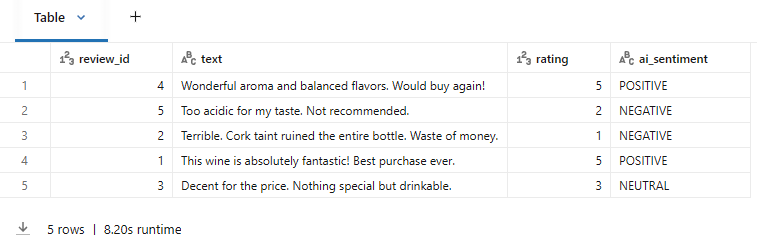
print(f"✅ 리뷰 테이블 생성: {CATALOG}.{SCHEMA}.wine_reviews_lab")감성 분석
# 💡 ai_query()로 감성 분석 — SQL 한 줄! (spark.sql로 변수 참조)
display(spark.sql(f"""
  SELECT
    review_id,
    text,
    rating,
    ai_query(
      '{LLM_MODEL}',
      CONCAT('Classify the sentiment of this review as POSITIVE, NEGATIVE, or NEUTRAL. Reply with ONLY the classification word. Review: ', text)
    ) AS ai_sentiment
  FROM {CATALOG}.{SCHEMA}.wine_reviews_lab
"""))
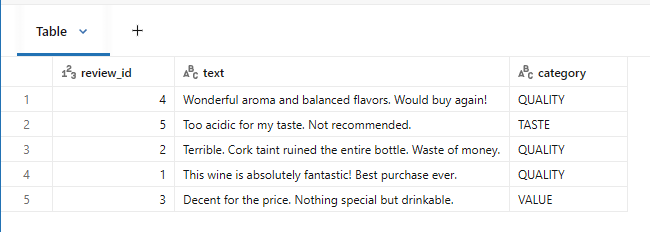
카테고리 자동 분류
# 카테고리 자동 분류
display(spark.sql(f"""
  SELECT
    review_id,
    text,
    ai_query(
      '{LLM_MODEL}',
      CONCAT('Classify this wine review into ONE category: TASTE, AROMA, VALUE, QUALITY, OTHER. Reply with only the category. Review: ', text)
    ) AS category
  FROM {CATALOG}.{SCHEMA}.wine_reviews_lab
"""))
Part C: 간단 RAG 체험
Vector Search 구조
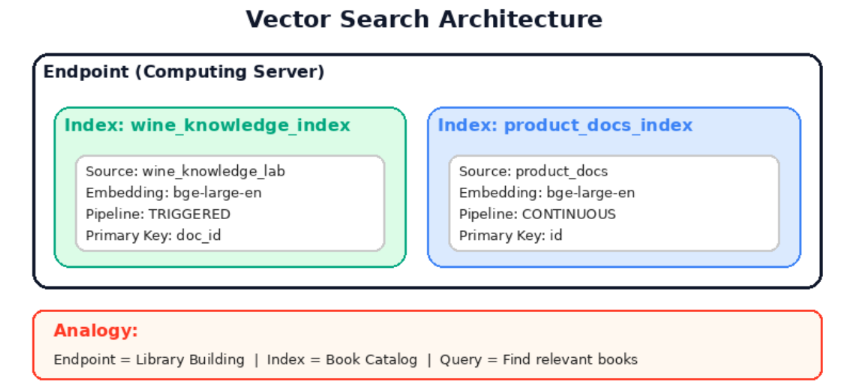
Vector Search 동작 3단계
| 구성요소 | 역할 | 비유 |
|---|---|---|
| Endpoint | 컴퓨팅 서버, 한 번 만들면 재사용 | 도서관 건물 |
| Index | 테이블의 텍스트를 벡터로 변환/저장 | 책 목록 |
| Query | 질문과 가장 유사한 문서 반환 | 관련 책 찾기 |
RAG(Retrieval-Augmented Generation)란?
- LLM은 학습 데이터에 없는 내부 문서를 모름
- Vector Search로 관련 문서를 찾고 → LLM에게 전달하여 답변 생성
- 사내 문서 기반 Q&A, 고객 지원 챗봇 등에 활용
[사용자 질문]
     ↓
[Vector Search] → 관련 문서 2~3개 검색
     ↓
[LLM] ← 질문 + 검색된 문서 (컨텍스트)
     ↓
[답변 생성]
Step 1: 지식 문서 테이블 생성
- 5 건의 와인/ML 지식 문서를 영어로 작성하여 Unity Catalog 테이블로 저장
- 임베딩 모델(databricks-bge-large-en)이 영어에 최적화되어 있어 영어 문서를 사용
# 소규모 와인 지식 문서 생성
wine_docs = spark.createDataFrame([
    Row(doc_id=1, content="Chardonnay is a white wine grape variety with buttery, oaky characteristics. In cool climates it shows apple and citrus flavors, while warm climates bring tropical fruit notes."),
    Row(doc_id=2, content="Cabernet Sauvignon is the flagship full-bodied red wine. It features blackcurrant, cedar, and vanilla aromas with high tannin and acidity."),
    Row(doc_id=3, content="Wine acidity is crucial for freshness and balance. A pH of 3.0-3.4 is typical, with lower values indicating more tartness. The balance between acidity and residual sugar is key to taste."),
    Row(doc_id=4, content="Wine pairing basics: Red wines pair with red meat, white wines with fish and chicken. Sweet wines go with desserts, but the wine should be sweeter than the food."),
    Row(doc_id=5, content="In MLOps, model monitoring detects data drift and model performance degradation. Databricks Lakehouse Monitoring provides automatic drift detection using statistical tests."),
])

wine_docs.write.mode("overwrite").saveAsTable(f"{CATALOG}.{SCHEMA}.wine_knowledge_lab")
print(f"✅ 지식 문서 테이블 생성: {CATALOG}.{SCHEMA}.wine_knowledge_lab")
Step 2: Change Data Feed 활성화
Vector Search의 Delta Sync 인덱스는 테이블 변경 추적이 필요
spark.sql(f"""
  ALTER TABLE {CATALOG}.{SCHEMA}.wine_knowledge_lab
  SET TBLPROPERTIES (delta.enableChangeDataFeed = true)
""")
print("✅ Change Data Feed 활성화 완료")
Step 3: Vector Search 엔드포인트 확인 & 인덱스 생성
from databricks.vector_search.client import VectorSearchClient

vsc = VectorSearchClient(disable_notice=True)

vsc.create_endpoint(name="my-endpoint", endpoint_type="STANDARD")

VS_ENDPOINT = "my-endpoint"

# 엔드포인트 상태 확인
try:
    ep_info = vsc.get_endpoint(VS_ENDPOINT)
    print(f"✅ 엔드포인트 '{VS_ENDPOINT}' 확인됨")
except Exception as e:
    print(f"❌ 엔드포인트를 찾을 수 없습니다: {e}")
    print("→ VS_ENDPOINT 이름을 확인하거나, 새로 생성해주세요.")
혹은 좌측 compute-vector search-endpoint 만들기

# 인덱스 생성
INDEX_NAME = f"{CATALOG}.{SCHEMA}.wine_knowledge_index"

try:
    vsc.create_delta_sync_index(
        endpoint_name=VS_ENDPOINT,
        index_name=INDEX_NAME,
        source_table_name=f"{CATALOG}.{SCHEMA}.wine_knowledge_lab",
        pipeline_type="TRIGGERED",
        primary_key="doc_id",
        embedding_source_column="content",
        embedding_model_endpoint_name="databricks-bge-large-en",
    )
    print(f"✅ Vector Search 인덱스 생성 시작: {INDEX_NAME}")
    print("⏳ 인덱스 준비까지 5~10분 소요됩니다.")
except Exception as e:
    if "already exists" in str(e).lower():
        print(f"ℹ️ 인덱스가 이미 존재합니다: {INDEX_NAME}")
    else:
        print(f"⚠️ {e}")
# 인덱스 상태 확인 (ready: True 가 될 때까지 이 셀을 반복 실행)
index_info = vsc.get_index(VS_ENDPOINT, INDEX_NAME).describe()
status = index_info.get("status", {})
print(f"상태: {status.get('detailed_state', 'UNKNOWN')}")
print(f"준비 완료: {status.get('ready', False)}")
if not status.get("ready", False):
print("\n⏳ 아직 준비 중입니다. 1~2분 후 이 셀을 다시 실행해주세요.")
else:
print("\n✅ 인덱스가 준비되었습니다! 다음 셀로 진행하세요.")Step 4: 유사 문서 검색 테스트
# 유사 문서 검색 테스트
results = vsc.get_index(
    endpoint_name=VS_ENDPOINT,
    index_name=INDEX_NAME,
).similarity_search(
    query_text="What wine pairs well with steak?",
    columns=["doc_id", "content"],
    num_results=2,
)

print("🔍 Search results:")
for doc in results.get("result", {}).get("data_array", []):
    print(f"  - [doc_id={doc[0]}] {doc[1][:100]}...")
Step 5: RAG 파이프라인 — 검색 + LLM 답변 생성
RAG 함수는 3 단계로 동작:
- Vector Search 로 관련 문서 2 개 검색
- 검색된 문서를 컨텍스트 문자열로 조합
- LLM 에게 [시스템 프롬프트 + 컨텍스트 + 질문] 전달
할루시네이션 방지
- 시스템 프롬프트에 "참고 문서에 없는 내용은 모른다고 답하라"는 지시를 포함하면 LLM 이 거짓
정보를 생성하는 것을 방지
def rag_answer(question):
    """Simple RAG: Search → Build context → LLM answer"""

    # 1️⃣ Vector Search로 관련 문서 검색
    search_results = vsc.get_index(VS_ENDPOINT, INDEX_NAME).similarity_search(
        query_text=question,
        columns=["content"],
        num_results=2,
    )

    # 2️⃣ 검색된 문서를 컨텍스트로 구성
    context_docs = search_results.get("result", {}).get("data_array", [])
    context = "\n".join([doc[0] for doc in context_docs])

    # 3️⃣ LLM에게 질문 + 컨텍스트 전달
    response = client.predict(
        endpoint=LLM_MODEL,
        inputs={
            "messages": [
                {"role": "system", "content": f"""You are a wine expert. Answer the question based ONLY on the reference documents below.
Answer concisely. If the information is not in the documents, say "Information not found in documents."

Reference documents:
{context}"""},
                {"role": "user", "content": question}
            ],
            "max_tokens": 256,
        }
    )

    return response['choices'][0]['message']['content']
# RAG 테스트
questions = [
"What are the characteristics of Chardonnay wine?",
"What wine pairs well with steak?",
"How does Databricks detect model drift?",
]
for q in questions:
print(f"\n❓ {q}")
print(f"💬 {rag_answer(q)}")
print("-" * 60)
참고 우리 팀 코드 스타일을 아는 AI 만들기: RAG와 Vector DB 활용기
- ts-morph로 코드 청킹하기
- 청킹은 코드를 나눠서 저장
- Vector DB를 구축하는데 핵심 단계
- 너무 긴 코드는 필연적으로 많은 컨텍스트를 가짐
- 이걸 통째로 임베딩하면 벡터에 여러 컨텍스트가 섞여 검색 정확도가 떨어짐
실습 7: 이미지 분류 & 캡셔닝 on Databricks
목표: 사전학습된 Vision Transformer(ViT)로 이미지를 분류하고, Foundation Model API로 이미지 캡셔닝(설명 생성)을 수행
- Part A: HuggingFace ViT 모델로 이미지 분류 (Transfer Learning)
- Part B: Databricks Foundation Model API로 이미지 캡셔닝 (멀티모달 LLM)
- Part C: 분류 + 캡셔닝 파이프라인을 MLflow로 추적
| 개념 | 설명 |
|---|---|
| Vision Transformer (ViT) | 이미지를 패치(조각)로 나눠 Transformer로 처리하는 모델 |
| Transfer Learning | 사전학습된 모델을 새 작업에 재활용하는 기법 |
| 이미지 캡셔닝 | 이미지를 보고 자연어 설명을 생성하는 작업 |
| 멀티모달 LLM | 텍스트 + 이미지를 동시에 이해하는 대규모 언어 모델 |
이론
Object detection과 classification
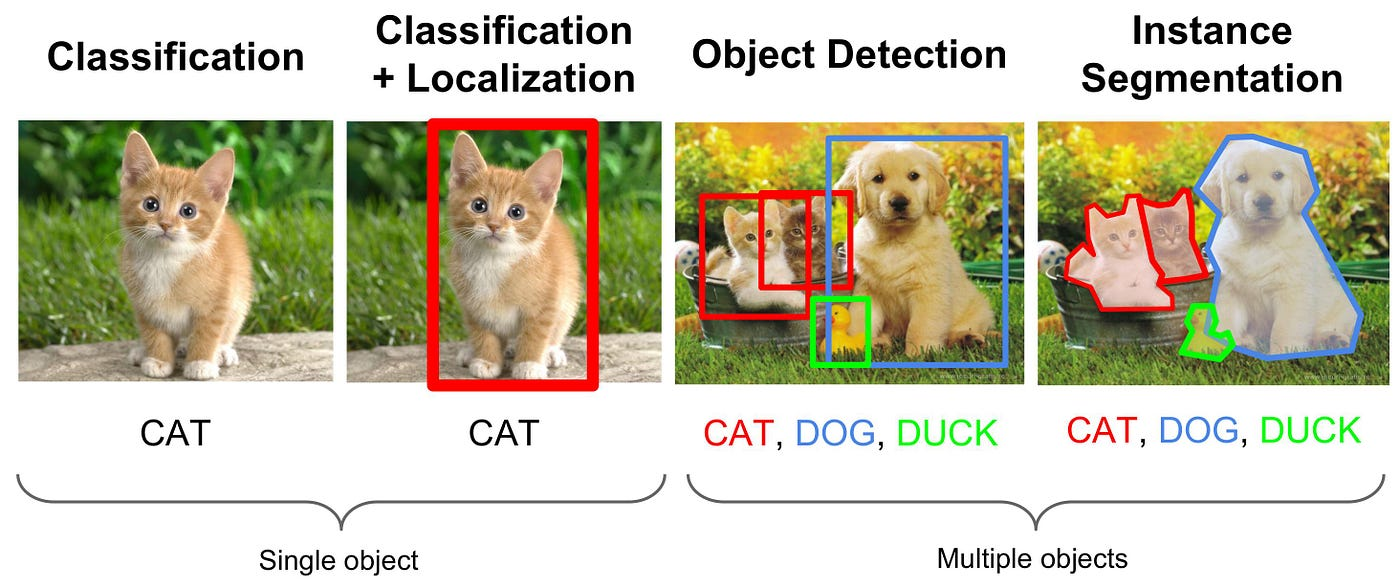
1. Classification (분류)
이미지 전체를 보고 해당 이미지가 어떤 카테고리에 속하는지 판별
특징: 이미지당 하나의 대표 클래스를 반환
예시: 사진을 보고 '자동차'인지 '사람'인지 분류.
2. Object Detection (객체 탐지/검출)
이미지 내의 객체를 분류하는 것과 동시에, 그 객체가 어디에 위치하는지 박스(Bounding Box)로 표시하여 위치를 파악하는 기술
구성: Classification(분류) + Localization(위치 파악).
특징: 한 이미지 내에 여러 객체가 있어도 각각의 위치와 종류를 탐지
활용: 자율주행 자동차(보행자, 신호등 탐지), 의료 영상 분석 등. 자율주행 자동차를 할거면 segmentation까지 필요
환경 설정
%pip install transformers torch torchvision datasets pillow --quiet
dbutils.library.restartPython()
# 공통 설정 — Python 재시작 후 이 셀부터 실행!
CATALOG = "3dt016_databricks"
SCHEMA = "classification"
print(f"📌 카탈로그: {CATALOG}")
print(f"📌 스키마: {SCHEMA}")Part A: 이미지 분류 — Vision Transformer (ViT)
ViT(Vision Transformer)
기존 이미지 분류는 CNN(합성곱 신경망)이 주류였지만, 2020년 Google이 발표한 ViT는 NLP에서 성공한 Transformer 구조를 이미지에 적용
작동 원리:
- 이미지를 16×16 픽셀 패치로 분할 (예: 224×224 이미지 → 196개 패치)
- 각 패치를 벡터로 변환 (패치 임베딩)
- 위치 정보 추가 (포지셔널 인코딩)
- Transformer 인코더로 패치 간 관계 학습
- [CLS] 토큰으로 전체 이미지 분류
장점: 대규모 데이터에서 CNN보다 뛰어난 성능, Transfer Learning에 탁월
Step A-1: 데이터 준비 — 음식 이미지 다운로드
from datasets import load_dataset
import matplotlib.pyplot as plt
from PIL import Image

# HuggingFace에서 음식 분류 데이터셋 로드
# Food-101에서 5개 클래스만 사용 (비용 절약)
import os
os.environ["HF_DATASETS_CACHE"] = "/tmp/hf_cache"
os.environ["HF_HOME"] = "/tmp/hf_home"

dataset = load_dataset(
    "ethz/food101",
    split="train",
    trust_remote_code=True,
    cache_dir="/tmp/hf_cache"
)

# 5개 음식 카테고리만 선택
target_foods = ["pizza", "sushi", "fried_rice", "ramen", "ice_cream"]
target_labels = {name: idx for idx, name in enumerate(dataset.features["label"].names) if name in target_foods}

print(f"✅ 선택한 음식 카테고리:")
for name, label_id in target_labels.items():
    print(f"   - {name} (label: {label_id})")
# 선택한 카테고리의 이미지만 필터링 (카테고리당 50장 = 총 250장)
import random
random.seed(42)
label_ids = set(target_labels.values())
filtered_data = {"image": [], "label": [], "label_name": []}
# 카테고리별로 이미지 수집
label_to_name = {v: k for k, v in target_labels.items()}
counts = {label_id: 0 for label_id in label_ids}
MAX_PER_CLASS = 50
for item in dataset:
label = item["label"]
if label in label_ids and counts[label] < MAX_PER_CLASS:
filtered_data["image"].append(item["image"])
filtered_data["label"].append(label)
filtered_data["label_name"].append(label_to_name[label])
counts[label] += 1
if all(c >= MAX_PER_CLASS for c in counts.values()):
break
print(f"\n✅ 총 {len(filtered_data['image'])}장 이미지 준비 완료!")
for name, label_id in target_labels.items():
print(f" {name}: {counts[label_id]}장")# 📸 샘플 이미지 시각화
fig, axes = plt.subplots(1, 5, figsize=(20, 4))
for i, name in enumerate(target_foods):
# 해당 카테고리의 첫 번째 이미지
idx = filtered_data["label_name"].index(name)
axes[i].imshow(filtered_data["image"][idx])
axes[i].set_title(name, fontsize=14, fontweight="bold")
axes[i].axis("off")
plt.suptitle("Food Image Samples (5 Categories)", fontsize=16)
plt.tight_layout()
plt.show()
Step A-2: 사전학습된 ViT 모델 로드
Google의 vit-base-patch16-224 모델을 사용. ImageNet(1000개 클래스)으로 사전학습된 모델
from transformers import ViTForImageClassification, ViTFeatureExtractor
import torch
import numpy as np

# 사전학습된 ViT 모델 로드 (ImageNet 1000 클래스)
model_name = "google/vit-base-patch16-224"
feature_extractor = ViTFeatureExtractor.from_pretrained(model_name)
model = ViTForImageClassification.from_pretrained(model_name)
model.eval()  # 추론 모드

print(f"✅ ViT 모델 로드 완료: {model_name}")
print(f"   - 모델 파라미터 수: {sum(p.numel() for p in model.parameters()):,}")
print(f"   - 입력 크기: 224 x 224 픽셀")
print(f"   - 출력 클래스: {model.config.num_labels}개 (ImageNet)")
Step A-3: 이미지 분류 수행
def classify_image(image, top_k=3):
    """이미지를 ViT 모델로 분류하고 상위 k개 결과 반환"""
    # 이미지 전처리 (리사이즈, 정규화)
    inputs = feature_extractor(images=image, return_tensors="pt")

    # 추론 (GPU 불필요)
    with torch.no_grad():
        outputs = model(**inputs)
        probs = torch.softmax(outputs.logits, dim=-1)

    # 상위 k개 결과
    top_probs, top_indices = torch.topk(probs, top_k)

    results = []
    for prob, idx in zip(top_probs[0], top_indices[0]):
        label = model.config.id2label[idx.item()]
        results.append({"label": label, "confidence": prob.item()})

    return results

# 각 카테고리별 첫 번째 이미지로 분류 테스트
print("🔍 이미지 분류 결과 (Top-3):\n")
for food_name in target_foods:
    idx = filtered_data["label_name"].index(food_name)
    image = filtered_data["image"][idx]
    results = classify_image(image)

    print(f"📷 [{food_name}]")
    for r in results:
        bar = "█" * int(r["confidence"] * 30)
        print(f"   {r['label']:30s} {r['confidence']:.1%} {bar}")
    print()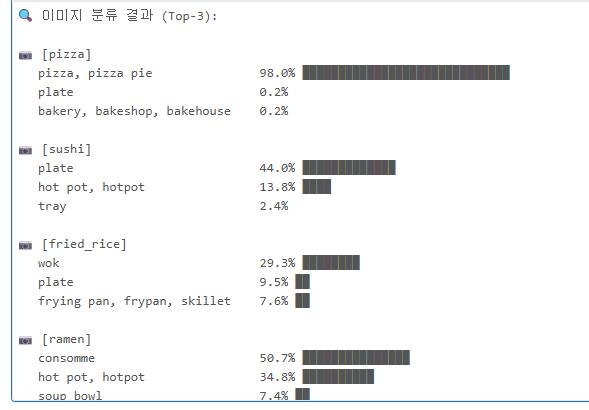
Step A-4: 배치 분류 — Spark으로 분산 처리
이미지가 수천~수만 장이라면? Spark UDF로 분산 처리
from pyspark.sql import functions as F
from pyspark.sql.types import StructType, StructField, StringType, FloatType, ArrayType
import io, base64

# 이미지를 base64로 인코딩하여 Spark DataFrame 생성
rows = []
for i in range(len(filtered_data["image"])):
    img = filtered_data["image"][i]
    # PIL 이미지 → base64 문자열
    buf = io.BytesIO()
    img.save(buf, format="JPEG")
    img_b64 = base64.b64encode(buf.getvalue()).decode("utf-8")
    rows.append((i, filtered_data["label_name"][i], img_b64))

image_df = spark.createDataFrame(rows, ["image_id", "true_label", "image_base64"])
print(f"✅ Spark DataFrame 생성: {image_df.count()}행")
display(image_df.select("image_id", "true_label").limit(10))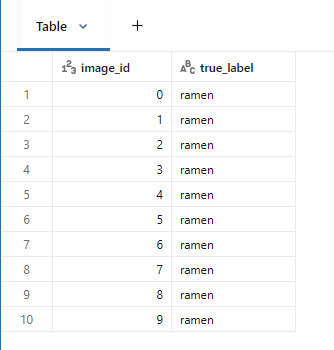
Step A-5: MLflow로 분류 실험 추적
import mlflow

mlflow.set_experiment("/Users/" + spark.sql("SELECT current_user()").first()[0] + "/image_classification_lab")

# 전체 분류 수행 + 정확도 계산
correct = 0
total = len(filtered_data["image"])

# ImageNet 라벨 → 음식 이름 매핑 (근사 매핑)
food_mapping = {
    "pizza": ["pizza", "pizza_pie"],
    "sushi": ["sushi"],
    "fried_rice": ["fried_rice"],
    "ramen": ["ramen", "noodle"],
    "ice_cream": ["ice_cream", "ice_lolly", "chocolate_sauce"]
}

with mlflow.start_run(run_name="vit_food_classification"):
    mlflow.log_param("model_name", model_name)
    mlflow.log_param("num_classes", len(target_foods))
    mlflow.log_param("total_images", total)

    predictions = []
    for i in range(total):
        image = filtered_data["image"][i]
        true_label = filtered_data["label_name"][i]
        result = classify_image(image, top_k=1)
        pred_label = result[0]["label"]
        pred_confidence = result[0]["confidence"]

        # 매핑 체크 (ImageNet 라벨이 음식 이름과 유사한지)
        is_correct = any(
            mapped in pred_label.lower().replace(" ", "_")
            for mapped in food_mapping.get(true_label, [])
        )
        if is_correct:
            correct += 1
        predictions.append({
            "true": true_label,
            "predicted": pred_label,
            "confidence": pred_confidence,
            "correct": is_correct
        })

    accuracy = correct / total
    mlflow.log_metric("accuracy", accuracy)
    mlflow.log_metric("total_images", total)
    mlflow.log_metric("correct_predictions", correct)

    print(f"✅ ViT 이미지 분류 완료!")
    print(f"   정확도: {accuracy:.1%} ({correct}/{total})")
    print(f"   * ImageNet 라벨 → 음식 이름 근사 매핑 기준")
Part B: 이미지 캡셔닝 — Foundation Model API
이미지 캡셔닝이란?
이미지를 보고 자연어로 설명을 생성하는 작업
활용 사례:
- 시각장애인을 위한 이미지 설명 (접근성)
- 이커머스 상품 이미지 자동 태깅
- SNS 자동 캡션 생성
- 의료 영상 소견 자동 작성