Language
디자인 & 코드
MainWindow.xaml
<Window x:Class="_029_Language.MainWindow"
xmlns="http://schemas.microsoft.com/winfx/2006/xaml/presentation"
xmlns:x="http://schemas.microsoft.com/winfx/2006/xaml"
xmlns:d="http://schemas.microsoft.com/expression/blend/2008"
xmlns:mc="http://schemas.openxmlformats.org/markup-compatibility/2006"
xmlns:local="clr-namespace:_029_Language"
mc:Ignorable="d"
Title="좋아하는 프로그래밍 언어" Height="320" Width="400">
<StackPanel Margin="20">
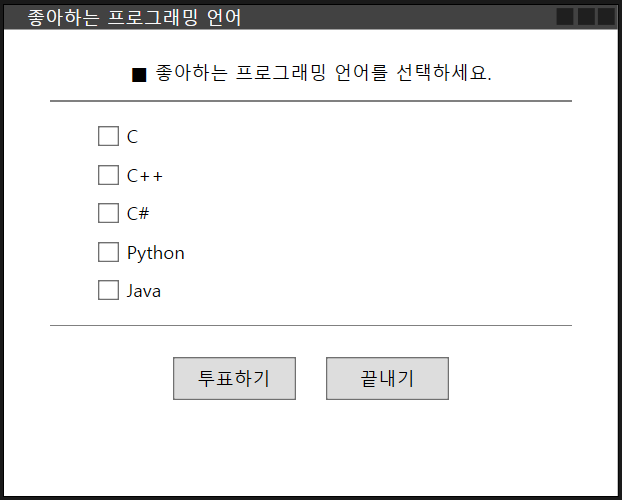
<TextBlock HorizontalAlignment="Center">■ 좋아하는 프로그래밍 언어를 선택하세요.</TextBlock>
<Separator Margin="10" Background="Gray"/>
<CheckBox x:Name="cbC" Margin="40 5 0 5">C</CheckBox>
<CheckBox x:Name="cbCPP" Margin="40 5 0 5">C++</CheckBox>
<CheckBox x:Name="cbCS" Margin="40 5 0 5">C#</CheckBox>
<CheckBox x:Name="cbPython" Margin="40 5 0 5">Python</CheckBox>
<CheckBox x:Name="cbJava" Margin="40 5 0 5">Java</CheckBox>
<Separator Margin="10" Background="Gray"/>
<StackPanel Orientation="Horizontal" HorizontalAlignment="Center">
<Button x:Name="btnSubmit" Width="80" Margin="10" Padding="5"
Click="btnSubmit_Click">투표하기</Button>
<Button x:Name="btnQuit" Width="80" Margin="10" Padding="5"
Click="btnQuit_Click">끝내기</Button>
</StackPanel>
</StackPanel>
</Window>CheckBox 태그로 체크 박스를 생성할 수 있다.
x:Name을 통해 체크 박스의 이름을 설정할 수 있다.
MainWindow.xaml.cs
using System;
using System.Collections.Generic;
using System.Linq;
using System.Text;
using System.Threading.Tasks;
using System.Windows;
using System.Windows.Controls;
using System.Windows.Data;
using System.Windows.Documents;
using System.Windows.Input;
using System.Windows.Media;
using System.Windows.Media.Imaging;
using System.Windows.Navigation;
using System.Windows.Shapes;

namespace _029_Language
{
  /// <summary>
  /// MainWindow.xaml에 대한 상호 작용 논리
  /// </summary>
  public partial class MainWindow : Window
  {
    public MainWindow()
    {
      InitializeComponent();
    }

    private void btnSubmit_Click(object sender, RoutedEventArgs e)
    {
      CheckBox[] c = new CheckBox[] {cbC, cbCPP, cbCS, cbPython, cbJava };
      string s = "";

      foreach(var cb in c)
      {
        if (cb.IsChecked == true)
          s += cb.Content + " ";
      }

      MessageBox.Show(s + "선택하였습니다!", "Language Preferred!");
    }

    private void btnQuit_Click(object sender, RoutedEventArgs e)
    {
      this.Close();
    }
  }
}
CheckBox 리스트를 생성해서, 체크 박스의 내용을 더 간편하게 다룰 수 있다.
문자열 변수 x에 체크된 체크 박스의 내용을 더해서 메시지 박스로 출력되게 한다.
결과

체크 박스를 선택하고, 투표하기 버튼을 누르면 메시지 박스가 표시된다.
끝내기 버튼을 누르면 프로그램이 종료 된다.
UserControl
디자인 & 코드
MainWindow.xaml
<Window x:Class="_030_UserControl.MainWindow"
xmlns="http://schemas.microsoft.com/winfx/2006/xaml/presentation"
xmlns:x="http://schemas.microsoft.com/winfx/2006/xaml"
xmlns:d="http://schemas.microsoft.com/expression/blend/2008"
xmlns:mc="http://schemas.openxmlformats.org/markup-compatibility/2006"
xmlns:local="clr-namespace:_030_UserControl"
mc:Ignorable="d"
Title="MainWindow" Height="450" Width="300">
<DockPanel Margin="10" LastChildFill="True">
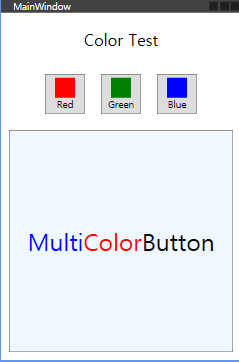
<TextBlock HorizontalAlignment="Center" FontSize="20"
Margin="10"
DockPanel.Dock="Top">
Color Test</TextBlock>
<StackPanel Orientation="Horizontal"
HorizontalAlignment="Center"
Margin="10"
DockPanel.Dock="Top">
<Button Width="50" Height="50" Margin="10">
<StackPanel>
<Rectangle Fill="Red" Width="25" Height="25"/>
<TextBlock HorizontalAlignment="Center">Red</TextBlock>
</StackPanel>
</Button>
<Button Width="50" Height="50" Margin="10">
<StackPanel>
<Rectangle Fill="Green" Width="25" Height="25"/>
<TextBlock HorizontalAlignment="Center">Green</TextBlock>
</StackPanel>
</Button>
<Button Width="50" Height="50" Margin="10">
<StackPanel>
<Rectangle Fill="Blue" Width="25" Height="25"/>
<TextBlock HorizontalAlignment="Center">Blue</TextBlock>
</StackPanel>
</Button>
</StackPanel>
<Button Background="AliceBlue"
DockPanel.Dock="Bottom">
<WrapPanel>
<TextBlock Foreground="Blue" FontSize="30">Multi</TextBlock>
<TextBlock Foreground="Red" FontSize="30">Color</TextBlock>
<TextBlock Foreground="Black" FontSize="30">Button</TextBlock>
</WrapPanel>
</Button>
</DockPanel>
</Window>DockPanel의 어느 방향으로 할지 컨트롤에 정해주면 클라이언트 영역의 Top, Bottom, Left, Right 위치에 도킹이 가능하다.
WrapPanel의 기본 동작은 StackPanel 과 같고 다른 점은 자식 요소가 패널의 크기를 벗어나면 다음 줄에 배치한다.
HorizontalAlignment 속성의 자식 요소는 부모 요소의 할당된 레이아웃 공간의 왼쪽에 정렬된다. 자식 요소는 부모 요소의 할당된 레이아웃 공간의 중앙에 정렬된다. 자식 요소는 부모 요소의 할당된 레이아웃 공간의 오른쪽에 정렬된다.
uniformGrid
디자인 & 코드
<Window x:Class="_031_uniformGrid.MainWindow"
xmlns="http://schemas.microsoft.com/winfx/2006/xaml/presentation"
xmlns:x="http://schemas.microsoft.com/winfx/2006/xaml"
xmlns:d="http://schemas.microsoft.com/expression/blend/2008"
xmlns:mc="http://schemas.openxmlformats.org/markup-compatibility/2006"
xmlns:local="clr-namespace:_031_uniformGrid"
mc:Ignorable="d"
Title="MainWindow" Height="450" Width="450">
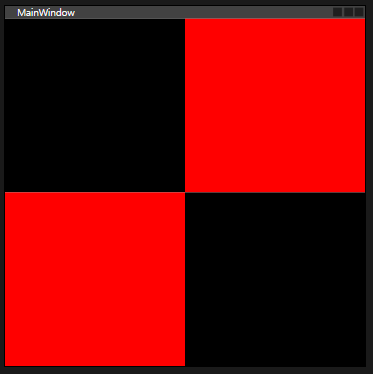
<UniformGrid>
<Rectangle Fill="Black"/>
<Rectangle Fill="Red"/>
<Rectangle Fill="Red"/>
<Rectangle Fill="Black"/>
</UniformGrid>
</Window>UniformGrid 태그 내용 안에 Rectangle 태그 4개를 추가하면 Rectangle의 개수만큼 정렬하여, 디자인처럼 체크판처럼 보이게 된다.
snakeBite
디자인 & 코드
MainWindow.xaml
<Window x:Class="_032_snakebite.MainWindow"
xmlns="http://schemas.microsoft.com/winfx/2006/xaml/presentation"
xmlns:x="http://schemas.microsoft.com/winfx/2006/xaml"
xmlns:d="http://schemas.microsoft.com/expression/blend/2008"
xmlns:mc="http://schemas.openxmlformats.org/markup-compatibility/2006"
xmlns:local="clr-namespace:_032_snakebite"
mc:Ignorable="d"
Title="SnakeBite" Height="400" Width="525">
<Grid>
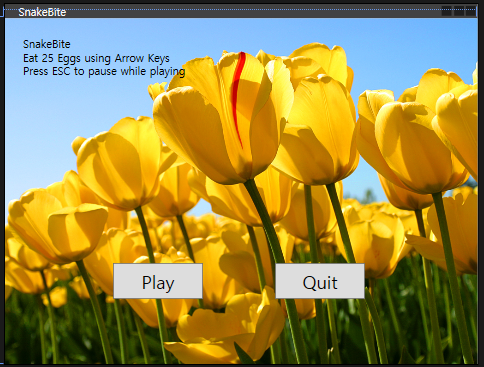
<Image Source="Images/tulip.jpg" Stretch="Fill"/>
<TextBlock Margin="20 20 0 0">SnakeBite</TextBlock>
<TextBlock Margin="20 35 0 0">Eat 25 Eggs using Arrow Keys</TextBlock>
<TextBlock Margin="20 50 0 0">Press ESC to pause while playing</TextBlock>
<Button Width="100" Height="40"
HorizontalAlignment="Left"
FontSize="20"
x:Name="btnPlay"
Margin="120 200 0 0"
Click="btnPlay_Click">Play</Button>
<Button Width="100" Height="40"
HorizontalAlignment="Left"
FontSize="20"
x:Name="btnQuit"
Margin="300,200,0,0"
Click="btnQuit_Click">Quit</Button>
</Grid>
</Window>Image 태그를 통해 Grid 안에 이미지로 채울 수 있다. Stretch 속성에 Fill을 넣으면 가득 차게 된다.
MainWindow.xaml.cs
using System;
using System.Collections.Generic;
using System.Linq;
using System.Text;
using System.Threading.Tasks;
using System.Windows;
using System.Windows.Controls;
using System.Windows.Data;
using System.Windows.Documents;
using System.Windows.Input;
using System.Windows.Media;
using System.Windows.Media.Imaging;
using System.Windows.Navigation;
using System.Windows.Shapes;

namespace _032_snakebite
{
  /// <summary>
  /// MainWindow.xaml에 대한 상호 작용 논리
  /// </summary>
  public partial class MainWindow : Window
  {
    public MainWindow()
    {
      InitializeComponent();
    }

    private void btnPlay_Click(object sender, RoutedEventArgs e)
    {
      Game game = new Game();
      game.Show();
    }

    private void btnQuit_Click(object sender, RoutedEventArgs e)
    {
      this.Close();
    }
  }
}
btnPlay를 클릭하면 game 객체가 생성되고, game이 보여진다.
btnQuit를 클릭하면 해당 창을 닫는다.
Game.xaml
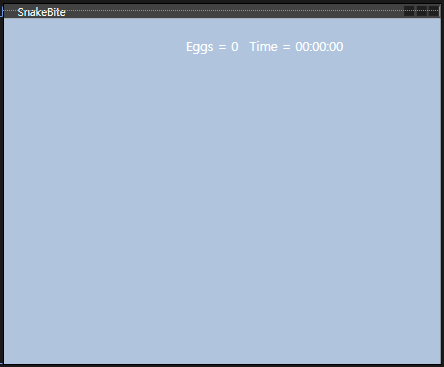
<Window x:Class="_032_snakebite.Game"
        xmlns="http://schemas.microsoft.com/winfx/2006/xaml/presentation"
        xmlns:x="http://schemas.microsoft.com/winfx/2006/xaml"
        xmlns:d="http://schemas.microsoft.com/expression/blend/2008"
        xmlns:mc="http://schemas.openxmlformats.org/markup-compatibility/2006"
        xmlns:local="clr-namespace:_032_snakebite"
        mc:Ignorable="d"
        Title="SnakeBite"
        SizeToContent="WidthAndHeight"
        KeyDown="Window_KeyDown" >
  <Grid Height="380" Width="480">
    <Canvas x:Name="field" Background="LightSteelBlue">
      <TextBlock x:Name="score" Text="Eggs = 0"
                 Foreground="White" FontSize="14"
                 Canvas.Left="200" Canvas.Top="20"/>
      <TextBlock x:Name="time" Text="Time = 00:00:00"
                 Foreground="White" FontSize="14"
                 Canvas.Left="270" Canvas.Top="20"/>
    </Canvas>
  </Grid>
</Window>
Grid의 Height, Width 속성을 통해 Grid의 폭과 높이를 설정할 수 있다.
Canvas 태그로 Canvas 위에서 움직일 Snake를 구현할 수 있게 된다.
Game.xaml.cs
using System;
using System.Diagnostics;
using System.Media;
using System.Windows;
using System.Windows.Controls;
using System.Windows.Input;
using System.Windows.Media;
using System.Windows.Shapes;
using System.Windows.Threading;

namespace _032_snakebite
{
  /// <summary>
  /// Game.xaml에 대한 상호 작용 논리
  /// </summary>
  public partial class Game : Window
  {
    private Random r = new Random();
    private Ellipse[] snakes;
    private Ellipse egg;
    private int unit = 10;  // 위치를 10 단위로 설정
    private int visibleCount = 5;
    private DispatcherTimer t = new DispatcherTimer();  // Form에서 Timer
    private Stopwatch sw = new Stopwatch();
    private string move = "";
    private int eaten = 0;
    private SoundPlayer myPlayer;
    public Game()
    {
      InitializeComponent();
      InitSnake();
      InitEgg();
      t.Interval = new TimeSpan(0, 0, 0, 0, 100); // 0.1초
      t.Tick += T_Tick;
      myPlayer = new SoundPlayer();
      myPlayer.SoundLocation = "../../Sounds/Windows Notify.wav";
    }

    private void T_Tick(object sender, EventArgs e)
    {
      for (int i = visibleCount; i > 0; i--)
        snakes[i].Tag = (Point)snakes[i - 1].Tag;

      Point q = (Point)snakes[0].Tag; // 뱀 머리 좌표

      if (move == "U")
        snakes[0].Tag = new Point(q.X, q.Y - unit);
      else if (move == "D")
        snakes[0].Tag = new Point(q.X, q.Y + unit);
      else if (move == "L")
        snakes[0].Tag = new Point(q.X - unit, q.Y);
      else if (move == "R")
        snakes[0].Tag = new Point(q.X + unit, q.Y);

      DrawSnakes();
      Swatch();
      EatEgg();
    }

    private void Swatch()
    {
      TimeSpan ts = sw.Elapsed;
      time.Text = String.Format("Time = {0:00}:{1:00}.{2:00}",
        ts.Minutes, ts.Seconds, ts.Milliseconds / 10);
    }

    private void EatEgg()
    {
      Point pS = (Point)snakes[0].Tag;
      Point pE = (Point)egg.Tag;

      if(pS.X == pE.X && pS.Y == pE.Y)
      {
        myPlayer.Play();
        egg.Visibility = Visibility.Hidden;
        visibleCount++;
        snakes[visibleCount-1].Visibility = Visibility.Visible;
        score.Text = "Eggs = " + ++eaten;

        if(visibleCount == 10)
        {
          t.Stop();
          sw.Stop();
          DrawSnakes();
          TimeSpan ts = sw.Elapsed;
          string s = String.Format("Time = {0:00}:{1:00}.{2:00}",
        ts.Minutes, ts.Seconds, ts.Milliseconds / 10);
          MessageBox.Show("Success!! \n" + s + " sec");
          this.Close();
        }

        // 새로운 알을 만들기
        int x = r.Next(1, 48);
        int y = r.Next(1, 38);
        egg.Tag = new Point(x * unit, y * unit);
        egg.Visibility = Visibility.Visible;
        Canvas.SetLeft(egg, x*unit);
        Canvas.SetTop(egg, y*unit);
      }
    }

    private void DrawSnakes()
    {
      for(int i=0; i<visibleCount; i++)
      {
        Point p = (Point)snakes[i].Tag;
        Canvas.SetLeft(snakes[i], p.X);
        Canvas.SetTop(snakes[i], p.Y);
      }
    }

    private void InitSnake()
    {
      snakes = new Ellipse[30];

      int x = r.Next(1, 48);
      int y = r.Next(1, 38);

      for(int i = 0; i < 30; i++)
      {
        snakes[i] = new Ellipse();
        snakes[i].Width = unit;
        snakes[i].Height = unit;
        snakes[i].Stroke = Brushes.Black;
        if(i%5 == 0)
          snakes[i].Fill = Brushes.Green;
        else
          snakes[i].Fill = Brushes.Gold;

        snakes[0].Fill = Brushes.Chocolate;

        snakes[i].Tag = new Point(x * unit, (y + i) * unit);
        field.Children.Add(snakes[i]);
        Canvas.SetLeft(snakes[i], x * unit);
        Canvas.SetTop(snakes[i], (y + i) * unit);
      }

      for (int i = visibleCount; i < 30; i++)
        snakes[i].Visibility = Visibility.Hidden;
    }

    private void InitEgg()
    {
      egg = new Ellipse();
      egg.Width = unit;
      egg.Height = unit;
      egg.Tag = new Point(r.Next(1, 480 / unit) * unit,
        r.Next(1, 380 / unit) * unit);
      egg.Stroke = Brushes.Black;
      egg.Fill = Brushes.Red;

      Point p = (Point)egg.Tag;
      field.Children.Add(egg);
      Canvas.SetLeft(egg, p.X);
      Canvas.SetTop(egg, p.Y);
    }

    private void Window_KeyDown(object sender, KeyEventArgs e)
    {
      // MessageBox.Show("KeyDown");
      t.Start();
      sw.Start();
      if (e.Key == Key.Left)
        move = "L";
      else if (e.Key == Key.Right)
        move = "R";
      else if (e.Key == Key.Up)
        move = "U";
      else if (e.Key == Key.Down)
        move = "D";
      else if (e.Key == Key.Escape)
      {
        move = "";
        t.Stop();
      }
    }
  }
}
Timer, StopWatch 객체를 생성하고, DrawSnakes 메소드로 스네이크를 구현한다.
InitEgg 메소드는 Egg를 생성한다. random 객체를 통해 Egg의 위치를 무작위로 생성한다.
Window_KeyDown 메소드로 윈도우 조작과 상호 작용 하는 기능을 추가하였다.
L은 왼쪽, R은 오른쪽, U는 위, D는 아래쪽이다. move 변수에 따라 뱀머리의 좌표가 이동하는 방향이 변한다.
