우리가 흔히 javascript 에서 ES5 혹은 ES6 라 부르는 것은 ECMAScript의 줄임말이며, MDN에 따르면 “ECMAScript는 자바스크립트의 토대를 구성하는 스크립트 언어입니다.” 라고 합니다.
ES8, 9 등 여러 앞선 버젼들이 이미 존재하지만 ES5를 아직까지 사용하는 이유는 아무래도 호환성 때문입니다; 아직도 많은 환경들이 ES5를 사용하고 있습니다. 그렇지만 ES6 또한 대중적으로 많이 사용이 되고 있으며 ES5에서의 몇가지 문법을 변형하여 간단하게 표현할 수 있게 되면서 ES6 syntax 를 아는 것은 선택 아닌 필수라고 생각합니다. 그렇다면 ES6 에서는 어떤 것이 다를까요?
1. Restructuring

ES5의 경우, name, age, hobby 를 각각 var 를 사용하여 선언하였습니다.
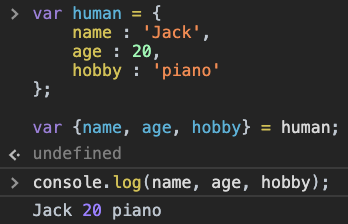
ES6의 경우, var 하나에 묶어서 선언할 수 있습니다. 이 때 변수명들은 객체의 key가 됩니다.

배열의 경우 index 순으로 선언됩니다.

function의 parameter로 사용할 때 유용합니다.
2. Spread Operator
Spread Operator 는 배열을 이용할 때 유용합니다.
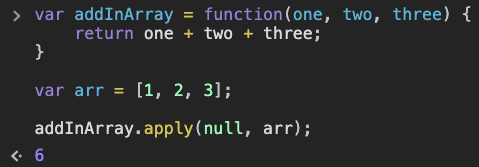
ES5에선 addInArray를 이용할 때 apply를 통해 배열을 인자로 넣었다면,

ES6에선 … 을 배열 앞에 붙이면 해결됩니다.
3. Rest Parameters
Rest Parameters 는 단어 그대로 “나머지 매개변수들" 을 쉽게 표현한 방식입니다.

ES5에선 주어지지 않은 arguments 들에 모두 접근하려면 function 내에서
var nums 처럼 선언을 해주거나 arguments[0 ~ last index] 까지 각각 접근해야 합니다.

하지만 ES6에선 parameter 뒤에 다시 …과 변수명을 지정해주면 x 뒤에 오는 모든 parameter 들을 배열로 묶어 나타냅니다.
3. Default Parameters
Default Parameters 는 parameter 가 따로 지정되어 있지 않으면 자동으로 값을 설정하는 방식입니다.
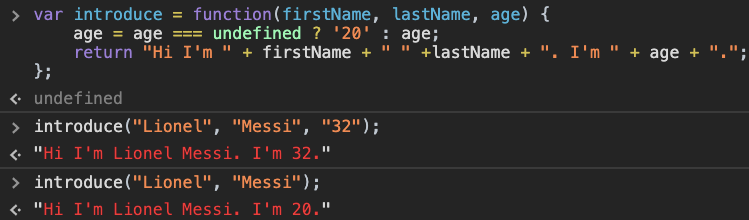
ES5 의 경우, 3항 조건 연산자(Conditional Operator)를 이용하여 값을 지정했습니다.
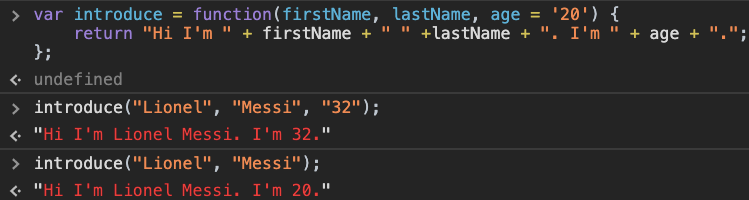
ES6 의 경우, parameter 를 선언하는 부분에 접근하여 직접 값을 지정합니다.
4. Template Literals
Template Literals 는 String 과 변수들이 섞여있을 때 둘의 연결을 간편화시킵니다.

ES5 의 경우 String 의 따옴표와 변수 사이에 + 를 추가하는 과정이 길수록 복잡해져서 실수할 확률이 높았습니다.

ES6 에서는 이러한 과정을 간소화했습니다. 전체 String 을 `(backtick) 을 이용하여 묶어준 후, 변수들만 ${} 안에 넣어주면 됩니다. 이 방식은 html에서 유용하게 사용됩니다.
5. Arrow Functions
Arrow Functions 는 일반 함수식을 짧게 표현을 해주며, 이 방식은 this 값을 바인딩하지 않기 때문에 객체지향 프로그래밍을 할 때 좋은 방식입니다. Rest Parameter 때의 예시를 다시 보겠습니다.
addInArray 함수 안에 reduce 함수를 ES6에서 보다 간단하게 표현할수 있습니다.

function() 을 간단히 () 로 표현 후, 화살표로 리턴 하려는 연산을 표시합니다. 이 방법은 간소화되었지만 this값을 바인딩하지 않기 때문에 항상 쓰는 것이 아니라 목적에 맞게 사용되어야 합니다.
6. for…of loop
for…of loop 을 이용하면 Array, String, Sets, Maps, arguments, NodeList 등과 같은 구조에서 모든 요소들을 순회하려 할 때 사용하면 유용합니다.

앞의 Rest Parameters 를 다시 한번 사용하여 만든 예시입니다. for loop 은 일반적인 방식일 때 입니다.

먼저 … 으로 Rest Parameters 를 사용하고, for…of loop 을 이용한 방식입니다. for…of loop 을 이용하면 index 를 빠트릴 걱정없이 콜렉션 안의 모든 값을 순회합니다.
다만 일반 for loop 은 순회하도록 지정한 숫자를 변경하기만 하는 대신, for…of loop 은 해당 콜렉션의 요소들을 순회하는 점에서 (데이터의 사이즈가 크다면) 퍼포먼스의 차이가 일어날 수 있습니다. 아래 링크를 통해 for…of loop이 ES5 로 변환되면 어떤 모습일지 확인할 수 있습니다.
https://stackoverflow.com/questions/48278719/performance-cost-of-the-for-of-loop
7. Using “Class” in ES6 & Inheritance
javascript 는 Object-Oriented Programming, 즉 객체지향 프로그래밍을 지향하지만, 원래부터 OOP 를 위해 만들어진 언어는 아닙니다. 그래서 javascript 에는 class 가 존재하지 않고 function 만 존재한 functional language 였습니다. ES6 에는 OOP 를 더 수월하게 구현하기 위해 class 가 추가되었습니다. 그럼 지금부터 ES5 에서 ES6 의 class 구현은 어떻게 바뀌었는지 비교하며 알아보도록 하겠습니다.
7-1. Class in ES5
먼저 아래와 같이 Person 과 Student 를 "Pseudoclassical pattern" 을 이용하여 선언하였습니다.
var Person = function(name) {
  this.name = name;
};

Person.prototype.eat = function() {
  console.log( this.name, “ is eating.” );
}

var Student = function(name) {
  this.name = name;
};

Student.prototype.learn = function() {
  console.log( this.name, “ is coding.” );
}
이렇게 생성을 하면 Person과 Student는 연관이 없는 두 class입니다.
var Student = function(name) {
  this.name = name;
};

Student.prototype = Object.create(Person.prototype); //이것을 추가

Student.prototype.learn = function() {
  console.log( this.name + “ is coding.”);
}

let student1 = new Student(“Daniel”);
// student1 instanceOf Student && Person === true;
// student1.__proto__.constructor === Person -> Student 이어야 한다.
Object.create 가 하는 일은 자신의 첫번째 인자를 기반으로 prototype 을 생성합니다. 여기선 Student.prototype 이 Person.prototype 을 카피한 셈입니다. 그리고 student1 이 무엇의 instance 인지를 확인하면 더 정확합니다. 하지만 여기서 문제는 student1 의 Prototype Link(__proto__) 가 Person 이 아닌 Student 이어야 합니다. 즉 현재는 상속(Inheritance)의 개념이 적용된 게 아닙니다.
var Student = function(name) {
  this.name = name;
};

Student.prototype = Object.create(Person.prototype);
Student.prototype.constructor = Student; //이것을 추가

Student.prototype.learn = function() {
  console.log(this.name + “ is coding.”);
}

let student1 = new Student(“Daniel”);
// student1 instanceOf Student && Person === true;
// student1.__proto__.constructor === Student -> true
// student1.eat() === ' is eating.' -> Person 의 this === undefined
Object.create 후에 위처럼 Student.prototype 의 constructor 를 Student 로 다시 연결해주어야 합니다. 하지만 student1 이 Person 의 method 를 사용하려 할 때 this(실행 context) 가 전달되지 않아 제대로 실행되지 않습니다.
이것을 해결하려면 아래와 같이 Student 내에서 this.name 을 Person 에 call 해주는 방식이 추가되어야 합니다.
var Student = function(name) {
  Person.call(this.name); //this를 parent class로 올려주는 역할
};

Student.prototype = Object.create(Person.prototype);
Student.prototype.constructor = Student;

Student.prototype.learn = function() {
  console.log(this.name + “ is coding.”);
};

let student1 = new Student(“Daniel”);
// student1 instanceOf Student && Person === true;
// student1.__proto__.constructor === Student -> true
// student1.eat() === 'Daniel is eating.'
class 의 특징 중 하나는 Polymorphism, 다형성입니다. 자식 class 에서 부모 class 의 Property 나 Method 를 자식 class 의 목적에 맞게 override(덮어쓰기) 할 수 있습니다. ES5에서 이것을 구현하려면 아래와 같은 라인이 추가되야 합니다.
var Student = function(name) {
  Person.apply(this, arguments); //apply로 arguments까지 전달
};

Student.prototype = Object.create(Person.prototype);
Student.prototype.constructor = Student;

Student.prototype.eat = function() {
  Person.prototype.eat.apply(this); //Person의 method에 this를 전달
  console.log(this.name + " can't eat right now.");
}

Student.prototype.learn = function() {
  console.log(this.name + " is coding.");
};

let student1 = new Student(“Daniel”);
// student1 instanceOf Student && Person === true;
// student1.__proto__.constructor === Student -> true
// student1.eat() === 'Daniel can't eat right now.'
7-2. Class in ES6
ES6 에선 위의 과정들이 대폭 축소됩니다. 바로 class 를 function 으로 흉내내는 것이 아니라 직접 사용할 수 있게 되었기 때문입니다.
class Person {
  constructor(name) {
    this.name = name;
  }

  eat() {
    console.log(this.name + " is eating.");
  }
}

class Student extends Person {
  constructor(name) {//
    super(name);     // Property를 따로 변경하지 않았기 때문에 생략 가능하다.
  }                  //
  eat() {
    super.eat(); // 이건 Person.eat()을 가져오기에 override하려면 생략 가능
    console.log(this.name+ “is studying.”);
  }

  learn() {
    console.log(this.name+ “is coding.”);
  }
}

var student1 = new Student("Daniel);
student1.eat();
// "Daniel is eating."
// "Daniel is studying."
이렇게 class 를 이용하면 prototype 과 constructor 와의 연결을 걱정할 필요없이 바로 사용 가능합니다. 상속을 받으려면 Student 옆에 extends 를 이용하여 상속받으려는 class 를 명시해줍니다. constructor 안에 super, 즉 상속해주는 class 의 property 를 받아올 수 있으며 property 를 덮어쓰기도 가능합니다.
이렇게 ES6의 알고 있으면 유용한 syntax들 몇가지와 class 사용법에 대해서 알아보았습니다. ES5에 익숙한 것은 좋지만 ES6 또한 대중화가 많이 이뤄진 만큼 알고 있으면 도움이 될 것입니다.
참조
https://developer.mozilla.org/en-US/docs/Web/JavaScript/Reference/Statements/for...of