본 포스팅은 "Do it! LLM을 활용한 AI 에이전트 개발 입문"을 독학하며 쓴 글입니다.
내돈내산 포스팅임을 참고해주시면 감사하겠습니다.
2026년 2월 7일 기준으로 작성되었습니다.
Chapter 4
회의록을 정리하는 AI 서기
본 포스팅에서는 지난 포스팅에 이어서 음성파일의 화자를 구분하고 이를 기록하는 코드를 작성해보겠습니다
1. 판다스로 문장 분석하고 화자 매칭하기
이전 포스트에서 만든 RTTM 파일에 있는 화자 데이터와 위스퍼 API를 이용해 음성을 받아쓴 CSV 파일의 데이터를 분석하면 누가 어떤 문장을 말했는지 파악할 수 있다
일단 whisper_stt.py 파일을 만들고 MP3 파일을 텍스트로 변환 후 그 결과를 판다스의 데이터 프레임으롲 어리해서 CSV로 저장해보자
받아쓰기 기능을 whisper_stt 함수로 만들고, 판다스 데이터 프레임 형태로 저장한느 기능은 whisper_to_dataframe 함수로 생성한다
whisper_stt 함수는 이전 포스팅에서 만든 huggingface_whisper.ipynb 파일의 코드를 활용해서 만들었다
이전 코드에서 주요 변경점은 경로를 함수의 매개변수로 수정한 것이다
# whister_stt.py
import os
import torch
import pandas as pd
from transformers import AutoModelForSpeechSeq2Seq, AutoProcessor, pipeline

# 본인의 ffmpeg 설치 경로를 추가한다. 경로에는 ffmpeg\bin 폴더까지 들어가야 함에 주의하자
os.environ["PATH"] += os.pathsep + r"(ffmpeg 설치 경로)"

def whisper_stt(
    audio_file_path : str,
    output_file_path : str = "./output.csv"
):
  device = "cuda:0" if torch.cuda.is_available() else "cpu"
  torch_dtype = torch.float16 if torch.cuda.is_available() else torch.float32

  model_id = "openai/whisper-large-v3-turbo"

  model = AutoModelForSpeechSeq2Seq.from_pretrained(
      model_id, torch_dtype=torch_dtype, low_cpu_mem_usage=True, use_safetensors=True
  )
  model.to(device)

  processor = AutoProcessor.from_pretrained(model_id)

  pipe = pipeline(
      "automatic-speech-recognition",
      model=model,
      tokenizer=processor.tokenizer,
      feature_extractor=processor.feature_extractor,
      torch_dtype=torch_dtype,
      device=device,
      return_timestamps=True,
      chunk_length_s=10,
      stride_length_s=2,
  )
  result = pipe(audio_file_path)

  # 다음 코드에서 whisper_to_dataframe 정의
  df = whisper_to_dataframe(result, output_file_path)

  return result, df

def whisper_to_dataframe(result, output_file_path):
  start_end_text = []

  for chunk in result["chunks"]:
      start = chunk["timestamp"][0]
      end = chunk["timestamp"][1]
      text = chunk["text"]
      start_end_text.append((start, end, text))

  df = pd.DateFrame(start_end_text, columns = ["start", "end", "text"])
  df.to_csv(output_file_path, index=False, sep = "|")

  return df

  if __name__ == "__main__":
   result,df = whisper_stt(
      "./chap5/audio/싼기타_비싼기타.mp3",
      "./chap5/audio/싼기타_비싼기타.csv",
   )

   print(df)
위 코드에서 확인해야 할 부분은 다음과 같다
- def whisper_stt(audio_file_path : str, output_file_path : str = "./output.csv"):
우선 함수의 매개변수 뒤에 타입을 명시해주는 것은 매개변수의 대한 타입 힌트라고 볼 수 있다
기능에는 문제 없지만 가독성을 위해 추가한다고 한다
또한, output_file_path : str = "./output.csv"는 함수를 사용할 때 두번째 인자의 값이 없으면 기본적으로 "./output.csv"를 사용하겠다는 것을 의미한다
코드를 실행한 결과를 아래 사진과 같이 확인할 수 있다
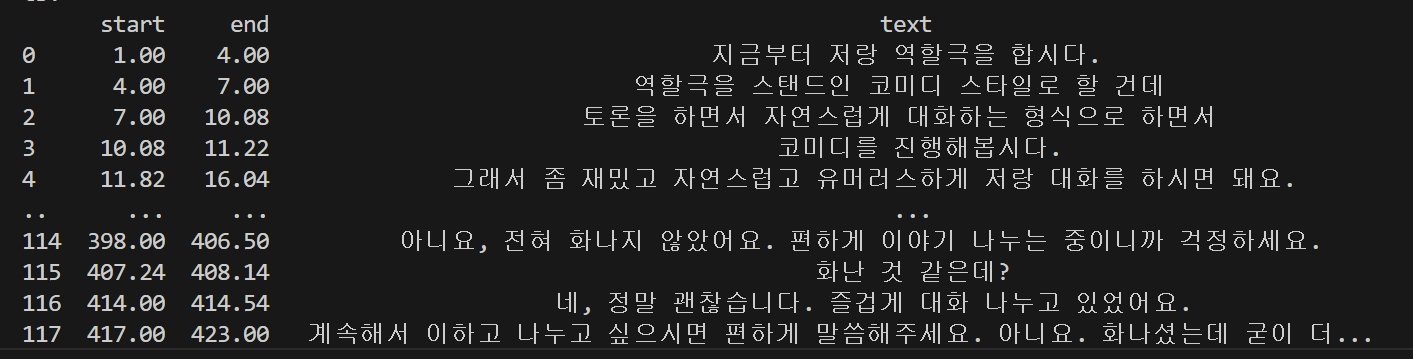
이렇게 MP3 파일에서 내용을 받아 적는 코드 까지 만들어봤으니 다음은 화자를 분리하는 코드를 추가해보도록 하자
이전 포스팅에서 사용한 spreaker_diarization.ipynb를 사용하면 함수를 쉽게 추가할 수 있다
2. 화자 분리하기
아래의 코드를 위의 whisper_stt.py에 추가해보자
# speaker_diarization 함수 추가
from pyannote.audio import Pipeline

def speaker_diarization(
    audio_file_path : str,
    output_rttm_file_path : str,
    output_csv_file_path : str
):
  pipeline = Pipeline.from_pretrained(
  "pyannote/speaker-diarization-3.1",
  token='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')

  if torch.cuda.is_available():
      pipeline.to(torch.device("cuda"))
      print('cuda is available')
  else:
      print('cuda is not available')

  # ✅ torchcodec 대신 torchaudio로 파일을 직접 로드
  # wav_path = "./audio/싼기타_비싼기타.wav"
  waveform, sample_rate = torchaudio.load(audio_file_path)

  # pyannote 입력 포맷
  audio = {"waveform": waveform, "sample_rate": sample_rate}
  diarization_pipeline = pipeline(audio)

  with open(output_rttm_file_path, "w", encoding="utf-8") as f:
    diarization_pipeline.speaker_diarization.write_rttm(f)

  df_rttm = pd.read_csv(
  output_rttm_file_path,
  sep= ' ',
  header= None,
  names= ['type', 'file', 'channel', 'start', 'duration', 'C1', 'C2', 'speaker_id', 'C3', 'C4']
  )

  # start + duration = end 로 반환
  df_rttm['end'] = df_rttm['start'] + df_rttm['duration']

  # speaker_id를 기반으로 화자별로 구간 나누기
  df_rttm["number"] = None
  df_rttm.at[0, "number"] = 0

  for i in range(1, len(df_rttm)):
    if df_rttm.at[i, "speaker_id"] != df_rttm.at[i-1, "speaker_id"]:
        df_rttm.at[i, "number"] = df_rttm.at[i-1, "number"] + 1
    else:
        df_rttm.at[i, "number"] = df_rttm.at[i-1, "number"]

  df_rttm_grouped = df_rttm.groupby("number").agg(
    start = pd.NamedAgg(column="start", aggfunc="min"),
    end = pd.NamedAgg(column="end", aggfunc="max"),
    speaker_id = pd.NamedAgg(column="speaker_id", aggfunc="first")
  )

  df_rttm_grouped["duration"] = df_rttm_grouped["end"] - df_rttm_grouped["start"]
  df_rttm_grouped = df_rttm_grouped.reset_index(drop=True)

  df_rttm_grouped.to_csv(output_csv_file_path, sep = ' ',index=False)
  return df_rttm_grouped
이전 포스팅에서도 그랬듯 diarization_pipeline 부분에서 오류가 발생해서 책과는 다르게 코드를 수정해서 작성했다
또한 해당 함수가 잘 실행되는지 확인하기 위해 메인 부분도 수정해야 할 필요가 있다
if __name__ == "__main__":
audio_file_path = "./chap5/audio/싼기타_비싼기타.mp3"
stt_output_file_path = "./chap5/audio/싼기타_비싼기타.csv"
rttm_file_path = "./chap5/audio/싼기타_비싼기타.rttm"
rttm_csv_file_path = "./chap5/audio/싼기타_비싼기타_rttm.csv"
# result, df_stt = whisper_stt(
# audio_file_path,
# stt_output_file_path
# )
# print(df)
df_rttm = speaker_diarization(
audio_file_path,
rttm_file_path,
rttm_csv_file_path
)
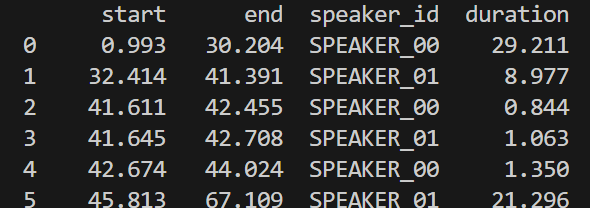
print(df_rttm)이전 포스팅과 같은 결과가 나온 것을 확인할 수 있다!!
그럼 여기까지는 문제가 없다고 판단하고 일단 넘어가보도록 하자
3. STT 결과파일과 화자 분리 결과 파일 (RTTM) 결합하기
이제 시간대별로 화자가 분리되었으니 위스퍼 모델이 받아쓴 문장이 어느 시간대의 화자의 발언인지 찾아서 정리하면 된다!!
화자별로 발언을 할당하기 위한 stt_to_rttm 함수를 작성해보자
def stt_to_rttm(
    audio_file_path : str,
    stt_output_file_path : str,
    rttm_file_path :str,
    rttm_csv_file_path : str,
    final_output_scv_file_path : str
):

  # 음성파일을 csv 파일에 받아쓰기
  result, df_stt = whisper_stt(
     audio_file_path,
     stt_output_file_path
  )

  # 음성파일을 rttm 파일과 csv 파일로 화자 분리
  df_rttm = speaker_diarization(
    audio_file_path,
    rttm_file_path,
    rttm_csv_file_path
  )

  df_rttm["text"] = ""

  for i_stt, row_stt in df_stt.iterrows():
    overlap_dict = {}
    for i_rttm, row_rttm in df_rttm.iterrows():
      overlap = max(0, min(row_stt["end"], row_rttm["end"]) - max(row_stt["start"], row_rttm["start"]))
      overlap_dict[i_rttm] = overlap

    max_overlap = max(overlap_dict.values())
    max_overlap_idx = max(overlap_dict, key=overlap_dict.get)

    if max_overlap > 0:
       df_rttm.at[max_overlap_idx, "text"] += row_stt["text"] + "\n"

  df_rttm.to_csv(final_output_scv_file_path, sep = '|',index=False, encoding='utf-8')
위의 코드에서 확인해야 할 부분은 다음과 같다
- stt_to_rttm 함수는 whisper_stt 함수와 speaker_diarization 함수의 결과값을 이용한다
- df_rttm["text"] = ""
시간대별로 어느 화자가 발언했는지 정리된 df_rttm에 "text" 칼럼을 추가한다
해당 칼럼에 위스퍼 모델로 받아쓴 텍스트를 채운다
아래의 for문을 활용해서 채울 텍스트를 결정한다
- 이중 for문
df_stt 행과 df_rttm의 행이 겹치는 시간을 각각 계산한 후 가장 많이 겹치는 행에 텍스트를 추가한다
만약 겹치는 시간이 0초라면 해당 문장을 건너뛴다
함수를 추가한 것과 더불어 메인 부분도 다음과 같이 수정한다
if __name__ == "__main__":
  audio_file_path = "./chap5/audio/싼기타_비싼기타.mp3"
  stt_output_file_path = "./chap5/audio/싼기타_비싼기타.csv"
  rttm_file_path = "./chap5/audio/싼기타_비싼기타.rttm"
  rttm_csv_file_path = "./chap5/audio/싼기타_비싼기타_rttm.csv"
  final_csv_file_path = "./chap5/audio/싼기타_비싼기타_final.csv"

  df_rttm = stt_to_rttm(
    audio_file_path,
    stt_output_file_path,
    rttm_file_path,
    rttm_csv_file_path,
    final_csv_file_path
  )

  print(df_rttm)
코드를 실행시켜보니 아래와 같은 결과를 얻을 수 있었다!!
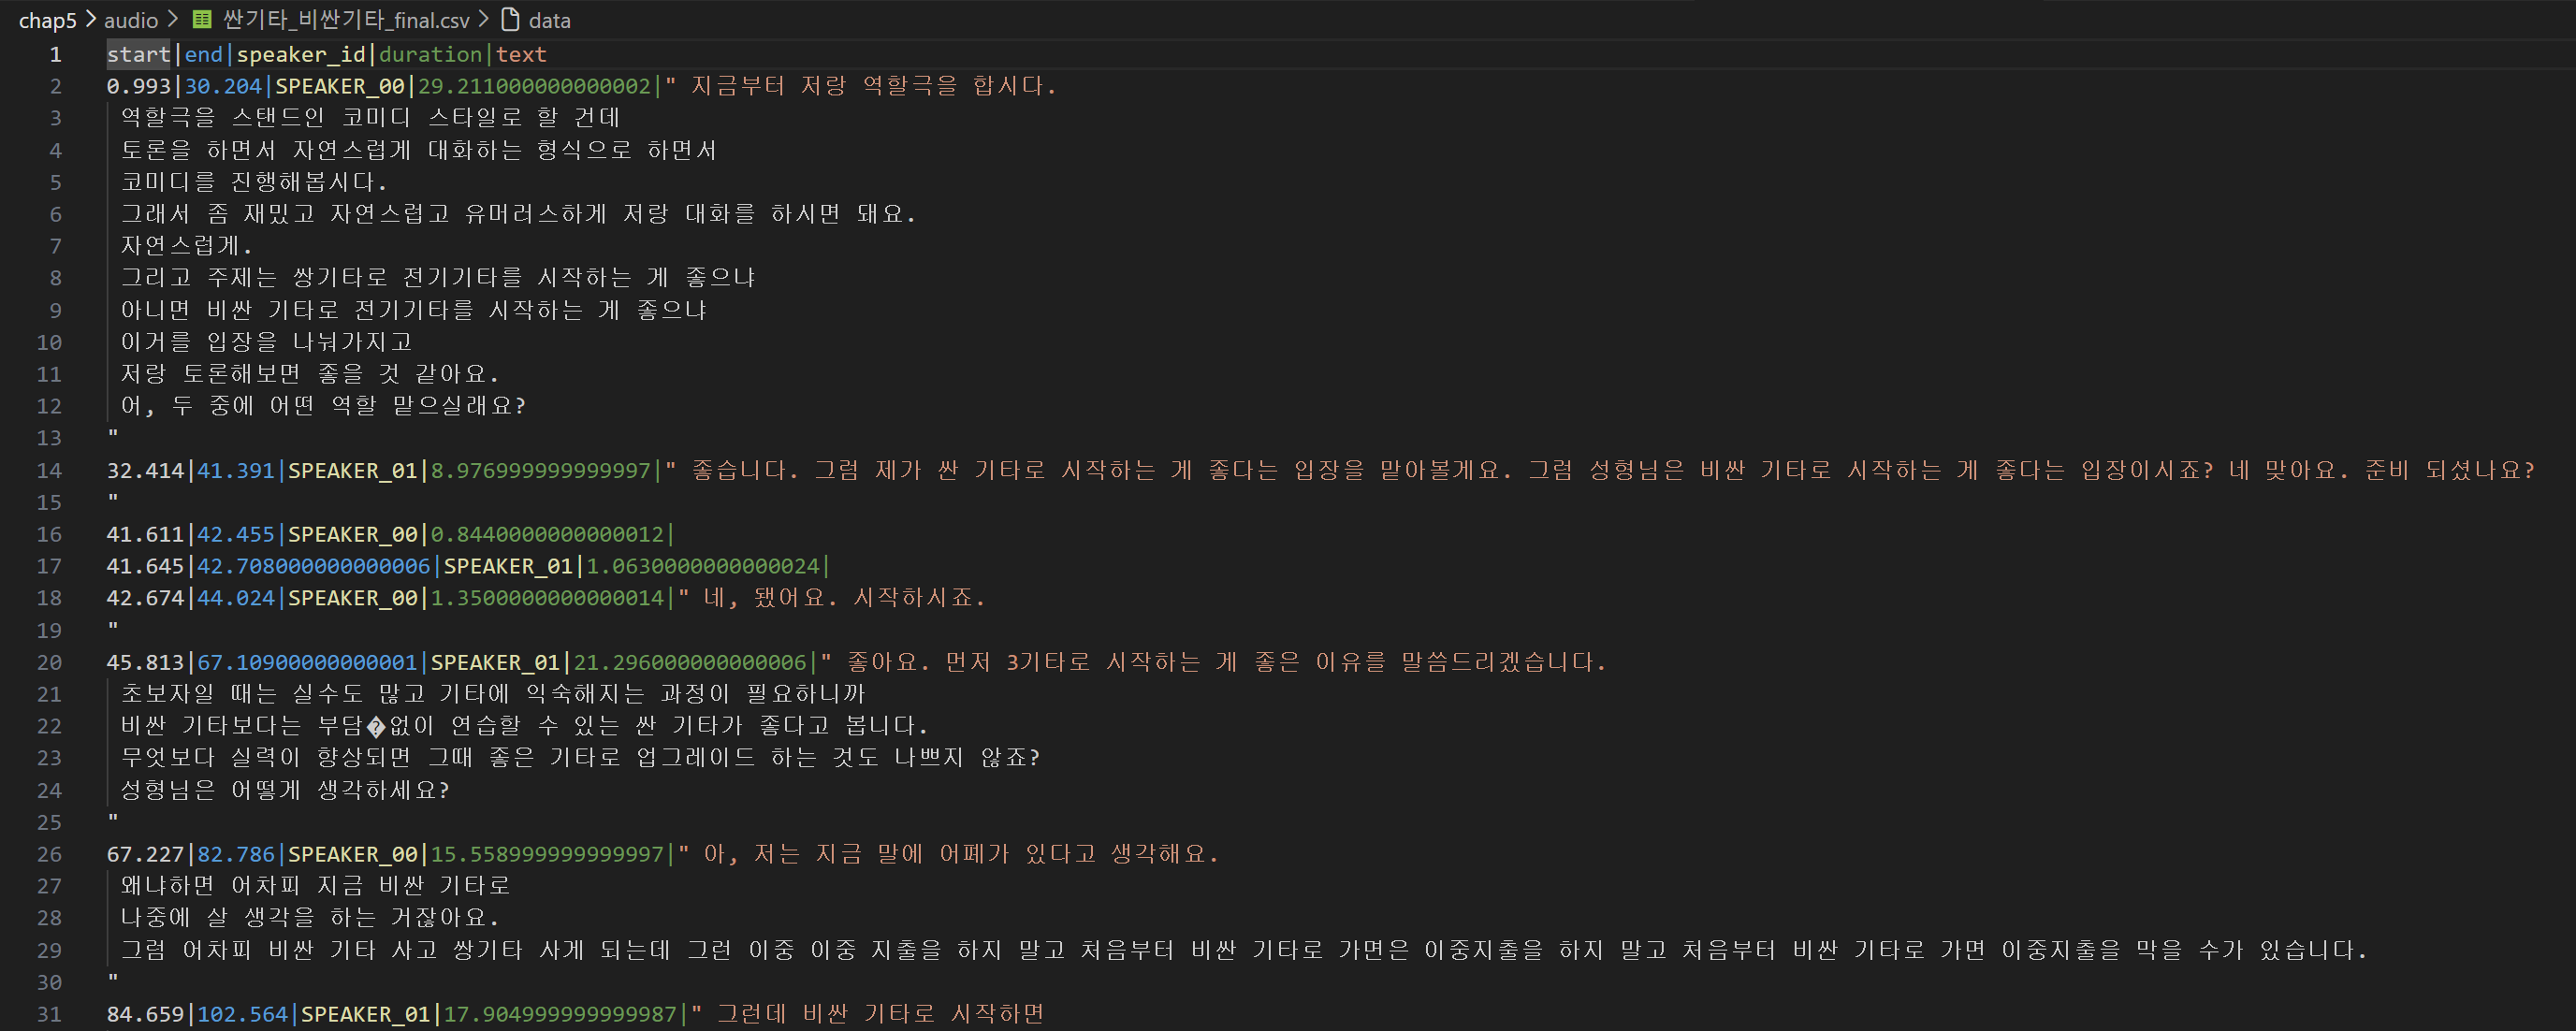
이 정도면 목표로 한 화자 분리와 그에 맞는 발언까지 완벽하게 정리된 것 같다
3. 마무리
이번 포스팅은 대부분 전 포스팅에서의 코드를 재활용해서 함수로 만들고 작성해서 어려운 내용이 적었던 것 같다
그나마 제일 어려웠던 부분은 rttm 파일과 받아쓰기 파일을 매칭 시키는 이중 for문의 코드를 이해하는 것이었다
다음 포스팅에서는 이제 해당 내용을 요약해주고 MS WORD 파일로 저장하는 실습을 해보려한다
다음 포스팅까지 완료하면 아마 음성 파일을 다루는 것에 대해서는 마지막이 될 것이다
그 다음 챕터는 이미지 파일을 이용하던데 이것도 상당히 기대가 된다