✏️ 오늘 학습한 내용
1. Google sheets -> Redshift table
2. Redshift select -> Google sheets
3. Airflow 모니터링
🔎 Google sheets -> Redshift table
구글 시트의 데이터들을 Redshift의 table로 복사하는 과정을 진행해보겠습니다.
구현 절차
-
Google Spreadsheets API 활성화
-
Google Service Account 생성
( JSON 파일로 다운 ) -
Account에서 생성한 이메일을 Google Sheets에 공유
-
Airflow DAG에서 Account를 저장한 JSON 파일로 인증 후 Google Sheets를 읽어옴
-
추출한 데이터를 Redshift에 적재
Google Spreadsheets API 활성화
-
Google Cloud 로그인
( 결제나 체험판 사용 X ) -
Project 생성
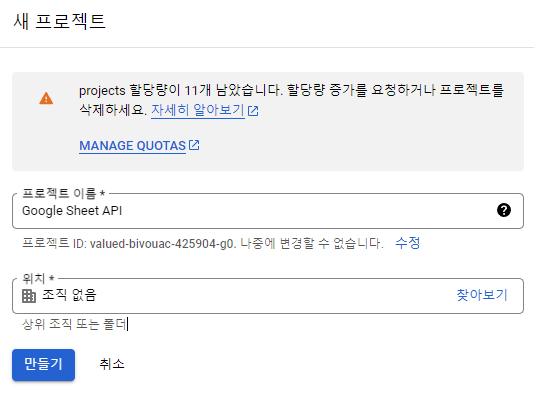
- Google Sheets API 활성화
( 로그인한 계정으로 ENABLE 혹은 사용 체크 )
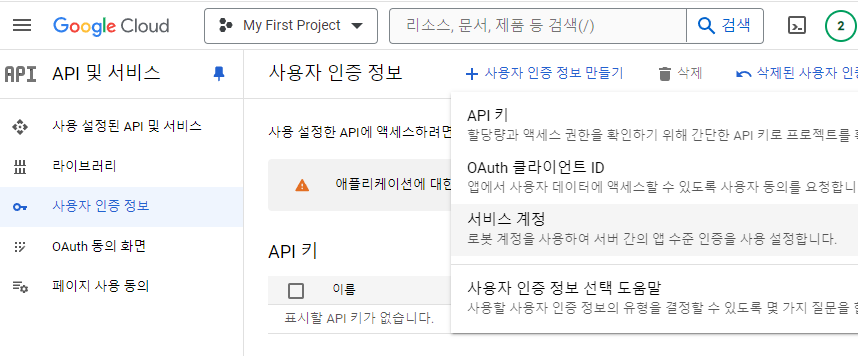
Google Service Account 생성
- Google Service Account 생성 - JSON 파일
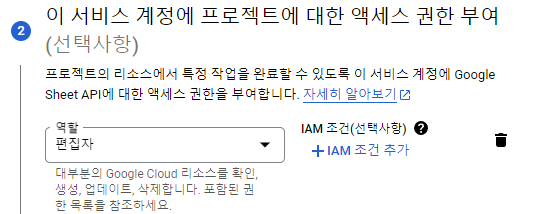
( API 및 서비스 -> 사용자 인증 정보 -> 서비스 계정 )
( 역할 -> 편집자 )
( 생성한 서비스 계정으로 접근 -> 키 선택 )
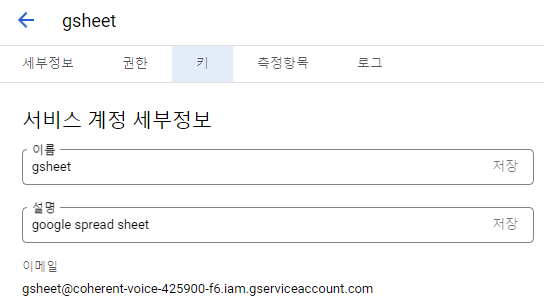
( 키 생성 -> JSON type -> local에 저장 )

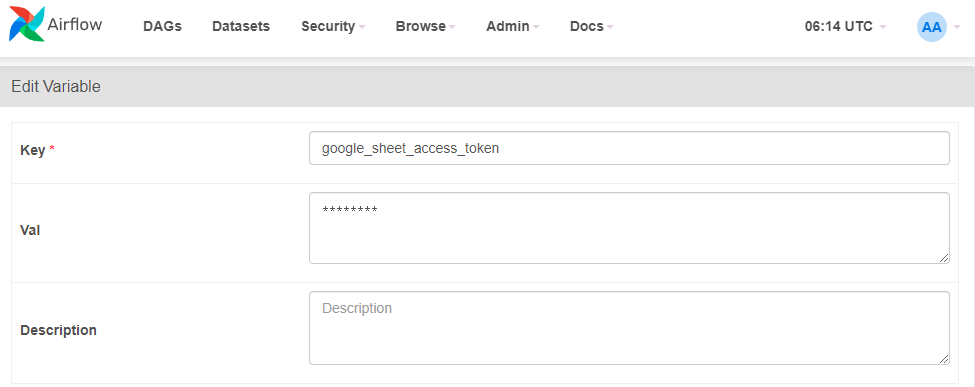
- JSON 파일을
google_sheet_access_token이란 이름의 Variable로 등록
( JSON 파일의 코드 그대로 Val에 복사 )
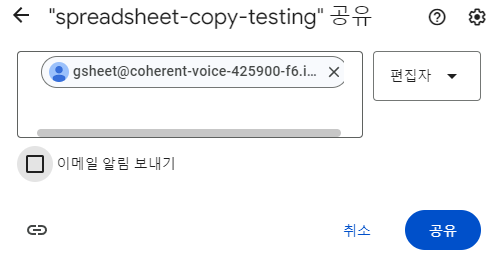
- JSON 파일 내의 이메일 주소를 찾아 Google Spreadsheet 파일에 공유
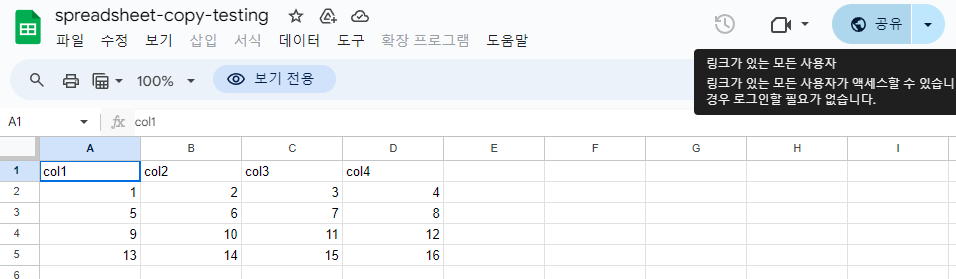
( 편집자 권한 부여 )
코드
구글 스프레드 시트를 읽고 Redshift 테이블로 복사하는 코드로
구글 스프레드 시트를 편집하는 메인 함수는 get_google_sheet_to_csv입니다.
구글 스프레드 시트와 연동하는 작업을 위해선,
아래 2개의 모듈 설치가 필요합니다.
pip3 install oauthclient
pip3 install gspread
Redshift의 테이블이 없다면, 자동 생성하는 부분은 구현이 안되어있기에 테이블을 미리 생성해두어야합니다.
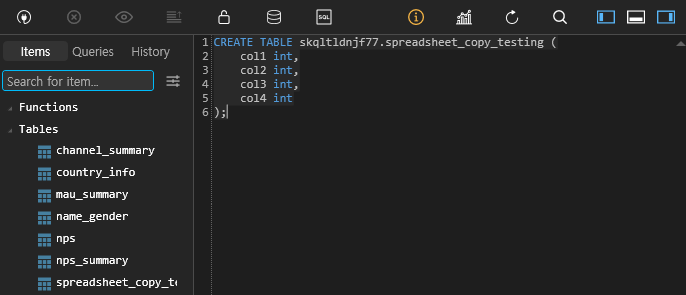
- Redshift Table 생성
또한, 앞에서 해두었던 Airflow Web UI에 Redshift연결과 S3연결이 선행되어야합니다.
gsheet.py( 주요 기능 )
# -*- coding: utf-8 -*-
from airflow.hooks.postgres_hook import PostgresHook
from airflow.models import Variable
from oauth2client.service_account import ServiceAccountCredentials

import base64
import gspread
import json
import logging
import os
import pandas as pd
import pytz


def write_variable_to_local_file(variable_name, local_file_path):
    content = Variable.get(variable_name)
    f = open(local_file_path, "w")
    f.write(content)
    f.close()


def get_gsheet_client():
    data_dir = Variable.get("DATA_DIR")
    scope = ['https://spreadsheets.google.com/feeds', 'https://www.googleapis.com/auth/drive']

    # 접근 권한
    # 위에서 지정한 variable : google_sheet_access_token의 내용을
    # 로컬에 저장할 파일의 이름을 지정
    gs_json_file_path = data_dir + 'google-sheet.json'

    # google_sheet_access_token을 JSON파일로 저장
    write_variable_to_local_file('google_sheet_access_token', gs_json_file_path)
    # 저장한 JSON 파일로 자격 증명
    credentials = ServiceAccountCredentials.from_json_keyfile_name(gs_json_file_path, scope)
    # gc : 스프레드 시트를 편집할 수 있는 오브젝트
    gc = gspread.authorize(credentials)

    return gc


def p2f(x):
    return float(x.strip('%'))/100

# 메인 함수
# google sheet API를 통해
# 구글 스프레드시트를 읽고 쓰는 것이 가능하게 해줍니다.
def get_google_sheet_to_csv(
    sheet_uri, # 이메일을 공유한 스프레드 시트 url
    tab, # 데이터를 읽어올 tab의 이름
    filename, # csv파일로 저장할 file 이름
    header_line=1,
    remove_dollar_comma=0,
    rate_to_float=0):

    data, header = get_google_sheet_to_lists(
        sheet_uri,
        tab,
        header_line,
        remove_dollar_comma=remove_dollar_comma)

    if rate_to_float:
        for row in data:
            for i in range(len(row)):
                if str(row[i]).endswith("%"):
                    row[i] = p2f(row[i])

    data = pd.DataFrame(data, columns=header).to_csv(
        filename,
        index=False,
        header=True,
        encoding='utf-8'
    )


def get_google_sheet_to_lists(sheet_uri, tab=None, header_line=1, remove_dollar_comma=0):
    gc = get_gsheet_client()

    # no tab is given, then take the first sheet
    # here tab is the title of a sheet of interest
    if tab is None:
        wks = gc.open_by_url(sheet_uri).sheet1
    else:
        wks = gc.open_by_url(sheet_uri).worksheet(tab)

    # list of lists, first value of each list is column header
    print(wks.get_all_values())
    print(int(header_line)-1)
    data = wks.get_all_values()[header_line-1:]

    # header = wks.get_all_values()[0]
    header = data[0]
    if remove_dollar_comma:
        data = [replace_dollar_comma(l) for l in data if l != header]
    else:
        data = [l for l in data if l != header]
    return data, header


def add_df_to_sheet_in_bulk(sh, sheet, df, header=None, clear=False):
    records = []
    headers = list(df.columns)
    records.append(headers)

    for _, row in df.iterrows():
        record = []
        for column in headers:
            if str(df.dtypes[column]) in ('object', 'datetime64[ns]'):
                record.append(str(row[column]))
            else:
                record.append(row[column])
        records.append(record)

    if clear:
        sh.worksheet(sheet).clear()
    sh.values_update(
        '{sheet}!A1'.format(sheet=sheet),
        params={'valueInputOption': 'RAW'},
        body={'values': records}
    )


def update_sheet(filename, sheetname, sql, conn_id):
    client = get_gsheet_client()
    hook = PostgresHook(postgres_conn_id=conn_id)
    sh = client.open(filename)
    df = hook.get_pandas_df(sql)
    print(sh.worksheets())
    sh.worksheet(sheetname).clear()
    add_df_to_sheet_in_bulk(sh, sheetname, df.fillna(''))


def replace_dollar_comma(lll):
return [ ll.replace(',', '').replace('$', '') for ll in lll ]Gsheet_to_Redshift.py( DAG )
DAG는 총 3가지 task로 구성되어 있습니다.- 스프레드 시트 내용을 csv파일로 다운로드
- 다운 받은 csv파일을 S3로 복사
- S3의 csv파일을 지정된 Redshift 테이블로 벌크 업데이트
from airflow import DAG
from airflow.operators.python import PythonOperator
from airflow.providers.amazon.aws.transfers.s3_to_redshift import S3ToRedshiftOperator
from airflow.models import Variable
from datetime import datetime
from datetime import timedelta
from plugins import gsheet
from plugins import s3
import requests
import logging
import psycopg2
import json
def download_tab_in_gsheet(**context):
url = context["params"]["url"]
tab = context["params"]["tab"]
table = context["params"]["table"]
data_dir = Variable.get("DATA_DIR")
# 메인 함수인 get_google_sheet_to_csv에 넣어줄 인자들을 지정
# url : 이메일을 공유한 스프레드 시트 url
# tab : 데이터를 읽어올 tab의 이름
# filename : csv로 저장할 파일 이름
gsheet.get_google_sheet_to_csv(
url,
tab,
data_dir+'{}.csv'.format(table)
)
def copy_to_s3(**context):
table = context["params"]["table"]
s3_key = context["params"]["s3_key"]
s3_conn_id = "aws_conn_id"
s3_bucket = "grepp-data-engineering"
data_dir = Variable.get("DATA_DIR")
local_files_to_upload = [ data_dir+'{}.csv'.format(table) ]
replace = True
s3.upload_to_s3(s3_conn_id, s3_bucket, s3_key, local_files_to_upload, replace)
dag = DAG(
dag_id = 'Gsheet_to_Redshift',
start_date = datetime(2021,11,27), # 날짜가 미래인 경우 실행이 안됨
schedule = '0 9 * * *', # 적당히 조절
max_active_runs = 1,
max_active_tasks = 2,
catchup = False,
default_args = {
'retries': 1,
'retry_delay': timedelta(minutes=3),
}
)
# 복사하고 싶은 스프레드 시트들을 url,tab,schema,table의 형태로 반복해서 구성
sheets = [
{
"url": "https://docs.google.com/spreadsheets/d/1hW-_16OqgctX-_lXBa0VSmQAs98uUnmfOqvDYYjuE50/",
"tab": "SheetToRedshift",
"schema": "skqltldnjf77",
"table": "spreadsheet_copy_testing"
}
]
# 3가지 task로 구성
for sheet in sheets:
# 1. 스프레드 시트 내용을 csv파일로 다운로드
download_tab_in_gsheet = PythonOperator(
task_id = 'download_{}_in_gsheet'.format(sheet["table"]),
# 메인 함수를 호출하는 부분
python_callable = download_tab_in_gsheet,
params = sheet,
dag = dag)
s3_key = sheet["schema"] + "_" + sheet["table"]
# 2. 다운 받은 csv파일을 S3로 복사
copy_to_s3 = PythonOperator(
task_id = 'copy_{}_to_s3'.format(sheet["table"]),
python_callable = copy_to_s3,
params = {
"table": sheet["table"],
"s3_key": s3_key
},
dag = dag)
# 3. S3의 csv파일을 지정된 Redshift 테이블로 벌크 업데이트
run_copy_sql = S3ToRedshiftOperator(
task_id = 'run_copy_sql_{}'.format(sheet["table"]),
s3_bucket = "grepp-data-engineering",
s3_key = s3_key,
schema = sheet["schema"],
table = sheet["table"],
copy_options=['csv', 'IGNOREHEADER 1'],
method = 'REPLACE',
redshift_conn_id = "redshift_dev_db",
aws_conn_id = 'aws_conn_id',
dag = dag
)
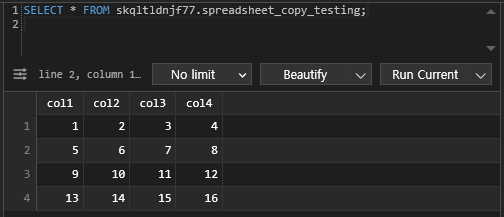
download_tab_in_gsheet >> copy_to_s3 >> run_copy_sql실행
# airflow scheduler에서 DAG 실행
airflow dags test Gheet_to_Redshift 2023-05-23
성공!

🔎 Redshift select -> Google sheets
Redshift의 테이블 중 하나인 analytics.nps_summary 테이블을 Google Spread Sheets로 복사해보겠습니다.
DAG 코드 SQL_to_Sheet.py를 기반으로
위에 작성한 gsheet.py의 update_sheet 함수를 사용하여
스프레드 시트에 복사하겠습니다.
gsheet.py의 update_sheet 함수
def update_sheet(filename, sheetname, sql, conn_id):
	# 구글 스프레드 시트를 편집할 수 있는 오브젝트
    client = get_gsheet_client()
    # Redshift 연결
    hook = PostgresHook(postgres_conn_id=conn_id)
    # 저장할 스프레드 시트 파일 열기
    sh = client.open(filename)
    # SQL 쿼리 결과 추출
    df = hook.get_pandas_df(sql)
    print(sh.worksheets())
    # 대상 스프레드 시트의 내용 초기화
    sh.worksheet(sheetname).clear()
    # 해당 스프레드 시트 탭에 벌크 업데이트
    add_df_to_sheet_in_bulk(sh, sheetname, df.fillna(''))
SQL_to_Sheet.py
from airflow import DAG
from airflow.operators.python import PythonOperator

from plugins import gsheet
from datetime import datetime

def update_gsheet(**context):
    sql = context["params"]["sql"]
    sheetfilename = context["params"]["sheetfilename"]
    sheetgid = context["params"]["sheetgid"]
	# update_sheet를 호출하여 스프레드 시트에 복사
    gsheet.update_sheet(sheetfilename, sheetgid, sql, "redshift_dev_db")


with DAG(
    dag_id = 'SQL_to_Sheet',
    start_date = datetime(2022,6,18),
    catchup=False,
    tags=['example'],
    schedule = '@once'
) as dag:

    sheet_update = PythonOperator(
        dag=dag,
        task_id='update_sql_to_sheet1',
        python_callable=update_gsheet,
        # 추출할 SELECT 문
        # 저장할 스프레드 시트 이름
        # 스프레드 시트의 저장할 tab
        params = {
            "sql": "SELECT * FROM analytics.nps_summary",
            "sheetfilename": "spreadsheet-copy-testing",
            "sheetgid": "RedshiftToSheet"
        }
    )
🔎 Airflow 모니터링
목표
- Airflow의 health check 기능을 통한 건강 여부 체크
- Airflow API로 외부에서 Airflow 조작
📃 Airflow의 API 활성화
airflow.cfg 내에는 api 섹션이 존재합니다.
이를 통해, 외부에서 조작할 수 있도록
Airflow의 API를 활성화하겠습니다.
유의사항
Airflow API, Airflow Web UI는 가능하면 VPN(Virtual Private Network) 뒤로 숨겨놓고 VPN을 통과하지 못한 사람들을 Access 하지 못하게 하는 것이 가장 좋습니다.
( Public한 Web에 노출 시키는 것은 굉장히 위험! )
airflow.cfg의 [api] - auth_backend 값 변경
auth_backend = airflow.api.backend.basic_auth
이 부분을 변경해야합니다!
docker-compose.yaml의 AIRFLOW__API__AUTH_BACKENDS
Airflow의 docker-compose.yaml에는
이미 AIRFLOW__API__AUTH_BACKENDS 라는
auth_backends에 접근할 수 있는 값이 설정되어 있습니다.
AIRFLOW__API__AUTH_BACKENDS: 'airflow.api.auth.backend.basic_auth,airflow.api.auth.backend.session'여기서 AIRFLOW__{1}__{2}는 airflow.cfg를
overriding 한다는 것을 의미하고,
{1}은 Section을 가리키고,
{2}는 Key를 가리킵니다.
auth_backend와 auth_backends
( 단수형과 복수형 ) 이 있는데, 그 차이는
API를 다수의 방법으로 로그인하느냐,
한 가지 방법으로 로그인 하느냐의 차이입니다.
즉, 이미 Airflow에는 API가 설정이 되어있기 때문에
별도의 설정이 필요하지 않습니다.
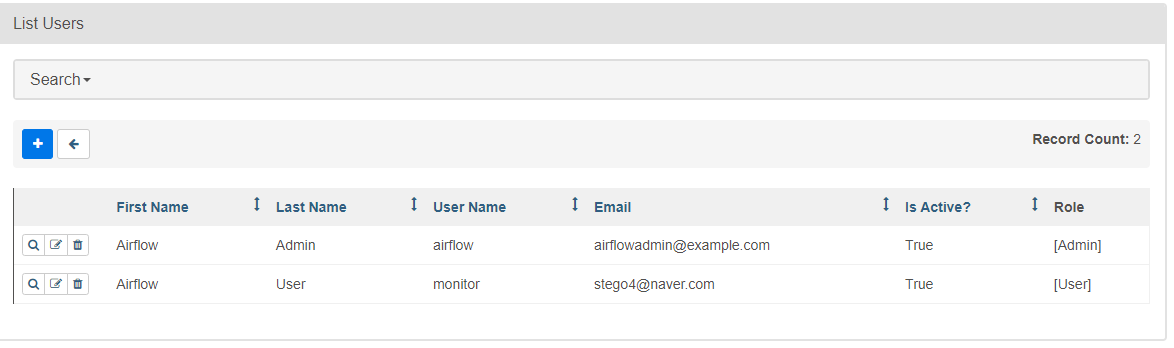
Airflow Web UI에서 새로운 사용자 추가 (API 사용자)
( Security -> List Users -> 사용자 추가 )
- Role : User
- ID/PW : monitor/MonitorUser1
📃 Health API 호출
Health API는 위에서 생성한 Airflow를
외부에서 조작할 수 있는 API와는 다른 API입니다.
Airflow의 상태를 물어보는 것이기 때문에
Airflow API 활성화 여부와 관계없이 사용 가능합니다.
/health API 호출
curl -X GET --user "monitor:MonitorUser1" http://localhost:8080/health- 정상 경우의 응답 예시
( JSON 형태로 반환 )
{
  "metadatabase": {
    "status": "healthy"
  },
  "scheduler": {
    "status": "healthy",
   	# 이 부분의 최근인지 확인해봐야 합니다.
    # 일반적으로 5~10분 전이여야 정상
    # 시간은 UTC 기준
 	"latest_scheduler_heartbeat": "2024-06-01T06:02:38.067178+00:00"
  }
}
📃 API 사용 예시
API 레퍼런스 간략하게 살펴보기
-
endpoint로 요청을 받을 때, 응답을 받을 때 모두 JSON 형태
( Data Format : JSON )

-
Config
( 현재 설정된 Confinguration 읽어오는 방법 )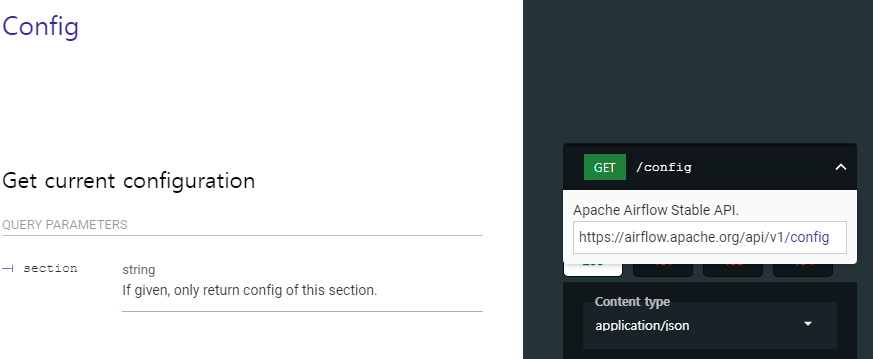
( 접근 방법 : https://localhost:8080/api/v1/config )
airflow.cfg의 Section 별로 어떤 값이 들어가있는 지 확인 가능
1. 특정 DAG를 API로 Trigger하기
DAG의 이름이 "HelloWorld"라 가정하면
API로 Trigger하는 예시는 다음과 같습니다.
curl -X POST --user "airflow:airflow" -H 'Content-Type: application/json' -d
'{"execution_date":"2023-05-24T00:00:00Z"}'
"http://localhost:8080/api/v1/dags/HelloWorld/dagRuns"
먼저, POST 명령으로 실행해야합니다.
DAG를 동작시키기 위해선 "execution_date"를 전달해야하기 때문입니다.
다음으로,
-H 옵션으로 Header에 json형태가 들어간다는 것을 알려주고
-d 옵션으로 데이터를 전달합니다.
endpoint의 형태는 아래와 같습니다.
"http://localhost:8080/api/v1/dags/ + dag이름 + dagRuns"
2. 모든 DAG 리스트하기
값 전달 없이 읽기만 하므로 GET 명령을 사용합니다.
curl -X GET --user "airflow:airflow" http://localhost:8080/api/v1/dags- 결과 예시)
 {
   "dag_id": "SQL_to_Sheet",
   "default_view": "grid",
   "description": null,
   "file_token": "...",
   "fileloc": "/opt/airflow/dags/SQL_to_Sheet.py",
   "has_import_errors": false,
   "has_task_concurrency_limits": false,
   "is_active": true,
   "is_paused": true,
   "is_subdag": false,
   ...
 }
여기서,
"is_active": true 가 뜻하는 바는 DAG폴더에 존재한다는 것이고
"is_paused": true 는 아직 활성화가 안되어있다는 의미입니다.
즉, 활성화가 되어있는 DAG들만 찾고 싶은 경우 ->
"is_paused": false인 경우로만 filtering을 하는
별도의 코드를 작성해야합니다.
3. 모든 Variable 리스트하기
DAG 리스트하는 것과 유사합니다.
curl -X GET --user "airflow:airflow" http://localhost:8080/api/v1/variables4. 모든 Config 리스트하기
airflow.cfg의 내용을 API를 통해서 읽어오는 것입니다.
curl -X GET --user "airflow:airflow" http://localhost:8080/api/v1/config{
"detail": "Your Airflow administrator chose not to expose the configuration, most likely for security reasons.",
"status": 403,
"title": "Forbidden",
"type": "https://airflow.apache.org/docs/apache-airflow/2.5.1/stable-rest-api-ref.html#section/Errors/PermissionDe
nied"
}
이는 중요한 정보들이 들어있기에 admin계정으로 접근해도 기본적으로 Disable있습니다.
-> 이를 사용하기 위해선,
airflow.cfg에 있는 section:key를 찾아서
Docker-compose.yaml에서 overriding해줘야합니다.
airflow.cfg의 아래 section:key가 잠금 역할을 합니다.
Section : [webserver]
Key :expose_config
이를 True로 변경해주면
config API를 사용할 수 있습니다.
docker-compose.yaml에서 overriding하는 방법은
다음과 같습니다.x-airflow-common: environment: AIRFLOW__WEBSERVER__EXPOSE_CONFIG: 'true' ...
5. 활성화되어 있는 DAG만 찾기
python script로 parsing하는 예제
import requests
from requests.auth import HTTPBasicAuth

url = "http://localhost:8080/api/v1/dags"

# BasicAuth를 get 방식으로 request
dags = requests.get(url, auth=HTTpBasicAuth("airflow","airflow"))

active_dags = []

# json 형식으로 받아와 각 "dags"에 접근
for dag in dags.json()["dags"]:
	# "is_paused"의 값이 boolean이므로 not 연산자로
    # false인 경우만 filtering
	if not dag["is_paused"]:
    	active_dags.append(dag["dag_id"])

print(active_dags)
📃 API 없이 CLI로 접근
Variables/Connections Import/Export
Variable이나 Connection은 API가 없이도
커맨드라인으로 접근할 수 있습니다.
# Web UI에 등록된 모든 variables를 json파일로 추출
airflow variables export variables.json

# json파일의 variables를 Web UI안으로 등록
airflow variables import variables.json

# Connection도 동일하게 사용
airflow connections export connections.json
airflow connections import connections.json
사용 예시)
docker exec -it airflow-setup-airflow-scheduler-1 airflow variables export var.json
( 스케줄러를 통해 명령 )
결정적인 약점
DB에 기록이 되서 Web UI에 보이는 Variables, Connections들만 동작합니다.
즉, 환경변수로 등록이 된 변수들은 접근할 수 없습니다.
그럼, API로 호출하는 Variables 리스트는 환경변수로 등록이 된 변수들이 포함이 되는가? 하면 그렇지도 않습니다.
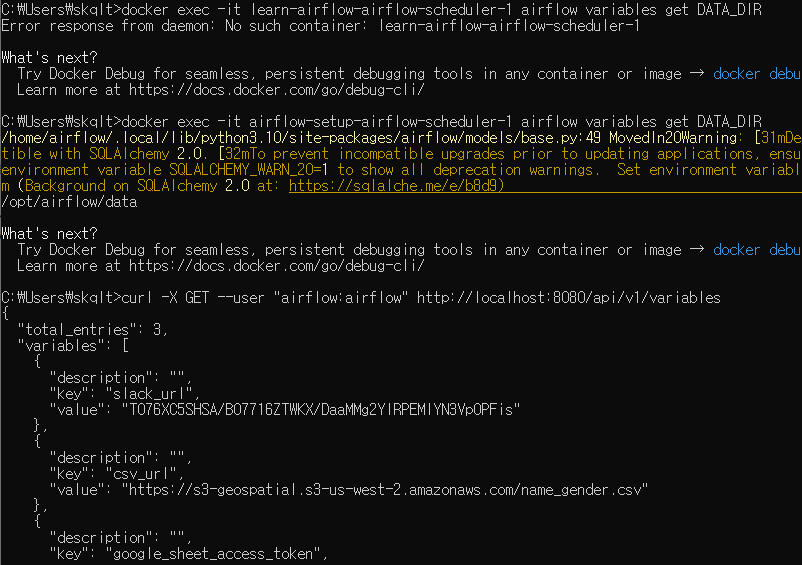
전에 추가했던 docker-compose.yaml의 환경변수 DATA_DIR의 경우 별도로 지정해서 호출하니 보이지만,
Variables API로도 보이지 않는 것으로 확인됐습니다.