Neural Style Transfer의 개요와 OpenCV를 활용한 구현
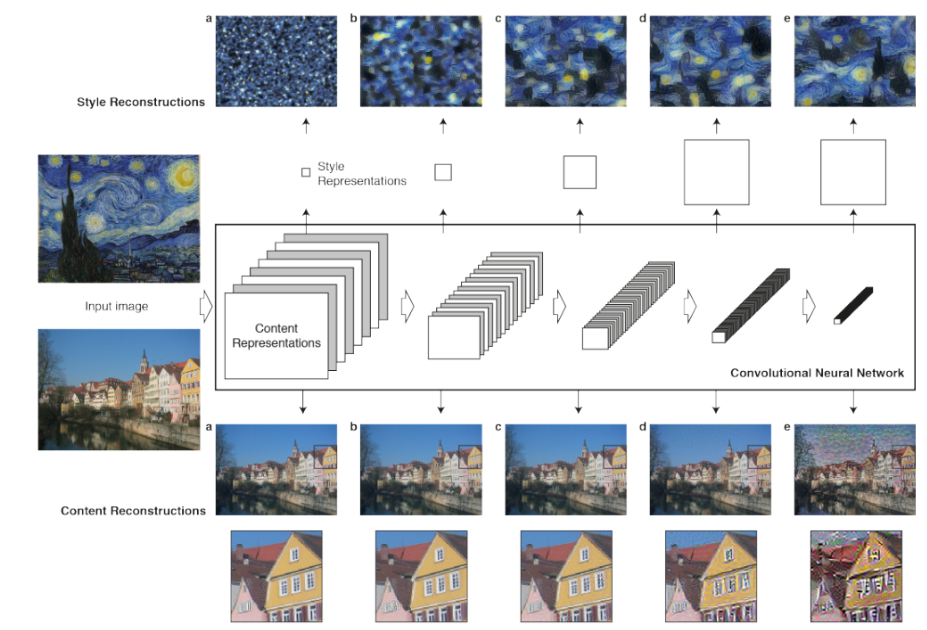
뉴럴네트워크나 딥 러닝을 이용해서 input image의 스타일을 추출해서 원하는 이미지에 그 스타일을 적용시킨다는 것
실습
사전 학습된 모델을 사용하여 Neural Style Transfer 구현
''cv2.dnn.readNetFromTouch()''를 사용하여 가져올 수 있는 사전 훈련된 t7 PyTorch 모델을 사용
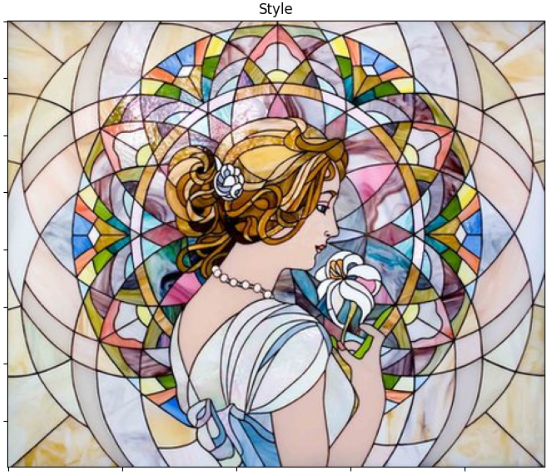
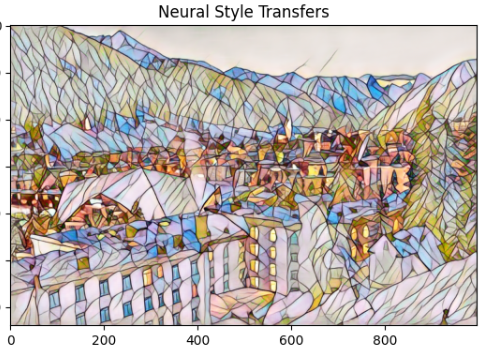
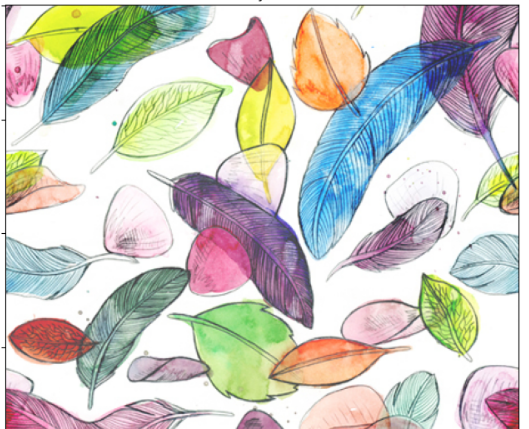
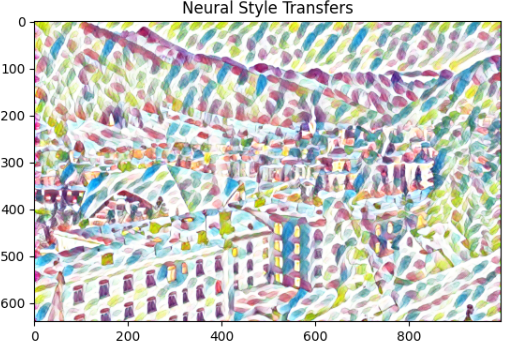
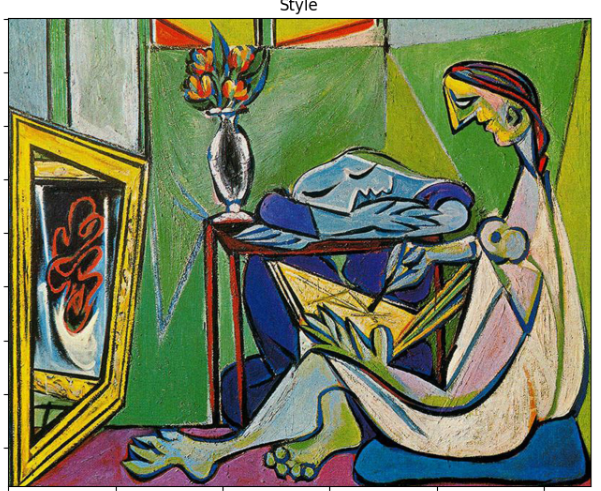
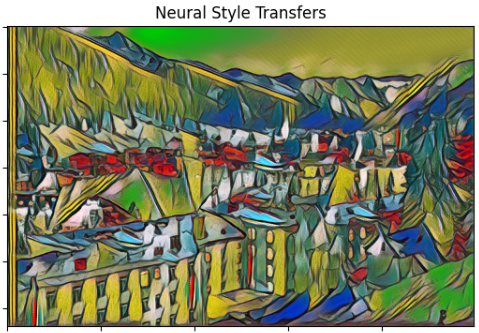
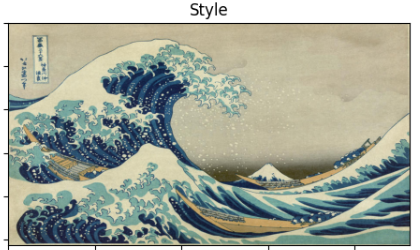
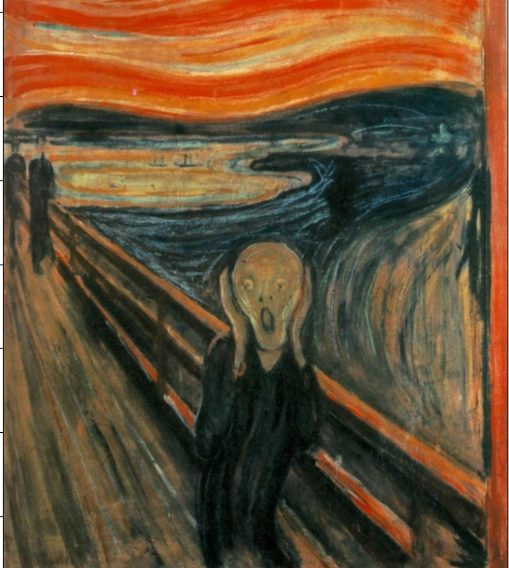
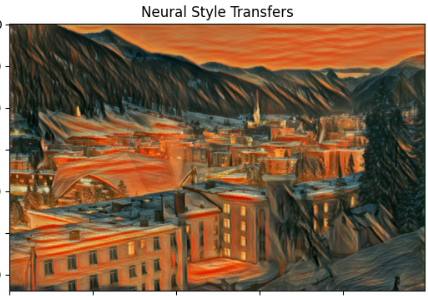
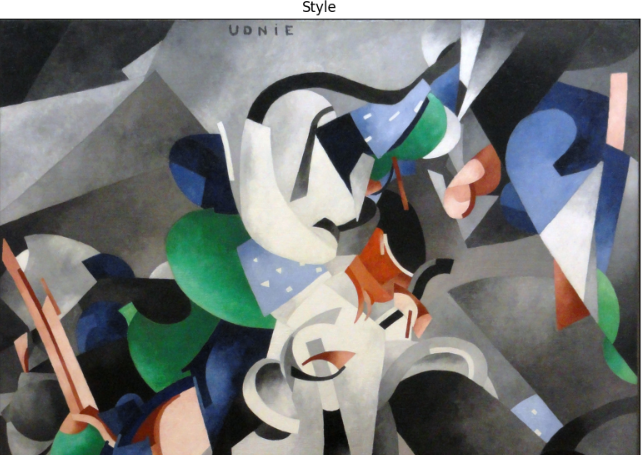
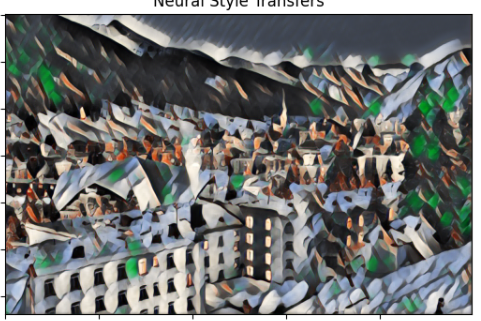
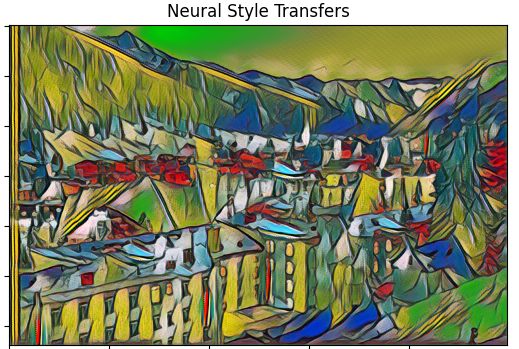
위 이미지지를 아래 이미지들의 스타일을 적용시킨다.
우선 결과부터 확인
1
2
3
4
5

6
7
8
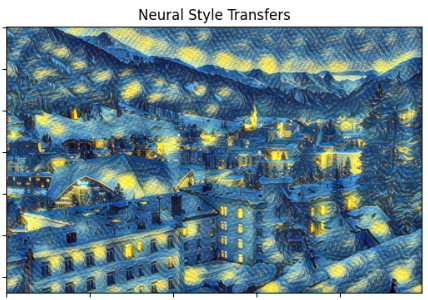
한눈에 봐도 스타일이 원본 이미지에 매우 잘 적용된것을 확인할 수 있다.
전체 코드
# t7 신경 전달 모델을 로드합니다.
model_file_path = "NeuralStyleTransfer/models/"
model_file_paths = [f for f in listdir(model_file_path) if isfile(join(model_file_path, f))]

# 테스트 이미지를 로드합니다.
img = cv2.imread("city.jpg")

# 각 모델 스타일을 적용하고 있는 중입니다.
for (i,model) in enumerate(model_file_paths):
    # 현재 사용 중인 모델을 출력합니다.
    print(str(i+1) + ". 모델 사용 중: " + str(model)[:-3])

    # 해당 모델에 대한 스타일 이미지를 로드합니다.
    style = cv2.imread("NeuralStyleTransfer/art/"+str(model)[:-3]+".jpg")

    # t7 신경 전달 모델을 로드합니다.
    neuralStyleModel = cv2.dnn.readNetFromTorch(model_file_path+ model)

    # 이미지 크기를 고정된 높이 640으로 조정합니다. (필요에 따라 변경 가능)
    height, width = int(img.shape[0]), int(img.shape[1])
    newWidth = int((640 / height) * width)
    resizedImg = cv2.resize(img, (newWidth, 640), interpolation = cv2.INTER_AREA)

    # 이미지에서 blob을 생성하고 네트워크의 forward pass를 실행합니다.
    inpBlob = cv2.dnn.blobFromImage(resizedImg, 1.0, (newWidth, 640), (103.939, 116.779, 123.68), swapRB=False, crop=False)
    neuralStyleModel.setInput(inpBlob)
    output = neuralStyleModel.forward()

    # 출력 텐서를 다시 모양을 변경하고 평균 값을 추가한 후 채널을 재배열합니다.
    output = output.reshape(3, output.shape[2], output.shape[3])
    output[0] += 103.939
    output[1] += 116.779
    output[2] += 123.68
    output /= 255
    output = output.transpose(1, 2, 0)

    # 원본 이미지, 스타일 이미지 및 Neural Style Transfer 출력을 표시합니다.
    imshow("Original", img)
    imshow("Style", style)
    imshow("Neural Style Transfers", output)
부분 설명
-
모델 및 이미지 로드:
model_file_path에서 t7 신경 전달 모델을 로드합니다.
city.jpg 이미지를 img로 로드합니다. -
각 모델에 대해 스타일 적용:
- 각 모델마다 스타일을 적용하고 있습니다.
- 모델의 이름을 출력합니다.
- 해당 모델의 스타일 이미지를 로드합니다.
- t7 신경 전달 모델을 로드합니다.
- 이미지 크기 조정 및 전달:
- 이미지 크기를 고정된 높이 640으로 조정합니다.
- blobFromImage() 함수를 사용하여 이미지에서 blob을 생성합니다.
- 생성된 blob을 신경 전달 모델에 입력으로 설정하고 forward pass를 실행합니다.
- 출력 처리:
- 출력 텐서를 재구성하고 평균 값을 추가하여 색상을 조정합니다.
- 이미지 채널을 재배열합니다.
- 결과 표시:
-
원본 이미지, 스타일 이미지 및 Neural Style Transfer 결과를 차례로 표시합니다.
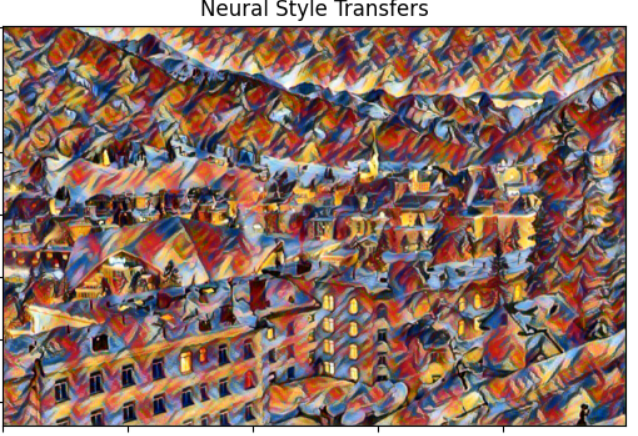
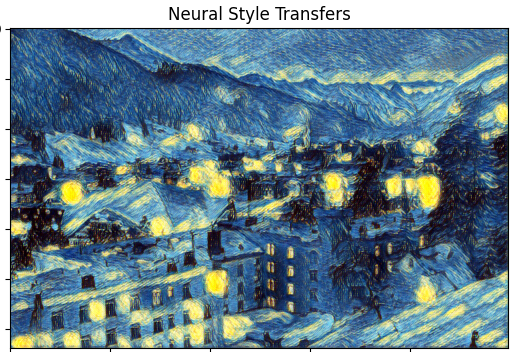
ECCV16 업데이트된 NST 알고리즘을 사용한 Neural Style Transfer
인스턴스 정규화를 적용한 모델로 이미지 스타일을 실시간으로 변환하기
위 코드와 다른점
- 모델 파일의 경로가 ECCV16 디렉토리 내로 변경됨.
- 인스턴스 정규화를 적용한 새로운 모델을 사용함.

# ECCV16 논문에서 사용된 모델을 불러옵니다.
model_file_path = "NeuralStyleTransfer/models/ECCV16/"
model_file_paths = [f for f in listdir(model_file_path) if isfile(join(model_file_path, f))]
# 테스트 이미지를 불러옵니다.
img = cv2.imread("city.jpg")
# 각 모델 스타일을 입력 이미지에 적용합니다.
for (i,model) in enumerate(model_file_paths):
# 사용 중인 모델 출력
print(str(i+1) + ". 모델 사용 중: " + str(model)[:-3])
style = cv2.imread("NeuralStyleTransfer/art/"+str(model)[:-3]+".jpg")
# 신경 스타일 전송 모델 로드
neuralStyleModel = cv2.dnn.readNetFromTorch(model_file_path+ model)
# 이미지 크기를 고정된 높이 640으로 변경합니다. (필요에 따라 변경 가능)
height, width = int(img.shape[0]), int(img.shape[1])
newWidth = int((640 / height) * width)
resizedImg = cv2.resize(img, (newWidth, 640), interpolation = cv2.INTER_AREA)
# 이미지에서 blob을 생성하고 네트워크를 통해 순방향 패스 실행
inpBlob = cv2.dnn.blobFromImage(resizedImg, 1.0, (newWidth, 640), (103.939, 116.779, 123.68), swapRB=False, crop=False)
neuralStyleModel.setInput(inpBlob)
output = neuralStyleModel.forward()
# 출력 텐서를 다시 형태를 변경하고 평균 뺄셈을 추가하고 채널을 재정렬합니다.
output = output.reshape(3, output.shape[2], output.shape[3])
output[0] += 103.939
output[1] += 116.779
output[2] += 123.68
output /= 255
output = output.transpose(1, 2, 0)
# 원본 이미지, 적용된 스타일 및 최종 Neural Style Transfer를 표시합니다.
imshow("Original", img)

imshow("Style", style)
imshow("Neural Style Transfers", output)
스타일이 적용될때 기존의 방식보다 적용하는 시간이 적게들고 (50초 > 25초)
조금 더 높은 퀄리티의 이미지를 출력해낸다.
(원본 이미지의 디테일이 살아남)
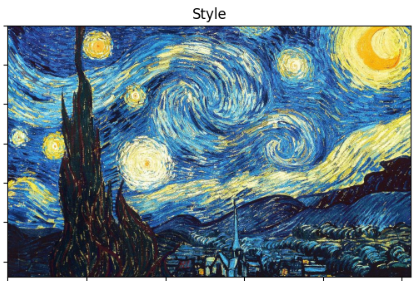
동영상에 Neural Style Transfer 적용하기
Starry Night 스타일을 사용하여 동영상을 변환

# t7 neural transfer 모델을 로드
model_file_path = "NeuralStyleTransfer/models/ECCV16/starry_night.t7"

# 비디오 스트림 로드, 긴 클립
cap = cv2.VideoCapture('dj.mp4')

# 프레임의 높이와 너비 가져오기 (정수로 필요)
w = int(cap.get(3))
h = int(cap.get(4))

# 코덱을 정의하고 VideoWriter 객체 생성. 출력은 '*.avi' 파일로 저장됨.
out = cv2.VideoWriter('NST_Starry_Night.avi', cv2.VideoWriter_fourcc('M','J','P','G'), 30, (w, h))

# 입력 이미지에 각 모델 스타일을 적용하기 위한 반복문
#for (i,model) in enumerate(model_file_paths):
style = cv2.imread("NeuralStyleTransfer/art/starry_night.jpg")
i = 0
while(1):

    ret, img = cap.read()

    if ret == True:
        i += 1
        print("Completed {} Frame(s)".format(i))
        # neural style transfer 모델 로드
        neuralStyleModel = cv2.dnn.readNetFromTorch(model_file_path)

        # 고정 높이 640으로 리사이즈 (원하는 대로 변경 가능)
        height, width = int(img.shape[0]), int(img.shape[1])
        newWidth = int((640 / height) * width)
        resizedImg = cv2.resize(img, (newWidth, 640), interpolation = cv2.INTER_AREA)

        # 이미지에서 blob 생성 후 네트워크의 순방향 패스 수행
        inpBlob = cv2.dnn.blobFromImage(resizedImg, 1.0, (newWidth, 640),
                                        (103.939, 116.779, 123.68), swapRB=False, crop=False)

        neuralStyleModel.setInput(inpBlob)
        output = neuralStyleModel.forward()

        # 출력 텐서의 형태 재조정, 평균 값 재추가 및 채널 순서 재정렬
        output = output.reshape(3, output.shape[2], output.shape[3])
        output[0] += 103.939
        output[1] += 116.779
        output[2] += 123.68
        output /= 255
        output = output.transpose(1, 2, 0)

        # 원본 이미지, 적용된 스타일 및 최종 Neural Style Transfer 출력 디스플레이
        # imshow("Original", img)
        # imshow("Style", style)
        # imshow("Neural Style Transfers", output)
        vid_output = (output * 255).astype(np.uint8)
        vid_output = cv2.resize(vid_output, (w, h), interpolation = cv2.INTER_AREA)
        out.write(vid_output)
    else:
        break

cap.release()
out.release()
감사합니다. https://www.youtube.com/channel/UCxlkiu9_aWijoD7BannNM7w