2주차의 시작이다!
2주차에서 다룰 주용 내용은 아래와 같다.
- 플러터의 핵심 아키텍처를 이루는 Widget이 무엇이고, 어떤 구조로 앱을 구성하는지 이해하는 것
- 플러터에서 Layout을 어떻게 만들어 나가는지 이해하는 것
Flutter architecture layer
플러터는 다양한 플랫폼에서 사용되기 위해 Embedder, Engine, Framework 3가지 레이어로 계층화되어 있다. 간단하게 살펴보자.

1. Embedder
iOS - Objective-C, aos - Java 및 C++, Windows - C++ 등 각 플랫폼에 적합한 언어로 작성되어있는 부분으로, 각 플랫폼의 네이티브 어플리케이션과 동일한 방식으로 패키징된다.
2. Engine
플러터의 핵심은 대부분 C++로 작성되어있으며, Skia라고 하는 그래픽 엔진으로 렌더링되며, 이외에도 텍스트 레이아웃, 파일 및 네트워크I/O, 접근성 지원, 플러그인 아키텍처 등 플러터의 핵심 API의 저수준 구현을 제공한다.
3. Framework
실제 플러터를 이용해 개발하는 개발자들이 접하게 되는 부분으로, 구글은 여기에 Dart 언어를 선택하였다. 대부분 일반적으로 사용되는 추상화를 제공하며, 애니메이션, 페인팅, 제스처 등을 제공한다.
Introduction to widgets
플러터의 위젯은 React로부터 영감을 받았다고 한다. 플러터 위젯의 핵심 아이디어는 위젯으로 UI를 구축한다는 것이다. 각 위젯을 트리 형태로 구성하며, 상태를 관리할 수 있도록 한다.
Hello world
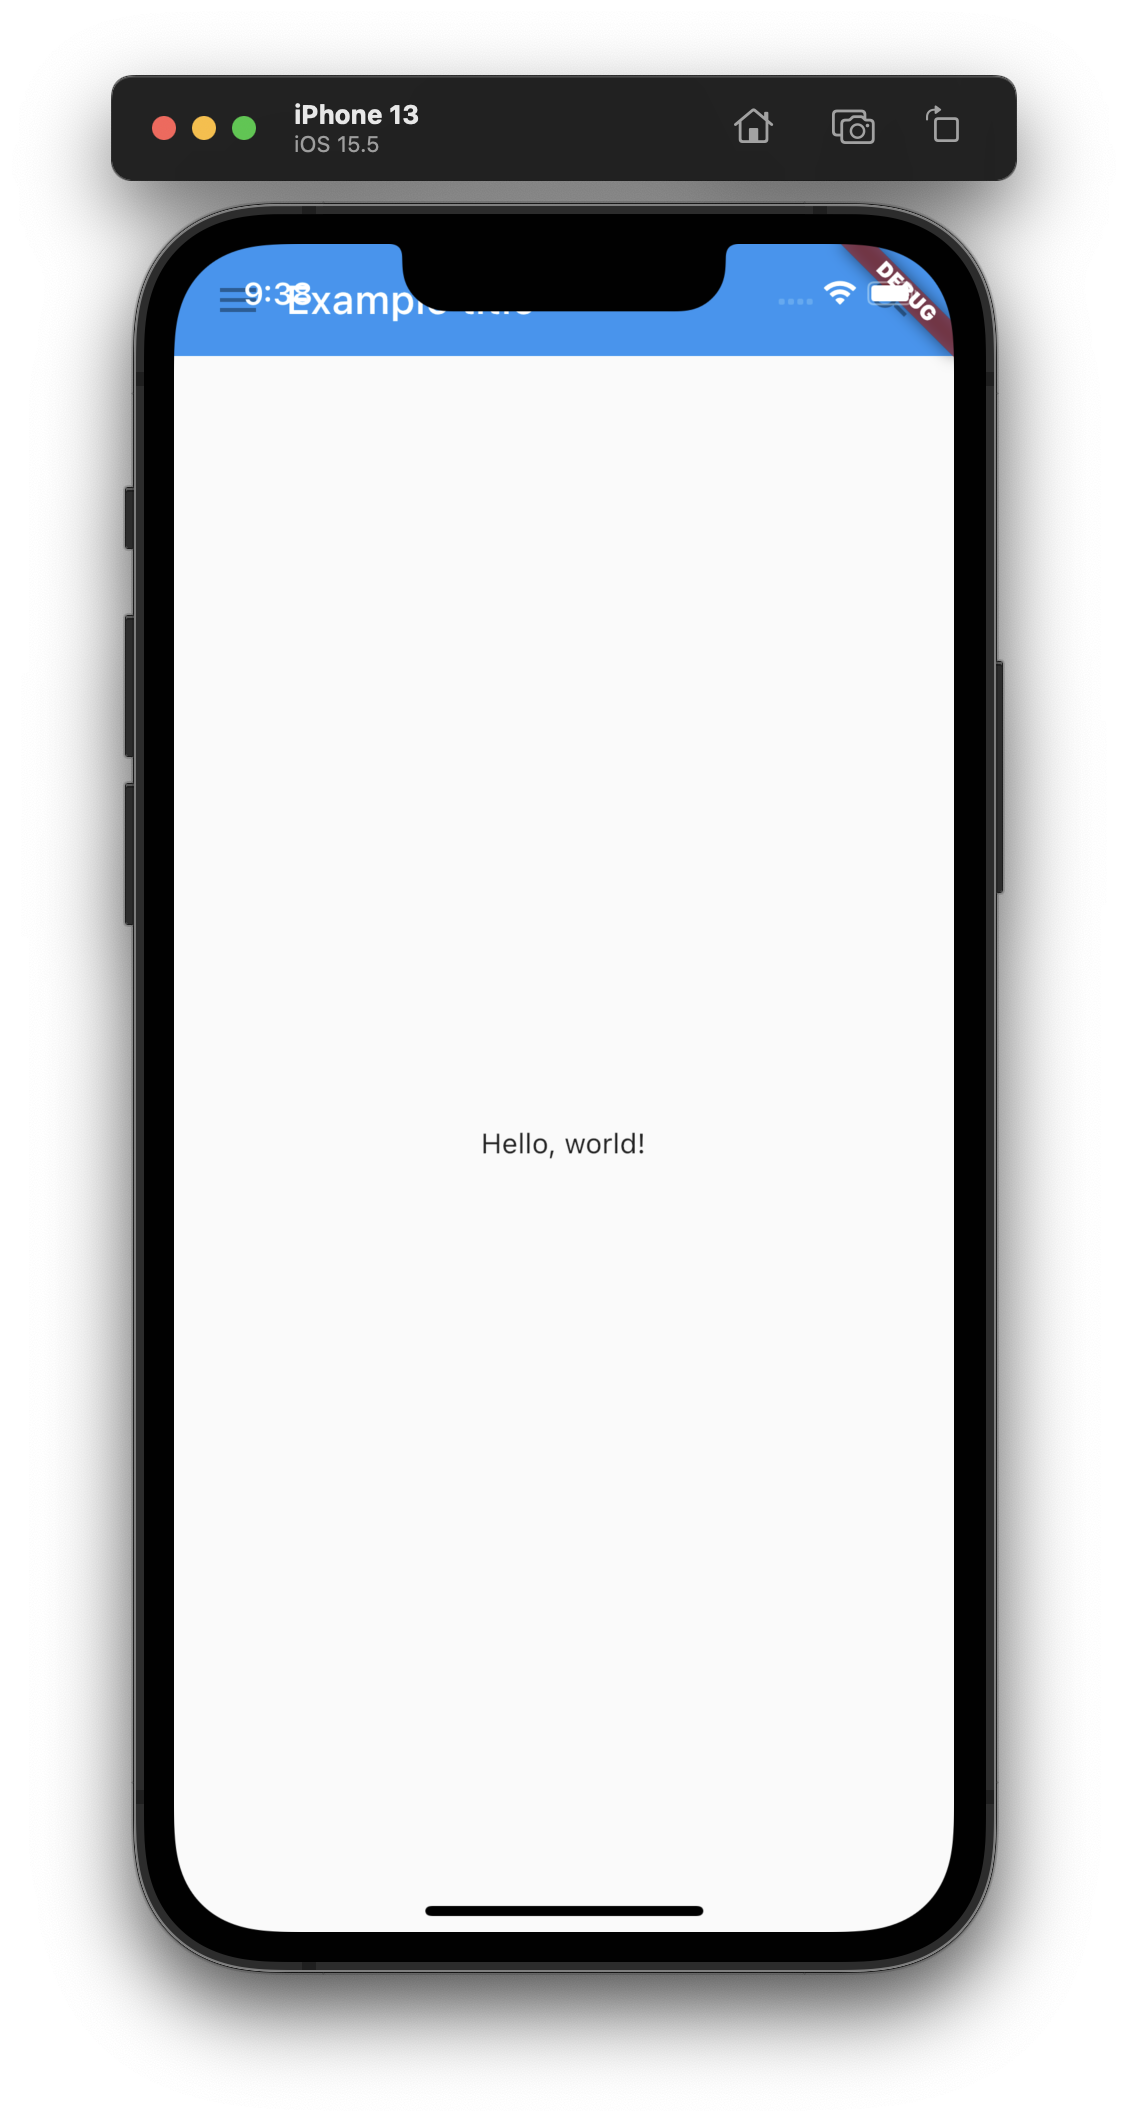
플러터에서 runApp() 함수를 호출하여 앱을 실행시킬 수 있다. 아래 Hello world 앱은 Center 위젯 아래에 Text 위젯이 존재하며, Text 위젯에 Hello world!라는 텍스트를 인자로 주었다.
import 'package:flutter/material.dart';

void main() {
  runApp(
    const Center(  // 이하 내용을 가운데로 정렬하는 Center 위젯
      child: Text(  // Center 위젯의 자식으로, Text를 가지는 Text 위젯
        'Hello, world!',
        textDirection: TextDirection.ltr,
      ),
    ),
  );
}
결과 화면

Basic widgets
플러터에서 자주 사용되는 기본 위젯들은 다음과 같다.
Text: 각종 스타일이 지정 가능한 텍스트 위젯Row,Column: 웹의 flexbox 레이아웃 모델에 기반하여 유연하게 행과 열을 만들 수 있는 위젯Stack: 웹의 absolute positioning 레이아웃 모델에 기반하여 여러 자식 위젯을 겹치고자 할 때 사용하는 위젯Container: 여백 패딩 등이 적용 가능한 직사각형 요소를 만들 수 있는 위젯
기본 위젯 사용 예시
아래 예시에서는 MyAppBar 위젯과 MyScaffold 위젯이 사용되었다. 위젯은 StatelessWidget 혹은 StatefulWidget을 상속받아 만들 수 있으며, 위젯의 변경이 필요없는 경우에는 일반적으로 StatelessWidget 위젯을 상속받아 사용한다. 일반적으로 위젯은 build 메소드를 override하여 위젯을 정의한다.
MyAppBar위젯
Container위젯을 루트 위젯으로,Row위젯을 자식 위젯으로 가지며, 이를 통해 아래 자식 위젯들이 수평적으로 배치된다는 것을 알 수있다.Row위젯은IconButton,Expanded,IconButton위젯들을 배열 형태로 자식 위젯을 가지고 있다.IconButton위젯은 이름이 나타내는 것과 같이 특정 아이콘과 해당 아이콘을 클릭했을 때의 이벤트 함수를 등록하는 형태로 구성되어 있다. 아래 예시에서는 메뉴 아이콘과 검색 아이콘이 사용되었다.Expanded위젯은 다른 자식이 사용하지 않는 남은 공간을 채우기 위해 사용되었다.
class MyAppBar extends StatelessWidget {
const MyAppBar({required this.title, super.key});
// Fields in a Widget subclass are always marked "final".
final Widget title;
Widget build(BuildContext context) {
return Container(
height: 56.0, // in logical pixels
padding: const EdgeInsets.symmetric(horizontal: 8.0),
decoration: BoxDecoration(color: Colors.blue[500]),
// Row is a horizontal, linear layout.
child: Row(
children: [
const IconButton(
icon: Icon(Icons.menu),
tooltip: 'Navigation menu',
onPressed: null, // null disables the button
),
// Expanded expands its child
// to fill the available space.
Expanded(
child: title,
),
const IconButton(
icon: Icon(Icons.search),
tooltip: 'Search',
onPressed: null,
),
],
),
);
}
}MyScaffold위젯
Material위젯은 해당 위젯이 Material 위젯임을 명시할 때 사용한다.Material이란 플랫 디자인의 장점을 살리면서도 빛에 따른 종이의 그림자 효과를 이용하여 입체감을 살리는 디자인 방식인Material Design을 의미한다.Column위젯을 자식 위젯으로 가지며, 이를 통해 아래 자식 위젯들이 수직적으로 배치된다는 것을 알 수있다.Column위젯은 위에서 만든MyAppBar,Expanded위젯들을 배열 형태로 자식 위젯을 가지고 있다.MyAppBar위젯은title을 필요로 하며, 타이틀을 넣으면 위 클래스의 build 부분에 정의된 형태의 위젯이 그려지게 된다.Expanded위젯은Center위젯 >Text위젯을 자식 위젯으로 가지며, 다른 자식(MyAppBar)이 사용하지 않는 남은 공간을 채우기 위해 사용되었다.
class MyScaffold extends StatelessWidget {
const MyScaffold({super.key});
Widget build(BuildContext context) {
// Material is a conceptual piece
// of paper on which the UI appears.
return Material(
// Column is a vertical, linear layout.
child: Column(
children: [
MyAppBar(
title: Text(
'Example title',
style: Theme.of(context) //
.primaryTextTheme
.headline6,
),
),
const Expanded(
child: Center(
child: Text('Hello, world!'),
),
),
],
),
);
}
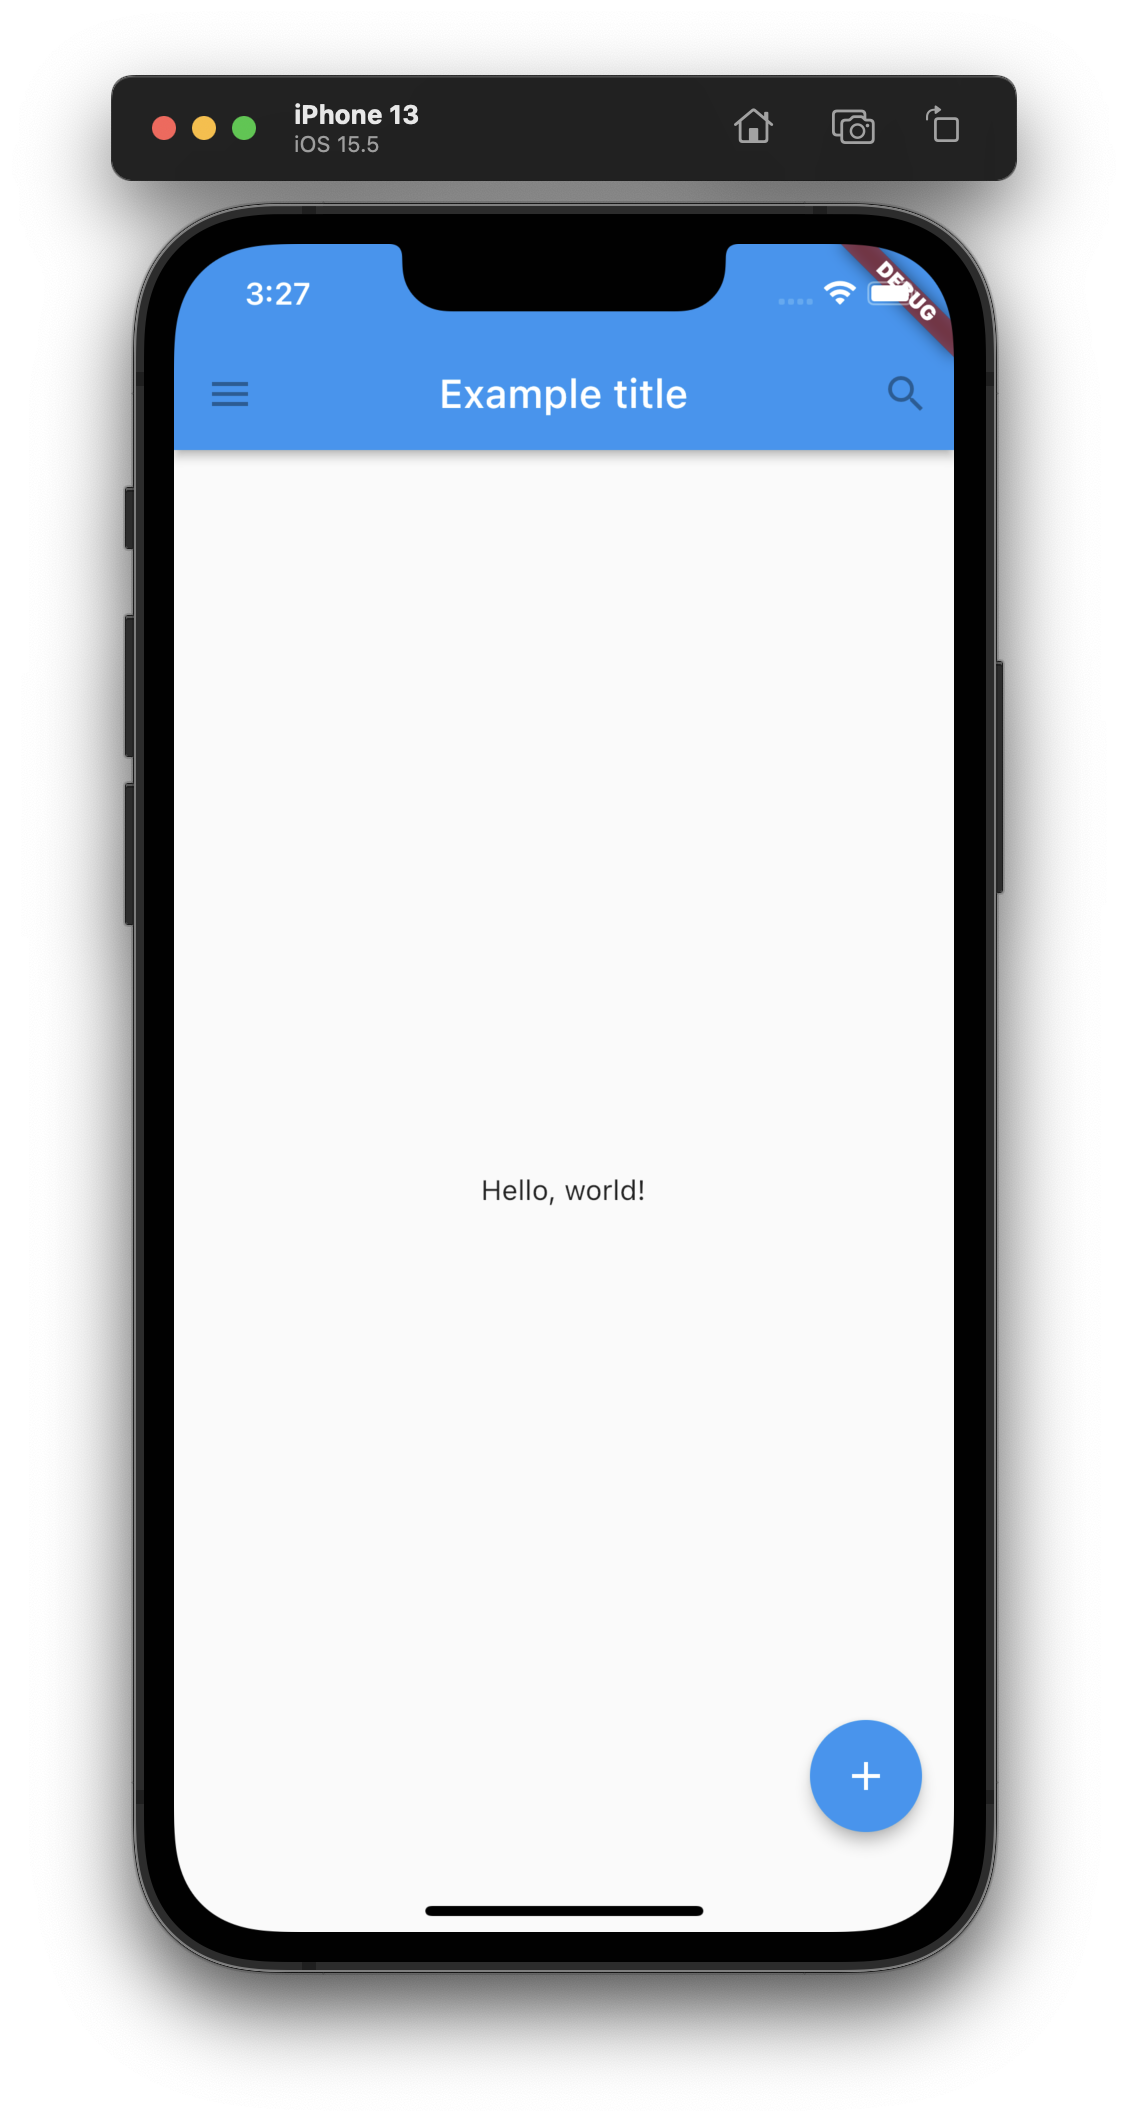
}전체 코드
import 'package:flutter/material.dart';
class MyAppBar extends StatelessWidget {
const MyAppBar({required this.title, super.key});
// Fields in a Widget subclass are always marked "final".
final Widget title;
Widget build(BuildContext context) {
return Container(
height: 56.0, // in logical pixels
padding: const EdgeInsets.symmetric(horizontal: 8.0),
decoration: BoxDecoration(color: Colors.blue[500]),
// Row is a horizontal, linear layout.
child: Row(
children: [
const IconButton(
icon: Icon(Icons.menu),
tooltip: 'Navigation menu',
onPressed: null, // null disables the button
),
// Expanded expands its child
// to fill the available space.
Expanded(
child: title,
),
const IconButton(
icon: Icon(Icons.search),
tooltip: 'Search',
onPressed: null,
),
],
),
);
}
}
class MyScaffold extends StatelessWidget {
const MyScaffold({super.key});
Widget build(BuildContext context) {
// Material is a conceptual piece
// of paper on which the UI appears.
return Material(
// Column is a vertical, linear layout.
child: Column(
children: [
MyAppBar(
title: Text(
'Example title',
style: Theme.of(context) //
.primaryTextTheme
.headline6,
),
),
const Expanded(
child: Center(
child: Text('Hello, world!'),
),
),
],
),
);
}
}
void main() {
runApp(
const MaterialApp(
title: 'My app', // used by the OS task switcher
home: SafeArea(
child: MyScaffold(),
),
),
);
}결과 화면

SafeArea
runApp의 home에
MyScaffold()가 직접 쓰이지 않고SafeArea()로 감싸진 이유는MyScaffold가 사용자 정의형으로 만들어진 위젯이기 때문이다. 이로 이해 디스플레이 영역에 대한 처리가 없어서 디스플레이의 모든 영역을 기준으로 위젯이 위치하기 때문에 아래처럼 원치 않는 화면이 나올 수 있다. 이를 해결하기 위해 화면에서 가려질 수 있는 영역을 처리하여 안전한 영역에만 위젯이 표시되기 위함이다.
Using Material Components
플러터는 Material 디자인을 따라는 앱을 빌드하기 위한 다양한 위젯을 제공한다. MaterialApp이라는 위젯을 이용하여 쉽게 사용할 수 있으며, 앱 화면간의 이동을 구현하기 위해 사용되는 Navigator를 포함한다.
- 위 예제에서 사용된
MyAppBar및MyScaffold가material.dart에서 지원하는AppBar와Scaffold로 변경되었으며, 기본 제공되는 클래스를 이용하여 좀 더 머터리얼하게 보이게 되었다. Scaffold에서 지원하는FloatingActionButton까지 이용할 수 있게 되었다.
import 'package:flutter/material.dart';
void main() {
runApp(
const MaterialApp(
title: 'Flutter Tutorial',
home: TutorialHome(),
),
);
}
class TutorialHome extends StatelessWidget {
const TutorialHome({super.key});
Widget build(BuildContext context) {
// Scaffold is a layout for
// the major Material Components.
return Scaffold(
appBar: AppBar(
leading: const IconButton(
icon: Icon(Icons.menu),
tooltip: 'Navigation menu',
onPressed: null,
),
title: const Text('Example title'),
actions: const [
IconButton(
icon: Icon(Icons.search),
tooltip: 'Search',
onPressed: null,
),
],
),
// body is the majority of the screen.
body: const Center(
child: Text('Hello, world!'),
),
floatingActionButton: const FloatingActionButton(
tooltip: 'Add', // used by assistive technologies
onPressed: null,
child: Icon(Icons.add),
),
);
}
}
CupertinoApp
플러터는 기본적으로
Material과Cupertino를 모두 지원하기 때문에 선택에 따라 원하는 디자인을 따를 수 있으며, 그에 따라 서로 다른 위젯을 사용해야 한다.
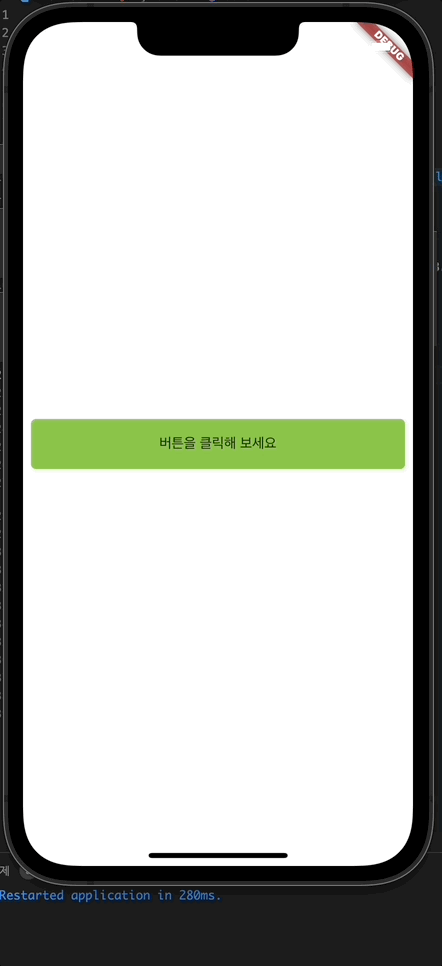
Handling gestures
당연하지만 대부분의 어플리케이션은 사용자 인터랙션이 존재한다. 플러터에서 이러한 액션은 클릭이 가능한 위젯 내에 존재할 수도 있지만, 별도의 위젯을 이용해 정의할 수도 있다.
아래 예시에서 GestureDetector위젯은 시각적인 역할은 없지만, 자신의 자식에 대한 사용자의 각종 움직임을 탐지할 수 있다.
예시에서는 onTap 즉 클릭했을 때에 대한 경우에만 특정 문자열을 출력하도록 하였지만, onDoubleTap, onLongPress 등 다양한 콜백이 사용 가능하다.
import 'package:flutter/material.dart';
class MyButton extends StatelessWidget {
const MyButton({super.key});
Widget build(BuildContext context) {
return GestureDetector(
onTap: () {
print('버튼이 클릭되었습니다!');
},
child: Container(
height: 50.0,
padding: const EdgeInsets.all(8.0),
margin: const EdgeInsets.symmetric(horizontal: 8.0),
decoration: BoxDecoration(
borderRadius: BorderRadius.circular(5.0),
color: Colors.lightGreen[500],
),
child: const Center(
child: Text('버튼을 클릭해 보세요'),
),
),
);
}
}
void main() {
runApp(
const MaterialApp(
home: Scaffold(
body: Center(
child: MyButton(),
),
),
),
);
}결과 화면
Changing widgets in response to input
지금까지 사용한 위젯들은 모두 StatelessWidget을 사용하였다. 따라서 대부분의 경우 인스턴스 앞에 const가 붙은 모습을 볼 수 있다. 이처럼 플러터에서 StatelessWidget 위젯과 StatefulWidget으로 나눠놓은 이유는 변경이 필요없는 위젯의 관리 부담을 덜기 위함으로 보인다.
StatelessWidget
StatelessWidget의 경우 지금까지 사용한 것처럼 StatelessWidget 클래스를 상속하여 build를 override하면 대부분 가능하다. StatelessWidget은 const를 사용하여 변하지 않는 final 멤버변수가 된다.(const 변수는 암시적으로 final임)
StatefulWidget
StatefulWidget는 위젯이 특정 상태를 가질 때 사용할 수 있으며, StatefulWidget 클래스를 상속하여 사용한다. 또한 상태를 관리하기 위해 State<T extends StatefulWidget>라고 하는 클래스를 상속하는 상태 클래스를 사용해야 한다.
StatefulWidget 클래스 살펴보기
아래 예시에서 StatefulWidget를 상속한 Counter라는 클래스를 정의하였다. 여기서 주의할 점은 StatelessWidget의 경우 상속받은 클래스에 모든 내용이 담겼지만, StatefulWidget는 그렇지 않다. 이 클래스에는 변경이 필요없는 데이터 및 실제 State를 위한 설정이 이루어지는 곳이다. 아래 코드에서 눈여겨 볼 부분은 오버라이드한 createState 메소드인데, 아래에 나올 _CounterState()를 반환하고 있다. 또한 StatefulWidget를 상속한 클래스 내에 존재하는 모든 필드는 변경이 불가능하기 때문에 반드시 final 이어야 한다.
class Counter extends StatefulWidget {
// This class is the configuration for the state.
// It holds the values (in this case nothing) provided
// by the parent and used by the build method of the
// State. Fields in a Widget subclass are always marked
// "final".
final String title // 변하지 않는 값으로, 제목을 위한 변수
const Counter({super.key, required this.title});
State<Counter> createState() => _CounterState();
}State 클래스 살펴보기
Counter 클래스의 실체인 _CounterState 클래스를 정의하였다. 플러터에서 State를 상속한 클래스는 _로 시작하는 것 같다. 이 클래스에는 상태 변화가 필요한 변수를 사용할 수 있으며, 상태를 변화시키기 위해서는 반드시 setState()를 사용해야 하며, 사용하지 않을 시 build 메소드가 다시 호출되지 않아 원하는 상태의 변경이 표현되지 않는다. 또한 위젯에서 선언한 변수에 접근하기 위해서 widget.variable 형식으로 사용 가능하다.
class _CounterState extends State<Counter> {
int _counter = 0;
// 상태를 변화시키는 메소드
void _increment() {
// 명시적으로 setState를 호출하여 상태가 변경됨을 알림
// setState를 사용하지 않으면 build 메소드가 호출되지 않아 변화가 보이지 않게 된다.
setState(() {
// This call to setState tells the Flutter framework
// that something has changed in this State, which
// causes it to rerun the build method below so that
// the display can reflect the updated values. If you
// change _counter without calling setState(), then
// the build method won't be called again, and so
// nothing would appear to happen.
_counter++;
});
}
Widget build(BuildContext context) {
// This method is rerun every time setState is called,
// for instance, as done by the _increment method above.
// The Flutter framework has been optimized to make
// rerunning build methods fast, so that you can just
// rebuild anything that needs updating rather than
// having to individually changes instances of widgets.
return Column(
mainAxisAlignment: MainAxisAlignment.center,
children: [
Text(
widget.title, // 위 위젯에서 정의한 변수에 접근
),
Row(
mainAxisAlignment: MainAxisAlignment.center,
children: <Widget>[
ElevatedButton(
onPressed: _increment, // 버튼이 클릭되었을 때 수행할 메소드
child: const Text('Increment'),
),
const SizedBox(width: 16),
Text('Count: $_counter'),
],
),
],
);
}
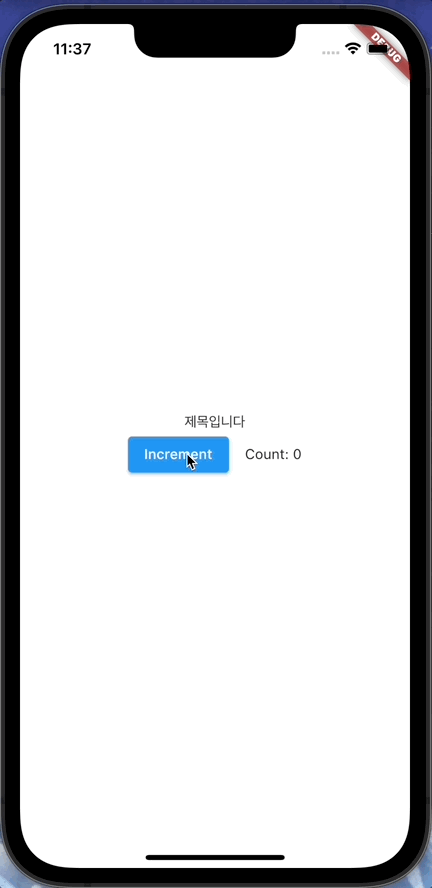
}전체 코드
import 'package:flutter/material.dart';
class Counter extends StatefulWidget {
// This class is the configuration for the state.
// It holds the values (in this case nothing) provided
// by the parent and used by the build method of the
// State. Fields in a Widget subclass are always marked
// "final".
final String title;
const Counter({super.key, reqiured this.title});
State<Counter> createState() => _CounterState();
}
class _CounterState extends State<Counter> {
int _counter = 0;
// 상태를 변화시키는 메소드
void _increment() {
// 명시적으로 setState를 호출하여 상태가 변경됨을 알림
// setState를 사용하지 않으면 build 메소드가 호출되지 않아 변화가 보이지 않게 된다.
setState(() {
// This call to setState tells the Flutter framework
// that something has changed in this State, which
// causes it to rerun the build method below so that
// the display can reflect the updated values. If you
// change _counter without calling setState(), then
// the build method won't be called again, and so
// nothing would appear to happen.
_counter++;
});
}
Widget build(BuildContext context) {
// This method is rerun every time setState is called,
// for instance, as done by the _increment method above.
// The Flutter framework has been optimized to make
// rerunning build methods fast, so that you can just
// rebuild anything that needs updating rather than
// having to individually changes instances of widgets.
return Column(
mainAxisAlignment: MainAxisAlignment.center,
children: [
Text(
widget.title, // 위 위젯에서 정의한 변수에 접근
),
Row(
mainAxisAlignment: MainAxisAlignment.center,
children: <Widget>[
ElevatedButton(
onPressed: _increment, // 버튼이 클릭되었을 때 수행할 메소드
child: const Text('Increment'),
),
const SizedBox(width: 16),
Text('Count: $_counter'),
],
),
],
);
}
}
void main() {
runApp(
const MaterialApp(
home: Scaffold(
body: Center(
child: Counter(title: '제목입니다'),
),
),
),
);
}결과 화면
Refference
- Architectural overview - flutter.dev
- Introduction to widgets - flutter.dev