Proxy Pattern
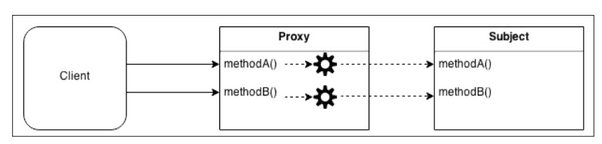
프록시 패턴은 대상 원본 객체를 대리하여 대신 처리하게 하여 로직의 흐름을 제어하는 행동 패턴이다. Proxy의 사전적인 의미는 대리인이라는 뜻이다. 즉, 누군가에게 어떤 일을 대신 시키는 것을 의미하는데 이를 객체 지향 프로그래밍에 접목해보면 클라이언트가 대상 객체를 직접 쓰는게 아니라 중간에 프록시를 거쳐서 쓰는 코드 패턴이라고 보면 된다. 따라서 대상 객체의 메서드를 직접 실행하는 것이 아닌, 대상 객체에 접근하기 전에 프록시 객체의 메서드를 접근한 후 추가적인 로직을 처리한 뒤 접근하게 된다.
바로 객체를 이용하지 않고 중계 대리자를 사용하는 이유는, 대상 클래스가 민감한 정보를 가지고 있거나, 인스턴스화 하기에 무겁거나, 추가 기능을 넣고 싶은데 원본 객체를 수정할 수 없는 상황일 때를 극복하기 위해서이다.
- 보안(Security) : 프록시는 클라이언트가 작업을 수행할 수 있는 권한이 있는지 확인하고 검사 결과가 긍정적인 경우에만 요청을 대상으로 전달한다.
- 캐싱(Caching) : 프록시가 내부 캐시를 유지하여 데이터가 캐시에 아직 존재하지 않는 경우에만 대상에서 작업이 실행되도록 한다.
- 데이터 유효성 검사(Data validation) : 프록시가 입력을 대상으로 전달하기 전에 유효성을 검사한다.
- 지연 초기화(Lazy initialization) : 대상의 생성 비용이 비싸다면 프록시는 그것을 필요로 할때까지 연기할 수 있다.
- 로깅(Logging) : 프록시는 메소드 호출과 상대 매개 변수를 인터셉트하고 이를 기록한다.
원격 객체(Remote objects) : 프록시는 원격 위치에 있는 객체를 가져와서 로컬처럼 보이게 할 수 있다.
Structure
프록시는 다른 객체에 대한 접근을 제어하는 개체이다. 다른 객체를 대상(Subject)라고 부른다. 프록시와 대상은 동일한 인터페이스를 가지고 있으며 이를 통해 다른 인터페이스와 완전히 호환되도록 바꿀 수 있다.
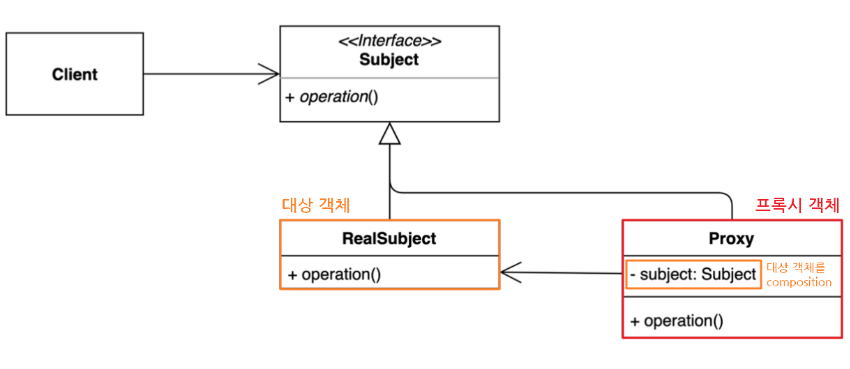
- Subject : Proxy와 RealSubject를 하나로 묶는 인터페이스 (다형성)
- 대상 객체와 프록시 역할을 동일하게 하는 추상 메소드 operation() 를 정의한다.
- 인터페이스가 있기 때문에 클라이언트는 Proxy 역할과 RealSubject 역할의 차이를 의식할 필요가 없다. - ealSubject : 원본 대상 객체
- Proxy : 대상 객체(RealSubject)를 중계할 대리자 역할
- 프록시는 대상 객체를 합성(composition)한다.
- 프록시는 대상 객체와 같은 이름의 메서드를 호출하며, 별도의 로직을 수행 할수 있다 (인터페이스 구현 메소드)
- 프록시는 흐름제어만 할 뿐 결과값을 조작하거나 변경시키면 안 된다. - Client : Subject 인터페이스를 이용하여 프록시 객체를 생성해 이용.
- 클라이언트는 프록시를 중간에 두고 프록시를 통해서 RealSubject와 데이터를 주고 받는다.
How
프록시 패턴은 단순하면서 자주 쓰이는 패턴이며, 그 활용 방식도 다양하다. 같은 프록시 객체라도 어떠한 로직을 짜느냐에 따라 그 활용도는 천차만별이 된다. Proxy 패턴의 기본형을 어떤 방식으로 변형하느냐에 따라 프록시 종류가 나뉘어지게 된다.
Normal Proxy
interface ISubject {
    void action();
}

class RealSubject implements ISubject {
    public void action() {
        System.out.println("원본 객체 액션 !!");
    }
}
class Proxy implements ISubject {
private RealSubject subject; // 대상 객체를 composition
Proxy(RealSubject subject) {
this.subject = subject;
}
public void action() {
subject.action(); // 위임
/* do something */
System.out.println("프록시 객체 액션 !!");
}
}
class Client {
public static void main(String[] args) {
ISubject sub = new Proxy(new RealSubject());
sub.action();
}
}Virvual Proxy
- 지연 초기화 방식
- 가끔 필요하지만 항상 메모리에 적재되어 있는 무거운 서비스 객체가 있는 경우
- 실체 객체에 많은 자원이 소모 되지만 사용 빈도는 낮을 때 쓰는 방식
- 서비스가 시작될 때 객체를 생성하는 대신에 객체 초기화가 실제로 필요한 시점에 초기화 될 수 있도록 지연
class Proxy implements ISubject {
    private RealSubject subject; // 대상 객체를 composition

    Proxy() {
    }

    public void action() {
    	// 프록시 객체는 실제 요청(action(메소드 호출)이 들어 왔을 때 실제 객체를 생성한다.
        if(subject == null){
            subject = new RealSubject();
        }
        subject.action(); // 위임
        /* do something */
        System.out.println("프록시 객체 액션 !!");
    }
}

class Client {
    public static void main(String[] args) {
        ISubject sub = new Proxy();
        sub.action();
    }
}
Protection Proxy
- 프록시가 대상 객체에 대한 자원으로의 엑세스 제어
- 특정 클라이언트만 서비스 객체를 사용할 수 있도록 하는 경우
- 프록시 객체를 통해 클라이언트의 자격 증명이 기준과 일치하는 경우에만 서비스 객체에 요청을 전달 가능
class Proxy implements ISubject {
    private RealSubject subject; // 대상 객체를 composition
    boolean access; // 접근 권한

    Proxy(RealSubject subject, boolean access) {
        this.subject = subject;
        this.access = access;
    }

    public void action() {
        if(access) {
            subject.action(); // 위임
            /* do something */
            System.out.println("프록시 객체 액션 !!");
        }
    }
}

class Client {
    public static void main(String[] args) {
        ISubject sub = new Proxy(new RealSubject(), false);
        sub.action();
    }
}
Logging Proxy
- 대상 객체에 대한 로깅을 추가하려는 경우
- 프록시는 서비스 메서드를 실행하여 전달하기 전에 로깅하는 기능을 추가하여 재정의
class Proxy implements ISubject {
    private RealSubject subject; // 대상 객체를 composition

    Proxy(RealSubject subject {
        this.subject = subject;
    }

    public void action() {
        System.out.println("로깅..................");

        subject.action(); // 위임
        /* do something */
        System.out.println("프록시 객체 액션 !!");

        System.out.println("로깅..................");
    }
}

class Client {
    public static void main(String[] args) {
        ISubject sub = new Proxy(new RealSubject());
        sub.action();
    }
}
Remote Proxy
- 프록시 클래스는 로컬에 있고, 대상 객체는 원격 서버에 존재하는 경우
- 프록시 객체는 네트워크를 통해 요청을 전달하여 네트워크와 관련된 불필요한 작업들을 처리하고 결과값만 반환
- 클라이언트 입장에선 프록시를 통해 객체를 이용하는 것이니 원격이든 로컬이든 신경 쓸 필요가 없으며, 프록시는 진짜 객체와 통신을 대리
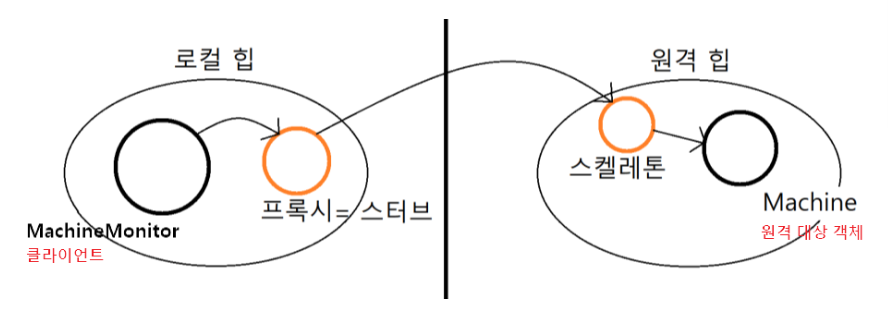
참고로 프록시를 스터브라고도 부르며, 프록시로부터 전달된 명령을 이해하고 적합한 메소드를 호출해주는 역할을 하는 보조객체를 스켈레톤이라 한다.
Cashing Proxy
- 데이터가 큰 경우 캐싱하여 재상용성을 개선
- 클라이언트 요청의 결과를 캐시하고 이 캐시의 수명 주기를 관리
When
- 접근을 제어하거가 기능을 추가하고 싶은데, 기존의 특정 객체를 수정할 수 없는 상황일때
- 초기화 지연, 접근 제어, 로깅, 캐싱 등, 기존 객체 동작에 수정 없이 가미하고 싶을 때
이러한 프록시 패턴을 사용하게 되면..
- 개방 폐쇄 원칙 준수 : 기존 대상 객체의 코드를 변경하지 않고 새로운 기능을 추가할 수 있다.
- 단일 책임 원칙 준수 : 대상 객체는 자신의 기능에만 집중 하고, 그 이외 부가 기능을 제공하는 역할을 프록시 객체에 위임하여 다중 책임을 회피 할 수 있다.
- 원래 하려던 기능을 수행하며 그외의 부가적인 작업(로깅, 인증, 네트워크 통신 등)을 수행하는데 유용하다
- 클라이언트는 객체를 신경쓰지 않고, 서비스 객체를 제어하거나 생명 주기를 관리할 수 있다.
- 사용자 입장에서는 프록시 객체나 실제 객체나 사용법은 유사하므로 사용성에 문제 되지 않는다.
But
- 많은 프록시 클래스를 도입해야 하므로 코드의 복잡도가 증가한다.
- 여러 클래스에 로깅 기능을 추가 : 각각의 클래스에 프록스 클래스를 만들어야 해서 코드량이 많아지고 중복이 발생 (동적 프록시 기법으로 해결 가능) - 프록시 클래스 자체에 들어가는 자원이 많다면 서비스로부터의 응답이 늦어질 수 있음
Example
아이템 이미지를 불러오는 로직을 작성한다고 가정해보자. 서버의 아이템 이미지 경로를 인자로 받아 메모리에 적재하고, showItemIamge() 메서드가 호출되면 아이템 이미지를 화면에 렌더링 하는 HighResolutionItemIamge 클래스를 구성해주었다.
using System.Threading;
using UnityEngine;

public class HighResolutionItemImage
{
    string img;

    public HighResolutionItemImage(string path)
    {
        LoadItemImage(path);
    }

    private void LoadItemImage(string path)
    {
        try
        {
            Thread.Sleep((3000));
            img = path;
        }
        catch (ThreadInterruptedException e)
        {
            Debug.Log(e.StackTrace);
        }
        Debug.Log($"{path}에 있는 아이템 이미지 로딩 완료");
    }

    public void ShowItemIamge()
    {
        Debug.Log($"{img} 이미지 출력");
    }
}
이때 HighResolutionItemImage 클래스를 ItemView 클래스에서 3개를 등롷개서 다음과 같이 2번 아이템의 이미지를 렌더링하고자 한다.
using UnityEngine;

public class ItemViewer : MonoBehaviour
{
    public void Start()
    {
        HighResolutionItemImage itemImage1 = new HighResolutionItemImage("itemImage1_Path");
        HighResolutionItemImage itemImage2 = new HighResolutionItemImage("itemImage2_Path");
        HighResolutionItemImage itemImage3 = new HighResolutionItemImage("itemImage3_Path");

        itemImage2.ShowItemIamge();
    }
}
실행결과 사진을 보면 알듯이, 두 번째 아이템 이미지를 showItemImage를 하기 전에 모든 이미지를 준비하는 과정이 진행되기 때문에 시간이 오래 소모된다. 그런데 굳이 사용자가 획득하지 못한 아이템 이미지를 메모리에 준비시킬 필요가 있을까? 사용자가 얻은 아이템 이미지만 로딩시키기 위해 프록시 패턴을 적용시킬 수 있다.
Proxy Pattern
프록시 클래스를 사용해서 사용자가 획득한 아이템 이미지만 로드해서 렌더링하도록 대상 객체를 제어하면 된다. 가상 프록시를 이용해 늦은 초기화로 실제 객체의 사용 시점을 제어할 수 있다. 참고로 HighResolutionItemIamge 클래스가 대상 객체가 된다.
프록시를 구현하는데 있어 가장 먼저할 일은, 대상 객체와 프록시 객체를 하나로 묶어주는 인터페이스를 정의하는 것이다. 다형성을 이용해 대상, 프록시 객체 모두를 하나의 타입으로 다루기 위해서이다.
interface IImage
{
    void ShowItemImage();
}
public class HighResolutionItemImage : IImage
{
string img;
public HighResolutionItemImage(string path)
{
LoadItemImage(path);
}
private void LoadItemImage(string path)
{
try
{
Thread.Sleep((3000));
img = path;
}
catch (ThreadInterruptedException e)
{
Debug.Log(e.StackTrace);
}
Debug.Log($"{path}에 있는 아이템 이미지 로딩 완료");
}
public void ShowItemImage()
{
Debug.Log($"{img} 이미지 출력");
}
}class ItemImageProxy : IImage
{
private IImage proxyImage;
private string path;
ItemImageProxy(string path)
{
this.path = path;
}
public void ShowItemImage()
{
proxyImage = new HighResolutionItemImage(path);
proxyImage.ShowItemImage();
}
}using UnityEngine;
public class ItemViewer : MonoBehaviour
{
public void Start()
{
IImage itemImage1 = new ItemImageProxy("itemImage1_Path");
IImage itemImage2 = new ItemImageProxy("itemImage2_Path");
IImage itemImage3 = new ItemImageProxy("itemImage3_Path");
itemImage2.ShowItemImage();
}
}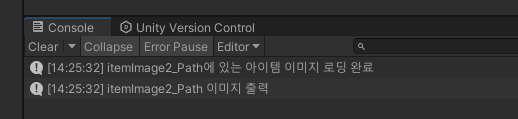
아이템 뷰어 클래스의 코드 자체는 크게 변하지 않았다. 똑같이 이미지 3개를 로드하는 코드인데, 대상 객체 대신에 프록시 객체를 할당한 점이 다를 뿐이다. 내부 동작 방식은 크게 변경되었는데, 실행 결과 사진을 보면 아시다시피 ShowItemImage를 호출하면 그때서야 대상 객체를 로드(lazyload)하여, 이미지를 메모리에 적재하고 대상 객체의 ShowItemIamge() 메서드를 위임 호출함으로써, 실제 메서드를 호출하는 시점에서 메모리 적재가 이루어지기 때문에 불필요한 자원낭비가 발생하지 않게 됐다.
Protection Proxy
인-게임에서 유저가 모든 직업별로 모든 퀘스트를 열람할 수 있었다고 한다. 이 때 스토리 팀에서 퀘스트 정보 열람 권한을 10 레벨 단위로 세분화해달라고 요청이 들어왔다. 예를 들어 10 레벨의 유저는 10레벨 미만의 퀘스트 정보만 열람할 수 있고, 자신보다 높은 레벨의 퀘스트 정보를 미리 열람할 수 없는 식이다. 기존의 프로그램 로직을 업데이트할 필요가 있는데, 기존의 프로그램을 수정하기에는 너무나 방대하고 복잡하다고 하자.
이러한 케이스를 Protection Proxy로 해결할 수 있다.
먼저 레벨을 표기하는 LEVEL enum 클래스를 정의하였다.
enum QuestLevel
 {
     LEVEL10,
     LEVEL20,
     LEVEL30
 }
그리고 퀘스트의 정보를 클래스화한 Quest 클래스를 정의했다. 이 클래스틑 퀘스트의 설명과 클리어 조건의 정보를 한번에 알 수 있는 GetInfo() 메서드를 지원한다.
class Quest
{
    private string questName;
    private string questDescription;
    private QuestLevel questLevel;

    public Quest(string questName, QuestLevel questLevel)
    {
        this.questName = questName;
        this.questLevel = questLevel;
    }

    public string GetQuestName()
    {
        return questName;
    }

    public QuestLevel GetQuestLevel()
    {
        return questLevel;
    }

    public string GetInfo()
    {
        return "Display : " + GetQuestName() + " Quest information";
    }
}
마지막으로 모든 퀘스트 정보를 출력하는 PrintQuestInfo 클래스 프로그램이 있다. 이 클래스는 생성자의 레벨을 인자로 몇 레벨의 유저가 퀘스트를 조회하는지를 받고 모든 구성원 리스트를 인자로 받아 출력해주는 PrintAllInfo() 메서드를 지원한다.
class PrintQuestInfo
{
    private int userLevel;

    PrintQuestInfo(int userLevel)
    {
        this.userLevel = userLevel;
    }

    void PrintAllQuests(List<Quest> quests)
    {
        quests.ForEach(quest => Debug.Log(quest.GetInfo()));
    }
}
이제 퀘스트를 List에 담아보고 레벨 10의 유저가 한 번 퀘스트 정보를 확인해보자.
public class QuestLoader : MonoBehaviour
{
    void Start()
    {
        Quest gatherHerbs = new Quest("Gather Healing Herbs", QuestLevel.LEVEL10);
        Quest defendVillage = new Quest("Defend the Village", QuestLevel.LEVEL10);
        Quest huntBoars = new Quest("Hunt Wild Boars", QuestLevel.LEVEL20);
        Quest rescueCaptives = new Quest("Rescue the Captives", QuestLevel.LEVEL20);
        Quest slayDragon = new Quest("Slay the Fire Dragon", QuestLevel.LEVEL30);
        Quest retrieveArtifact = new Quest("Retrieve the Lost Artifact", QuestLevel.LEVEL30);

        List<Quest> quests = new List <Quest>
        {
            gatherHerbs, defendVillage, huntBoars, rescueCaptives, slayDragon, retrieveArtifact
        };

        /*--------------------------------------------------*/

        PrintQuestInfo view = new PrintQuestInfo(10);
        view.PrintAllQuests(quests);
    }
}
모든 퀘스트 정보가 화면에 출력된다. 레벨에 따라 접근 제한을 두어야 하는데, 기존의 프로그램을 수정하기엔 비용이 많이 든다고 한다. 이럴때 프록시 객체를 통해 기존의 프로그램의 일부 기능을 제어하도록 할 수 있다.
보호 프록시는 프록시 객체가 사용자의 실제 객체에 대한 접근을 제어한다. 여기선 직책에 따른 퀘스트 정보 열람 접근 제어이다. 여러번 말했듯이 프록시를 구성하기에 앞서, 우선 대상 객체와 프록시 객체를 모두 묶어주는 인터페이스를 선언해준다.
public interface IQuest
{
    string GetQuestName();
    QuestLevel GetQuestLevel();
    string GetInfo(IQuest quest);
}
이때까지 Quest 클래스 타입으로 받은 변수와 매갭변수의 타입을 인터페이스로 재설정해준다.
class Quest : IQuest
{
    private string questName;
    private string questDescription;
    private QuestLevel questLevel;

    public Quest(string questName, QuestLevel questLevel)
    {
        this.questName = questName;
        this.questLevel = questLevel;
    }

    public string GetQuestName()
    {
        return questName;
    }

    public QuestLevel GetQuestLevel()
    {
        return questLevel;
    }

    public string GetInfo(IQuest quest)
    {
        return "Display : " + GetQuestName() + " Quest information";
    }
}
class PrintQuestInfo
{
private IQuest viewer;
public PrintQuestInfo(IQuest viewer)
{
this.viewer = viewer;
}
public void PrintAllQuests(List<IQuest> quests)
{
quests.ForEach(quest => Debug.Log(quest.GetInfo(viewer)));
}
}이제 본격적으로 프록시 클래스를 설정해주자. 무지성으로 모든 퀘스트 정보를 출력해주던 GetInfo() 메서드에 제어 로직을 추가하고 객체의 메서드 위임 호출해줌으로써 보호 프록시를 구성해줄 수 있다.
public class ProtectedQuest : IQuest
{
    private IQuest quest;

    public ProtectedQuest(IQuest quest) {
        this.quest = quest;
    }

    public string GetQuestName() {
        return this.quest.GetQuestName();
    }

    public QuestLevel GetQuestLevel() {
        return this.quest.GetQuestLevel();
    }

    public string GetInfo(IQuest viewer)
    {
        QuestLevel questLevel = this.quest.GetQuestLevel(); // 조회 당하는 퀘스트의 레벨 조건

        // 조회 유저의 레벨에 따라 출력을 제어
        switch (viewer.GetQuestLevel())
        {
            case QuestLevel.LEVEL30 :
                // 레벨 30은 모든 퀘스트 열람 가능하므로 바로 반환
                return this.quest.GetInfo(viewer);
            case QuestLevel.LEVEL20 :
                // 레벨 20은 30레벨 퀘스트를 볼 수 없음
                if (questLevel != QuestLevel.LEVEL30)
                {
                    return this.quest.GetInfo(viewer);
                }

                return "현재 레벨에는 공개되지 않는 퀘스트입니다.";
            case QuestLevel.LEVEL10 :
                // 레벨 10은 20, 30레벨 퀘스트를 볼 수 없음
                if (questLevel != QuestLevel.LEVEL30 && questLevel != QuestLevel.LEVEL20)
                {
                    return this.quest.GetInfo(viewer);
                }

                return "현재 레벨에는 공개되지 않는 퀘스트입니다.";
            default :
                return "viewer 퀘스트 레벨을 확인해주세요.";
        }
    }
}
이제 기존 프로그램에 등록되어있는 quest 리스트를 가져와서 프록시 객체로 감싸서 프록시로 인스턴스화해준다.
public class QuestLoader : MonoBehaviour
{
void Start()
{
Quest gatherHerbs = new Quest("Gather Healing Herbs", QuestLevel.LEVEL10);
Quest defendVillage = new Quest("Defend the Village", QuestLevel.LEVEL10);
Quest huntBoars = new Quest("Hunt Wild Boars", QuestLevel.LEVEL20);
Quest rescueCaptives = new Quest("Rescue the Captives", QuestLevel.LEVEL20);
Quest slayDragon = new Quest("Slay the Fire Dragon", QuestLevel.LEVEL30);
Quest retrieveArtifact = new Quest("Retrieve the Lost Artifact", QuestLevel.LEVEL30);
List<Quest> quests = new List <Quest>
{
gatherHerbs, defendVillage, huntBoars, rescueCaptives, slayDragon, retrieveArtifact
};
List<IQuest> protectedQuests = new List<IQuest>();
foreach (Quest quest in quests)
{
protectedQuests.Add(new ProtectedQuest(quest));
}
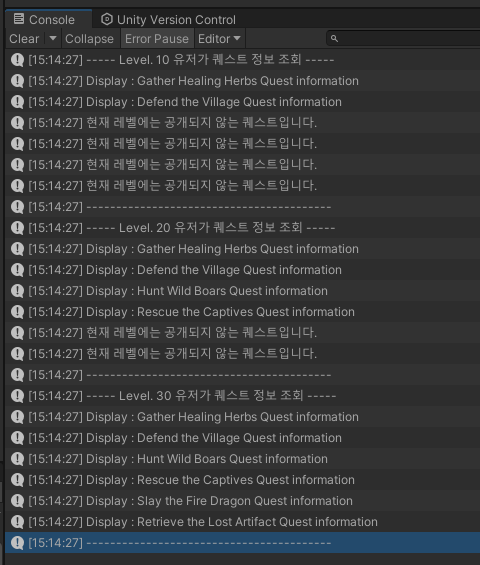
Debug.Log("----- Level. 10 유저가 퀘스트 정보 조회 -----");
PrintQuestInfo view = new PrintQuestInfo(new Quest("_user", QuestLevel.LEVEL10));
view.PrintAllQuests(protectedQuests);
Debug.Log("-----------------------------------------");
Debug.Log("----- Level. 20 유저가 퀘스트 정보 조회 -----");
view = new PrintQuestInfo(new Quest("_user", QuestLevel.LEVEL20));
view.PrintAllQuests(protectedQuests);
Debug.Log("-----------------------------------------");
Debug.Log("----- Level. 30 유저가 퀘스트 정보 조회 -----");
view = new PrintQuestInfo(new Quest("_user", QuestLevel.LEVEL30));
view.PrintAllQuests(protectedQuests);
Debug.Log("-----------------------------------------");
}
}