추출 기반으로 기계 독해를 푸는 방법
Extraction-based MRC
- Extraction-based MRC 문제 정의
- 질문(question)의 답변(answer)이 항상 주어진 지문(context) 내에 span으로 존재
- e.g. SQuAD, KorQuAD, News QA, Natural Questions, etc.
- Extraction-based MRC 평가 방법
- Exact Match(EM) Score
- 예측값과 정답이 캐릭터 단위로 완전히 똑같을 경우에만 1점 부여, 하나라도 다른 경우 0점
- F1 Score
- 예측값과 정답의 overlap을 비율로 계산하여 0점과 1점 사이의 부분점수를 받을 수 있음
- Exact Match(EM) Score
Pre-processing
- Tokenization
- 텍스트를 작은 단위(Token)로 나누는 것
- 띄어쓰기 기준, 형태소, subword 등 여러단위 토큰 기준이 사용됨
- 최근엔 Out-Of-Vocabulary(OOV) 문제를 해결해주고 정보학적으로 이점을 가진 Byte Pair Encoding(BPE)을 주로 사용함
- 텍스트를 작은 단위(Token)로 나누는 것
- Special Tokens
- [CLS]: 문장의 시작을 나타내는 특별 토큰
- [SEP]: Question과 Context를 분리하기 위해 사용
- [PAD]: 입력 시퀀스를 동일한 길이로 맞추기 위해 사용하는 패딩 토큰
- Attention Mask
- 입력 시퀸스 중에서 attention을 연산할 때 무시할 토큰을 표시
- 0은 무시, 1은 연산에 포함
- 보통 [PAD]와 같은 의미가 없는 특수토큰을 무시하기 위해 사용
- Token Type IDs
- 입력이 2개 이상의 시퀸스일 때 (예: 질문&지문), 각각에게 ID를 부여하여 모델이 구분해서 해석하도록 유도
- MRC에서는 질문이 항상 첫번째 문장이므로 질문에 해당하는 범위는 0
- Context 내에서 정답을 찾아야하므로 context에 해당하는 범위는 1
- PAD 토큰 내에서 정답을 찾으면 안되므로 padding에 해당하는 범위는 0
- 입력이 2개 이상의 시퀸스일 때 (예: 질문&지문), 각각에게 ID를 부여하여 모델이 구분해서 해석하도록 유도
- 모델 출력값
- 정답은 문서 내 존재하는 연속된 단어토큰(span)이므로, span의 시작과 끝 위치를 알면 정답을 맞힐 수 있음
- Extraction-based에선 답안을 생성하기보다, 시작위치와 끝위치를 예측하도록 학습함
→ 즉 Token Classification 문제로 치환
Fine-tuning
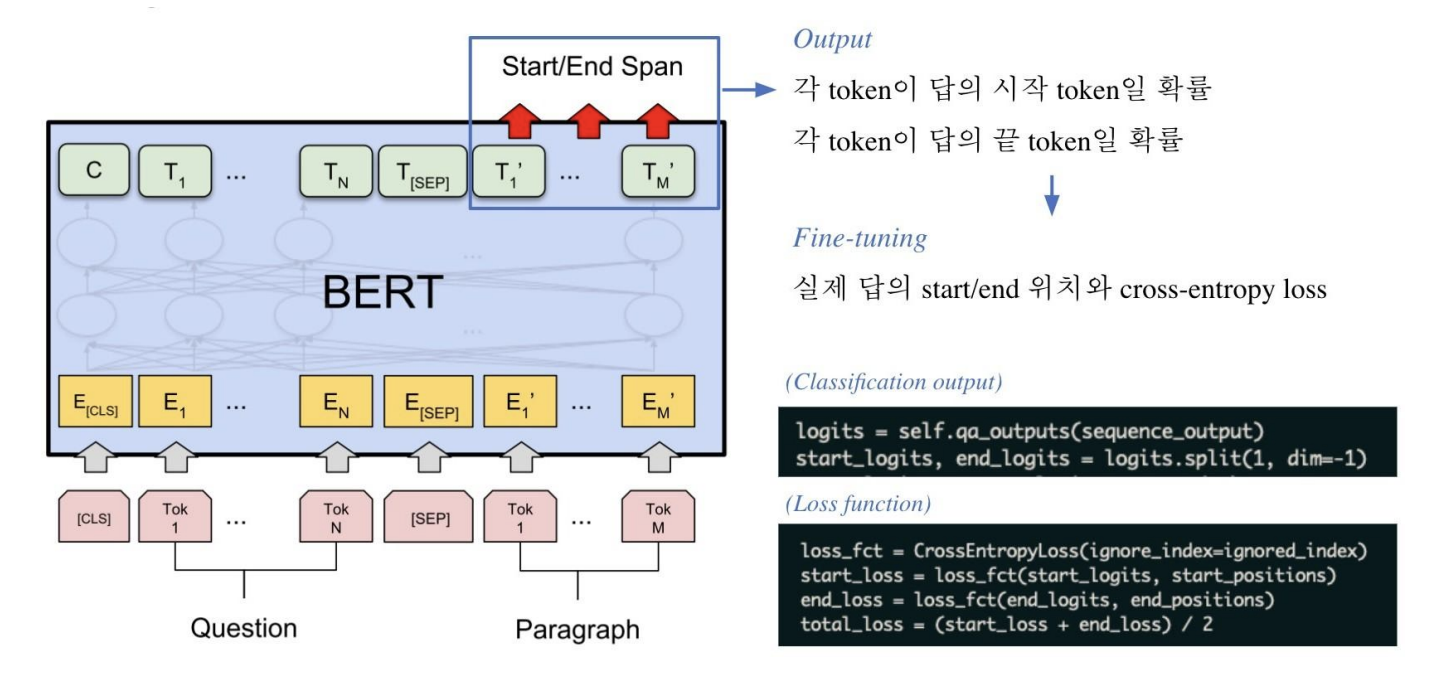
logits = self.outputs(sequence_output)
start_logits, end_logits = logits.split(1, dim=-1)- Classification output
- 레이어가
sequence_output을 받아 로짓(logits)을 생성sequence_output: transformer 모델의 출력self.outputs: 선형 레이어
logits를 두 부분으로 나누어start_logits와end_logits생성start_logits: 답변의 시작 위치에 대한 확률 분포end_logits: 답변의 끝 위치에 대한 확률 분포
- 레이어가
loss_fct = CrossEntropyLoss(ignore_index=ignored_index)
start_loss = loss_fct(start_logits, start_positions)
end_loss = loss_fct(end_logits, end_positions)
total_loss = (start_loss + end_loss) / 2- Loss function
- 손실함수 정의
CrossEntropyLoss: 분류 문제에서 사용되는 손실 함수ignore_index: 특정 인덱스의 손실을 무시하도록 설정(보통 padding 토큰 무시)
- 답변 시작 위치에 대한 손실을 계산
start_logits: 모델의 예측값start_positions: 실제 정답 위치
- 답변 끝 위치에 대한 손실을 계산
end_logits: 모델의 예측값end_positions: 실제 정답 위치
- 시작 위치와 끝 위치의 손실을 평균내어 총 손실을 계산
- 손실함수 정의
Post-processing
- 불가능한 답 제거하기
- 다음과 같은 경우 candidate list에서 제거한다.
- End position이 start position보다 앞에 있는 경우 (e.g. start=90, end=80)
- 예측한 위치가 context를 벗어난 경우 (e.g. question 위치 쪽에 답이 나온 경우)
- 미리 설정한 max_answer_length보다 길이가 더 긴 경우
- 다음과 같은 경우 candidate list에서 제거한다.
- 최적의 답안 찾기
- Start/end position prediction에서 score(logits)가 가장 높은 N개를 각각 찾는다.
- 불가능한 start/end 조합을 제거한다.
- 가능한 조합들을 score의 합이 큰 순서대로 정렬한다.
- Score가 가장 큰 조합을 최종 예측으로 선정한다.
- Top-k가 필요한 경우 차례대로 내보낸다.
Extraction-based MRC 실습
데이터 및 평가 지표 불러오기
from datasets import load_dataset, load_metric

datasets = load_dataset("squad_kor_v1")
metric = load_metric('squad')- metric: 모델의 성능을 측정하는 데 사용됨
- squad: 질문-응답 시스템의 성능을 측정하는 데 사용됨
- Exact Math(EM): 모델이 예측한 답이 정답과 정확히 일치하는지를 평가하는 지표
- F1 Score: 모델이 예측한 답이 얼마나 정답과 유사한지를 평가하는 지표
- squad: 질문-응답 시스템의 성능을 측정하는 데 사용됨
Pre-trained 모델 불러오기
from transformers import AutoConfig, AutoModelForQuestionAnswering, AutoTokenizer

model_name = "bert-base-multilingual-cased"

config = AutoConfig.from_pretrained(model_name)
model = AutoModelForQuestionAnswering.from_pretrained(model_name, config=config)
tokenizer = AutoTokenizer.from_pretrained(model_name, use_fast=True)- Auto Classes
- 많은 경우, 사용하려는 아키텍처는
from_pretrained()메서드에 제공하는 사전 훈련된 모델의 이름이나 경로에서 추측할 수 있습니다. AutoClass는 이 작업을 대신 수행하여 사전 학습된 weights/config/vocabulary에 대한 이름이나 경로가 주어지면 관련 모델을 자동으로 검색합니다. - AutoConfig, AutoModel, AutoTokenizer 중 하나를 인스턴스화하면 관련 아키텍처의 클래스가 직접 생성된다.
- 예를들어
model = AutoModel.from_pretrained("google-bert/bert-base-cased")는 BertModel의 인스턴스인 모델을 생성합니다. AutoConfig는 특정 모델의 설정을 자동으로 로드해주는 유틸리티입니다. 모델을 정의할 때 필요한 다양한 설정값들을 관리하고, 특히 Hugging Face에서 제공하는 사전 훈련된 모델을 로드할 때 유용하게 사용됩니다.hidden_size,num_attention_heads,num_hidden_layers등 모델의 내부 구조를 정의하는 값들을 자동으로 가져오고, 최대 입력 시퀀스 길이, 입력에 필요한 토큰 타입의 수, 어휘 사전 크기 등을 자동으로 설정합니다.
- 많은 경우, 사용하려는 아키텍처는
설정하기
max_seq_length = 384       # 질문과 컨텍스트, special token을 합한 문자열의 최대 길이
pad_to_max_length = True   # 설정한 최대 길이까지 Padding 설정
doc_stride = 128           # 컨텍스트가 너무 길어서 나눴을 때 오버랩되는 시퀀스 길이
max_train_samples = 16     # 훈련에 사용할 최대 샘플 수를 설정
max_val_samples = 16       # 검증에 사용할 최대 샘플 수를 설정
preprocessing_num_workers = 4
batch_size = 4             # 한 번에 처리할 배치의 크기를 설정
num_train_epochs = 2       # 모델을 훈련할 에폭 수를 설정
n_best_size = 20           # 추론할 때 모델이 출력한 답변 후보들 중에서 상위 20개의 답변을 선택
max_answer_length = 30     # 답변의 최대 길이를 제한
위와 같은 설정은 실제 프로젝트에서는 arguments.py 파일로 따로 관리합니다.
전처리하기
train 데이터셋 전처리
def prepare_train_features(examples):
    # 주어진 텍스트를 tokenization
    tokenized_examples = tokenizer(
        examples["question"],
        examples["context"],
        truncation="only_second",  # pair의 두번째 파트(context)만 max_seq_length까지 truncation
        max_length=max_seq_length,
        stride=doc_stride,
        return_overflowing_tokens=True, # 길이를 넘어가는 토큰들을 반환할 것인지
        return_offsets_mapping=True,  # 각 토큰에 대해 (char_start, char_end) 정보를 반환한 것인지
        padding="max_length",
    )

    # 길이 제한으로 인해 나뉜 여러 sequence가 어느 example에서 파생된 것인지 매핑해주는 역할
    overflow_to_sample_mapping = tokenized_examples.pop("overflow_to_sample_mapping")

    # 토큰화된 텍스트의 각 토큰이 원본 context 내 몇번째 글자부터 몇번째 글자까지 해당하는지 알 수 있음
    offset_mapping = tokenized_examples.pop("offset_mapping")

    # 정답지를 만들기 위한 리스트
    tokenized_examples["start_positions"] = []
    tokenized_examples["end_positions"] = []

    # offset_mapping은 각 토큰의 원래 텍스트에서 시작하는 위치와 끝나는 위치를 나타냄
    ## input_ids는 해당 예시의 토큰화된 입력
    ## cls_index는 [cls]의 토큰 위치로, 만약 정답을 찾지 못했을 때 이 위치로 대체할 수 있도록 준비
    for i, offsets in enumerate(offset_mapping):
        input_ids = tokenized_examples["input_ids"][i]
        cls_index = input_ids.index(tokenizer.cls_token_id)

        # 해당 example에 해당하는 sequence를 찾음
        sequence_ids = tokenized_examples.sequence_ids(i)

        # sequence가 속하는 example index를 이용해 answer를 찾음
        example_index = overflow_to_sample_mapping[i]
        answers = examples["answers"][example_index]

        # 텍스트에서 answer의 시작점, 끝점
        answer_start_offset = answers["answer_start"][0]
        answer_end_offset = answer_start_offset + len(answers["text"][0])

        # 텍스트에서 현재 span의 시작 토큰 인덱스
        token_start_index = 0
        while sequence_ids[token_start_index] != 1:
            token_start_index += 1

        # 텍스트에서 현재 span 끝 토큰 인덱스
        token_end_index = len(input_ids) - 1
        while sequence_ids[token_end_index] != 1:
            token_end_index -= 1

        # answer가 현재 span을 벗어났는지 체크
        if not (offsets[token_start_index][0] <= answer_start_offset and offsets[token_end_index][1] >= answer_end_offset):
            tokenized_examples["start_positions"].append(cls_index)
            tokenized_examples["end_positions"].append(cls_index)
        else:
            # token_start_index와 token_end_index를 answer의 시작점과 끝점으로 옮김
            while token_start_index < len(offsets) and offsets[token_start_index][0] <= answer_start_offset:
                token_start_index += 1
            tokenized_examples["start_positions"].append(token_start_index - 1)
            while offsets[token_end_index][1] >= answer_end_offset:
                token_end_index -= 1
            tokenized_examples["end_positions"].append(token_end_index + 1)

    return tokenized_examples
이 과정을 통해 텍스트 형태의 examples이 벡터 형태의 tokenized_examples이 되어, BERT 모델의 입력으로 들어갈 수 있는 형태가 됩니다.
- 질문과 문맥을 토큰화하는 과정
- 질문과 문맥을 연결해 하나의 입력 시퀀스로 만듦
- 문맥이 길 경우에는
max_seq_length에 맞게 자르고, 필요한 경우 stride로 여러 시퀀스로 나누어 슬라이딩 처리
- 정답의 위치를 토큰화된 문맥 내에서 찾는 과정
- 문맥과 질문을 토큰화한 결과인
tokenized_examples에서 각 토큰이 원본 문맥에서 몇 번째 글자에 해당하는지를 알려주는offset_mapping을 구함 - 원본 정답(글자 단위로 주어진)을 토큰화된 문맥 내에서 찾아, 해당 정답이 시작되는 토큰과 끝나는 토큰의 위치를 기록
- 문맥과 질문을 토큰화한 결과인
- 주어진 데이터셋(질문과 문맥)을 BERT 모델이 이해할 수 있는 형태로 전처리한 것
{
'input_ids': [[101, ...], [101, ...], ...], # 각 시퀀스의 토큰 ID
'attention_mask': [[1, ...], [1, ...], ...], # 각 시퀀스의 어텐션 마스크
'token_type_ids': [[0, ...], [1, ...], ...], # 각 토큰의 유형 ID
'start_positions': [0, 1, ...], # 각 예제의 정답 시작 인덱스
'end_positions': [2, 3, ...], # 각 예제의 정답 끝 인덱스
'overflow_to_sample_mapping': [0, 0, ...], # 각 시퀀스의 원본 예제 인덱스
'offset_mapping': [[(0, 1), ...], [(0, 1), ...], ...] # 각 토큰의 원래 텍스트 위치
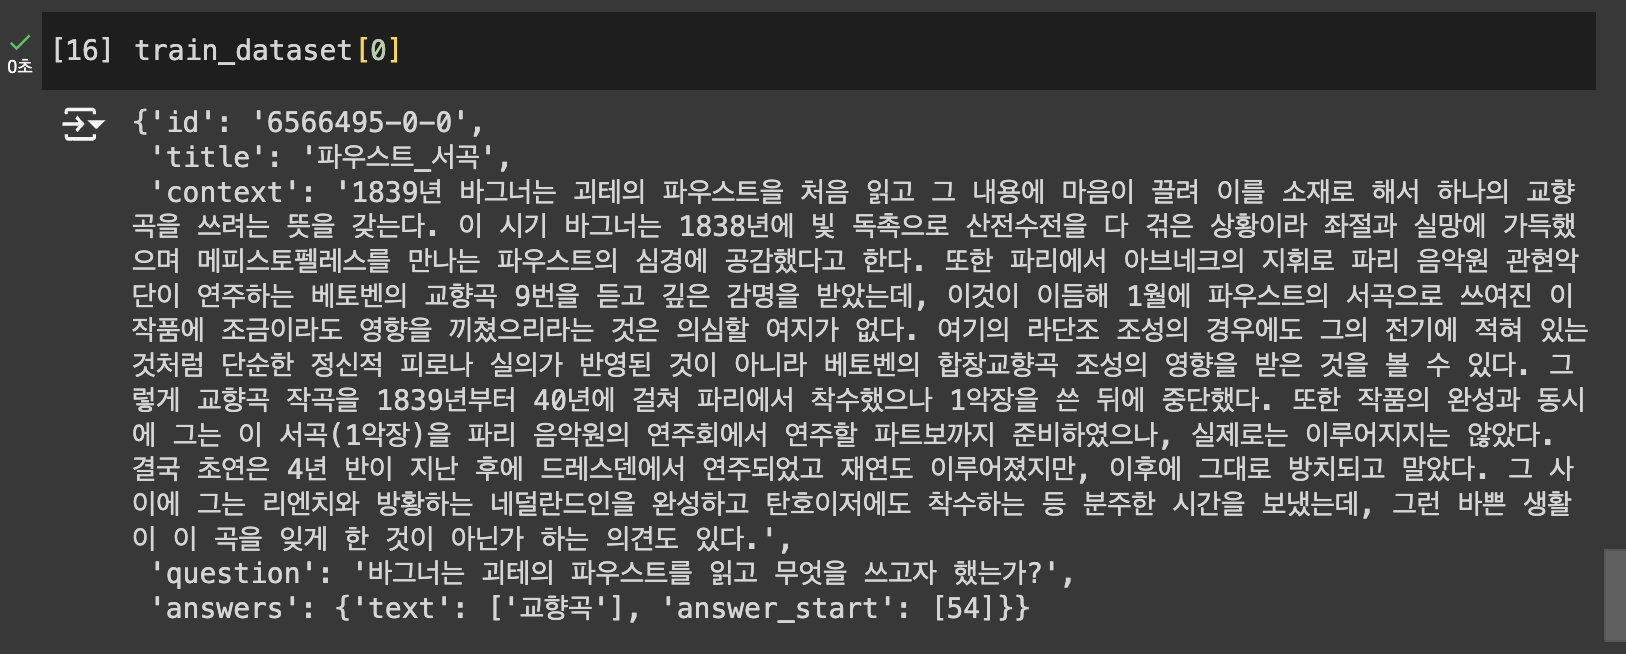
}train_dataset = datasets["train"]
train_dataset = train_dataset.select(range(max_train_samples))
column_names = datasets["train"].column_names
train_dataset = train_dataset.map(
prepare_train_features,
batched=True,
num_proc=preprocessing_num_workers,
remove_columns=column_names,
load_from_cache_file=True,
)remove_columns=column_namescolumn_names는 원래 데이터셋의 열 이름들을 포함함tokenizer를 호출할 때input_ids열이 자동으로 생성되며, 모델이 입력을 처리할 수 있도록 함- 따라서,
input_ids와 같은 새로 생성된 열을 제외한 원래 데이터셋의 모든 열이 삭제됨
validation 데이터셋 전처리
def prepare_validation_features(examples):
    tokenized_examples = tokenizer(
        examples['question'],
        examples['context'],
        truncation="only_second",
        max_length=max_seq_length,
        stride=doc_stride,
        return_overflowing_tokens=True,
        return_offsets_mapping=True,
        padding="max_length",
    )

    sample_mapping = tokenized_examples.pop("overflow_to_sample_mapping")

    tokenized_examples["example_id"] = []

    for i in range(len(tokenized_examples["input_ids"])):
        sequence_ids = tokenized_examples.sequence_ids(i)
        context_index = 1

        sample_index = sample_mapping[i]
        tokenized_examples["example_id"].append(examples["id"][sample_index])

        tokenized_examples["offset_mapping"][i] = [
            (o if sequence_ids[k] == context_index else None)
            for k, o in enumerate(tokenized_examples["offset_mapping"][i])
        ]

return tokenized_examples- train과 유사하지만 아래 사항만 변경됨
- 훈련 데이터는 모델 학습을 위한 정답 정보를 포함
start_positions: 정답의 시작 인덱스end_positions: 정답의 끝 인덱스
- 검증 데이터는 모델의 예측을 평가하기 위한 추가 정보를 포함
- example_id: 각 입력 시퀀스가 원본 예제와 연결될 수 있도록 하는 ID
- 훈련 데이터는 모델 학습을 위한 정답 정보를 포함
{
  "input_ids": [[101, 200, 102], [101, 201, 202, 102]],
  "attention_mask": [[1, 1, 1], [1, 1, 1, 1]],
  "offset_mapping": [[None, (4, 8), None], [None, (5, 8), (9, 12), None]],
  "example_id": ["id1", "id2"]
}
eval_examples = datasets["validation"]
eval_examples = eval_examples.select(range(max_val_samples))
eval_dataset = eval_examples.map(
prepare_validation_features,
batched=True,
num_proc=preprocessing_num_workers,
remove_columns=column_names,
load_from_cache_file=True,
)Fine-tuning 하기
from transformers import default_data_collator, TrainingArguments, EvalPrediction
from trainer_qa import QuestionAnsweringTrainer
from utils_qa import postprocess_qa_predictions
def post_processing_function(examples, features, predictions):
# Post-processing: 모델이 이해하는 형태에서 사람이 이해하는 형태로 변환
predictions = postprocess_qa_predictions(
examples=examples, # 전처리되지 않은 원본 데이터셋
features=features, # 전처리된 데이터셋. 모델이 예측한 logits이 여기에 매핑됨
predictions=predictions, # 모델이 예측한 시작 및 끝 위치 logits
version_2_with_negative=False, # 정답이 없는 데이터셋을 포함하는지 여부를 결정하는 플래그
n_best_size=n_best_size, # 가장 가능성이 높은 n_best개의 예측을 저장하는 개수
max_answer_length=max_answer_length, # 예측할 수 있는 정답의 최대 길이
null_score_diff_threshold=0.0, # null 예측을 선택할 때 사용하는 점수 차이 임계값
output_dir=training_args.output_dir,
is_world_process_zero=trainer.is_world_process_zero(),
)
# Format the result to the format the metric expects.
formatted_predictions = [{"id": k, "prediction_text": v} for k, v in predictions.items()]
references = [{"id": ex["id"], "answers": ex["answers"]} for ex in datasets["validation"]]
return EvalPrediction(predictions=formatted_predictions, label_ids=references)- Post-processing
predictions: 모델이 예측한logits(시작과 끝 위치 logits)을 사람이 이해할 수 있는 텍스트 형태의 정답으로 변환한 것
- 예측 결과를 평가 지표에 맞게 포맷
formatted_predictions: 모델의 예측값을 평가에 필요한 형식으로 변환하여, 각 예측은 질문의id와prediction_text로 구성된 딕셔너리 형태references: 실제 정답 데이터(datasets["validation"])를 평가에 필요한 형식으로 변환하여, 각 reference는 질문의id와 해당answers(정답)으로 구성된 딕셔너리 형태
- EvalPrediction 객체로 반환
EvalPrediction: Hugging Face에서 제공하는 객체로 평가 결과를 저장하는 데 사용되며, 여기서 모델의 예측값(formatted_predictions)과 실제 정답(references)을 넘겨줌
def compute_metrics(p: EvalPrediction):
return metric.compute(predictions=p.predictions, references=p.label_ids)EvalPredictionEvalPrediction은 주로compute_metrics함수에서 사용되며, 이 함수는 평가 시점에서 모델의 성능을 측정하기 위한 평가 지표를 계산하는 데 활용EvalPrediction은 두 가지 주요 속성을 가짐predictions: 모델이 예측한 값(추론 결과)label_ids: 실제 정답 값(레이블)
metric.compute()- 모델이 예측한 값(
p.predictions)과 정답(p.label_ids)이 함수로 전달 metric.compute함수는 주어진 예측값과 참조값을 기반으로 평가 지표를 계산하는데,metric객체에 어떤 평가 지표가 설정되어 있느냐에 따라 계산 방식이 달라짐- 이 실습에서는
metric = load_metric("squad")를 통해 SQuAD 평가 지표를 불러옴
- 이 실습에서는
- 모델이 예측한 값(
training_args = TrainingArguments(
    output_dir="outputs",
    do_train=True,
    do_eval=True,
    learning_rate=3e-5,
    per_device_train_batch_size=batch_size,
    per_device_eval_batch_size=batch_size,
    num_train_epochs=num_train_epochs,
    weight_decay=0.01,
)
trainer = QuestionAnsweringTrainer(
model=model,
args=training_args,
train_dataset=train_dataset,
eval_dataset=eval_dataset,
eval_examples=datasets["validation"],
tokenizer=tokenizer,
data_collator=default_data_collator,
post_process_function=post_processing_function,
compute_metrics=compute_metrics,
)QuestionAnsweringTrainer: Hugging Face의 Trainer 클래스를 기반으로 한 질문-답변(Question Answering) 모델 학습을 위한 특화된 트레이너- 일반적인
Trainer클래스와 비슷하지만, 질문-답변 문제의 특성에 맞춘 추가 기능을 제공 - 예를 들어, 질문과 문맥에서 정답의 위치(토큰 인덱스)를 예측하는 과정을 다룸
- 학습, 평가, 예측 등의 작업을 효율적으로 수행하도록 자동으로 조정됨
- 일반적인
eval_dataset과eval_examples의 차이eval_dataset: 모델이 평가할 때 사용하는 토큰화된 데이터셋으로 질문과 문맥이 토큰화된 형태로 제공되며, 이 데이터는 모델이 입력받고 예측을 수행하는 데 사용됨eval_examples: 원본 데이터셋으로 토큰화되지 않은 질문과 문맥이 포함되어 있어, 모델이 예측한 결과와 비교하여 평가 지표를 계산하는 데 사용됨
post_process_function- 모델이 예측한 토큰의 시작과 끝 인덱스를 원본 텍스트 상의 답변으로 변환하는 역할
- 토큰화된 예측을 다시 원래 텍스트로 복원하고, 이를 기반으로 평가 메트릭(
compute_metrics)에서 정확성을 계산할 수 있게 함
trainer.train()-
문맥 이해
trainer.train()메서드는 모델이 훈련 데이터를 통해 다양한 질문과 그에 대한 문맥(답변이 포함된 텍스트)을 학습하게 합니다. 모델은 각 입력 배치에 대해 순전파(forward pass)를 수행하면서, 주어진 문맥에서 질문에 대한 적절한 답변을 찾아내기 위해 필요한 패턴과 관계를 학습합니다. -
손실 최적화
각 질문과 문맥 쌍에 대해 모델의 예측과 실제 정답 간의 차이를 측정하고, 이를 최소화하기 위해 손실값을 계산합니다. 손실 최적화 시 Metrics를 사용할 때, EM과 F1 Score를 모두 활용하는 것이 일반적이며, 이를 통해 모델의 성능을 보다 정확하고 포괄적으로 평가할 수 있습니다. 손실을 줄이는 방향으로 모델의 가중치를 조정하는 역전파(backward pass) 과정은 모델이 문맥의 의미를 더 잘 파악할 수 있도록 돕습니다.
-
반복적인 학습
여러 에폭(epoch)을 통해 모델은 다양한 문맥과 질문 쌍에 대해 반복적으로 학습하게 됩니다. 이 과정에서 모델의 성능이 점진적으로 향상되며, 문맥을 더 깊이 이해하게 됩니다.
-
결과의 일반화
최종적으로 모델은 훈련 데이터에 대한 학습을 바탕으로 새로운 데이터에 대해서도 질문에 대한 답변을 생성할 수 있는 능력을 가지게 됩니다. 즉, 문맥의 내용을 이해하고, 그에 기반한 적절한 응답을 생성하는 능력을 갖추게 되는 것입니다.
평가하기
trainer.evaluate()훈련된 모델을 사용하여 검증 데이터셋에 대한 성능을 측정하기 위해 다양한 메트릭(EM, F1 Score)을 사용합니다.