나흘간의 연휴 너무 꿀 같았다. 그리고 한가지 좋은 소식은 드디어 맥북을 샀다 !!!

중고로 뽑았는데 전 주인분이 거의 새 것 같이 깔끔하게 쓰셨다. 설정하고 익숙해지는데 꼬박 하루가 걸렸다. 처음엔 조금 불편하다 생각했지만 적응되니까 뭔가 심플하고 잘 정돈된 느낌이 좋았다. 그리고 우분투가 설치된 레노버는 팔지 않을 생각이다. 가끔식 꺼내어 써볼 예정이다. 우분투가 호환만 잘 되고 조금 안정적이었으면 바꾸지 않았을 만큼 코딩을 하기엔 너무 좋았다.
연휴 전에 고민했던 리액트 트위틀러를 연휴기간 동안 완성하였다. 하는 김에 enter키를 누르면 submit이 되는 이벤트도 추가 해보았다.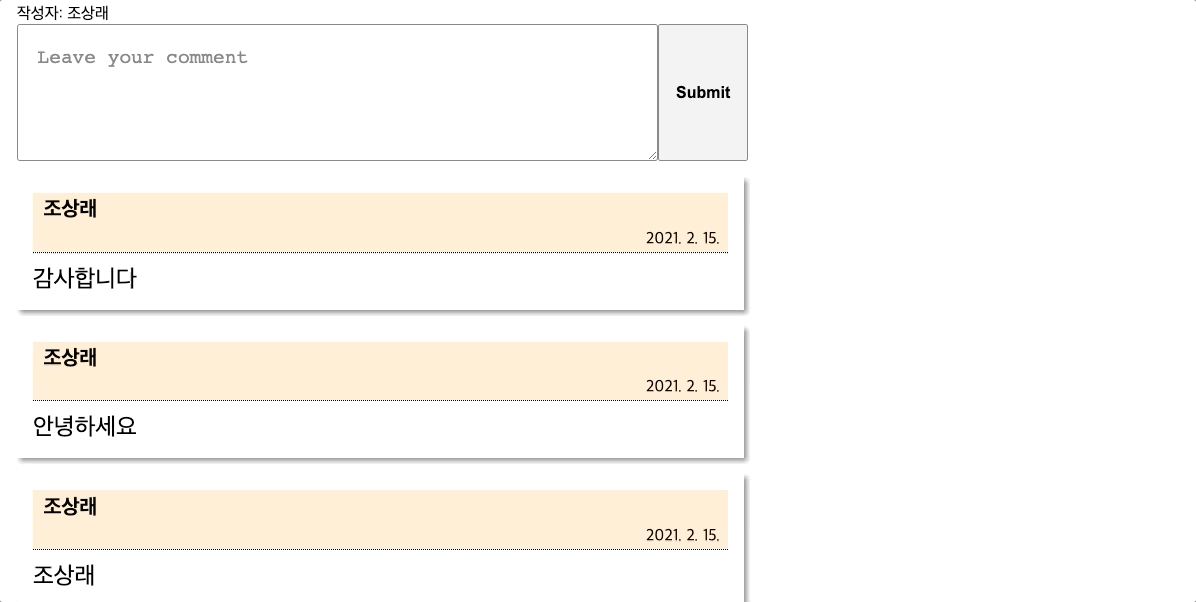
어떻게 구현을 하였냐면, 먼저 코드스테이츠에서 요구 하는 것은 최소 두개의 컴포넌트(클래스)를 이용하여 구현을 하는것인데 컴포넌트 하나는 하단에 등록되는 이름/ 날짜/ 코멘트가 담긴 폼을 Li태그로 만드는 것이고, 다른 하나의 컴포넌트는 만들어진 유닛의 트윗을 Ul태그 하위로 붙여서 렌더링 하는 것. 여기서 주의할 점은 state를 활용하여 트윗을 추가할 때 마다 state의 변화를 주어야 한다는 것.
먼저 유닛의 트윗을 구현하는 코드를 보자,
export class SingleTweet extends React.Component {
  constructor(props) {
    super(props);
  }

  render() {
    return (
      <li className='singleTweet'>
        <div>{this.props.writer}</div>
        <div>{this.props.date}</div>
        <div>{this.props.content}</div>
      </li>
    )
  }
}
여기서 중요한것은 props이다. props는 저번에도 말 했듯이 컴포넌트가 생성 될 때 주어지는 고유의 속성이다. 그러면 props는 어디서 부여가 되었을까?
단위 트윗이 자식으로 렌더를 하는 컴포넌트의 코드를 보면 알 수 있다.
export class Twittler extends React.Component {
  constructor(props) {
    super(props);
    this.state = {tweets: []};
    this.uuid = 0;
    this.submitHandler = this.submitHandler.bind(this);
    this.enterEvent = this.enterEvent.bind(this);
  }

  makeAData(uuid, content) {
    let today = new Date()
    return [{
      uuid: uuid,
      writer: '조상래',
      date: today.toLocaleDateString(),
      content: content
    }];
  }

  submitHandler() {
    let content = document.querySelector('#new-tweet-content');
    const newTweet = this.makeAData(this.uuid, content.value);
    if (!content.value) {
      alert('Need at least a letter');
    } else {
      this.setState({tweets: newTweet.concat(this.state.tweets)});// (1)
      this.uuid += 1;
      content.value = '';
    }
  }

  enterEvent(e) {
    if (e.key === 'Enter') {
      this.submitHandler();
      e.preventDefault();
    }
  }

  render() {
    return (
      <div>
        <div>작성자: 조상래</div>
        <div id="writing-area">
          <textarea id="new-tweet-content" placeholder="Leave your comment" onKeyPress={this.enterEvent}></textarea>
          <button id="submit-new-tweet" onClick={this.submitHandler}>Submit</button>
        </div>
        <ul id="tweets">
          {this.state.tweets.map((tweet) => {
            return <SingleTweet writer={tweet.writer} date={tweet.date} content={tweet.content} key={tweet.uuid} />
              //(2)
          })}
        </ul>
      </div>
    )
  }
}
입력된 정보를 기반으로 객체를 만들어 state의 tweets 속성에 업데이트 되게 만드는 형식이다. 참고로 concat의 부분(1)을 {tweets: this.state.tweets.concat(newTweet)} 으로 바꾸면 트윗이 최신일수록 하단으로 가게 렌더링을 할 수 있다.
그리고 props를 할당 해주는 부분(2)를 보면 state.tweets의 배열의 요소인 객체 하나하나를 map을 활용하여 props의 속성에 할당 해주었고, 새로운 배열을 만들어서 렌더링 해주었다.
검색을 하고 문서를 참고하며 거의 따라하기 수준으로 구현을 하여서 몇가지 개념이 부족하다. 첫 번째는 렌더링 해줄 때 map을 이용해 새로운 배열을 만들었는데 왜 굳이 배열인가? 두 번째는 key에 대해서이다. 오늘 다른 스프린트를 시작했는데 key값을 활용하여 해결해야할 부분이었던 것 같았지만 도저히 활용할수가 없었다... 연휴 때 너무 놀아재꼈나보다... 다시 열심히 해야겠다.