Neuralangelo
Nividia에서 개발한 3D 모델링 AI
참고
공식 사이트 : https://research.nvidia.com/labs/dir/neuralangelo/
Baseline : https://colab.research.google.com/drive/1JD9CpAPteg_JsxneB1B-0XX-pZpybuEj
환경 세팅
- WSL Ubuntu 22.04 : 파이썬 버전과 CUDA 버전, cmake 버전을 모두 만족하는 ubuntu 버전
python3 --version
> 3.10

sudo apt update

sudo apt upgrade

sudo apt install build-essential ffmpeg git python3-pip cmake python3-venv

python3 -m venv venv
source venv/bin/activate

git clone https://github.com/nvlabs/neuralangelo
cd ./neuralangelo
git submodule update --init --recursive

cd ..

sudo apt-get install \
    ninja-build \
    build-essential \
    libboost-program-options-dev \
    libboost-filesystem-dev \
    libboost-graph-dev \
    libboost-system-dev \
    libeigen3-dev \
    libflann-dev \
    libfreeimage-dev \
    libmetis-dev \
    libgoogle-glog-dev \
    libgtest-dev \
    libsqlite3-dev \
    libglew-dev \
    qtbase5-dev \
    libqt5opengl5-dev \
    libcgal-dev \
    libceres-dev

sudo apt-get install xvfb

pip install gdown
pip show gdown
echo 'export PATH=$PATH:/home/crysh/.local/bin' >> ~/.bashrc
source ~/.bashrc


gdown 1Ob2pSUFp46lZNAEK7y7ZSnpwvdIMsILb
sudo tar -C /usr -zxf colmap-3.8.tar.gz
pip install \
    addict \
    k3d \
    opencv-python-headless \
    pillow \
    plotly \
    pyyaml \
    trimesh


cd ./neuralangelo

gdown 1Ee6ucKlmmS2ZsB1uD09XHhf3p_pYv7nt

cd ./third_party/colmap

mkdir build
cd build

sudo apt-get update
sudo apt-get install -y libceres-dev libboost-all-dev libfreeimage-dev libflann-dev libsqlite3-dev libgl1-mesa-dev libglu1-mesa-dev libglew-dev libmetis-dev qtbase5-dev qt5-qmake

cmake .. -DCUDA_ENABLED=ON -DCMAKE_CUDA_ARCHITECTURES="70;72;75;80;86" -GNinja

ninja

sudo sudo ninja install

wget https://developer.download.nvidia.com/compute/cuda/repos/wsl-ubuntu/x86_64/cuda-wsl-ubuntu.pin

sudo mv cuda-wsl-ubuntu.pin /etc/apt/preferences.d/cuda-repository-pin-600

wget https://developer.download.nvidia.com/compute/cuda/11.8.0/local_installers/cuda-repo-wsl-ubuntu-11-8-local_11.8.0-1_amd64.deb

sudo dpkg -i cuda-repo-wsl-ubuntu-11-8-local_11.8.0-1_amd64.deb

sudo cp /var/cuda-repo-wsl-ubuntu-11-8-local/cuda-*-keyring.gpg /usr/share/keyrings/

sudo apt-get update

sudo apt-get -y install cuda

echo 'export PATH=/usr/local/cuda-11.8/bin:$PATH' >> ~/.bashrc
echo 'export LD_LIBRARY_PATH=/usr/local/cuda-11.8/lib64:$LD_LIBRARY_PATH' >> ~/.bashrc

sudo ln -sfn /usr/local/cuda-11.8 /usr/local/cuda

source ~/.bashrc

which nvcc
nvcc --version

cd ~
git clone https://github.com/NVIDIA/libglvnd
cd ./libglvnd

sudo apt-get install libxext-dev libx11-dev x11proto-gl-dev
sudo apt-get install autoconf automake libtool
sudo apt-get install libffi-dev
sudo ./autogen.sh
sudo ./configure
sudo make -j4
sudo make install
export LD_LIBRARY_PATH=$LD_LIBRARY_PATH:/usr/lib/wsl/lib
export LDFLAGS="-L/usr/lib/wsl/lib"

---
pip uninstall -y tinycudann

sudo apt-get update
sudo apt-get install -y build-essential cmake ninja-build

cd ~
git clone https://github.com/NVlabs/tiny-cuda-nn.git

cd ~/tiny-cuda-nn/
git submodule update --init --recursive
cd bindings/torch

export TCNN_CUDA_ARCHITECTURES=75


pip install .
이후 필요한 코드만 사용하면 됩니다.
code
예제에서 설치부분을 제외한 실행 부분만을 사용했습니다.
순차적으로 ipynb 파일에서 쉘 단위로 실행하면 됩니다.
(1)
# Take a look at the video.
from IPython.display import HTML
from base64 import b64encode
mp4 = open("lego.mp4", "rb").read()
data_url = "data:video/mp4;base64," + b64encode(mp4).decode()
HTML(f"""<video src="{data_url}" width=400 controls></video>""")
(2)
SEQUENCE = "lego"
PATH_TO_VIDEO = "lego.mp4"
DOWNSAMPLE_RATE = 2
SCENE_TYPE = "object"  # {outdoor,indoor,object}
# Run the script.
colmap_path = f"datasets/{SEQUENCE}_ds{DOWNSAMPLE_RATE}"
!rm -rf {colmap_path}
!bash projects/neuralangelo/scripts/preprocess.sh {SEQUENCE} {PATH_TO_VIDEO} {DOWNSAMPLE_RATE} {SCENE_TYPE}
# Check whether we have 100 images registered.
import os
num_images = len(os.listdir(f"{colmap_path}/images"))
print("----------------------------------------")
print(f"Number of registered images: {num_images}")
(3)
%cd ./neuralangelo
# Import Python libraries.
import numpy as np
import torch
import k3d
import json
import plotly.graph_objs as go
from collections import OrderedDict
# Import imaginaire modules.
from projects.nerf.utils import camera, visualize
from third_party.colmap.scripts.python.read_write_model import read_model
# Read the COLMAP data.
cameras, images, points_3D = read_model(path=f"{colmap_path}/sparse", ext=".bin")
# Convert camera poses.
images = OrderedDict(sorted(images.items()))
qvecs = torch.from_numpy(np.stack([image.qvec for image in images.values()]))
tvecs = torch.from_numpy(np.stack([image.tvec for image in images.values()]))
Rs = camera.quaternion.q_to_R(qvecs)
poses = torch.cat([Rs, tvecs[..., None]], dim=-1)  # [N,3,4]
print(f"# images: {len(poses)}")
# Get the sparse 3D points and the colors.
xyzs = torch.from_numpy(np.stack([point.xyz for point in points_3D.values()]))
rgbs = np.stack([point.rgb for point in points_3D.values()])
rgbs_int32 = (rgbs[:, 0] * 2**16 + rgbs[:, 1] * 2**8 + rgbs[:, 2]).astype(np.uint32)
print(f"# points: {len(xyzs)}")
(4)
json_fname = f"{colmap_path}/transforms.json"
with open(json_fname) as file:
    meta = json.load(file)
center = meta["sphere_center"]
radius = meta["sphere_radius"]
# ------------------------------------------------------------------------------------
# These variables can be adjusted to make the bounding sphere fit the region of interest.
# The adjusted values can then be set in the config as data.readjust.center and data.readjust.scale
readjust_x = 0.  # @param {type:"number"}
readjust_y = 0.  # @param {type:"number"}
readjust_z = 0.  # @param {type:"number"}
readjust_scale = 1.  # @param {type:"number"}
readjust_center = np.array([readjust_x, readjust_y, readjust_z])
# ------------------------------------------------------------------------------------
center += readjust_center
radius *= readjust_scale
# Make some points to hallucinate a bounding sphere.
sphere_points = np.random.randn(100000, 3)
sphere_points = sphere_points / np.linalg.norm(sphere_points, axis=-1, keepdims=True)
sphere_points = sphere_points * radius + center
(5)
vis_depth = 0.2
# Visualize with Plotly.
x, y, z = *xyzs.T,
colors = rgbs / 255.0
sphere_x, sphere_y, sphere_z = *sphere_points.T,
sphere_colors = ["#4488ff"] * len(sphere_points)
traces_poses = visualize.plotly_visualize_pose(poses, vis_depth=vis_depth, xyz_length=0.02, center_size=0.01, xyz_width=0.005, mesh_opacity=0.05)
trace_points = go.Scatter3d(x=x, y=y, z=z, mode="markers", marker=dict(size=1, color=colors, opacity=1), hoverinfo="skip")
trace_sphere = go.Scatter3d(x=sphere_x, y=sphere_y, z=sphere_z, mode="markers", marker=dict(size=0.5, color=sphere_colors, opacity=0.7), hoverinfo="skip")
traces_all = traces_poses + [trace_points, trace_sphere]
layout = go.Layout(scene=dict(xaxis=dict(showspikes=False, backgroundcolor="rgba(0,0,0,0)", gridcolor="rgba(0,0,0,0.1)"),
                              yaxis=dict(showspikes=False, backgroundcolor="rgba(0,0,0,0)", gridcolor="rgba(0,0,0,0.1)"),
                              zaxis=dict(showspikes=False, backgroundcolor="rgba(0,0,0,0)", gridcolor="rgba(0,0,0,0.1)"),
                              xaxis_title="X", yaxis_title="Y", zaxis_title="Z", dragmode="orbit",
                              aspectratio=dict(x=1, y=1, z=1), aspectmode="data"), height=800)
fig = go.Figure(data=traces_all, layout=layout)
fig.show()
(6)
GROUP = "test_exp"
NAME = "lego"
!torchrun --nproc_per_node=1 train.py \
    --logdir=logs/{GROUP}/{NAME} \
    --show_pbar \
    --config=projects/neuralangelo/configs/custom/lego.yaml \
    --data.readjust.scale=0.5 \
    --max_iter=40000 \
    --validation_iter=99999999 \
    --model.object.sdf.encoding.coarse2fine.step=200 \
    --model.object.sdf.encoding.hashgrid.dict_size=19 \
    --optim.sched.warm_up_end=200 \
    --optim.sched.two_steps=[12000,16000]
(7)
mesh_fname = f"logs/{GROUP}/{NAME}/mesh.ply"
!torchrun --nproc_per_node=1 projects/neuralangelo/scripts/extract_mesh.py \
    --config=logs/{GROUP}/{NAME}/config.yaml \
    --checkpoint=logs/{GROUP}/{NAME}/epoch_00068_iteration_000020000_checkpoint.pt \
    --output_file={mesh_fname} \
    --resolution=300 --block_res=128 \
    --textured
(8)
import numpy as np
import trimesh
# Load the mesh.
mesh = trimesh.load(mesh_fname)
print(f"# vertices: {len(mesh.vertices)}")
print(f"# faces: {len(mesh.faces)}")
# Create a Trimesh scene and visualize the mesh.
scene = trimesh.Scene()
scene.add_geometry(mesh)
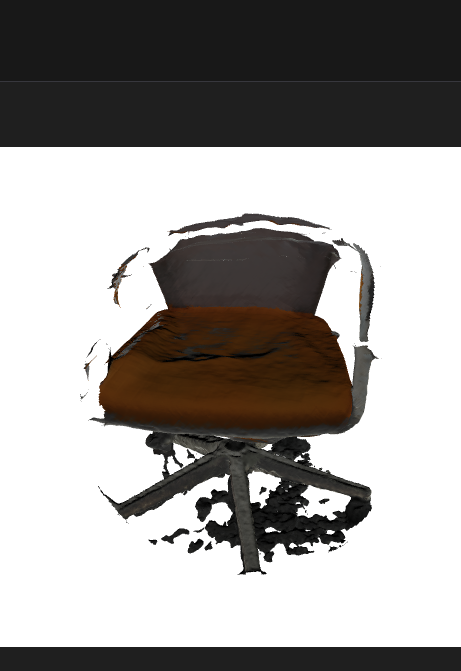
scene.show()결과물
(원본)
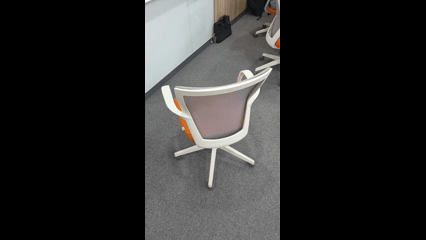
위의 영상을 랜더링한 결과는 아래와 같습니다.
(결과물)
커피를 넣으면 코드가 나옵니다.