Gazebo Plugin이란?🤷♀️
Gazebo plugins give your URDF models greater functionality and can tie in ROS messages and service calls for sensor output and motor input.
Gazebo API는 물체를 움직이거나 센서 데이터를 받아오거나 등등의 다양한 기능을 제공하는데 이때 plugin은 이 API에 접근이 가능하도록 해준다.
Plugin은 C++ library로
Plugin 개발 환경 준비
- C++로 만들어짐
Plugin 만들기
cd ~/sim_ws/src
catkin_create_pkg writing_plugins gazebo gazebo_ros gazebo_plugins roscpp
code ~/sim_ws/src/writing_plugins/src/my_gazebo_plugin.cc
.cc 파일이 처음인 분도 있을 것이다.
오래된 code base나 embedded system programming에서 사용되는 확장자로
c with classes의 약어이고 대부분 cpp compiler에서 작동한다.
gazebo는 plugin을 만들 때 .cc 파일을 활용한다.
<my_gazebo_plugin.cc>
#include <gazebo/gazebo.hh>
#include <gazebo/physics/physics.hh>
#include <iostream>
namespace gazebo{
        class MyGazeboPlugin : public WorldPlugin {
            public:
            MyGazeboPlugin() : WorldPlugin() {
                std::cout << "Plugin constructor method!" << std::endl;
            }

            public:
            void Load(physics::WorldPtr _world, sdf::ElementPtr _sdf) {
                std::cout << "Everything is awesome!" << std::endl;
            }
        };

        // register plugin - why no semicolon..?
        GZ_REGISTER_WORLD_PLUGIN(MyGazeboPlugin)
}
GZ_REGISTER_WORLD_PLUGIN : gazebo에 plugin을 등록하는데 사용되는 매크로 호출이다.
.
<CMakeLists.txt> 도 수정해줘야한다.
cmake_minimum_required(VERSION 3.0.2)
project(writing_plugins)

find_package(gazebo REQUIRED)

find_package(catkin REQUIRED COMPONENTS
  gazebo_plugins
  gazebo_ros
  roscpp
)

catkin_package()

include_directories(
	# include
  ${catkin_INCLUDE_DIRS}
)

include_directories(${GAZEBO_INCLUDE_DIRS})
link_directories(${GAZEBO_LIBRARY_DIRS})
list(APPEND CMAKE_CXX_FLAGS "${GAZEBO_CXX_FLAGS}")

add_library(my_gazebo_plugin SHARED src/my_gazebo_plugin.cc)
target_link_libraries(my_gazebo_plugin ${GAZEBO_LIBRARIES})
.
- find_package : 우리가 사용할 package의 필요한 dependency를 찾고 구성해주는 역할
(패키지 의존성(Package Dependencies)이란 한 패키지가 정상적으로 동작하기 위해서 다른 패키지나 라이브러리 패키지) - catkin_package : package.xml을 바탕으로 cmake에 지시를 줌
- include_directories / link_directoies : directory나 link library를 프로젝트에 추가해줌
- add_library : 라이브러리를 추가해주고
- target_link_libraries : 라이브러리를 연결해주는 역할
이제 build를 해준다. 빌드가 되고나면 이제 plugin을 사용할 준비가 되었다는 뜻이다.
나는 catkin_make를 이용해서 계속 package를 빌드해왔다.
정확히는 alias를 정의해서 'cd ~/sim_ws && catkin_make' 이렇게 한번에 해주고 있다.
문득 catkin build랑 catkin_make는 뭐가 다른지 궁금해서 정리해뒀으니 궁금한 사람은 읽어보자 👍
*한번 catkin_make로 빌드하고 나면 catkin build로 빌드가 안됨
cd ~/sim_ws
catkin build
.
[궁금증] catkin_make vs catkin build ?
- catkin build를 사용하면 전체적인 build configuration이 훨씬 견고해지고
isolated package는 병렬로 빌드되므로 훨씬 빠르다.- catkin build는 아무 directory에서나 가능하지만 catkin_make는 top level directory에서만 가능하다.
- single package만 build할수도 있다. - catkin build (package_name)
- catkin build는 catkin clean, install, list ... 등등의 다양한 subcommands도 제공한다.
.
.
Plugin 경로설정
- Gazebo plugin 환경변수를 선언해주자.
- 이렇게 하면 새로 생성한 plugin을 gazebo에게 알려줄 수 있다.
simulation을 실행할 때마다 terminal에서 선언해주면 된다.
.
참고로 띄어쓰기를 하면 안된다 ㅎㅎ
export GAZEBO_PLUGIN_PATH=${GAZEBO_PLUGIN_PATH}:~/sim_ws/devel/lib.
실행을 위한 파일 생성
launch & world 파일 만들기
- 우리가 만든 package안에 launch & world 폴더와 파일을 만들어주자
mkdir -p ~/sim_ws/src/writing_plugins/launch
code ~/sim_ws/src/writing_plugins/launch/gazebo.launch
mkdir -p ~/sim_ws/src/writing_plugins/worlds
code ~/sim_ws/src/writing_plugins/launch/gazebo.world
[궁금증] mkdir -p는?
mkdir 뒤에 옵션으로 붙는 -p는 상위폴더도 함께 생성하라는 의미이다.
그 외에도 -v는 생성하고 생성된 경로를 메세지 출력 등의 옵션이 있습니다.
.
.
<gazebo.launch>
<launch>
    <include file="$(find gazebo_ros)/launch/empty_world.launch">
    	<arg name="world_name" value="$(find writing_plugins)/worlds/gazebo.world"/>
        <arg name="paused" value="false"/>
        <arg name="use_sim_time" value="true"/>
        <arg name="gui" value="true"/>
        <arg name="headless" value="false"/>
        <arg name="debug" value="false"/>
    </include>
</launch>
<gazebo.world>
<?xml version="1.0"?>
<sdf version="1.4">
	<world name="default">
    	<plugin name="my_gazebo_plugin" filename="libmy_gazebo_plugin.so"/>
    </world>
</sdf>
.world 파일이 visual studio code에서 xml로 인식이 잘 안된다면
아래 링크를 참고해 vsc상에서 설정해주자
vsc 파일 확장자 설정하기
결과확인
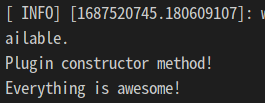
roslaunch writing_plugins gazebo.launch실행시키고 나면 위에서 <my_gazebo_plugin.cc>가 실행되어 아래내용이 print된다.
Plugin constructor method!
Everything is awesome!
.
.
World Plugin
Plugin으로 gazebo상에 model 넣기
위에서 만든 my_gazebo_plugin.cc에서 Load 함수 부분만 변경해주면 되지만
나는 더 정확히 이해하기 위해
다른 이름 my_gazebo_plugin_world.cc 를 만들어주었다.
.cc 파일 만들기
<my_gazebo_plugin_world.cc>
#include <gazebo/gazebo.hh>
#include <gazebo/physics/physics.hh>
#include <iostream>
namespace gazebo{
    class MyGazeboPlugin : public WorldPlugin {
        public:
        MyGazeboPlugin() : WorldPlugin() {
            std::cout << "Plugin constructor method!" << std::endl;
        }

        public:
        void Load(physics::WorldPtr _world, sdf::ElementPtr _sdf){
            //set a node
            transport::NodePtr node(new transport::Node());
            node->Init(_world->Name());

            //set publisher
            transport::PublisherPtr publisher=node->Advertise<msgs::Factory>("~/factory");

            //create msg obj
            msgs::Factory msg;

            //model to use
            msg.set_sdf_filename("model://jersey_barrier");

            //send the message
            publisher->Publish(msg);
        }
    };
    GZ_REGISTER_WORLD_PLUGIN(MyGazeboPlugin)
}
.
.
.
CMakeList.txt 수정하기
이미 위에서 CMakeList.txt를 수정했기 때문에 1줄만 추가해주면 된다.
add_library(my_gazebo_plugin_world SHARED src/my_gazebo_plugin_world.cc)
그 다음 build를 해주면 .so 파일이 생성된 걸 확인할 수 있다.
.
world 파일 만들기
code ~/sim_ws/src/writing_plugins/worlds/gazebo_world.world<gazebo_world.world>
<?xml version="1.0"?>
<sdf version="1.4">
    <world name="default">
        <plugin name="my_gazebo_plugin_world" filename="libmy_gazebo_plugin_world.so"/>
    </world>
</sdf>
Launch 파일 만들기
code ~/sim_ws/src/writing_plugins/launch/gazebo_world.launch<gazebo_world.launch>
<launch>
    <include file="$(find gazebo_ros)/launch/empty_world.launch">
    	<arg name="world_name" value="$(find writing_plugins)/worlds/gazebo_world.world"/>
        <arg name="paused" value="false"/>
        <arg name="use_sim_time" value="true"/>
        <arg name="gui" value="true"/>
        <arg name="headless" value="false"/>
        <arg name="debug" value="false"/>
    </include>
</launch>
.
.
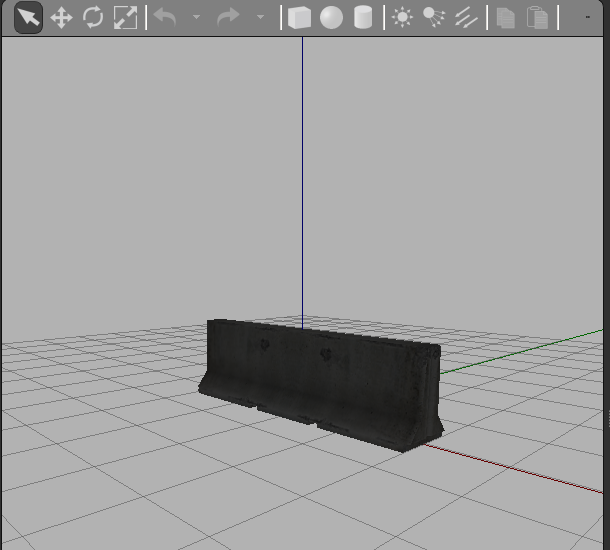
결과
launch 파일을 실행하면
gazebo에 jersey_barrier가 생긴 것을 볼 수 있다.
Plugin을 이용해 모델을 특정위치에 배치하기
- world_plugin.cc 파일 생성하고, CMakeList.txt에 필요한 코드 추가하기
- gazebo.world도 이에 맞게 수정하기
- Plugin을 통해 모델을 특정 위치에 배치하기
힌트
msgs::Set(msg.mutable_pose(),
	ignition::math::Pose3d(
    	ignition::math::Vector3d(5,5,0),
        ignition::math::Quaterniond(0,0,0))
);
.
<world_plugin.cc>
#include <gazebo/gazebo.hh>
#include <gazebo/physics/physics.hh>
#include <iostream>
namespace gazebo{
class MyGazeboPlugin : public WorldPlugin {
public:
MyGazeboPlugin() : WorldPlugin() {
std::cout << "Plugin constructor method!" << std::endl;
}
public:
void Load(physics::WorldPtr _world, sdf::ElementPtr _sdf){
//set a node
transport::NodePtr node(new transport::Node());
node->Init(_world->Name());
//set publisher
transport::PublisherPtr publisher=node->Advertise<msgs::Factory>("~/factory");
//create msg obj
msgs::Factory msg;
//model to use
msg.set_sdf_filename("model://jersey_barrier");
msgs::Set(msg.mutable_pose(),
ignition::math::Pose3d(
ignition::math::Vector3d(5,5,0),
ignition::math::Quaterniond(0,0,0))
);
//send the message
publisher->Publish(msg);
}
};
GZ_REGISTER_WORLD_PLUGIN(MyGazeboPlugin)
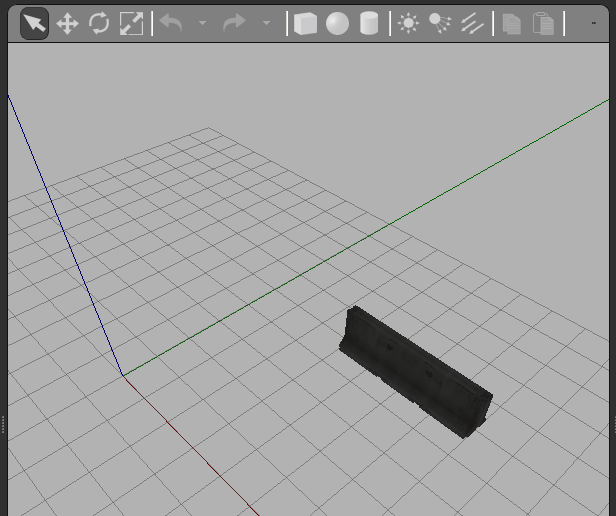
}결과
- (5,5) 위치에 잘 놓여있는 것을 확인할 수 있다~
.
.
Model Plugin
모델 움직이기
- world plugin과 다른 class를 상속해주면 model plugin을 만들 수 있다.
code ~/sim_ws/src/writing_plugins/worlds/model.world
code ~/sim_ws/src/writing_plugins/src/my_model_plugin.cc
code ~/sim_ws/src/writing_plugins/launch/model.launch
모델을 움직이는 plugin.cc 만들기
<my_model_plugin.cc>
#include <functional>
#include <gazebo/common/common.hh>
#include <gazebo/gazebo.hh>
#include <gazebo/physics/physics.hh>
#include <ignition/math/Vector3.hh>

namespace gazebo {
    class MyModelPlugin : public ModelPlugin {
        public:
        void Load(physics::ModelPtr _parent, sdf::ElementPtr) {
            // Store the pointer to the model
            this->model = _parent;

            // Listen to the update event. This event is broadcast every simulation iteration.
            this->updateConnection = event::Events::ConnectWorldUpdateBegin(
                std::bind(&MyModelPlugin::OnUpdate, this));
        }

        // Called by the world update start event
        public:
        void OnUpdate() {
            // Apply a small linear velocity to the model.
            if (this->counter < 10000) {
                this->model->SetLinearVel(ignition::math::Vector3d(0, 0, 0.4));
            }

            this->counter++;
        }

        // Pointer to the model
        private:
        physics::ModelPtr model;

        private:
        int counter;

        // Pointer to the update event connection
        private:
        event::ConnectionPtr updateConnection;
    };

    // Register this plugin with the simulator
    GZ_REGISTER_MODEL_PLUGIN(MyModelPlugin)
} // namespace gazebo
OnUpdate : 반복 주기에 의한 callback 함수
모델이 위쪽으로 움직이게 되는 이유는 setLinearVel에서 Z 축 방향으로 0.4만큼의 velocity를 계속 인가하고 있기 때문, 관련링크 : setLinearVel
- API에 대한 내용은 홈페이지를 참고하자 : Gazebo:Model class
.
.
CMakeList.txt 수정하기
<CMakeList.txt> 파일에서 아래 내용을 수정해준 후 빌드를 해주면 된다.
add_library(my_model_plugin SHARED src/my_model_plugin.cc)
target_link_libraries(my_model_plugin ${GAZEBO_LIBRARIES})
.world 파일 만들기
model plugin의 경우, world 파일에서 불러와줘야 하므로
<model.world> 파일에서 model 태그 안에 내용을 수정해줘야 한다.
<?xml version="1.0"?>
<sdf version="1.4">
    <world name="default">
        <!-- Ground Plane -->
        <include>
            <uri>model://ground_plane</uri>
        </include>

        <include>
            <uri>model://sun</uri>
        </include>

        <model name="box">
            <pose>0 0 0.5 0 0 0</pose>
            <link name="link">
                <collision name="collision">
                    <geometry>
                        <box size="1.0 1.0 1.0"/>
                    </geometry>
                </collision>

                <visual name="visual">
                    <geometry>
                        <box size="1.0 1.0 1.0"/>
                    </geometry>
                </visual>
            </link>

            <!-- import plugin -->
            <plugin name="my_model_plugin" filename="libmy_model_plugin.so"/>
        </model>

    </world>
</sdf>
launch 파일도 생성해준다 ( 앞에서 많이 했으니 생략하겠다. )
결과
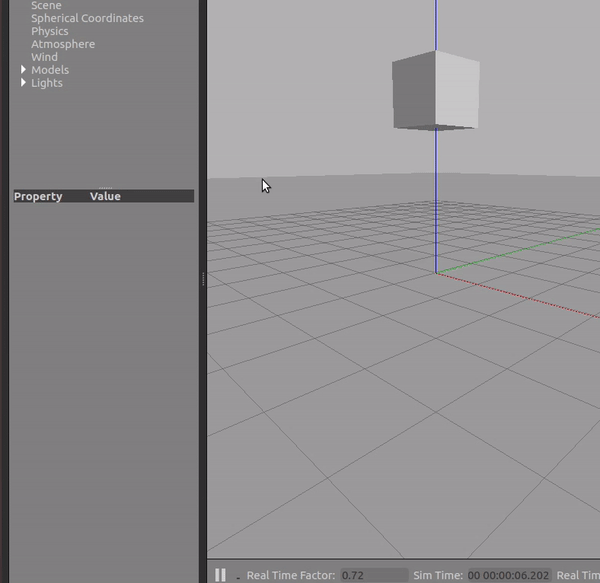
정육면체가 위로 올라가는 것을 확인할 수 있다.
.
.
모델을 움직이게 하는 Plugin
- 목표 : 모델을 움직이게 하는 Plugin (a_model_plugin.cc)
- Mission
- 모델이 반복하며 정사각형 패턴으로 움직이도록 프로그래밍- OnUpdate() callback 함수를 다시 활용
- Load() 매서드 안에 hint 코드를 활용하기 (반복횟수 "iterations"와 선형속도 "linear_vel"을 파라미터로 활용)
- 설정한 파라미터는 model.world에서 설정할 수 있다!
<hint code - load() - .cc 코드에 넣기>
this -> iterations = 10 * 1000;
if (_sdf->HasElement("iterations")){
	this->iterations=_sdf->Get<int>("iterations");
}
<model.world>
<plugin name="a_model_plugin" filename="liba_model_plugin.so">
	<linear_vel>0.2</linear_vel>
    <iterations>15000</iterations>
</plugin>
.
.
.cc 파일 만들기
포인터가 많이나와서 .. 포인터를 열심히 공부해야겠다 생각했다..
<a_model_plugin.cc>
#include <functional>
#include <gazebo/common/common.hh>
#include <gazebo/gazebo.hh>
#include <gazebo/physics/physics.hh>
#include <ignition/math/Vector3.hh>
#include <ros/ros.h>

namespace gazebo {
    class AModelPlugin : public ModelPlugin {
        public:
        void Load(physics::ModelPtr _parent, sdf::ElementPtr _sdf) {
            //store the pointer to the model
            this->model = _parent;

            this -> iterations = 10 * 1000;
            if (_sdf->HasElement("iterations")){
                this->iterations=_sdf->Get<int>("iterations");
            }

            this -> linear_vel = 0.0;
            if (_sdf->HasElement("linear_vel")){
                this->linear_vel=_sdf->Get<double>("linear_vel");
            }


            this->updateConnection = event::Events::ConnectWorldUpdateBegin(
                std::bind(&AModelPlugin::OnUpdate, this)
            );

        }

        // Called by the world update start event
        public:
        void OnUpdate() {
            // apply a small linear velocity to the model

            if(this->counter < this->iterations)
            {
                this->model->SetLinearVel(ignition::math::Vector3d(this->linear_vel,0,0));
            }
            else if(this->counter < 2 * this->iterations)
            {
                this->model->SetLinearVel(ignition::math::Vector3d(0,this->linear_vel,0));
            }
            else if(this->counter < 3 * this->iterations)
            {
                this->model->SetLinearVel(ignition::math::Vector3d(-this->linear_vel,0,0));
            }
             else if(this->counter < 4 * this->iterations)
            {
                this->model->SetLinearVel(ignition::math::Vector3d(0,-this->linear_vel,0));
            }
            else
            {
                this->counter = 0;
            }
            this->counter++;
        }

        private:
        physics::ModelPtr model;

        private:
        int counter;
        double linear_vel;
        int iterations;

        // Pointer to the update event connection
        private:
        event::ConnectionPtr updateConnection;
    };

    // register this plugin with the simulation
    GZ_REGISTER_MODEL_PLUGIN(AModelPlugin)
}
CMakeList.txt 수정하기
아래 내용을 추가해주고~
add_library(a_model_plugin SHARED src/a_model_plugin.cc)
target_link_libraries(a_model_plugin ${GAZEBO_LIBRARIES})
.world 만들기
<?xml version="1.0"?>
<sdf version="1.4">
    <world name="default">
        <!-- Ground Plane -->
        <include>
            <uri>model://ground_plane</uri>
        </include>

        <include>
            <uri>model://sun</uri>
        </include>

        <model name="a_barrier">
            <pose>1 1 0 0 0 0</pose>
            <static>false</static>
            <include>
                <uri>model://suv</uri>
            </include>

            <!-- import plugin -->
            <plugin name="a_model_plugin" filename="liba_model_plugin.so">
                <linear_vel>5.0</linear_vel>
                <iterations>5000</iterations>
            </plugin>
        </model>

    </world>
</sdf>
launch 파일은 어렵지 않으니 생략하겠다...
결과
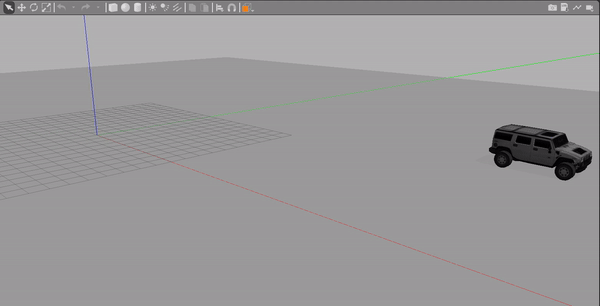
사각형패턴으로 움직이는 것을 확인할 수 있다.
마치며
정말 분량이 많아서 오래걸리고 힘들었지만.....
그래도 ... 반복해서 하다보니 plugin을 만드는 flow를 이해하는데 도움이 되었다!!
c++ 공부에 더 매진해야겠다.
난 이제 지쳤어요 땡벌땡벌