이미지 성능 최적화
[기존 방식]
[미리보기]
[Promise.all로 한번에 변환하기]
[LazyLoad, PreLoad, 이미지 관련 라이브러리]
이미지 업로드 프로세스
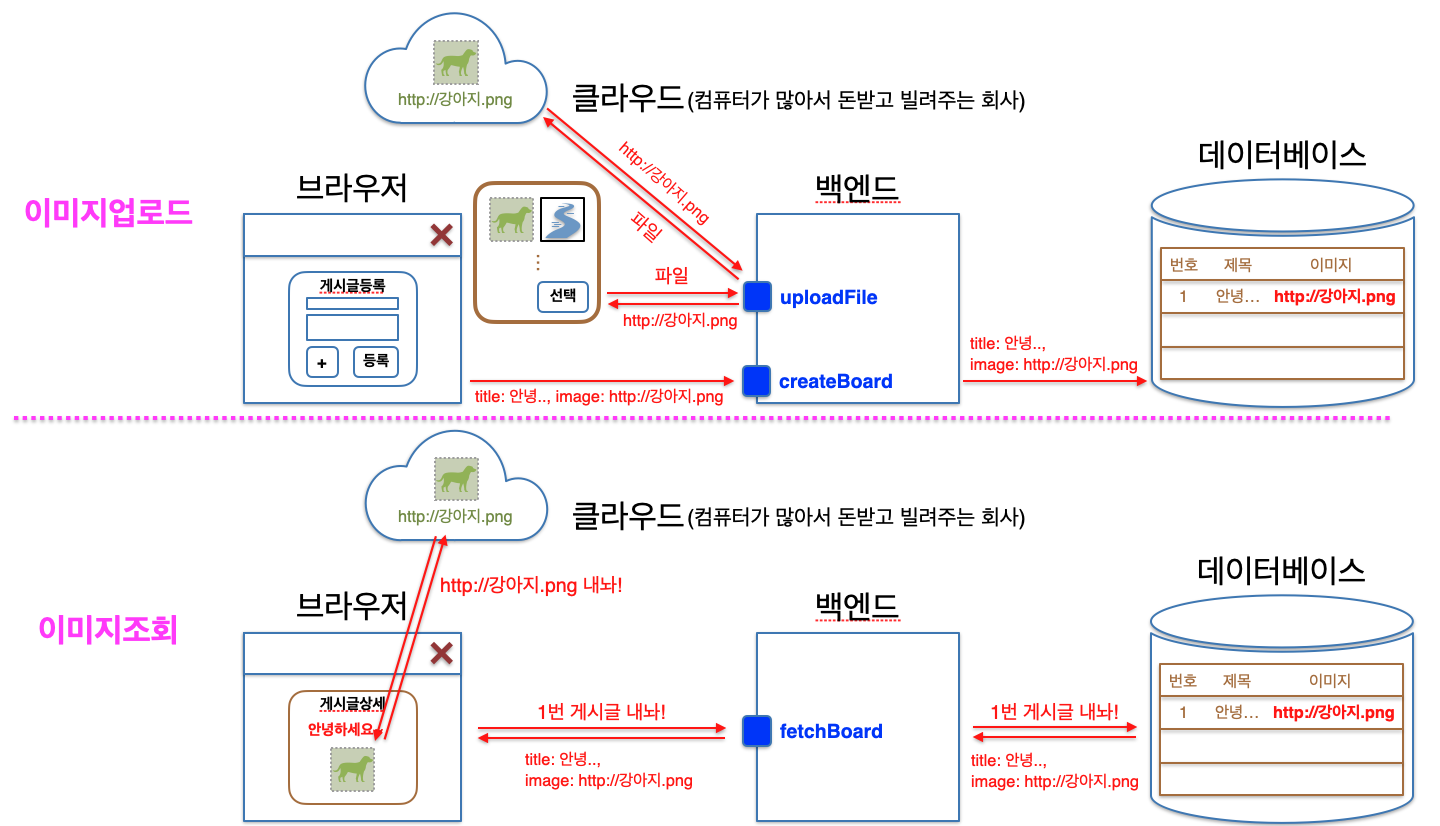
이미지는 DB에 직접 넣지 않고 이미지를 다운받을 수 있는 주소를 넣는다.
실제 이미지는 다른 컴퓨터에 저장한다.
이미지는 용량이 굉장히 커서, 실제 이미지를 저장하는 컴퓨터는 사이즈가 매우 커야 한다.
Cloud Provider
- AWS(1등), GCP - 구글 클라우드 플랫폼(2등), MS Azure, NHN Cloud, Naver Cloud 등
- 컴퓨터를 빌려준다.
- 가격은 메모리 용량 등에 따라 달라진다.
- 클라우드 안에 storage가 있다.
Storage Service: 파일, 영상 등을 저장할 수 있다. 많은 컴퓨터들이 연결되어 큰 용량을 담을 수 있는 DB이다.
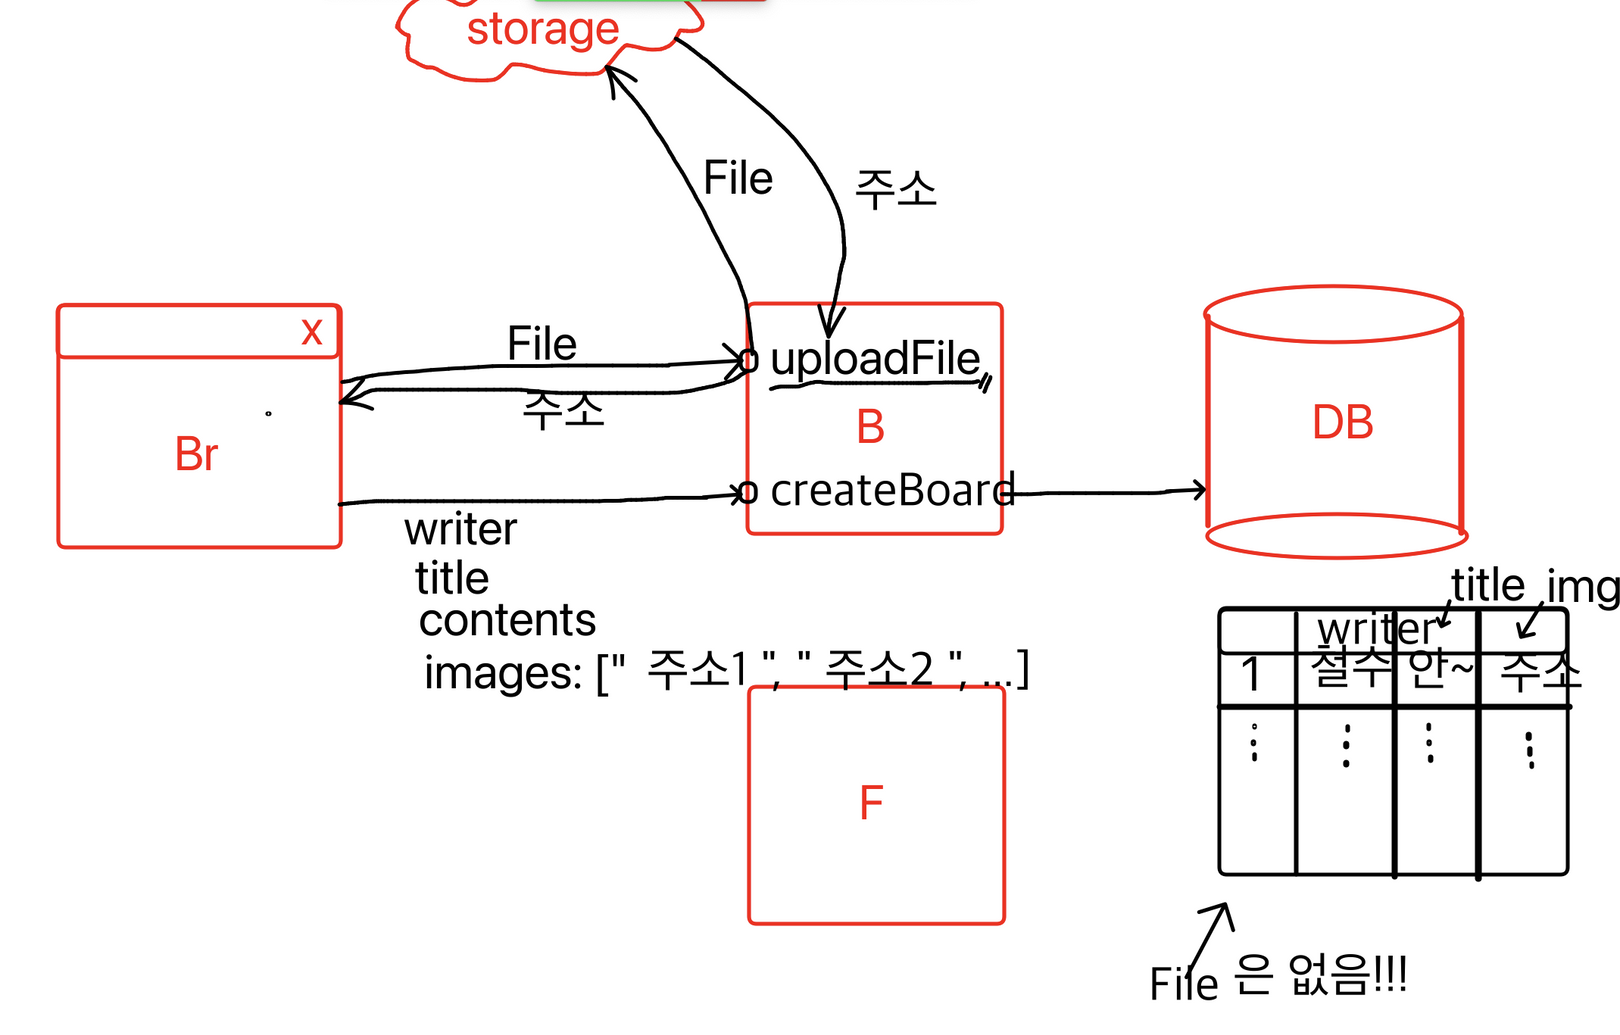
이미지 업로드 과정
실제 이미지는 Storage에 저장하고, 주소를 활용해 처리한다!
-
Back-end에 파일을 업로드하는 API를 만든다. ex)
uploadFile API -
브라우저에 파일 태그인
<input type="file"/>를 만든다. -
2의 태그를 통해 파일을 선택하면 파일 객체가 들어오고, 그 객체를 state나 변수에 저장할 수 있다.
-
파일을
uploadFile API에 보내면 Back-end에서 Storage로 파일을 전송한다. -
Storage에서는 파일을 저장해주고 그 파일을 다운받을 수 있는 주소를 준다.
-
Back-end가 그 주소를 받아서 다시 프론트에 돌려준다.
전달받은 주소를 img 태그 등에 사용하면 실제로 브라우저에서 해당 이미지를 볼 수 있게 된다. -
createBoard API에
writer, title, contents, image 주소를 넘긴다.
DB에 이미지 주소를 등록하고, fetchBaord하면 마찬가지로 image 주소를 받아와서 화면에 보여준다.
image를 DB에 직접 넣지 않는 이유
데이터베이스는 각각의 타입이 있다. (text, integer ...)
이미지 주소가 문자열로 들어가면 text, 실제 이미지가 들어가면 blob 타입이 된다.(blob: 블랍)
blob
bynary large object 0과 1로 구성된 이진 데이터
사진을 0과 1로 변환해서 집어넣는다.
사진은 픽셀 단위로 이루어져있다.
각 픽셀은 rgb 색상을 가지고 있다. --> 색상 값에 해당하는 숫자로 변환한 숫자를 저장한다.
사이즈가 엄청 크다!
그래서 storage에 저장하고, 다운로드 할 수 있는 주소만 받아서 사용하는 방식을 쓰고 있다.
결론: 데이터베이스에 이미지를 직접 저장하는 방식은 사용하지 않는다.
이미지 업로드하기
1. 아폴로 업로드 라이브러리를 설치한다.
yarn add apollo-upload-client
yarn add --dev '@types/apollo-upload-client'
2. _app.tsx 파일에서 apollo를 다시 세팅 한다.
추가한 부분
1.import {createUploadLink} from 'apollo-upload-client';
2.
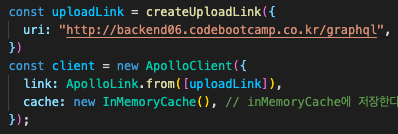
class/_app.tsx
import {createUploadLink} from 'apollo-upload-client';
function MyApp({ Component, pageProps }: AppProps) {
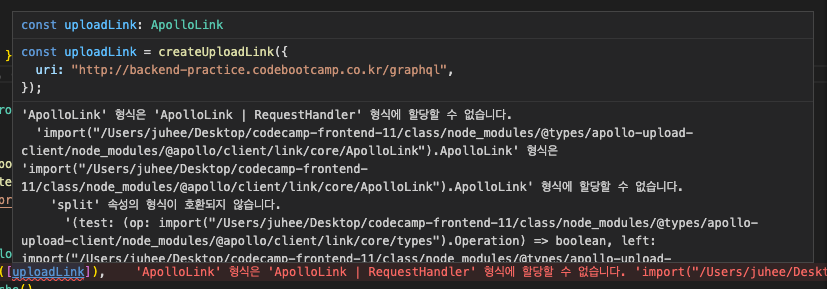
const uploadLink = createUploadLink({
uri: "http://backend06.codebootcamp.co.kr/graphql",
})
const client = new ApolloClient({
link: ApolloLink.from([uploadLink as unknown as ApolloLink]),
cache: new InMemoryCache(),
});
return (
<ApolloProvider client={client}>
<Global styles={globalStyles} />
<Layout>
<Component {...pageProps} />
</Layout>
</ApolloProvider>
);
}
export default MyApp;
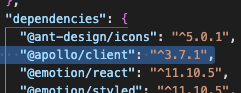
위 에러가 발생한다면 apollo/client의 버전을 3.7.1로 바꿔주고 nodemodules, yarn.lock 삭제 후 yarn install을 진행한다.
3. FileReader로 이미지 읽기(skip 가능)
export default function Web() {
	const readImage = (input) => {
		// 인풋 태그에 파일이 있는 경우
		if (input.target.files && input.target.files[0]) {
			console.log(input.target.files[0]);
			// FileReader 인스턴스 생성
			const reader = new FileReader();
			// reader가 이미지 읽도록 하기
			reader.readAsDataURL(input.target.files[0]);
			// 이미지가 로드가 된 경우
			reader.onload = (e) => {
				const previewImage = document.getElementById('image');
				previewImage.src = e.target.result;
			};
		}
	};

	return (
		<>
			<div>
				<img style={{ width: '500px' }} id="image" />
				<input type="file" onChange={readImage}></input>
			</div>
		</>
	);
}
4. 이미지 검증
4-1. type, size 이용
이미지를 검증하는 함수를 commons에 만들고 Import해서 사용했다.
commons/libraries/validation.ts
export const checkFileValidation = (file?: File) => {
  if (!file?.size) {
    alert("파일이 없습니다.");
    return false;
  }

  if (file.size > 5 * 1024 * 1024) {
    alert("파일 용량이 너무 큽니다. (제한: 5MB)");
    return false;
  }

  if (!file.type.includes("jpeg") && !file.type.includes("png")) {
    alert("jpeg 또는 png 파일만 업로드가 가능합니다.");
    return false;
  }
  return true;
};
index.tsx
 const isValid = checkFileValidation(file);
    if (!isValid) return;
4-2. accept 속성 활용
<input type="file" accept="image/png" onChange={readImage}></input>
accept 속성을 이용하면 지정한 확장자의 파일만 활성화된다.
5. 버튼 바꾸기
5-1. useRef 이용
 const fileRef = useRef<HTMLInputElement>(null);

 const onClickImage = () => {
    fileRef.current?.click();
  };

  return (
    <>
      <div>이미지 업로드 연습하기</div>
      <div
        style={{ width: "50px", height: "50px", backgroundColor: "gray" }}
        onClick={onClickImage}
      >
        이미지 선택
      </div>
      <input
        style={{ display: "none" }}
        type="file"
        onChange={onChangeFile}
        ref={fileRef}
      />
      <img src={`https://storage.googleapis.com/${imageUrl}`} />
    </>
  );
}
5-2. label 태그와 htmlFor 활용
<label htmlFor="fileTag">이거 눌러도 실행돼요!</label>
				<img style={{ width: '500px' }} id="image" />
				<input id="fileTag" type="file" onChange={readImage}></input>
이미지 업로드 코드 최종(api 활용)
import { useMutation, gql } from "@apollo/client";
import { ChangeEvent, useRef, useState } from "react";
import { checkFileValidation } from "../../src/commons/libraries/validation";
import {
  IMutation,
  IMutationUploadFileArgs,
} from "../../src/commons/types/generated/types";

const CREATE_BOARD = gql`
  mutation createBoard($createBoardInput: CreateBoardInput!) {
    createBoard(createBoardInput: $createBoardInput) {
      _id
      writer
      title
      contents
      images
    }
  }
`;
const UPLOAD_FILE = gql`
  mutation uploadFile($file: Upload!) {
    uploadFile(file: $file) {
      url
    }
  }
`;

export default function GraphqlMutationPage() {
  const [myWriter, setMyWriter] = useState("");
  const [myTitle, setMyTitle] = useState("");
  const [myContents, setMyContents] = useState("");
  const [myPassword, setMyPassword] = useState("");
  const fileRef = useRef<HTMLInputElement>(null);
  const [imageUrl, setImageUrl] = useState<string | undefined>("");
  const [uploadFile] = useMutation<
    Pick<IMutation, "uploadFile">,
    IMutationUploadFileArgs
  >(UPLOAD_FILE);
  const [data, setData] = useState("");
  const [callApi] = useMutation(CREATE_BOARD);
  console.log(data);
  const callGraphqlApi = async () => {
    const result = await callApi({
      variables: {
        createBoardInput: {
          writer: myWriter,
          title: myTitle,
          contents: myContents,
          password: myPassword,
          images: [imageUrl],
        },
      },
    });
    setData(result.data.createBoard.message);
  };

  const onChangeWriter = (event: ChangeEvent<HTMLInputElement>) => {
    setMyWriter(event.target.value);
  };
  const onChangeTitle = (event: ChangeEvent<HTMLInputElement>) => {
    setMyTitle(event.target.value);
  };
  const onChangeContents = (event: ChangeEvent<HTMLInputElement>) => {
    setMyContents(event.target.value);
  };
  const onChangePassword = (event: ChangeEvent<HTMLInputElement>) => {
    setMyPassword(event.target.value);
  };
  const onClickImage = () => {
    fileRef.current?.click();
  };
  const onChangeFile = async (event: ChangeEvent<HTMLInputElement>) => {
    const file = event.target.files?.[0];
    const isValid = checkFileValidation(file);
    if (!isValid) return;
    try {
      const result = await uploadFile({ variables: { file } });
      setImageUrl(result.data?.uploadFile.url);
    } catch (error: any) {
      alert(error.message);
    }
  };

  return (
    <>
      {/* <div>{data}</div> */}
      작성자: <input type="text" onChange={onChangeWriter} />
      <br />
      비밀번호: <input type="password" onChange={onChangePassword} />
      <br />
      제목: <input type="text" onChange={onChangeTitle} />
      <br />
      내용: <input type="text" onChange={onChangeContents} />
      <br />
      <div>이미지 업로드 연습하기</div>
      <div
        style={{ width: "50px", height: "50px", backgroundColor: "gray" }}
        onClick={onClickImage}
      >
        이미지 선택
      </div>
      <input
        style={{ display: "none" }}
        type="file"
        onChange={onChangeFile}
        ref={fileRef}
      />
      <img src={`https://storage.googleapis.com/${imageUrl}`} />
      <button onClick={callGraphqlApi}>GraphQL-API 요청하기</button>
    </>
  );
}
주의사항
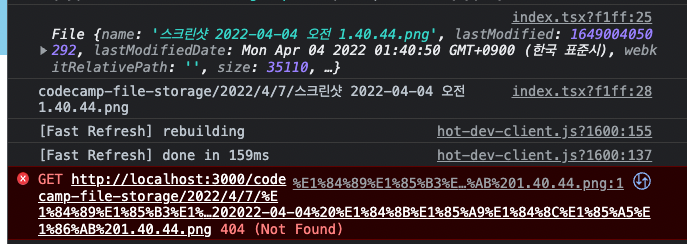
https://storage.googleapis.com를 url 앞에 추가해줘야 한다.
안 넣으면 이미지 파일의 주소가 이렇게 됨..

multiple을 쓰면 사진을 선택할 때 여러 개를 선택할 수 있다.