데이터는 앞에서 사용했던 와인데이터를 사용한다.
1. 데이터 불러오기
import pandas as pd
red_wine = pd.read_csv(red_url, sep=';')
white_wine = pd.read_csv(white_url, sep=';')

red_wine['color'] = 1
white_wine['color'] = 0

wine = pd.concat([red_wine, white_wine])
두 와인 데이터 모두 불러온 뒤
color 컬럼을 만들어 레드와인은 1, 화이트와인은 0 값울 주고, 하나로 합친다.
2. Pipeline 기본
앞서 했었던 와인 분류 모델은 아래와 같은 순서로 작동한다.
StandardScaler -> test_train_split -> Decision Tree여기서 test_train_split은 Pipeline 내부가 아니다..!!
이걸 pipline으로 한번에 만들 수 있다!
from sklearn.pipeline import Pipeline
from sklearn.tree import DecisionTreeClassifier
from sklearn.preprocessing import StandardScaler
estimators = [('scaler', StandardScaler()),
             ('clf', DecisionTreeClassifier())]

pipe = Pipeline(estimators)
pipe

각 단계는 리스트형으로 작성하고,
단계별 이름과 모듈은 다시 튜플로 입력해야 한다.
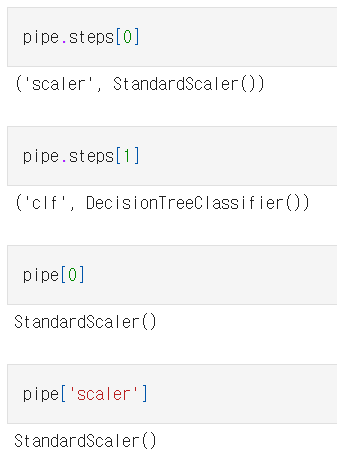
단계들은 객체로 호출 할수 있다.
3. Pipeline 파라미터 지정
pipeline에 있는 모든 단계의 파라미터를 지정할수 있다.
스탭이름 + 언더바 두개 + 속성이름 순서로 작성하면 된다!
pipe.set_params(clf__max_depth=2)
pipe.set_params(clf__random_state=13)

4. Pipeline 을 이용해 와인 분류 모델 만들기
from sklearn.model_selection import train_test_split
X_train, X_test, y_train, y_test = train_test_split(X, y, test_size=0.2, random_state=13, stratify=y)
위에서 말했듯, train_test_split은 pipeline 내부에 없으므로,
내가 해줘야 한다.
from sklearn.metrics import accuracy_score
pipe.fit(X_train, y_train)

y_pred_tr = pipe.predict(X_train)
y_pred_test = pipe.predict(X_test)

print('Train Acc : ', accuracy_score(y_train, y_pred_tr))
print('Test Acc : ', accuracy_score(y_test, y_pred_test))

위에서 만든 pipe를 train데이터로 .fit() 하기만 하면 된다.
앞서 따로 해서 귀찮(?) 았던 데이터 전처리 작업, Decision Tree 학습작업 을 한번에!!!
5. 모델 구조 알아보기
import matplotlib.pyplot as plt
import sklearn.tree as tree
plt.figure(figsize=(12, 8))
tree.plot_tree(pipe['clf'], feature_names=X.columns, filled=True);
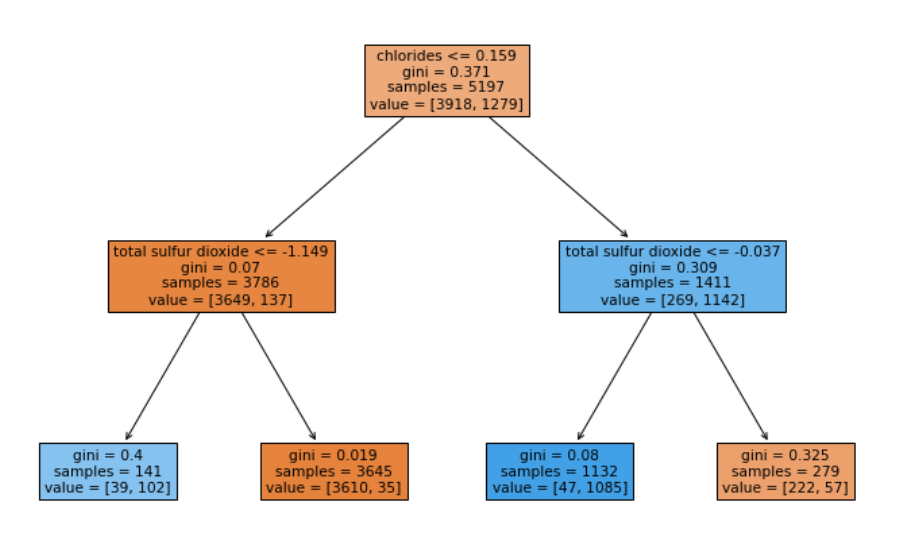
Decision Tree의 구조를 알고싶은 거니까 pipe['clf'] 로 입력하면 된다.
모든 단계는 객체로 호출할수 있으니까~!!!!!

데이터 분석으로 세상을 읽어보쟈 빠샤