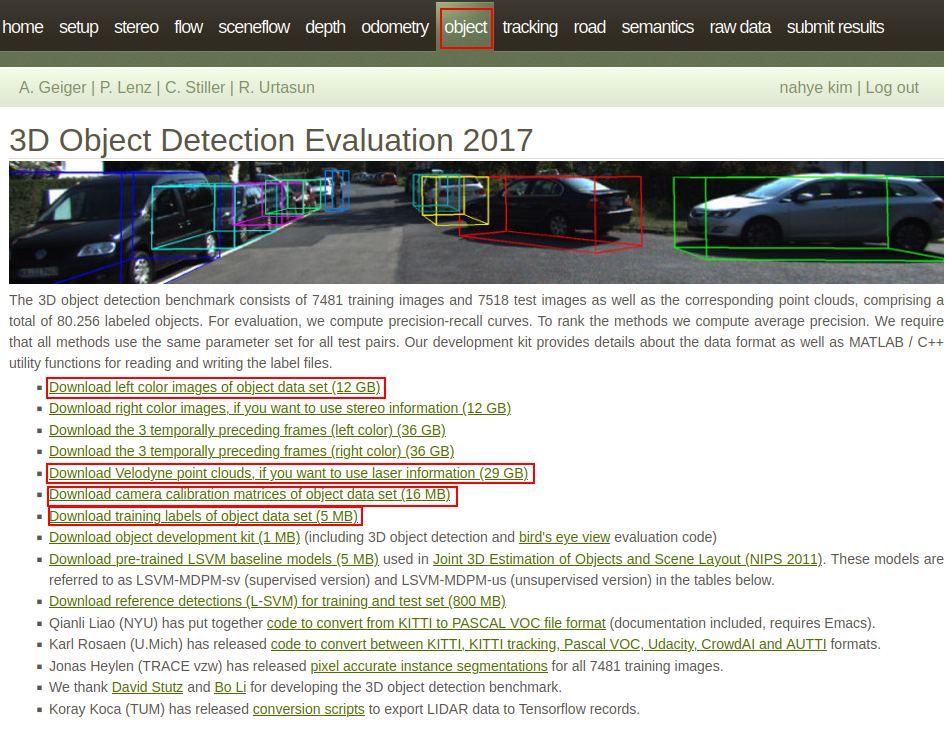
1. Dataset (KITTI)
- KITTI dataset을 사용한다 (KITTI homepage)
- KITTI > object > 3d object 에서 아래 3개를 다운받는다
- left color images of object data set (12 GB) : 2d 이미지 데이터
- Velodyne point clouds (29 GB) : 3d LiDAR 데이터
- training labels of object data set (5 MB) : 데이터 라벨링 값
- camera calibration matrices of object data set (16 MB) : 카메라 calibraion 정보
2. Object Detection 모델
2-1. 2D Object Detection (YOLO v7)
- yolov7 github
- 2D 이미지에서 객체를 인식하기 위해 yolo v7 모델을 사용한다
- yolo v7 모델도 다양한 버전이 있는데 기존 버전을 사용하기로 결정했다
- 실시간 FPS와 성능을 고려하여 선택하였다
2-2. 3D Object Detection (CenterPoint)
- centerpoint-kitti github
- LiDAR의 3D 데이터 즉, point cloud 에서 객체를 인식하기 위해 centerpoint 모델을 사용한다
- class : ['Car', 'Pedestrian', 'Cyclist'] 3종류
centerpoint.yaml모델,pv_rcnn.yaml모델 2종류로 각각 학습을 진행하였다- 결과를 확인할 때 해당 파일의 POST_PROCESSING > SCORE_THRESH 값을 바꿔주며 결과 이미지를 확인했다 (해당 부분이
3. KITTI format을 YOLO format으로 변환하기
KITTI format
- (class_type, truncated, occluded, alpha, bbox_xmin, bbox_ymin, bbox_xmax, bbox_ymax, dimension_height, dimension_width, dimension_length, location_x, location_y, location_z, rotation) 형식으로 되어 있다
- 예시
Car 0.00 0 -1.59 553.89 184.63 598.47 220.55 1.26 1.60 3.56 -1.39 1.73 27.81 -1.64
Car 0.00 0 -1.49 502.27 183.99 537.52 210.78 1.37 1.63 3.57 -4.95 2.00 39.72 -1.61
Car 0.00 0 2.52 837.66 190.04 921.14 223.55 1.38 1.35 3.30 11.95 2.18 32.11 2.87
Car 0.00 0 2.24 955.63 189.82 1046.94 226.08 1.59 1.73 4.02 18.79 2.44 34.70 2.73
Van 0.00 2 -1.61 560.17 165.84 585.44 198.47 2.26 1.64 5.20 -2.79 1.81 52.88 -1.66
DontCare -1 -1 -10 486.65 171.90 546.07 186.53 -1 -1 -1 -1000 -1000 -1000 -10
YOLO format
- (class_id, center_x, center_y, width, height) 형식으로 되어있다
- bounding box를 의미하는 center_x, center_y, width, height는 0 ~ 1 사이의 값으로 normalized 되어있다
- normalized는 이미지의 width, height로 나누어 수행한다
변환하기
- KITTI의 class_type, bbox 정보 4개만 가지고 와서 YOLO 형식으로 변환한다
- string으로 되어 있는 class_type을 int 형식으로 변환하고 bbox도 YOLO에 맞게 변환한다
def xyxy2xywh_np(bbox, img_width, img_height):
    min_x, min_y, max_x, max_y = np.array(bbox, dtype=np.float32)

    center_x = round((max_x + min_x) / 2,2)
    center_y = round((max_y + min_y) / 2,2)
    bbox_width = round(max_x - min_x,2)
    bbox_height = round(max_y - min_y,2)

    yolo_x = center_x / img_width
    yolo_y = center_y / img_height
    yolo_width = bbox_width / img_width
    yolo_height = bbox_height / img_height

    bbox = (yolo_x, yolo_y, yolo_width, yolo_height)

    return bbox

class convert2yolo():
    def __init__(self):
        self.label_dir = "./kitti_labels/val/"
        self.img_dir = "./images/"
        self.img_train_dir = self.img_dir + "val/"
        # self.img_valid_dir = self.img_dir + "valid/"
        self.output_dir = "./labels/val/"

        self.class_names = {
                        'Car' : 0,
                        'Van' : 1,
                        'Truck' : 2,
                        'Pedestrian' : 3,
                        'Person_sitting' : 4,
                        'Cyclist' : 5,
                        'Tram' : 6,
                        'Misc' : 7,
                        'DontCare' : 8
                    }

        self.label_dir_list = glob(self.label_dir + "/*")
        os.makedirs(self.output_dir, exist_ok=True)

    def save(self):
        for file in self.label_dir_list:
            img_path = file.split('/')[-1].split('.')[0]
            img_name = self.img_train_dir + img_path + ".png"
            img = cv2.imread(img_name, cv2.IMREAD_ANYCOLOR)
            img_width = img.shape[1]
            img_height = img.shape[0]

            yolo_file = open(self.output_dir + file.split("/")[-1],"w+")
            with open(file, 'r', encoding='UTF-8') as f:
                lines = f.readlines()
                for line in lines:
                    line = line.split(' ')
                    class_id = self.class_names[line[0]]
                    cx, cy, w, h = xyxy2xywh_np(line[4:8], img_width, img_height)
                    yolo_file.write(f"{class_id} {cx} {cy} {w} {h}\n")
            f.close()
            yolo_file.close()


if __name__ == "__main__":
    convert = convert2yolo()
    convert.save()
4. YOLO v7 학습하기
4-0. 프로젝트 환경
- AWS EC2 G5
- GPU 1, 24GB memory
- 용량 : 45GB
- ubuntu 18.04
- pytorch
4-1. yolo v7 다운 받기
$ https://github.com/WongKinYiu/yolov7.git4-2. docker container 생성
$ docker run -it --ipc=host --gpus all -v /home/ubuntu/yolov7/:/workspace/yolov7 -v /home/ubuntu/KITTI/:/workspace/KITTI -p 8888:8888 --name yolov7 nvcr.io/nvidia/pytorch:21.12-py3
4-3. dataset 구조 설정
📦KITTI
┣ 📂images
┃ ┣ 📂train
┃ ┣ 📂val
┃ ┗ 📂test
┣ 📂labels
┃ ┣ 📂train
┃ ┗ 📂val
┣ 📜train.txt : 전체 경로를 포함한 이미지 경로 리스트
┣ 📜val.txt
┗ 📜test.txt
- 이미지 경로 리스트 만드는 방법
# ls | while read file; do echo "$(pwd)/$file"; done > ../train.txt4-4. 환경 설정
- container 내부에 yolo v7을 위한 환경을 설정한다
# apt update
# apt install -y zip htop screen libgl1-mesa-glx

# pip install seaborn thop


# cd /yolov7
# pip install -r requirements.txt
4-5. 코드 수정
- coco.yaml 파일에서 경로, class 관련 내용 변경
train : /workspace/KITTI/train.txt
val : /workspace/KITTI/val.txt
test : /workspace/KITTI/test.txt

# number of classes
nc: 9

# class names
names: ['Car', 'Van', 'Truck', 'Pedestrian', 'Person_sitting', 'Cyclist', 'Tram', 'Misc', 'DontCare']- yolov7.yaml 파일에도 class 수 변경
- train.py 파일에서도 class 수와 관련된 내용 변경
4-6. train
- 아래의 명령어로 학습 시작!
python train.py --workers 8 --device 0 --batch-size 16 --data data/coco.yaml --img 640 640 --cfg cfg/training/yolov7.yaml --weights '' --name yolov7 --hyp data/hyp.scratch.p5.yamlmax_split_size_mb 에러
- gpu out of memory 에러가 발생했다
- 원래 batch-size가 32였는데 이를 16으로 줄이니까 해결되었다
4-7. inference
# python detect.py --weight ./runs/train/yolov7/weights/best.pt --conf 0.25 --img-size 640 --source /workspace/KITTI/images/test/000002.png5. Object Detection 결과
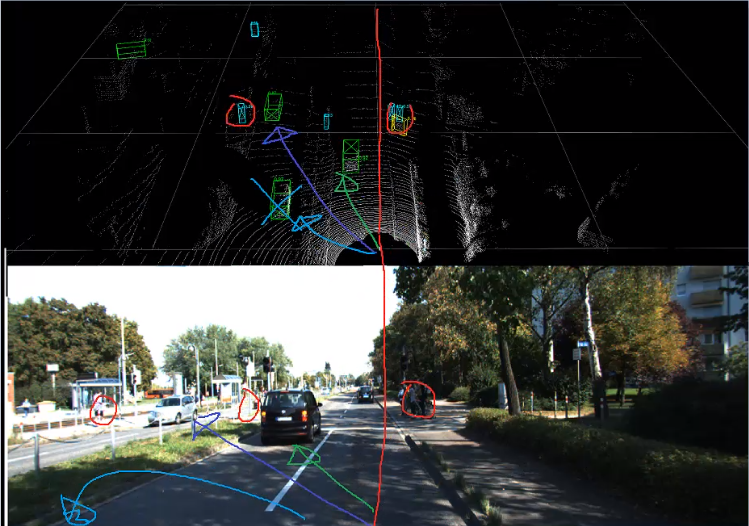
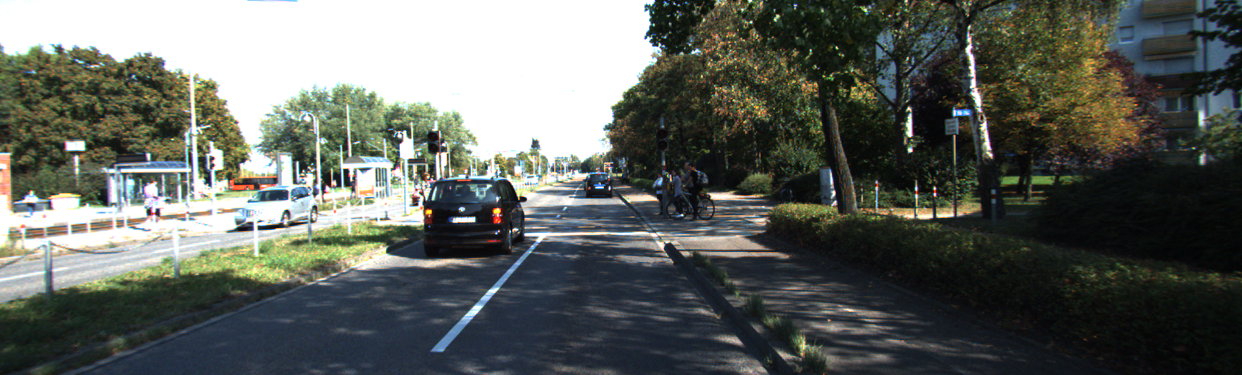
5-1. camera image 2D Object Detection
5-2. LiDAR cloud point 3D Object Detection
 |
|---|
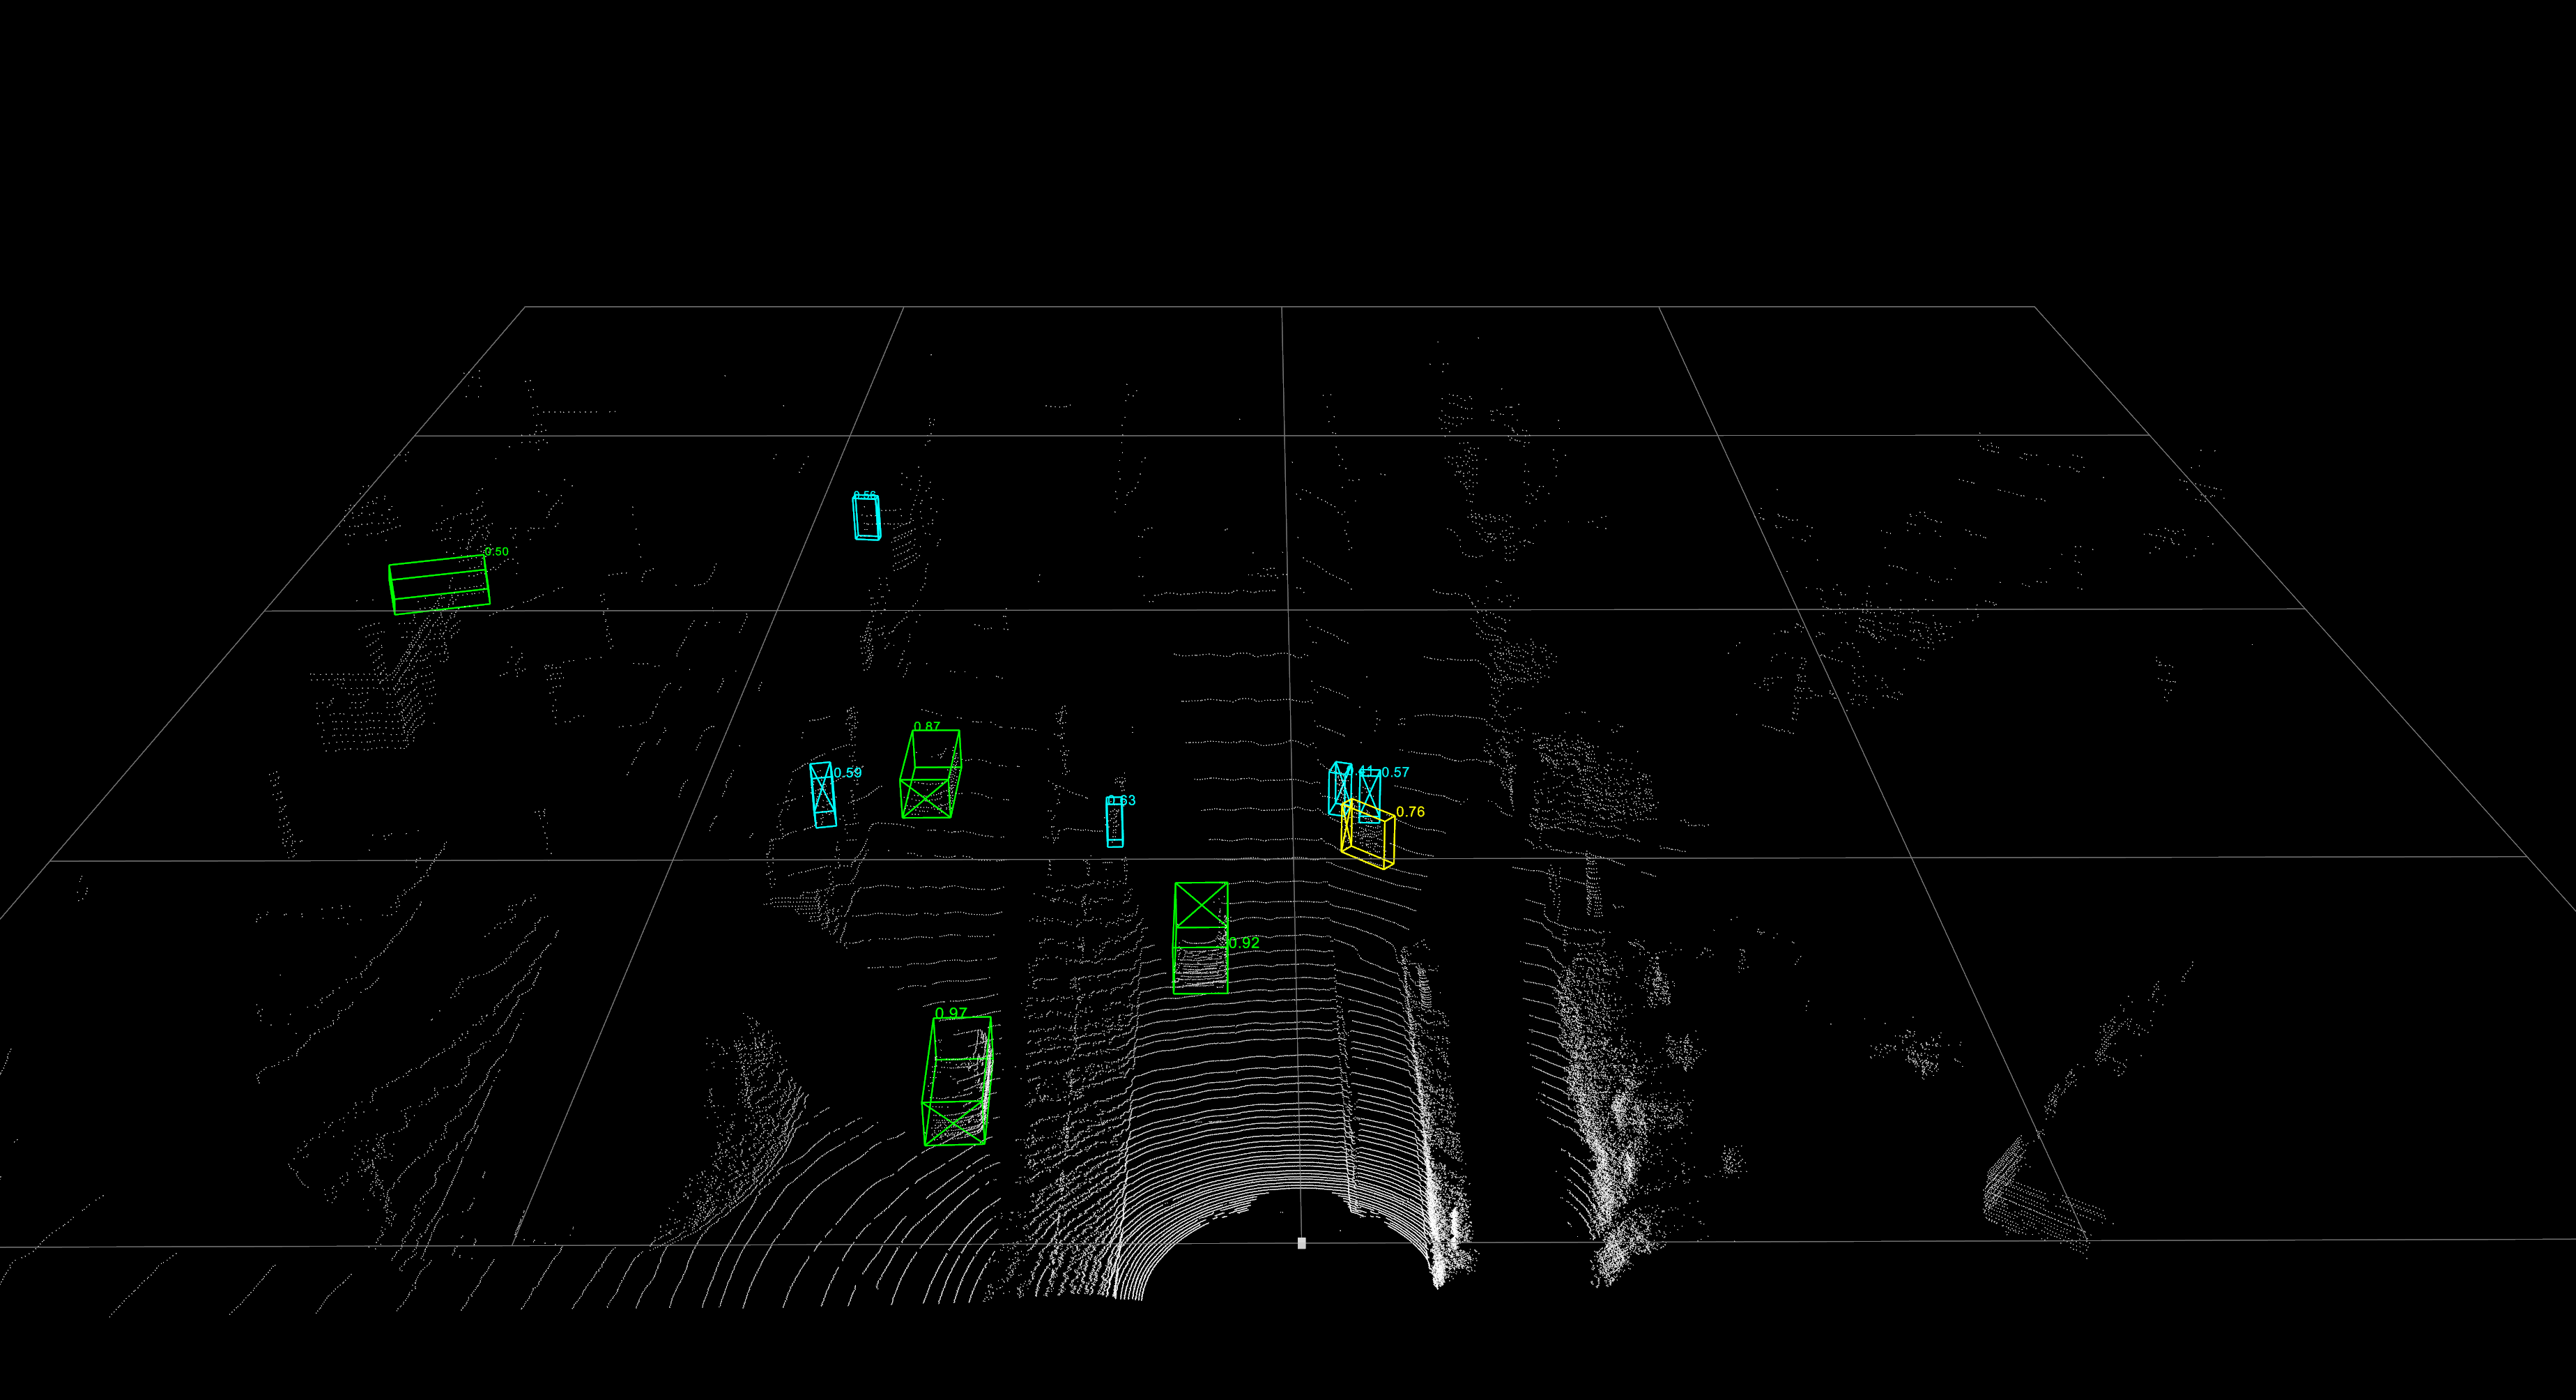 |
- threshold를 0.4로 설정
- 아래의 이미지는 2D 이미지와 매칭을 해보았다