
공부하면서 조금 모자르게 느꼇던 부분에 대해서 정리와 보충하고 1주일 간의 회고를 작성해 보려고 합니다.
<회고>
시간이 정말 빠른것 같다. 벌써 immersive코스가 1주일이 지났다. pre코스를 합쳐서 5주간 달려가는 중이다. 매일매일 열심히 해야지라는 생각을 가지고 임하지만 하루하루 만족스럽지 못할때 자책을 하게 된다. 공부량에 비해 마음이 많이 조급해 지는것 같기도 벌써부터 지친건가 싶기도 하다. 객관적으로 생각을 했을때 공부량은 더욱이 늘려야한다고 생각은 하는 중이다. pre코스와 비슷 아니면 더 적게 공부하는 1주일이 되었던거 같아... 이번주는 여러 실무에서 사용하는 것들 그리고 컴퓨터 공학의 꽃이라고 불리우는 자료구조를 배우게 되었다. 실무에서 적용하는 eslint, npm, nvm 등등 여러 것들을 배우고 직접 적용하는데에 있어서 생각보다 애를 먹었었다. 평소 조급한 내 성격 때문인지는 몰라도 천천히 급하지 않게 삽질을 하더라도 천천히 하는 습관을 길러야 할거 같다. 처음 배운 개념을 어느 누가 빠르게 적용 시킨단 말인가... 그리고 코드스테이츠에서 배운것 뿐만 아니라 개념에 대해 더 깊게 파야한다고 느낄때는 더 파고 들어야하는데 배운 것에서 그치는 내 모습이 보일때는 많이 아쉬운거 같다. 특히 이번주가 그랬던거 같아 회고가 길어 지는것 같기도 ㅎㅎ 천천히 그리고 꾸준히 달리는 내 모습을 봤으면 좋겠다 앞으로 꾸준히...
1. linked -list
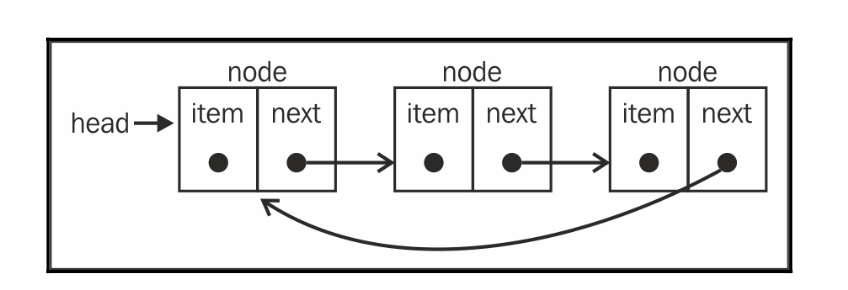
연결리스트에 대해 코드스테이츠에서 과제로 내준 부분과 연결리스트의 이중연결리스트, 원형 연결리스트등등을 추가로 더 작성해 보겠습니다. 코드스테이츠에서는 객체를 사용하여 노드를 구현하였습니다.
1) 단일 연결리스트
const LinkedList = function() {
  const list = {};
  // 가장 먼저 들어온 Node;
  list.head = null;
  // 마지막에 들어온 Node;
  list.tail = null;

  list.addToTail = function(value) {
    var newNode = new Node(value);
    if (list.tail) {
      list.tail.next = newNode;
      list.tail = newNode;
    } else {
      list.head = newNode;
      list.tail = newNode;
    }
  };

  list.removeHead = function() {
    if (!list.head) {
      return 'empty list';
    }
    var beforeHeadValue = list.head.value;
    list.head = list.head.next;
    return beforeHeadValue;
  };

  list.contains = function(target) {
    if (!list.head) {
      return false;
    }
    var temp = list.head;
    while (temp.value !== target) {
      temp = temp.next;
      if (!temp) {
        return false;
      }
    }
    return true;
  };

  return list;
};

const Node = function(value) {
  this.value = value;
  this.next = null;
};
단일 연결리스트의 삭제와 삽입을 머리 부분과 꼬리 부분에서 진행하는 코드입니다. 저번 시간에 작성한 psedo코드로 직접 구현을 하였데 contain-> 해당 타겟을 찾는 코드를 작성하는데에 있어서 while문 구현이 힘들었습니다.
위의 코드를 es6버전으로 구현하면서 조금 수정해 보겠습니다.
class Node{
  constructor(value){
    this.value = value;
    this.next = null;
  }
}

const LinkedList = function() {

  // head노드 생성
  constructor(){
    this.head = new Node("head") // head 노드 생성
  }

  // searching
  find(target){
    let curNode = this.head;
    while(curNode.value !== target){
      curNode = curNode.next;
    }
    return curNode;
  }
  // 삽입
  insert(newValue,target){
    let newNode = new Node(newValue);
    let currentNode = this.find(item);
    newNode.next = current.next;
    current.next = newNode;
  }
  //노드의 상황 보기
  display() {
    let curNode = this.head;
    while(!(curNode.next === null)){
      console.log(curNode.next.value);
      curNode = curNode.next;
    }
  }

  findPrevious(item){
    let curNode = this.head ;

    while(!(curNode.next === null) && (curNode.next.value !== item)){
      curNode = curNode.next;
    }
    return curNode;
  }
  // 해당 요소 삭제
  remove(item){
    let preNode = this.findPrevious(item);
    if(!(preNode.next === null)){
      preNode.next = preNode.next.next;
    }
  }
}
기본적으로 Node를 생성하고, 그 집합을 관리하는 linked-list를 생성합니다.
노드의 시작 부분을 head노드로 만들어줍니다.
find() 메소드는 head노드부터 차례로 해당 item을 검색해 찾으면 해당 노드를 리턴 해주는 메소드입니다.
insert() 메소드는 find()메소드로 찾은 노드 뒤에 새로운 노드를 연결 해줍니다.
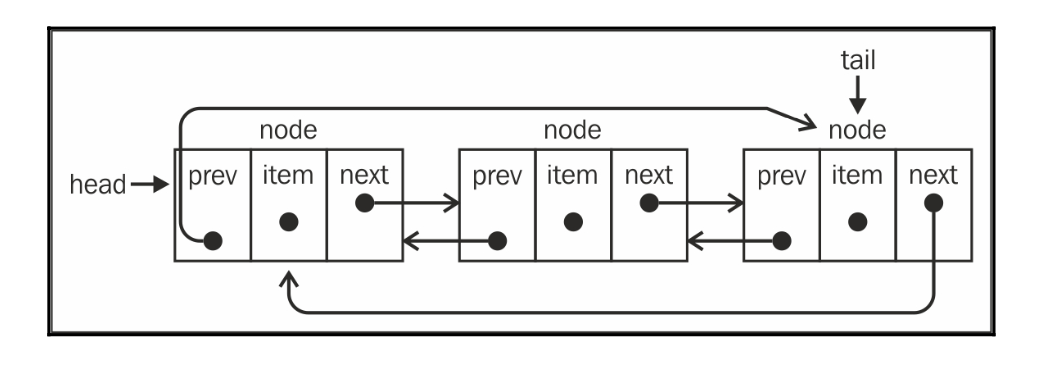
2) 이중 연결리스트
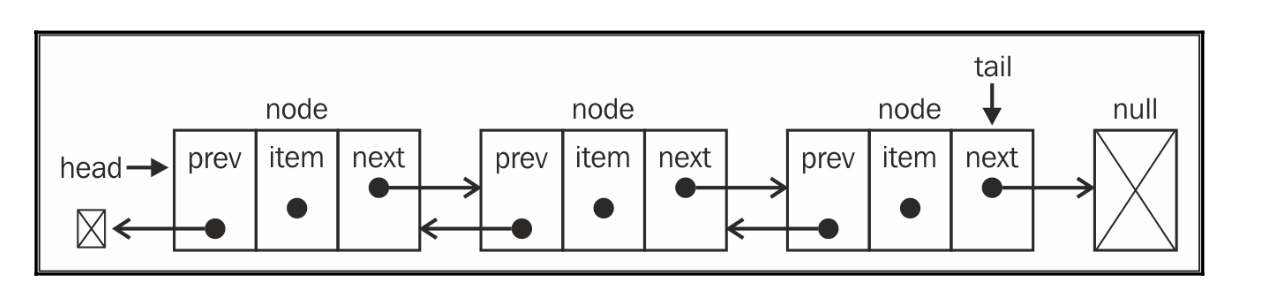
이중 연결리스트는 link가 노드에 두개가 존재하고 링크가 전 노드, 다음 노드를 가르킴으로서 하나의 노드애서 이전 노드, 다음 노드로 접근이 가능한 연결 리스트입니다.
Property
* element: 노드의 값

* next: 다음 노드를 가르키는 링크

* prev : 이전 노드를 가르키는 링크

* head : 연결리스트의 시작 노드

* tail : 연결리스트의 마지막 노드
이중 연결리스트 속성
function DoublyLinkedList() {
  // 노드 생성
  let Node = function(element){
    this.element = element;
    this.next = null;
    this.prev = null;
};

let length = 0;
let head = null;
let tail = null;
}
이중 연결리스트의 삽입 알고리즘
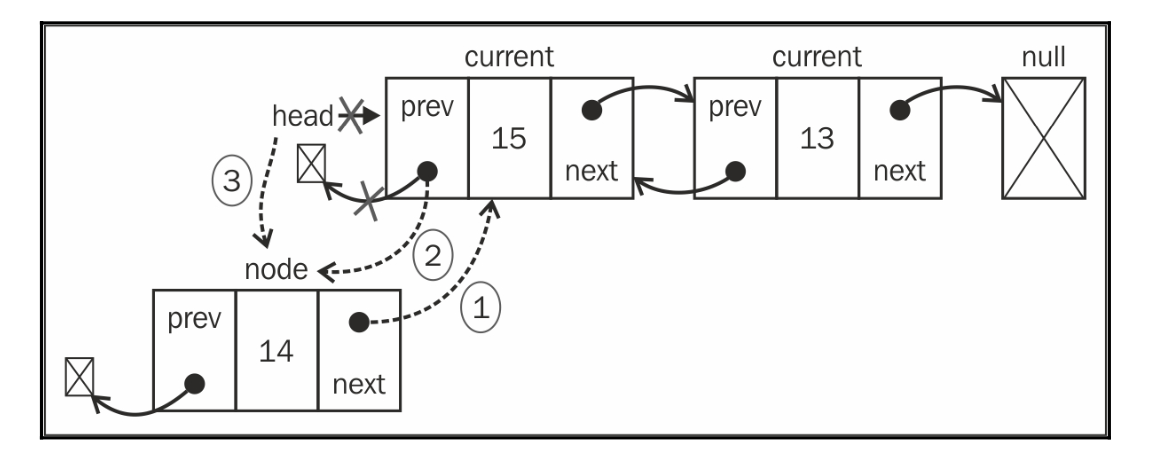
이중 연결리스트의 첫번째 노드 (head) 삽입 그림입니다.
이중 연결리스트의 마지막 노드(tail) 삽입 그림입니다.

이중 연결리스트 중간 노드 삽입 그림입니다.
this.insert = function(position, element){
//check for out-of-bounds values
if (position >= 0 && position <= length){
let node = new Node(element), current = head,previous,index = 0;
if (position === 0){ //add on first position
if (!head){ //NEW {1} head = node;
tail = node;
} else {
node.next = current; current.prev = node; //NEW {2} head = node;
}
} else if (position === length) { //last item //NEW
current = tail; // {3} current.next = node; node.prev = current;
tail = node;
}
else { while (index++ < position){ //{4}
previous = current;
current = current.next; }
node.next = current; //{5} previous.next = node;
current.prev = node; //NEW
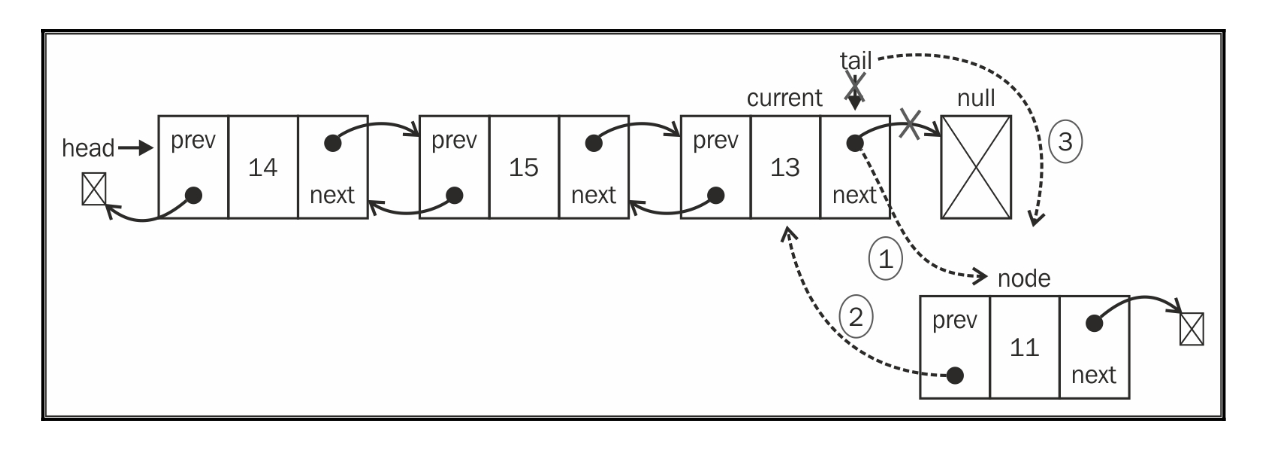
node.prev = previous; //NEW }이중 연결리스트의 삭제를 구현 하기 위한 알고리즘입니다. 차차 알고리즘을 통한 구현을 해보겠습니다.
이중 연결리스트 삭제

이중 연결리스트의 첫번째 노드 head 삭제

이중 연결리스트의 마지막 노드 tail 삭제
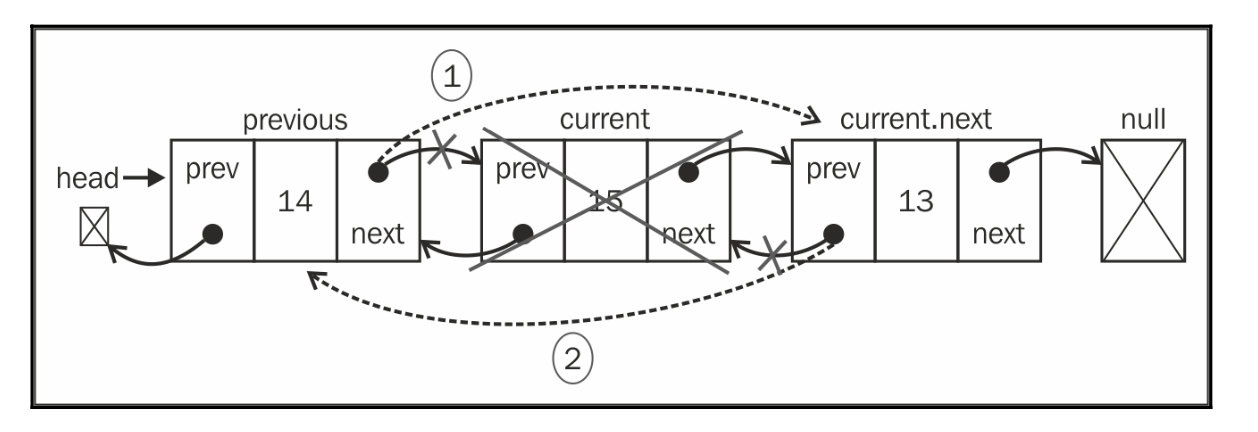
이중 연결리스트의 중간 노드 삭제
이중연결리스트 삭제 알고리즘
this.removeAt = function(position){
//look for out-of-bounds values
if (position > -1 && position < length){
let current = head, previous,
index = 0;
//removing first item if (position === 0){
head = current.next; // {1}

//if there is only one item, update tail //NEW if (length === 1){ // {2}
tail = null; }
  else {
head.prev = null; // {3} }
} else if (position === length-1){ //last item //NEW
current = tail; // {4} tail = current.prev; tail.next = null;
       }
 else {
   while (index++ < position){ // {5}
previous = current;
current = current.next; }
//link previous with current's next - skip it previous.next = current.next; // {6} current.next.prev = previous; //NEW
} length--;

  return current.element;
     } else {
       return null;
} };
3) 원형 연결리스트
원형 연결리스트는 마지막 노드인 tail의 링크 값을 head의 값으로 연결 해준 것 입니다.
아래 그림은 원형 이중 연결리스트의 그림입니다.
2. stack
저번 포스팅에서의 설명은 생략하고 과제에서 사용 했던 코드를 가져와 리뷰 하겠습니다.

화이팅입니다.