Albumentation
Input Image를 입력받아 Augmentation기법을 적용하는 경우가 있다.
Model의 train dataset에 대한 Overfitting을 방지하기위해 적용하게 되는데 이를 지원하는 Image Augmentation Library다.
다른 Image Library에 비해 빠르다는 장점이 있다.
다음 Image로 공부해보겠다.
HorizontalFlip/VerticalFlip
HorizontalFlip, VerticalFlip 각각의 객체는 좌우, 상하 반전을 시켜준다.
'p'라는 Parameter가 존재하는 데 이는 확률을 뜻한다.(0.0~1.0)
우선 다음 함수(show_grid_image)로 앞으로 볼 Image를 출력하겠다.
import matplotlib.pyplot as plt
import cv2
%matplotlib inline

# albumeatation을 적용한 Image 4개 보여주는 함수
def show_grid_image(org_image, nrows=1, ncols=4, augmentor=None, title=None):
    figure, axs = plt.subplots(figsize=(8,8), nrows=nrows, ncols=ncols)
    for c in range(ncols):
        alb_image = augmentor(image=org_image)['image']
        axs[c].imshow(alb_image)
        axs[c].axis('off')
        axs[c].set_title(title)
먼저, 좌우반전(HorizontalFlip)을 적용한 Albumentation을 이용.
import albumentations as A

# 좌우반전하는 Albumentation(50%확률)
test_albumentation = A.HorizontalFlip(p=0.5)

# 특정 Image에 Albumentation을 적용할 때 'image=' 형식으로 입력받아야한다.
# 딕셔너리 형태로 반환하기 때문에 ['image']로 지정해주어야 한다.
alb_image = test_albumentation(image=org_image)['image']

show_grid_image(org_image, augmentor=test_albumentation, title='HorizontalFlip')
output

다음은 상하반전(VerticalFlip)을 적용한 Albumentation을 이용.
# 상하반전하는 Albumentation(50%확률)
test_albumentation = A.VerticalFlip(p=0.5)

show_grid_image(org_image, augmentor=test_albumentation, title='VerticalFlip')
output

Rotate/RandomRotate90
Rotate, RandomRotate90은 Image를 회전시켜준다.
- Rotate : 임의로 Image를 한계(limit)까지 회전시켜줌.
- RandomRotate90 : 90도 간격(90,180,270)으로 회전시켜줌.
다음은 Rotate Albumentation이다.
# 회전하는 Albumentation(50%확률) : 임의 각도로 회전
# limit : 최대 n까지의 각도만 돌릴 수 있음(-n ~ n)
# border_mode : 빈 공간은 지정된 방식으로 채우는 param
test_albumentation = A.Rotate(limit=90, p=0.5, border_mode=cv2.BORDER_REPLICATE)

show_grid_image(org_image, augmentor=test_albumentation, title='Rotate')
output

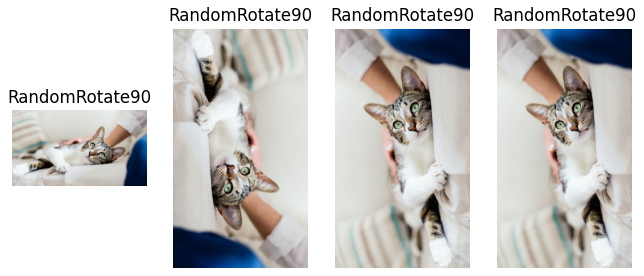
다음은 RandomRotate90 Albumentation이다.
# 임의 90도 간격으로 회전시키는 Albumentation(확률 100%)
test_albumentation = A.RandomRotate90(p=1)

show_grid_image(org_image, augmentor=test_albumentation, title='RandomRotate90')
output
ShiftScaleRotate
ShiftScaleRotate는 shift/scale(zoom)/rotate를 적용할 수 있는 Augmentation이다.
각각의 Param shift_limit, scale_limit, rotate_limit을 이용해서 조절할 수 있다.
- shift_limit : 좌우 움직임(shift)을 조절하는 Param
- scale_limit : Zoom(Scale)을 조절하는 Param
- rotate_limit : 회전(Rotate)을 조절하는 Param
우선 Scale만 적용되는 Albumentation이다.
# Scale만 적용되는 Albumentation
test_albumentation = A.ShiftScaleRotate(shift_limit=0, scale_limit=(0.5, 1.0), rotate_limit=0, p=0.5)

show_grid_image(org_image, augmentor=test_albumentation, title='ShiftScaleRotate')
output

다음은 Shift만 적용되는 Albumentation이다.
비는 부분은 Near이미지로 채웠다.
# Shift만 적용되는 Albumentation
# 비는 부분은 Near이미지로 채우기
test_albumentation = A.ShiftScaleRotate(shift_limit=(0.2, 0.1), scale_limit=0, rotate_limit=0, p=0.5)

show_grid_image(org_image, augmentor=test_albumentation, title='ShiftScaleRotate')
output

Shift Augmentation으로 인해 Image에 빈 공간이 생길 수 있다.
이 부분을 검정색으로 Fill해보겠다.
# 비는 부분은 검은색으로 채우기
test_albumentation = A.ShiftScaleRotate(shift_limit=(0.2, 0.1), scale_limit=0, rotate_limit=0, border_mode=cv2.BORDER_CONSTANT, p=0.5)

show_grid_image(org_image, augmentor=test_albumentation, title='ShiftScaleRotate')
output

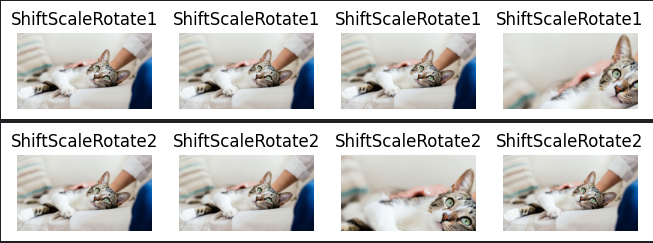
또한 ShiftScaleRotate는 shift/scale/rotate를 한번에 적용할 수 있다.
# shift/scale/rotate 모두 적용한 Albumentation
test_albumentation = A.ShiftScaleRotate(shift_limit=(0.2, 0.1), scale_limit=(0.5, 1.0), rotate_limit=90, p=0.5)

show_grid_image(org_image, augmentor=test_albumentation, title='ShiftScaleRotate1')
show_grid_image(org_image, augmentor=test_albumentation, title='ShiftScaleRotate2')
output
Compose()
지금까지 적용한 Augmentation 기법들은 Compose()를 이용하여 한번에 적용할 수 있다.
마치.. 혼합(compose)한다는 느낌..?
# Compose()를 이용하여 Augmentation 연속 적용
# 여기서는 상하/좌우 반전 Albumentation
Compose_test_albumentation = A.Compose([
    A.HorizontalFlip(p=0.5),
    A.VerticalFlip(p=0.5)
    ])

show_grid_image(org_image, augmentor=test_albumentation, title='Compose1')
output

Crop/CenterCrop/RandomCrop/RandomResizedCrop
이 4가지 객체는 Image의 특정부분을 잘라준다.
Crop이라는 이름에서도 유추할 수 있다.
Image를 자르고 resize를 해줘야한다. Model은 같은 Image Size를 Input Data로 사용하니까.
resize는 RandomResizedCrop만 해준다.
resize가 자동으로 안되는 객체를 사용할 때는 Compose에서 Resize해줘야한다.
- Crop : (x_min ~ x_max, y_min ~ y_max)부분을 잘라준다. (No Resized)
- CenterCrop : 중심으로부터 height/width만큼 잘라준다. (No Resized)
- RandomCrop : height/width만큼 랜덤부분을 잘라준다. (No Resized)
- RandomResizedCrop : scale만큼 랜덤부분을 잘라준 후 height/width로 resize해준다.(Resized)
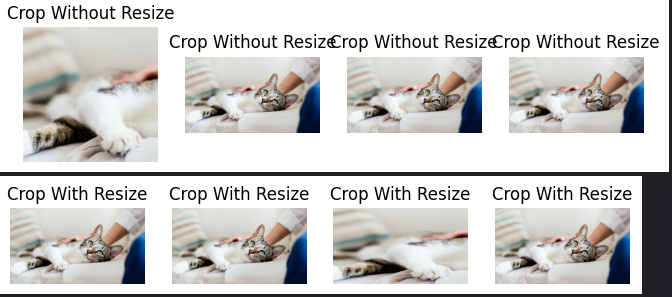
다음은 Crop Albumentation의 resize 적용유무에 따른 코드/결과이다.
# Crop적용한 Albumentation
# Crop만 적용하면 resize하지 않으므로 Compose에서 resize해줘야함.

# resize 적용하지 않은 Crop Albumentation
test_albumentation = A.Crop(x_min=100, y_min=100, x_max=500, y_max=500, p=0.5)

show_grid_image(org_image, augmentor=test_albumentation, title='Crop Without Resize')

# resize 적용한 Crop Albumentation
test_albumentation = A.Compose([A.Crop(x_min=100, y_min=100, x_max=500, y_max=500, p=0.5),
                               A.Resize(578,1028)])

show_grid_image(org_image, augmentor=test_albumentation, title='Crop With Resize')
output
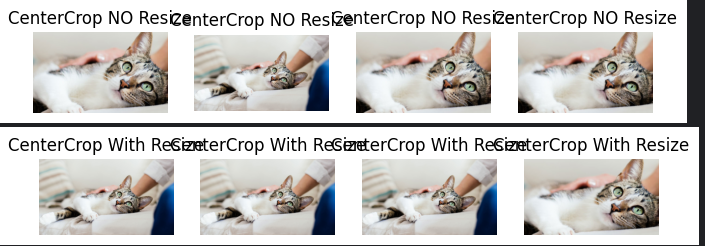
다음은 CenterCrop Albumentation의 resize 적용유무에 따른 코드/결과이다.
# CenterCrop적용한 Albumentation
# CenterCrop만 적용하면 resize하지 않으므로 Compose에서 resize해줘야함.

# resize 적용하지 않은 CenterCrop Albumentation
test_albumentation = A.CenterCrop(height=300, width=500, p=0.5)

show_grid_image(org_image, augmentor=test_albumentation, title='CenterCrop NO Resize')

# resize 적용한 CenterCrop Albumentation
test_albumentation = A.Compose([A.CenterCrop(height=300, width=500, p=0.5),
                               A.Resize(578,1028)])

show_grid_image(org_image, augmentor=test_albumentation, title='CenterCrop With Resize')
output
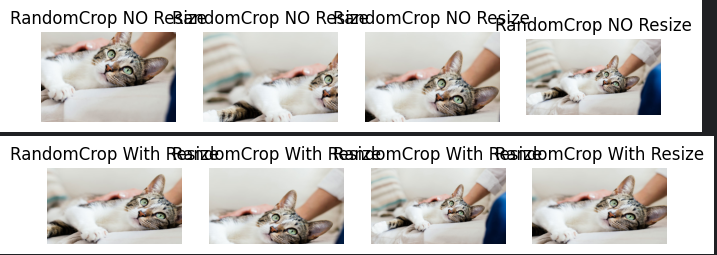
다음은 RandomCrop Albumentation의 resize 적용유무에 따른 코드/결과이다.
# RandomCrop적용한 Albumentation
# RandomCrop만 적용하면 resize하지 않으므로 Compose에서 resize해줘야함.

# resize 적용하지 않은 RandomCrop Albumentation
test_albumentation = A.RandomCrop(height=400, width=600, p=0.5)

show_grid_image(org_image, augmentor=test_albumentation, title='RandomCrop NO Resize')

# resize 적용한 RandomCrop Albumentation
test_albumentation = A.Compose([A.RandomCrop(height=400, width=600, p=0.5),
                               A.Resize(578,1028)])

show_grid_image(org_image, augmentor=test_albumentation, title='RandomCrop With Resize')
output
마지막으로 RandomResizeCrop Albumentation이다. 자동 resize가 되므로 따로 살펴볼 필요가 없다. (살펴볼 수도 없다.)
# RandomResizedCrop적용한 Albumentation
# 어떤 영역을 자르는지는 모름
# Resize해줌

test_albumentation = A.RandomResizedCrop(height=579, width=1028, scale=(0.5, 0.7), p=0.5)

show_grid_image(org_image, augmentor=test_albumentation, title='RandomResizedCrop')
output

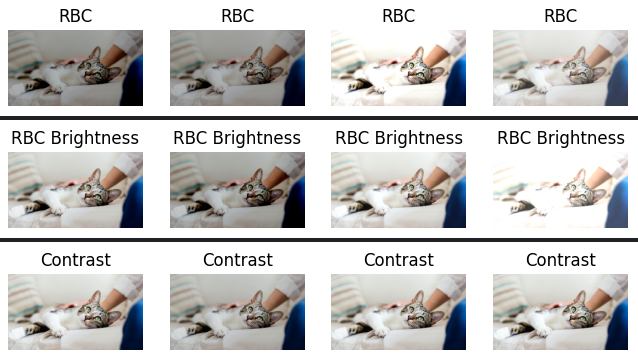
RandomBrightnessContrast
RandomBrightnessContrast객체는 밝기와 대비를 둘다 컨트롤할 수 있는 객체다.
- brightness_limit : 밝기 조절
- contrast_limit : 대비 조절
다음은 각각 (bright/contrast), bright, contrast를 차례대로 적용한 코드/결과다.
# RandomBrightnessContrast 적용한 Albumentation
test_albumentation = A.RandomBrightnessContrast(brightness_limit=(-0.3, 0.3), contrast_limit=(-0.3, 0.3), p=0.5)

show_grid_image(org_image, augmentor=test_albumentation, title='RBC')

# 대비 고정(밝기만 변경)
test_albumentation = A.RandomBrightnessContrast(brightness_limit=(-0.3, 0.3), contrast_limit=0, p=0.5)

show_grid_image(org_image, augmentor=test_albumentation, title='RBC Brightness')

# 밝기 고정(대비만 변경)
test_albumentation = A.RandomBrightnessContrast(brightness_limit=0, contrast_limit=(-0.3, 0.3), p=0.5)

show_grid_image(org_image, augmentor=test_albumentation, title='Contrast')
output
RGBShift
RGBShift객체는 말그대로 RGB값을 특정 범위에서 임으로 변경해준다.
- r_shift_limit : R 변경
- g_shift_limit : G 변경
- b_shift_limit : B 변경
# RGBShift적용한 Albumentation
test_albumentation = A.RGBShift(r_shift_limit=(-20, 20), g_shift_limit=(-20, 20), b_shift_limit=(-20, 20),p=0.5)

show_grid_image(org_image, augmentor=test_albumentation, title='RGBShift')
output

ChannelShuffle
ChannelShuffle객체는 RGB채널축을 임의로 변경해준다.
코드로 살펴보자.
# ChannelShuffle적용한 Albumentation
test_albumentation = A.ChannelShuffle(p=0.5)

show_grid_image(org_image, augmentor=test_albumentation, title='ChannelShuffle')
output

ColorJitter
ColorJitter는 밝기, 대비, 채도, 색상을 임의값으로 변경해준다.
- brightness : 밝기 조정
- contrast : 대비 조정
- saturation : 채도 조정
- hue : 색상 조정
다음은 default값을 구지구지 Parameter로 넣어준 코드/결과이다.
왜냐면 내가 까먹을 것 같아서..
# ColorJitter적용한 Albumentation(default값으로 구현)
test_albumentation = A.ColorJitter(brightness=0.2,
                                  contrast=0.2,
                                  saturation=0.2,
                                  hue=0.2,
                                  p=0.5)

show_grid_image(org_image, augmentor=test_albumentation, title='ColorJitter')
output

GaussNoise
GaussNoise객체는 Gaussian분포를 가지는 Noise를 원본 이미지에 추가해준다.
var_limit으로 정해준다.
# Gaussian Noise적용한 Albumentation
test_albumentation = A.GaussNoise(var_limit=(0, 100), p=1)

show_grid_image(org_image, augmentor=test_albumentation, title='GaussNoise')
ouput

잘 보일진 모르겠지만 노이즈가 낀걸 볼 수 있다.
Cutout/CoarseDropout
Cutout/CoarseDropout객체를 이용하면 임의의 noise hole을 Image에 추가할 수 있다.
둘의 차이는? hole이 정사각형 noise이냐 직사각형 noise이냐로 나뉜다.
- Cutout : 정사각형
- CoarseDropout : 직사각형
다음 코드/결과로 살펴보자.
# CoarseDropout적용한 Albumentation
test_albumentation = A.CoarseDropout(max_holes=25, p=0.5)

show_grid_image(org_image, augmentor=test_albumentation, title='CoarseDropout')
output

왜인진 모르겠는데 Cutout이 안된다..ㅠㅠ 아무튼 Cutout도 CoarseDropout과 사용법은 같다.
CLAHE
CLAHE객체는 원본 IMAGE보다 명암대비가 선명한 IMAGE를 만들어준다.
# CLAHE적용한 Albumentation(default값으로 설정)
test_albumentation = A.CLAHE(clip_limit=4.0, p=0.5)

show_grid_image(org_image, augmentor=test_albumentation, title='CLAHE')
output

Blur/GaussianBlur
Blur/GaussianBlur는 Image에 Blur처리를 해준다.
kernel값을 생성하여 Blur처리를 해준다.
GaussianBlur는 Gaussian함수를 통해 값을 생성한다. blur_limit값이 클수록 Image가 더 흐려진다.
GaussianBlur의 경우 kernelsize는 홀수가 되어야한다.(blur_limt)
# Blur적용한 Albumentation
test_albumentation = A.Blur(blur_limit=8, p=0.5)

show_grid_image(org_image, augmentor=test_albumentation, title='Blur')

#GaussianBlur적용한 Albumentation
test_albumentation = A.GaussianBlur(blur_limit=9, p=0.5)

show_grid_image(org_image, augmentor=test_albumentation, title='GaussianBlur')
output

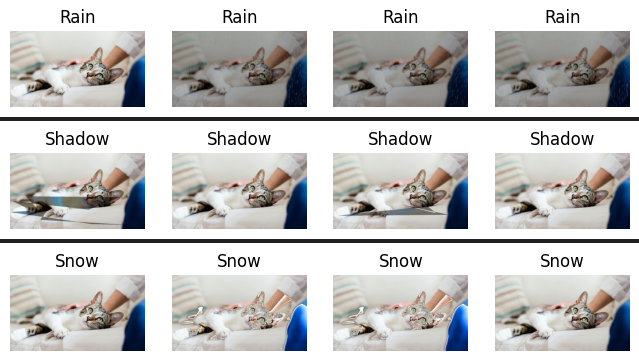
날씨 효과 Noise(RandomRain/RandomShadow/RandomSnow)
RandomRain/RandomShadow/RandomSnow는 각각 비,그림자,눈 효과를 Image에 준다.
# Rain적용한 Albumentation
test_albumentation = A.RandomRain(p=0.5)
show_grid_image(org_image, augmentor=test_albumentation, title='Rain')

# Shadow적용한 Albumentation
test_albumentation = A.RandomShadow(p=0.5)
show_grid_image(org_image, augmentor=test_albumentation, title='Shadow')

# Snow적용한 Albumentation
test_albumentation = A.RandomSnow(p=0.5)
show_grid_image(org_image, augmentor=test_albumentation, title='Snow')
output
끝! 아무튼 끝 힘들어. 그만 끝! ~~
이거 정리하느라 고생 많았다 내 자신!
출처
