Object Detection
- 다중 처리
- label 분류 > 위치값 Bounding-box (BBOX)
- 이미지에 대한 정답을 만들어 주는 작업 annotion
- bbox위에 퍼센트: confidence(신뢰도)
- Overlap problem : 한물체에 여러 BBox생기는 문제 > confidence가 제일 높은것 추출(CNN)
DETR(Detection Transformer) 모델
- Transformer 기반의 object detection 모델
- 장점
- 기존의 object detection 모델들보다 단순한 구조, 복잡한 후처리 과정(NMS) 개선
- 높은 정확도
- 개요(구조) : 특성 추출(CNN 이용) → Transformer encoder → Transformer decoder → class label, bounding box 좌표 예측
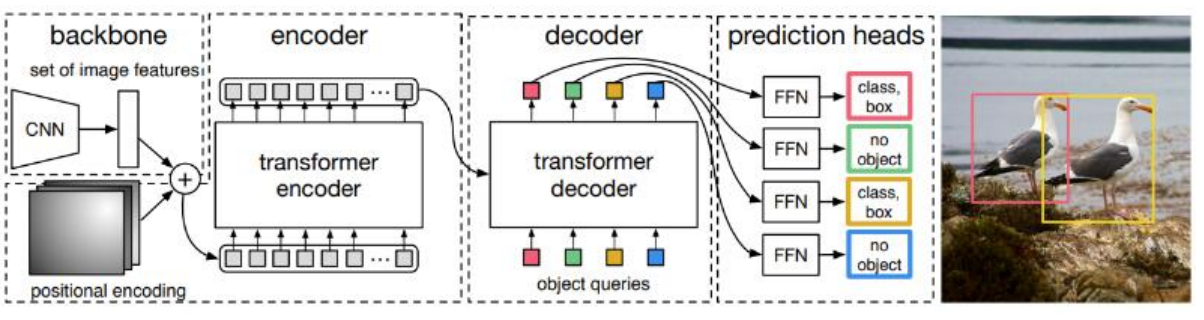
- CNN(ResNet) 기반 backbone : 이미지의 특징(feature map) 추출
- Encoder : feature map(772048)을 받아 위치 정보 학습
- Pooling 연산을 통해 각 local 위치 정보 생성
- Transformer의 입력으로 전달되기 전에, local feature map은 1차원 배열로 변환됨 (각 패치가 하나의 토큰처럼 처리)
- Transformer의 Self-attention을 통해 전체 위치 정보 학습 (전역적 상호작용)
- Decoder : Encoder의 출력과 미리정의된 query vector를 입력으로 받아 object의 class와 Bounding Box의 좌표 예측
- Query Vector 생성 : 이미지 내 object detection을 위한 100개의 고정된 query vector 사용 > 학습 과정에서 object와의 상관관계를 학습하며, 각 쿼리는 하나의 object를 예측함
- Encoder에 전역적 특징과 query vector를 사용하여 Self-attention 적용
- Cross-Attention(Encoder-Decoder 상호작용)
- Encoder에서 출력된 feature map과 query vector를 통해 이미지 정보 추출함 > 각 query는 각 object에 대응하는 특성 학습
- 각 query vector에 대해 Bounding box 및 Object Class 예측 > 예측된 Bounding box는 (cx, cy, w, h) 형식으로 중심 좌표와 너비, 높이를 포함함
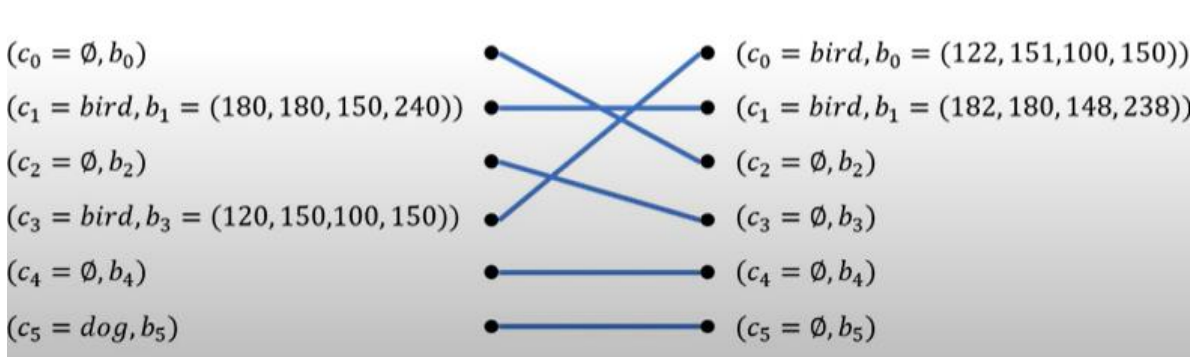
- Hungarian algorithm (bipartite matching) : 모델의 예측과 실제 정답을 최소의 손실로 연결
- 이분 매칭(bipartite matching) : 모델의 예측과 실제 정답을 최소의 손실로 연결
- 학습의 과정( 0,2,4 > 배경 분류 / 1,3 > 물체 분류 / 5 > 오분류)
(이 시리즈의 모든 코드는 코랩환경에서 Python으로 작성하였습니다)
DETR(Detection Transformer) Code 1 (이미지 데이터 및 모델 불러오기)
# 필요한 라이브러리 설치
!pip install supervision- pip supervision : bbox를 생성해주는 라이브러리
# 필요한 라이브러리, 함수 임폴트
import torch
from transformers import DetrImageProcessor, DetrForObjectDetection
from PIL import Image
import matplotlib.pyplot as plt
# 이미지 읽기
# 이미지 경로 설정
file_path='/content/drive/MyDrive/CV/vit_test.jpg'
# 이미지 읽기
img = Image.open(file_path).convert('RGB')
# 이미지 확인(출력)
plt.imshow(img)
plt.axis('off')
plt.show()# 사전 학습된 이미지 전처리 모델과 object detection
model_name="facebook/detr-resnet-101"
processor = DetrImageProcessor.from_pretrained(model_name, revision="no_timm")
model = DetrForObjectDetection.from_pretrained(model_name, revision="no_timm")
print(processor)
print(model)- pytorch : facebook에서 만듬
- timm : pytorch에서 제공하는 이미지 처리 모델
DETR(Detection Transformer) Code 2 (모델 사용)
# object detection

# 필요한 라이브러리 임폴트
import supervision as sv

# 이미지 전처리
inputs = processor(images=img, return_tensors='pt')
print(f'이미지 전처리의 결과 : \n{inputs}')

print('-'*80)

# 모델 출력 : class 분류, bbox의 위치 예측 좌표
outputs = model(**inputs)
print(f'모델 출력 : \n{outputs}')

print('-'*80)

# class 예측의 값(softmax 통과 전)
logits = outputs.logits
print(f'class 예측 값의 모양 : {logits.shape}')

print('-'*80)

# bbox의 위치 예측 좌표
boxes = outputs.pred_boxes
print(f'bbox 예측 좌표 값의 모양 : {boxes.shape}')

print('-'*80)

# 이미지 --> pytorch tensor 변환 --> 입력 이미지의 크기 순서 변경
target_size = torch.tensor([img.size[::-1]])

# 모델 출력에 대한 후처리
results = processor.post_process_object_detection(outputs, threshold=0.5, target_sizes=target_size)[0]
print(f'모델 출력에 대한 후처리의 결과 : \n{results}')

print('-'*80)

# 후처리 결과 --> supervision에서 사용할 수 있는 형태로 변환
detections = sv.Detections.from_transformers(results)
print(f'supervision에서 사용할 수 있는 형태로 변환 결과 : \n{detections}')

print('-'*80)

# 모델의 예측 레이블 : 정수 --> 문자열
labels = []
for class_id in detections.class_id:
    label = model.config.id2label[class_id]
    labels.append(label)
print(f'모델의 예측 레이블 : {labels}')
DETR(Detection Transformer) Code 3 (결과 확인)
# 이미지 복사
annotated_img = img.copy()

# 이미지에 bounding box 표시
annotated_img = sv.BoxAnnotator().annotate(annotated_img, detections)

# 이미지 정답 레이블 표시
annotated_img = sv.LabelAnnotator().annotate(annotated_img, detections, labels=labels)

# 이미지 출력
plt.imshow(annotated_img)
plt.axis('off')
plt.show()
# 보충 : 다운로드 받은 object detection 모델에 내장되어 있는 정답 사전(dict)
print(model.config.id2label)참고 자료

AI & Robotics