ViT(Vison Transformer)
- 모델 개요
- 2020년에 발표된 모델(논문: An Image is Worth 16x16 Words: Transformers for Image Recognition at Scale)
- 자연어 처리(NLP)에서 사용되는 Transformer를 이미지 분류에 적용
- 핵심 : Convolution 연산을 Self-Attention으로 대체
- ViT 기본 개념
- Transformer는 원래 NLP에서 문장을 토큰 단위로 나눠 시퀀스를 처리함
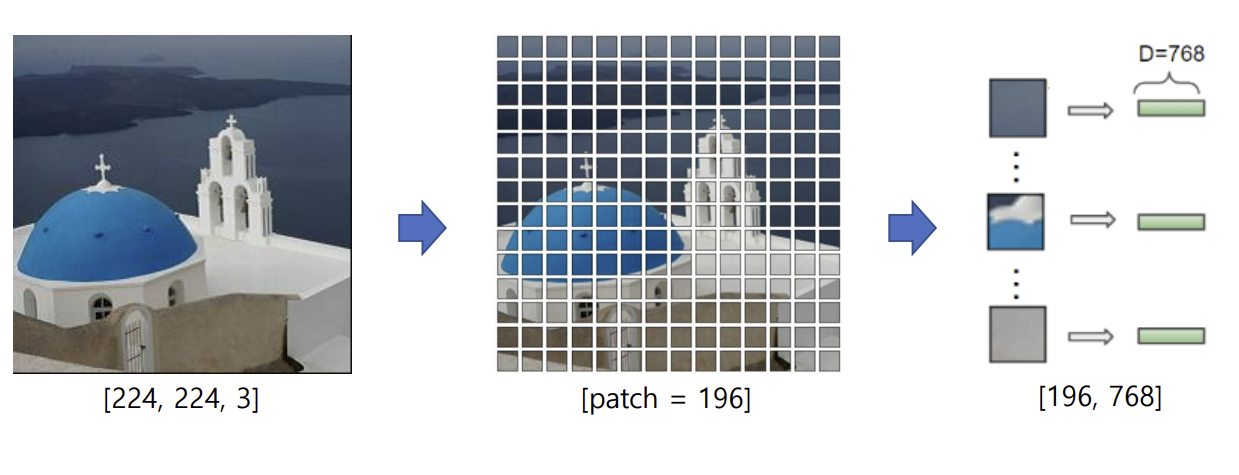
- 이미지를 작은 패치(보통 16x16)로 나누고, 각 패치를 토큰으로 변환한 후 Transformer로 처리함
- 즉, 각 패치는 하나의 벡터 표현으로 바뀌며, Transformer는 이 벡터들을 기반으로 전역적 특징을 학습
- CNN과 Transformer 비교

ViT(Vison Transformer) Self-Attention
- 이미지 → patch 단위로 분할 → 2D(N, D) 임베딩 행렬 생성
- class token(patch) 추가 → Position 정보 추가
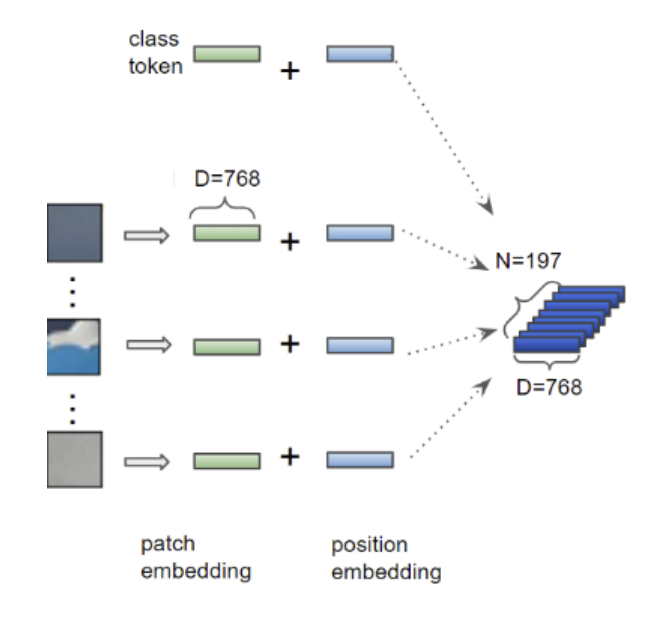
- NLP의 단어 토큰처럼, 각 패치가 하나의 토큰으로 변환
- 이미지의 패치 순서(공간적 위치)를 Transformer가 이해할 수 있도록 위치 인코딩(Position Encoding)을 추가
- Self-Attention
- transformer의 과정과 똑같음
- 각 패치의 쿼리(Q), 키(K), 값(V)은 Self-Attention을 통해 다른 patch들과 결합

(이 시리즈의 모든 코드는 코랩환경에서 Python으로 작성하였습니다)
ViT Code 1 (이미지 불러오기)
import matplotlib.pyplot as plt
from PIL import Image

# 이미지 불러오기
file_path = '/content/drive/MyDrive/CV/vit_test.jpg'

# 이미지 읽기
img = Image.open(file_path)

# 이미지 출력
print(img.size) #size(해상도)
plt.imshow(img)
plt.show()
ViT Code 2 (이미지 전처리 없이 이미지 분류)
# 필요한 함수 임폴트
from transformers import pipeline
model_name='google/vit-large-patch16-224'

# pipeline 함수 호출
pipe = pipeline(task='image-classification', model=model_name)

# 이미지 데이터 입력
result = pipe(img)

# 이미지 분류 결과 > 리스트
for i in result:
print(i)- ViT - normalize
- 0~255(흐리면 0)으로 값이 존재하는데 차이가 심할경우 비교가 힘듬 > 그래서 범위를 0~1로 변경함
- 구글의 ViTImageProcessor 같은 경우엔 0~1로 변경 후에 각 값에 -0.5를 하고 0.5로 나눠줌 > 범위가 -1~1로 변경되며 경험적으로 -1~1사이일 경우 가장 성능이 좋았기 때문
ViT Code 3 (이미지 전처리)
# 필요한 함수 임폴트
import matplotlib.pyplot as plt
from PIL import Image
from transformers import ViTImageProcessor, ViTForImageClassification
import torch
# 이미지 전처리를 위한 pre-trained + fine-tuning된 모델 다운로드
model_name='google/vit-large-patch16-224'
processor = ViTImageProcessor.from_pretrained(model_name)
print(processor,'\n','-'*100, '\n')
# 이미지 분류를 위한 pre-trained + fine-tuning된 모델 다운로드
model = ViTForImageClassification.from_pretrained(model_name)
print(model)
# 이미지 전처리 > 입력데이터 생성
input = processor(images=img, return_tensors='pt')
# 분류 모델 > 이미지 전처리의 결과 입력
output = model(**input) #output = model(input['pixel_values'])- 파이토치의 특징
- 추가 함수 없이 print하면 모델 출력 가능
- Python 입력값이 dict일 때 : **dict == 딕셔너리의 값만 뽑아줌
ViT Code 4 (전처리 후 이미지 분류)
# imageNet의 정답 label 확인
dic = model.config.id2label
print(dic)

# 예측 결과 > 값이 최대인 인덱스 추출 > argmax() 함수 적용
logits = output.logits
idx = torch.argmax(logits)
print(idx)
print(type(idx), '\n')

# 정답 레이블 > 확률이 최대인 인덱스 검색 > 정수형으로 타입 변경 > 문자열 형태의 레이블 추출
label = dic[idx.item()]
print(label)
print('-'*100)

# 예측 확률 상위 top20 추출
values, idx = logits.sort(descending=True) #내림차순
top20 = idx[0, :20] #2차원 배열 슬라이싱

for idx in top20:
print(dic[idx.item()])- ViT의 input은 dict타입이지만, output은 imageclassifier전용 타입이기 때문에 dict 값 출력 방법으로 출력할 수 없음
- torch.argmax(배열값)
- 배열값들 중 최대값의 인덱스를 출력함
- type : torch.Tensor (숫자가 하나여도 타입은 정수가 될 수 있음
- 딕셔너리의 레이블에는 정수가 들어가야 함 but, argmax 타입은 배열임 > 정수로 변경 > item()
- 텐서플로우는 그냥 가능함
- torch.sort
- 값들을 크기 순으로 정렬 + 인덱스도 표시
- 기본값 : descending=False (오름차순)
ViT Code 5 (이미지 분류 코드 함수화 + 추가 이미지 파일)
# 정리 : 이미지 분류 함수 정의

# 필요한 라이브러리 / 함수 임폴트
from transformers import ViTImageProcessor, ViTForImageClassification
from PIL import Image
import torch

# 사전학습 + 파인튜닝된 모델 다운 (전처리 모델, 분류 모델)
model_name='google/vit-large-patch16-224'
processor = ViTImageProcessor.from_pretrained(model_name)
model = ViTForImageClassification.from_pretrained(model_name)

# 사용자 설정 함수 정의
def image_classify(path):
  img = Image.open(path) #이미지 읽기

  input = processor(images=img, return_tensors='pt') #이미지 전처리
  output = model(**input) #전처리 결과 입력

  logits = output.logits #결과 값 출력
  idx = torch.argmax(logits) #최대 값 추출

  label = model.config.id2label[idx.item()] #정답 레이블 추출

  return label
# 이미지 파일 경로 설정
file_path = ['/content/drive/MyDrive/CV/vit_test.jpg',
'/content/drive/MyDrive/CV/dog.jpg']
for i in file_path:
print(image_classify(i))참고자료

AI & Robotics