개요
Unity3D 공간에서의 큐브의 움직임을 구현해야 합니다.
기본적인 키는 상, 하, 좌, 우, Space 총 5개입니다.
화살표로는 큐브가 한 칸 움직이면서 해당 방향의 옆면이 바닥으로 가게 회전시킵니다.
짐벌락에 대해 들어본 사람들은 유명한 짐벌락 설명 영상을 봤을 것입니다.
회전하게 되면 회전, 스케일 축이 돌아가게 되므로 그 부분을 신경쓰며 구현해야 합니다.
또한, 각 방향에 어느 칸이 있는지도 유지해야하기 때문에 하드코딩이 많이 필요합니다.
구현
BoxController.cs
    [Header("Jump Variables")]
    [SerializeField] private float jumpHeight = 0.6f;
    [SerializeField] private float jumpDuration = 0.3f;

    [SerializeField] private float scaleDuration = 0.1f;
    [SerializeField] private float scaleEffect = 0.3f;

    [Space(10)]

    [Header("Input Buffer")]
    [SerializeField, Range(0f, 1f)] private float inputThreshold;
    [Space(10)]

    [Header("Confuse")]
    [SerializeField, Tooltip("DO NOT SELECT BOTTOM, TOP")] private BoxDir forwardDir;
    [Space(10)]

    [Header("DEBUG")]
    [SerializeField, ReadOnly(true)] private BoxDir[] boxDirs;
    [SerializeField, ReadOnly(true)] private ColorSet[] boxColors;
    [SerializeField, ReadOnly(true)] private Vector2Int boxPosition;
    [SerializeField, ReadOnly(true)] private int boxHeight;
에디터 변수선언부 입니다.
Jump Variables 부분은 점프에 관한 부분입니다.
위에서부터 점프 높이, 시간이며, 아래 scale부분은 점프 시 슬라임같이 뭉게지는 효과를 나타내는 부분입니다.
그 아래는 Input Buffer 선입력 입니다. 선입력이 없으면 조작감이 별로 좋지 않아서 inputThreshold를 조절하여 선입력을 받아들이는 시간을 조절할 수 있습니다.
Confuse 는 게임 플레이의 기능적인 부분입니다.
예를 들어, forwardDir 을 BoxDir.RIGHT로 설정하면 모든 키가 시계방향으로 한 칸씩 움직입니다. 위쪽을 누르면 오른쪽으로, 오른쪽을 누르면 아래쪽으로 움직이게 됩니다.
DEBUG 부분은 여러 디버그에 필요한 변수들을 Inspector 창에서 보기위해 모아두었습니다.
각 면의 방향, 색, 현재 box의 위치, 높이를 저장해둔 변수입니다.
    public BoxDir[] BoxDirs { get { return boxDirs; } }

    private float jumpDistance = Constant.GRID_SIZE;;

    // Index sequence to rotate boxDirs
    readonly KeyCode[] arrowKeys = { KeyCode.UpArrow, KeyCode.DownArrow, KeyCode.RightArrow, KeyCode.LeftArrow, KeyCode.Space};
    readonly int[] vertIdx = new int[4] { 3, 0, 1, 2 };
    readonly int[] horzIdx = new int[4] { 3, 5, 1, 4 };
    readonly int[,] confuseIdx = new int[6, 4] {
        { 0, 1, 2, 3 },
        { 0, 1, 2, 3 },
        { 1, 0, 3, 2 },
        { 0, 1, 2, 3 },
        { 3, 2, 0, 1 },
        { 2, 3, 1, 0 } };

    private float jumpProgress = 0f;
    private bool isJumping;
    private Vector3 jumpStart;
    private Vector3 jumpTarget;
    private Vector3 rotateAxis;
    private Vector3 direction;
    private Quaternion targetRotation;
    private Quaternion startRotation;

    // Previous input buffer
    private KeyCode prevInputBuffer;
이 부분은 내부 함수에서 사용하는 전역변수들 입니다.
윗 부분에는 프로퍼티, 하드코딩을 위한 변수들이 있고, 아래는 각 함수마다 전부 넘겨주는 것 보단 전역변수가 나은 것 같아 두었습니다.
Update()
    void Update()
    {
        if (inputBuffer != KeyCode.None && !isJumping)
        {
            GetKeyInput(inputBuffer); return;
        }

        foreach (KeyCode key in arrowKeys)
        {
            if (Input.GetKey(key))
            {
                GetKeyInput(key); return;
            }
        }

    }
맨 앞에는 선입력 부분을 처리합니다. 선입력 버퍼에 입력이 들어와 있으면 해당 내용부터 처리합니다.
아래 부분에서 arrowKeys 에 받아야할 입력을 전부 넣어두었기 때문에 foreach 로 처리합니다.
최신 유니티에서는 foreach 호출 시 박싱때문에 GC가 호출되는 문제가 해결되었다고 하니 사용해도 될 듯 합니다.
GetKeyInput(Keycode key)
GetKeyInput 함수에서는 받은 Key에 따라 전처리 및 변수를 설정합니다.
int jDis = 1;
int hDis = 0;
public void GetKeyInput(KeyCode key)
{
    // Key Block during Jumping
    if (isJumping)
    {
        if (jumpProgress > inputThreshold) inputBuffer = key;
        return;
    }
    inputBuffer = KeyCode.None;
    direction = Vector3.zero;


    Color tmpC = GetComponent<BoxColorController>().GetBlendColorWithFloor();


    forwardDir = BoxDir.FORWARD;
    jDis = 1;
    hDis = 0;
    // Color Func
    switch (tmpC)
    {
        case var _ when tmpC.Equals(ColorConstants.RED):
            jDis = 2;
            break;
        case var _ when tmpC.Equals(ColorConstants.BLUE):
            hDis = 1;
            break;
        case var _ when tmpC.Equals(ColorConstants.YELLOW):
            forwardDir = BoxDir.RIGHT;
            break;
        case var _ when tmpC.Equals(ColorConstants.ORANGE):
            forwardDir = BoxDir.BACK;
            break;
        case var _ when tmpC.Equals(ColorConstants.GREEN):
            forwardDir = BoxDir.LEFT;
            break;
            //case var _ when tmpC.Equals(ColorConstants.PURPLE):
            //jDis = 2; hDis = 1;
            //break;
    }

    if (key == KeyCode.Space)
    {
        StartCoroutine(StampCoroutine(jumpDuration));
        return;
    }

    key = ConfuseDirection(key);
    switch (key) {
        case KeyCode.UpArrow:
            direction = Vector3.forward;
            rotateAxis = new Vector3(1, 0, 0);
            break;

        case KeyCode.DownArrow:
            direction = Vector3.back;
            rotateAxis = new Vector3(-1, 0, 0);
            break;

        case KeyCode.LeftArrow:
            direction = Vector3.left;
            rotateAxis = new Vector3(0, 0, 1);
            break;

        case KeyCode.RightArrow:
            direction = Vector3.right;
            rotateAxis = new Vector3(0, 0, -1);
            break;
    }


    if (direction != Vector3.zero)
    {
        // Jump Start
        jumpStart = transform.position;
        startRotation = transform.rotation;
        targetRotation = Quaternion.AngleAxis(90, rotateAxis) * startRotation;

        JumpBox(key);
    }

    return;
}
맨 위에는 선입력 처리를 해줍니다. isJumping 이면 선입력, 아니면 Key를 실행합니다.
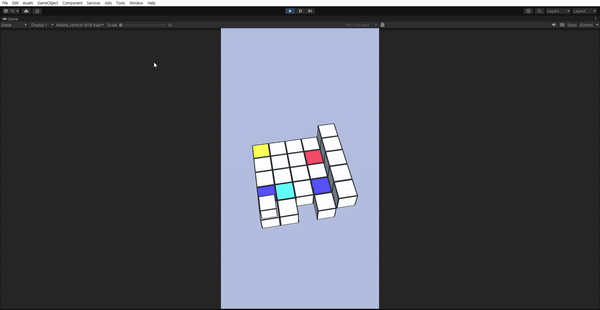
그 아래에는 색을 섞는 부분입니다. 제가 생각하고있는 게임에서는 정육면체의 아랫부분과 바닥부분의 색을 합쳐서 효과를 냅니다.
그다음에는 Space 및 Confuse 함수를 씌운 화살표 입력에 대한 처리를 해줍니다.
각 화살표마다 가야하는 방향 및 rotateAxis 를 설정해주고 direction이 바뀌었으면 추가 변수 설정 및 JumpBox(key); 함수를 호출합니다.
JumpBox(KeyCode key)
해당 함수에서는 위에서 설정한 변수들을 토대로 박스가 어느 동작을 할 지 결정/실행합니다.
    private void JumpBox(KeyCode key)
    {


        jumpTarget = jumpStart + direction * jumpDistance * jDis;
        jumpTarget.y = jumpStart.y;

        // Calc Position in advance
        Vector2Int tmp = Vector2Int.zero;
        switch (key)
        {
            case KeyCode.UpArrow:
                tmp = new Vector2Int(1, 0); break;
            case KeyCode.DownArrow:
                tmp = new Vector2Int(-1, 0); break;
            case KeyCode.RightArrow:
                tmp = new Vector2Int(0, 1); break;
            case KeyCode.LeftArrow:
                tmp = new Vector2Int(0, -1); break;
        }

        MapGrid mForGrid = MapGenerator.Instance.GetMapGrid(boxPosition + tmp);
        tmp *= jDis;

        MapGrid mGrid = MapGenerator.Instance.GetMapGrid(boxPosition + tmp);

        // exceptions

        if (jDis == 1)
        {
            if (mGrid == null) // null -> fall
            {
                MoveBoxPos(key, jDis);
                StartCoroutine(JumpFallCoroutine(jumpDuration)); return;
            }

            if (mGrid.Gridinfo.Height >= boxHeight + 2) {
                StartCoroutine(JumpBlockCoroutine(jumpDuration));
                return;
            }

            if (mGrid.Gridinfo.Height == boxHeight + 1 && hDis <= 0)
            {
                StartCoroutine(JumpBlockCoroutine(jumpDuration));
                return;
            }
        }
        else
        {
            if (mForGrid.Gridinfo.Height >= boxHeight + 1)
            {
                StartCoroutine(JumpBlockCoroutine(jumpDuration));
                return;
            }

            if (mGrid == null) // null -> fall
            {
                MoveBoxPos(key, jDis);
                StartCoroutine(JumpFallCoroutine(jumpDuration)); return;
            }
        }


        switch (key)
        {
            case KeyCode.UpArrow:
                RotateBox(BoxDir.FORWARD); break;
            case KeyCode.DownArrow:
                RotateBox(BoxDir.BACK); break;
            case KeyCode.RightArrow:
                RotateBox(BoxDir.RIGHT); break;
            case KeyCode.LeftArrow:
                RotateBox(BoxDir.LEFT); break;
        }

        MoveBoxPos(key, jDis);


        if (mGrid.Gridinfo.Height == boxHeight + 1 && hDis == 1) // JumpUp or Block
        {
            StartCoroutine(JumpUpDownCoroutine(jumpDuration, true));
        }
        else if (mGrid.Gridinfo.Height == boxHeight - 1)
        {
            StartCoroutine(JumpUpDownCoroutine(jumpDuration, false));
        }
        else
        {
            StartCoroutine(JumpCoroutine(jumpDuration, jDis));
        }


    }
jumpTarget을 정하고, 2칸 점프하는 경우를 대비하여 바로 앞 칸과 도착하는 칸의 예외처리를 따로 해줍니다.
JumpFallCoroutine 은 점프 후에 떨어지는 모션이고, JumpBlockCoroutine 은 앞에 막히는 모션입니다.
예외처리를 한 후에 BoxDirs 배열에 저장해두었던 각 면에 대한 정보를 RotateBox 함수로 교체합니다.
또한 MoveBoxPos로 현재 위치 또한 수정합니다. 높이는 JumpUpDownCoroutine 내부에서만 처리합니다.
전부 처리했으면 코루틴을 실행합니다.
JumpCoroutine(float duration)
    // Jump
    private IEnumerator JumpCoroutine(float duration)
    {
        SoundManager.Instance.CreateAudioSource(transform.position, EffectClip.D_JUMP);

        isJumping = true;
        jumpProgress = 0f;

        Vector3 scaleAxis = GetScaleYAxis();

        float elapsedTime = 0f;
        float scaleProgress = 0f;

        while (scaleProgress < 1.0f)
        {
            scaleProgress = elapsedTime / scaleDuration;
            float tmp = Mathf.Lerp(0, scaleEffect, scaleProgress);
            transform.localScale = Vector3.one - tmp * scaleAxis;
            elapsedTime += Time.deltaTime;
            yield return null;
        }

        transform.localScale = Vector3.one;


        elapsedTime = 0f;
        while (jumpProgress < 1.0f)
        {
            jumpProgress = elapsedTime / duration;
            // Calculate parabola
            float height = Mathf.Sin(Mathf.PI * jumpProgress) * jumpHeight;
            transform.position = Vector3.Lerp(jumpStart, jumpTarget, jumpProgress) + new Vector3(0, height, 0);
            transform.rotation = Quaternion.Lerp(startRotation, targetRotation, jumpProgress);

            elapsedTime += Time.deltaTime;
            yield return null;
        }


        // Jump Complete
        transform.position = jumpTarget;
        transform.rotation = targetRotation;


        isJumping = false;
    }
위쪽의 While 문은 점프하기 전에 슬라임처럼 뭉게지는 모션을 위한 부분입니다.
특히, Rotate를 조정하다 보면 축이 틀어지기 때문에 GetScaleYAxis() 함수를 통해 올바른 축을 사용해야 합니다.
아래의 While 문이 점프하는 모션입니다.
주석에는 Parabola 라 되어있는데 모양이 비슷한 싸인함수를 사용했습니다.
위 코루틴과 비슷하게 Block, Fall, JumpUp/Down을 각각 만들어주면 아래와 같이 됩니다.

마무리
박스의 모션 및 각 색상에 대한 기능을 구현해봤습니다.
단순 구현이라 어려운 부분보다는 실수가 잦아 시간이 오래걸렸습니다.
다음에는 Space바 키를 통해 색을 조작하는 StampCoroutine 구현 및 색을 저장하는 ColorSet 클래스를 자세히 살펴보겠습니다.