개요
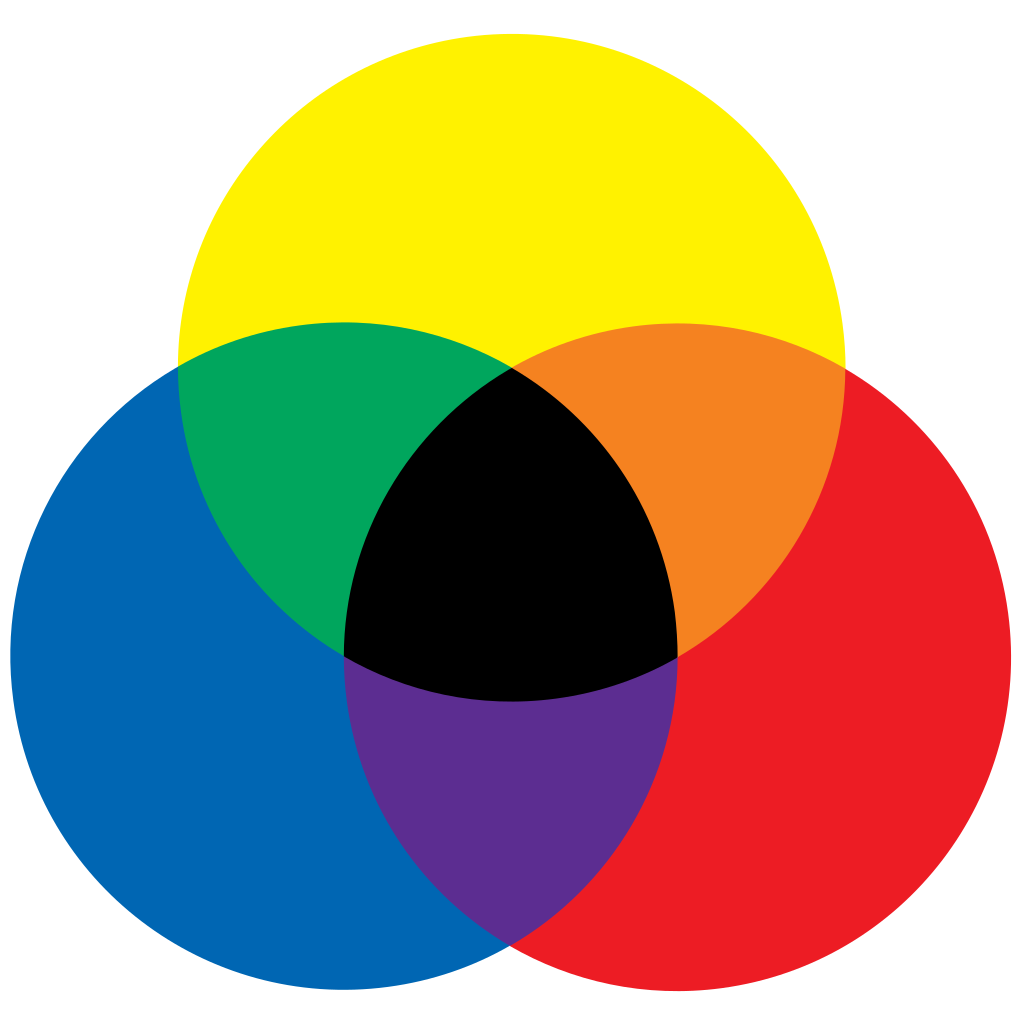
저는 게임에서 RYB 색을 사용할 예정입니다.
RGB나 CMYK를 사용하고 게임 안에서 감산법/가산법을 설명하기는 좀 그래서,
평소 미술시간에 물감을 칠하면 나오는 직관적인 색 조합인 RYB를 사용하기로 했습니다.
우선, 유니티에서는 기본적으로 RGB를 사용중이라, 제가 따로 클래스를 만들어서 색을 관리해야 합니다.
색을 저장하고 섞어서 올바른 색을 출력하는 클래스를 만들어보겠습니다.
구현
ColorSet
// Convert RGB to RYB
[Serializable]
public class ColorSet
{
    public int r;
    public int y;
    public int b;

    public int Total { get => (r + y + b); }

    public ColorSet(Color color)
    {
        SetColor(color);
    }

    public void SetColor(Color color)
    {

        switch (color) {
            case var _ when color.Equals(ColorConstants.RED):
                r = 1; y = 0; b = 0;
                break;
            case var _ when color.Equals(ColorConstants.BLUE):
                r = 0; y = 0; b = 1;
                break;
            case var _ when color.Equals(ColorConstants.YELLOW):
                r = 0; y = 1; b = 0;
                break;
            case var _ when color.Equals(ColorConstants.ORANGE):
                r = 1; y = 1; b = 0;
                break;
            case var _ when color.Equals(ColorConstants.GREEN):
                r = 0; y = 1; b = 1;
                break;
            case var _ when color.Equals(ColorConstants.PURPLE):
                r = 1; y = 0; b = 1;
                break;
            case var _ when color.Equals(ColorConstants.BLACK):
                r = 1; y = 1; b = 1;
                break;
            case var _ when color.Equals(ColorConstants.WHITE):
                r = 0; y = 0; b = 0;
                break;
            default:
                Debug.LogError("Color Error : color can't maching ryb");
                break;

        }
    }

    public Color GetColor()
    {
        if (r == 0 && y == 0 && b == 0) return ColorConstants.WHITE;
        else if (r == 1 && y == 1 && b == 1) return ColorConstants.BLACK;
        else if (r == 1 && y == 0 && b == 0) return ColorConstants.RED;
        else if (r == 0 && y == 1 && b == 0) return ColorConstants.YELLOW;
        else if (r == 0 && y == 0 && b == 1) return ColorConstants.BLUE;
        else if (r == 0 && y == 1 && b == 1) return ColorConstants.GREEN;
        else if (r == 1 && y == 1 && b == 0) return ColorConstants.ORANGE;
        else if (r == 1 && y == 0 && b == 1) return ColorConstants.PURPLE;

        Debug.LogError("Color Error : ryb can't matching color"); return Color.clear;
    }

    public bool IsEmpty()
    {
        return (r== 0 && y == 0 && b== 0);
    }

    public void RemoveColor()
    {
        r = 0; y=0; b=0;
    }

    public void BlendColor(ColorSet cSet)
    {
        r = (r + cSet.r) > 1 ? 1 : r + cSet.r;
        y = (y + cSet.y) > 1 ? 1 : y + cSet.y;
        b = (b + cSet.b) > 1 ? 1 : b + cSet.b;
    }

    public override string ToString()
    {
        return "ColorSet(RYB) : " + r + ", " + y + ", " + b;
    }
}
ColorSet 내부에서 RGB값을 그대로 사용하면 색을 섞을 때 원하는 색상을 지정하지 못하게 됩니다.
저는 전체적으로 파스텔 톤의 옅은 느낌을 주고 싶어서 상수로 색 코드를 전부 저장해두고, ColorSet 내부에서는 r, y, b를 int 형으로 관리합니다.
따라서 SetColor 및 GetColor 는 하드코딩으로 구현했습니다.
BlendColor 는 삼항연산자를 통해 값이 1이 넘지 않도록 했습니다.
이제 이 ColorSet 을 사용하여 구현만 해두었던 함수들을 고쳐보겠습니다.
BoxColorController
    public void StampColor(BoxDir dir)
    {
        ColorSet gridC = MapGenerator.Instance.GetGridColor(boxController.GetBoxPos());
        ColorSet boxC = boxColorSet[(int)dir];

        // Empty-> get Color from grid
        if (boxColorSet[(int)dir].IsEmpty())
        {
            boxC.BlendColor(gridC);
            gridC.RemoveColor();
        }
        // !Empty -> Blend color to grid
        else
        {
            gridC.BlendColor(boxC);
            boxC.RemoveColor();
        }

        SetBoxColor(dir, boxC.GetColor());
        MapGenerator.Instance.SetGridColor(boxController.GetBoxPos(), gridC.GetColor());

    }

    public Color GetBlendColorWithFloor()
    {
        ColorSet cs = new ColorSet(boxColorSet[(int)boxController.BoxDirs[(int)BoxDir.BOTTOM]].GetColor());

        cs.BlendColor(MapGenerator.Instance.GetGridColor(boxController.GetBoxPos()));

        return cs.GetColor();
    }
StampColor 는 해당 방향의 face와 바닥의 색을 섞습니다.
바닥에만 색이 있다면 해당 면에 색을 칠해주고, 해당 면에 색이 있다면 바닥에 색을 섞습니다.
바닥에 색을 칠할 때에는 SetGridColor를 사용하여 서서히 칠해지도록 해줍니다.
GetBlendColorWIthFloor 는 저번에 보셨겠지만, 점프하기 전에 바닥과 섞인 색을 보고 어떤 점프를 할 지 결정하기 위해 사용합니다.
BoxController
    // Stamp!
    private IEnumerator StampCoroutine(float duration)
    {
        SoundManager.Instance.CreateAudioSource(transform.position, EffectClip.D_JUMP);

        isJumping = true;
        GetComponent<BoxColorController>().StampColor(boxDirs[(int)BoxDir.BOTTOM]);
        jumpProgress = 0f;

        float elapsedTime = 0f;
        float scaleProgress = 0f;

        Vector3 scaleAxis = GetScaleYAxis();

        Vector3 originalPosition = transform.position;
        Vector3 originalScale = Vector3.one;
        Vector3 stampScale = scaleAxis * scaleEffect + (GetScaleXAxis() +GetScaleZAxis())*1.15f;

        while (scaleProgress < 1.0f)
        {
            scaleProgress = elapsedTime / duration;
            Vector3 tmp = Vector3.Lerp(originalScale, stampScale, scaleProgress);

            // 주축 방향으로 줄이고 다른 축은 약간 늘리기
            transform.localScale = tmp;

            // 위치 조정 - y축 방향으로 이동
            float scaleOffset = MathF.Abs(Vector3.Dot(originalScale, scaleAxis) - Vector3.Dot(transform.localScale, scaleAxis)) / 2;
            transform.position = new Vector3(originalPosition.x, originalPosition.y - scaleOffset, originalPosition.z);

            elapsedTime += Time.deltaTime;
            yield return null;
        }


        elapsedTime = 0f;
        scaleProgress = 0f;

        while (scaleProgress < 1.0f)
        {
            scaleProgress = elapsedTime*3 / duration;
            Vector3 tmp = Vector3.Lerp( stampScale, originalScale, scaleProgress);

            // 주축 방향으로 줄이고 다른 축은 약간 늘리기
            transform.localScale = tmp;

            // 위치 조정 - y축 방향으로 이동
            float scaleOffset = MathF.Abs(Vector3.Dot(originalScale, scaleAxis) - Vector3.Dot(transform.localScale, scaleAxis)) / 2;


            transform.position = new Vector3(originalPosition.x, originalPosition.y - scaleOffset, originalPosition.z);

            elapsedTime += Time.deltaTime;
            yield return null;
        }

        transform.localScale = Vector3.one;
        transform.localPosition = originalPosition;

        isJumping = false;

    }
StampCoroutine 을 만들어주고 Space 키와 연결해줍니다.
내적을 사용하여 아래로 누르는 듯한 느낌을 주었습니다.
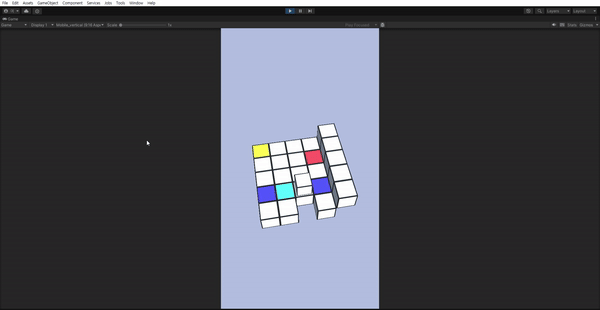
아래는 실행 화면입니다.
마무리
색을 혼합하는 기능까지 만들었습니다.
이제 메인메뉴 씬 및 UI를 제작하여 씬 간 이동 및 게임 플레이를 제어해보겠습니다.