- 개인적으로 정리한 글이기 때문에 다소 설명이 친절하지 않을 수 있습니다.
CLIP 스터디 이유
처음 접해보는 Multimodal
- 프로젝트를 진행하면서, 처음으로 multimodal task에 대해 다루게 됐다. 프로젝트를 위해 관련 논문들을 읽어봤지만, 멀티모달의 이해가 약간 부족한 것 같았다.
- Multimodal하면 자주 언급되는 CLIP에 대해 알아보고 싶었다.
정리한 내용
- CLIP 모델의 구현 방식
- Visual Encoder 부분의 코드 분석
CLIP 모델 정리
PDF 내용 정리
Related Works
Learned visual representations from text paired with images
- ConVIRT
- VirText
그동안의 개념이 혼합되어 쓰였었는데, 이 논문을 통해 Natural language supervision으로 명칭하게 되었다.
Natural Language Supervision
- 장점
- 사람이 일일이 annotation해서 얻는 data보다 dataset의 크기를 키우기가 쉽다.
- ImageNet Dataset의 경우, 22000개의 카테고리의 140만 개의 Image annotation 위해 25000명 정도가 필요하다고 한다.
- 현재 ImageNet이 엄청나게 큰 데이터셋은 아닌 것으로 고려했을 때, 시간낭비.
- ImageNet Dataset의 경우, 22000개의 카테고리의 140만 개의 Image annotation 위해 25000명 정도가 필요하다고 한다.
- 인터넷에 있는 수동적으로 많은 양의 텍스트로부터 learn 할 수 있다.
- Vision representation을 배움과 동시에, language representation과 연결할 수 있는 방법을 같이 배울 수 있기 때문에 downstream task*에 transfer할 때 좀 더 flexible하게 할 수 있다.
- 사람이 일일이 annotation해서 얻는 data보다 dataset의 크기를 키우기가 쉽다.
but, 이러한 장점에도 ConVIRT와 VirTex는 10만 개에서 20만 개정도의 이미지를 학습했다.
*downstream task: 최종적으로 해결하고자 하는 작업, 여기서는 내가 최종적으로 만들고자 하는 모델을 의미한다. upstream task로는 pre-trained model이라고 생각하면 될 듯하다.
New Dataset
- 400M (image, text) 페어를 인터넷에서 crawling해서 새로운 데이터셋을 구축하고, CLIP을 학습시켰다.
- 왜 굳이 새로운 데이터셋을 구축했나?
- MS-COCO, Visual Genome
- Size: Small (100,000)
- High Quality
- YFCC100M
- Size: Large (100M)
- Varying Quality
- after filtered, 15M (high)
- MS-COCO, Visual Genome
CLIP: Contrastive Language-Image Pre-training
Pre-train method로 contrasive learning을 이용했고, text-image pair 이용해 pre-train 시켰다.
Efficient Pre-training Method
- 이 태스크는 *upstream task라고 볼 수 있다.
-
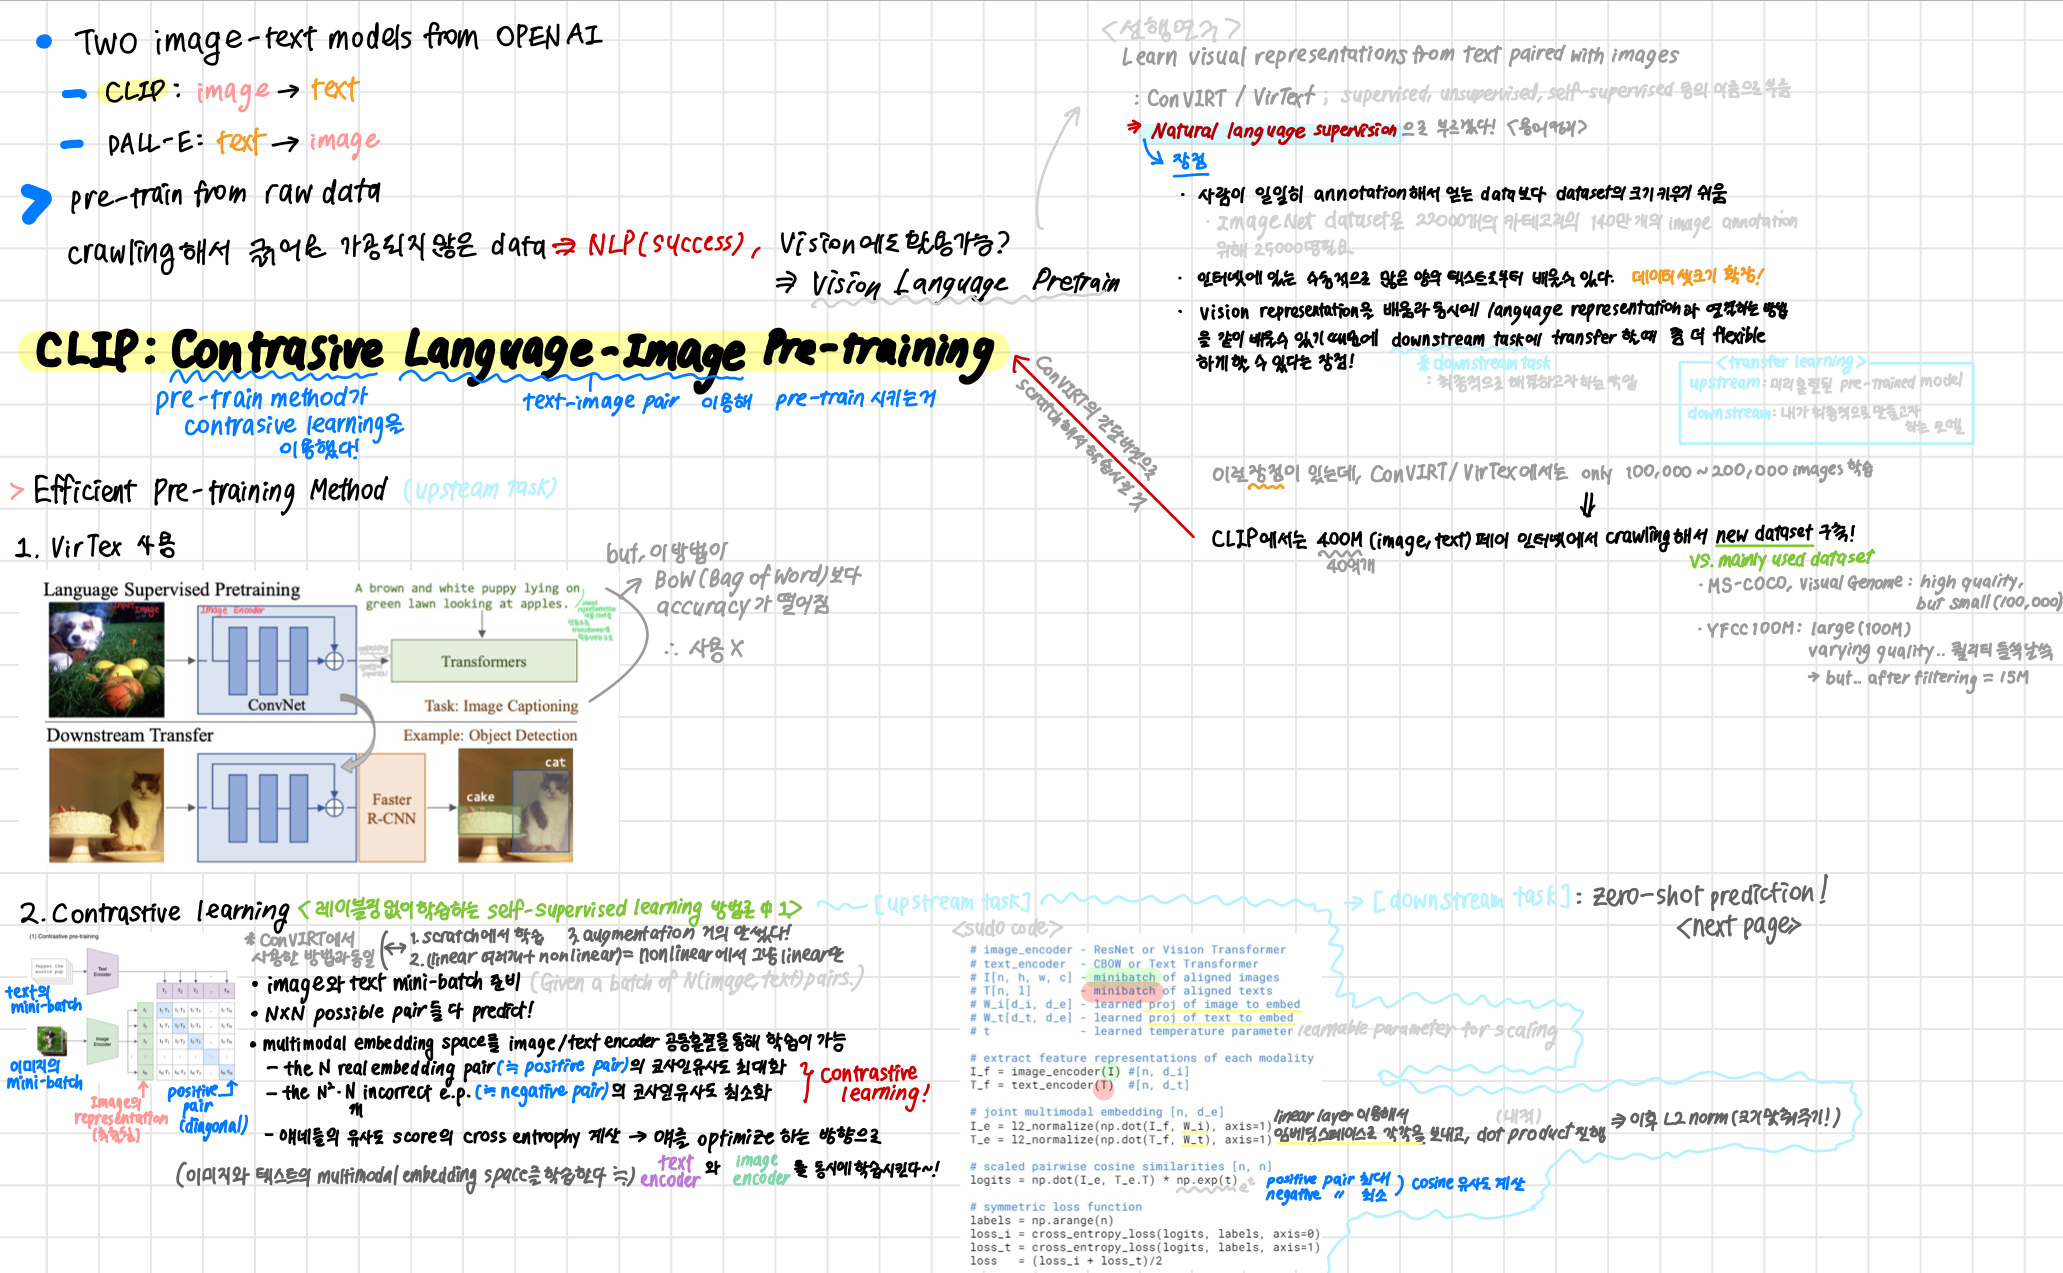
VirTex 사용
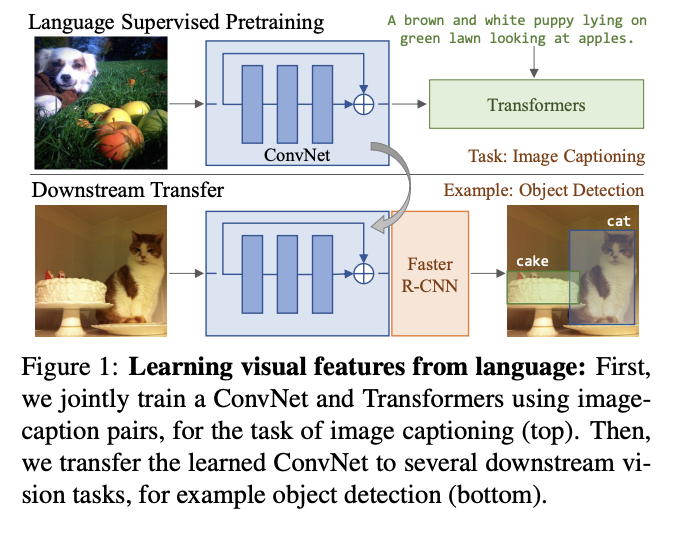
- Language Supervised Pretraining
- Input Image를 Image Encoder(ConvNet)에 넣고, Image Encoder에 넣었던 것을 임베딩하여 transformer에 input으로 넣는다.
- image representation 내용을 text로 만들도록 transformer를 학습시키는 것이다.
- 하지만, 이 방법이 BoW(Bag of Word)보다 accuracy가 떨어지는 것을 확인.
- 사용 X
- Language Supervised Pretraining
-
Contrastive Learning
- ConVIRT에서 사용한 방법과 동일하나, 간단 버전으로 scratch해서 학습시킨 것.
- labeling 없이 학습하는 self-supervised learning 방법론 중 하나이다.
- Image와 Text의 minibatch를 각각 준비한다.
- possible pair들 다 predict
- multimodal embedding space를 image/text encoder 공동훈련을 통해 학습이 가능하다.
- Contrastive Learning!
- the real embedding space pair (≒ positive pair) 의 코사인 유사도 최대화
- the 개 incorrect embedding space pair (≒ negative pair)의 코사인 유사도 최소화
- 얘네들의 유사도 score의 cross entrophy loss 계산
- 얘를 optimize 하는 방향으로 text encoder와 image encoder를 동시에 학습시킨다! (이미지와 텍스트의 multimodal embedding space를 학습한다!)
- Contrastive Learning!
- SUDO CODE
# image_encoder - ResNet or Vision Transformer
   # ViT-L/14가 가장 좋은 성능을 보여 모든 실험의 backbone으로 사용됨

# text_encoder - CBOW or Text Transformer
   # Text Transformer 가 사용된듯.. Sparse Transformer 사용

# I[n, h, w, c] - minibatch of aligned images
# T[n, l]       - minibatch of aligned texts
# W_i[d_i, d_e] - learned proj of image to embed
# W_t[d_t, d_e] - learned proj of text to embed
# t             - learned temperature parameter
  # learnable parmeter for scaling

# extract feature representations of each modality
I_f = image_encoder(I)   # [n, d_i]
T_f = text_encoder(T)    # [n, d_t]

# joint multimodal embedding [n, d_e]
I_e = l2_normalize(np.dot(I_f, W_i), axis=1)
T_e = l2_normalize(np.dot(T_f, W_t), axis=1)
# linear layer를 이용해서 임베딩 스페이스로 각각을 보내고, dot product!
# 이후 둘을 내적해서 유사도 확인할 것이니, l2 normalization으로 크기 맞춰주기

# scaled pariwise cosine similarities [n, n]
logits = np.dot(I_e, T_e.T) * np.exp(t)
# I_e와 전치된 T_e를 내적하고, e의 t(스케일링 파라미터)승을 곱해 코사인 유사도 확인

# symmetric loss function
labels = np.arange(n)
loss_i = cross_entropy_loss(logits, labels, axis=0)
loss_t = cross_entropy_loss(logits, labels, axis=1)
# cross entropy loss로 최적화시켜줌
loss = (loss_i + loss_t) / 2   # 두 모달리티 loss 값의 평균을 loss로 봄
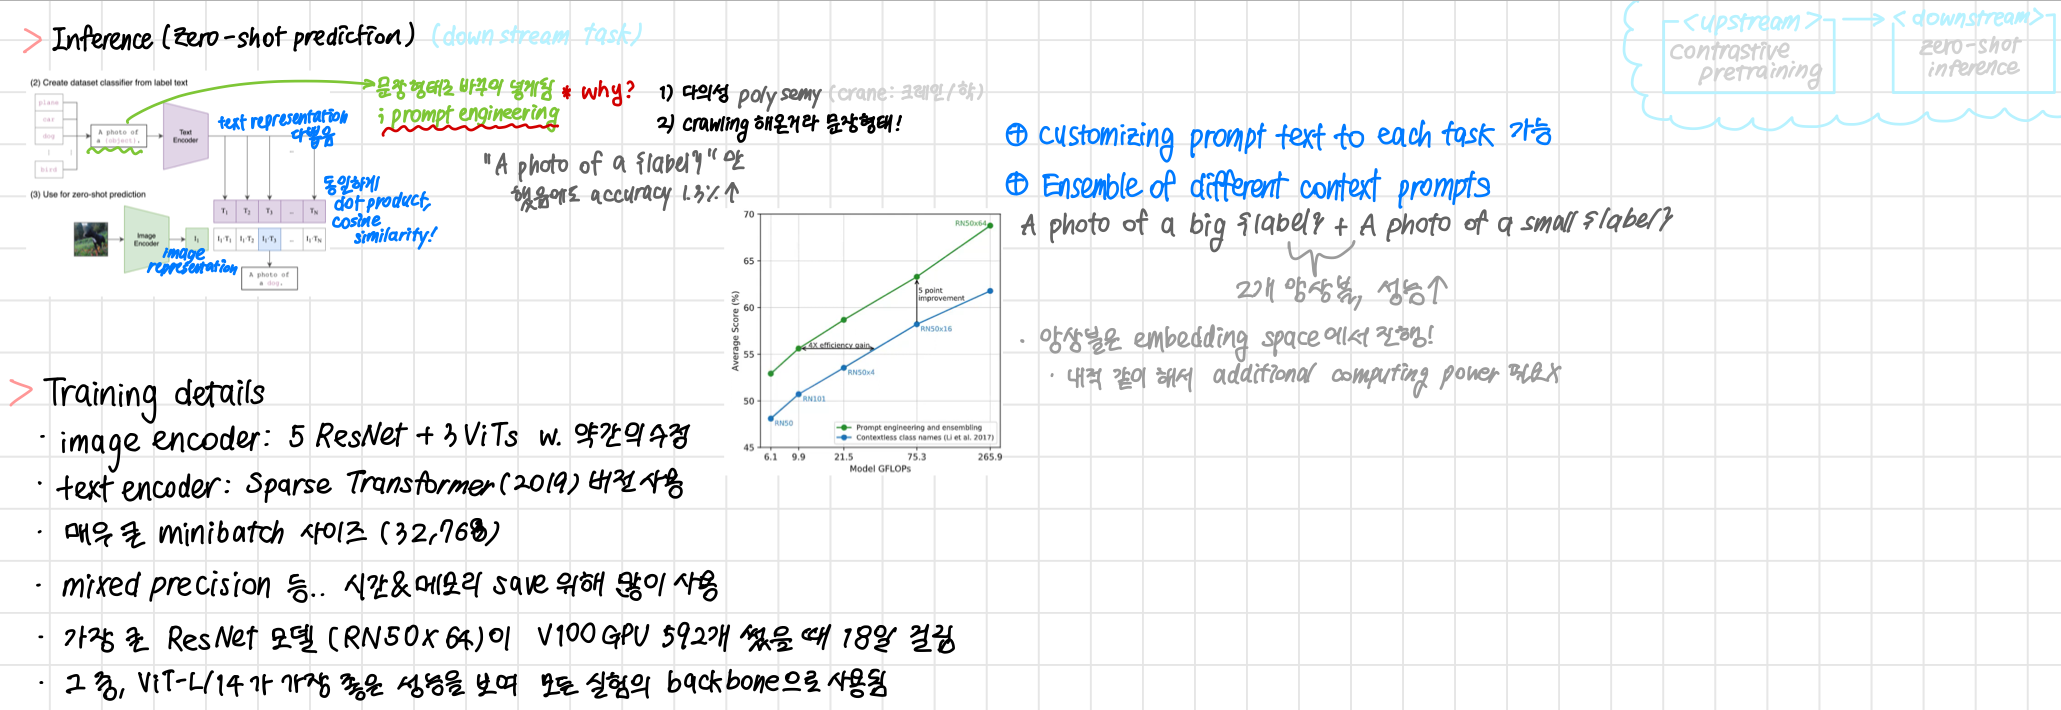
Inference (Zero-shot prediction)
- downstream task
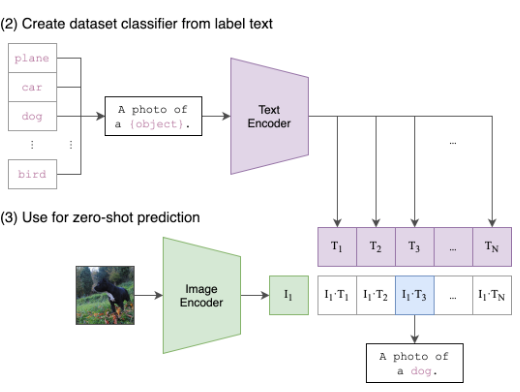
- Dataset Classifier를 label text로부터 만듦
- 단어만 존재하는 classifier에서
문장 형태로 prompting을 진행한다.A photo of a {object}.
- 다의성
- 기존에 학습시킨 dataset이 crawling 해온 것이기 때문에, 문장 형태여서!
- 단어만 들어가면, 정확하게 그 단어만을 맞추려고 하기 때문에 오히려 정확도가 떨어지게 된다.
- 단어만 존재하는 classifier에서
- 이후 Text Encoder, Image Encoder에서 각각 representation을 다 뽑고, 내적해서 코사인 유사도를 뽑아낸다. 과정은 같다.
Training Details
- Image Encoder: 5 ResNet + 3 ViTs w. 약간의 수정
- Text Encoder: Sparse Transformer(2019) 버전 사용
- 매우 큰 minibatch 사이즈 (32,768)
- 가장 큰 ResNet 모델 (RN50x64)이 V100 GPU 592개 썼을 때 18일 걸림
- 그 중,
ViT-L/14가 가장 좋은 성능을 보여 모든 실험의 backbone으로 쓰임
Visual Encoder 코드 정리
CLIP 모델의 레포지토리, model.py 코드 보면서 코드 정리 진행
class CLIP(nn.Module):
    def __init__(self,
                 embed_dim: int,
                 # vision
                 image_resolution: int,
                 vision_layers: Union[Tuple[int, int, int, int], int],
                 vision_width: int,
                 vision_patch_size: int,
                 # text
                 context_length: int,
                 vocab_size: int,
                 transformer_width: int,
                 transformer_heads: int,
                 transformer_layers: int
                 ):
        super().__init__()

        self.context_length = context_length
if isinstance(vision_layers, (tuple, list)):
vision_heads = vision_width * 32 // 64
self.visual = ModifiedResNet(
layers=vision_layers,
output_dim=embed_dim,
heads=vision_heads,
input_resolution=image_resolution,
width=vision_width
)
else:
vision_heads = vision_width // 64
self.visual = VisionTransformer(
input_resolution=image_resolution,
patch_size=vision_patch_size,
width=vision_width,
layers=vision_layers,
heads=vision_heads,
output_dim=embed_dim
)
@ property
def encode_image(self, image):
return self.visual(image.type(self.dtype))- ModifiedResNet
- 오리지날 ResNet에 조금 수정된 버전을 사용
- ResNet-D버전을 사용
- rect-2 blur pooling을 사용
- global average pooling 레이어를 attention pooling 메커니즘으로 대체
- 코드
class ModifiedResNet(nn.Module):
    """
    A ResNet class that is similar to torchvision's but contains the following changes:
    - There are now 3 "stem" convolutions as opposed to 1, with an average pool instead of a max pool.
    - Performs anti-aliasing strided convolutions, where an avgpool is prepended to convolutions with stride > 1
    - The final pooling layer is a QKV attention instead of an average pool
    """

    def __init__(self, layers, output_dim, heads, input_resolution=224, width=64):
        super().__init__()
        self.output_dim = output_dim
        self.input_resolution = input_resolution

        # the 3-layer stem
        self.conv1 = nn.Conv2d(3, width // 2, kernel_size=3, stride=2, padding=1, bias=False)
        self.bn1 = nn.BatchNorm2d(width // 2)
        self.relu1 = nn.ReLU(inplace=True)
        self.conv2 = nn.Conv2d(width // 2, width // 2, kernel_size=3, padding=1, bias=False)
        self.bn2 = nn.BatchNorm2d(width // 2)
        self.relu2 = nn.ReLU(inplace=True)
        self.conv3 = nn.Conv2d(width // 2, width, kernel_size=3, padding=1, bias=False)
        self.bn3 = nn.BatchNorm2d(width)
        self.relu3 = nn.ReLU(inplace=True)
        self.avgpool = nn.AvgPool2d(2)

        # residual layers
        self._inplanes = width  # this is a *mutable* variable used during construction
        self.layer1 = self._make_layer(width, layers[0])
        self.layer2 = self._make_layer(width * 2, layers[1], stride=2)
        self.layer3 = self._make_layer(width * 4, layers[2], stride=2)
        self.layer4 = self._make_layer(width * 8, layers[3], stride=2)

        embed_dim = width * 32  # the ResNet feature dimension
        self.attnpool = AttentionPool2d(input_resolution // 32, embed_dim, heads, output_dim)

    def _make_layer(self, planes, blocks, stride=1):
        layers = [Bottleneck(self._inplanes, planes, stride)]

        self._inplanes = planes * Bottleneck.expansion
        for _ in range(1, blocks):
            layers.append(Bottleneck(self._inplanes, planes))

        return nn.Sequential(*layers)

    def forward(self, x):
        def stem(x):
            x = self.relu1(self.bn1(self.conv1(x)))
            x = self.relu2(self.bn2(self.conv2(x)))
            x = self.relu3(self.bn3(self.conv3(x)))
            x = self.avgpool(x)
            return x

        x = x.type(self.conv1.weight.dtype)
        x = stem(x)
        x = self.layer1(x)
        x = self.layer2(x)
        x = self.layer3(x)
        x = self.layer4(x)
        x = self.attnpool(x)

        return x
- VisionTransformer
- 하나의 추가적인 layer normalization을 추가
- 코드
class VisionTransformer(nn.Module):
    def __init__(self, input_resolution: int, patch_size: int, width: int, layers: int, heads: int, output_dim: int):
        super().__init__()
        self.input_resolution = input_resolution
        self.output_dim = output_dim
        self.conv1 = nn.Conv2d(in_channels=3, out_channels=width, kernel_size=patch_size, stride=patch_size, bias=False)

        scale = width ** -0.5
        self.class_embedding = nn.Parameter(scale * torch.randn(width))
        self.positional_embedding = nn.Parameter(scale * torch.randn((input_resolution // patch_size) ** 2 + 1, width))
        self.ln_pre = LayerNorm(width)

        self.transformer = Transformer(width, layers, heads)

        self.ln_post = LayerNorm(width)
        self.proj = nn.Parameter(scale * torch.randn(width, output_dim))

    def forward(self, x: torch.Tensor):
        x = self.conv1(x)  # shape = [*, width, grid, grid]
        x = x.reshape(x.shape[0], x.shape[1], -1)  # shape = [*, width, grid ** 2]
        x = x.permute(0, 2, 1)  # shape = [*, grid ** 2, width]
        x = torch.cat([self.class_embedding.to(x.dtype) + torch.zeros(x.shape[0], 1, x.shape[-1], dtype=x.dtype, device=x.device), x], dim=1)  # shape = [*, grid ** 2 + 1, width]
        x = x + self.positional_embedding.to(x.dtype)
        x = self.ln_pre(x)

        x = x.permute(1, 0, 2)  # NLD -> LND
        x = self.transformer(x)
        x = x.permute(1, 0, 2)  # LND -> NLD

        x = self.ln_post(x[:, 0, :])

        if self.proj is not None:
            x = x @ self.proj

        return

나는 데단한 데싸인 ☠️