📋 목차
- 대미지 감소 모듈
- 중간 결과 1
- 환경 적응 모듈
- UI에 적용
- 모듈 적용
- 중간 결과 2
- 스킬 모듈
- 최종 결과
- 오늘의 배운 점
- 다음 계획
🔑 대미지 감소 모듈
방어구의 기본 효과, 대미지 감소 효과를 구현하겠습니다. ModuleEffect 스크립트를 생성합니다.
1. 대미지 감소 로직
// ModuleEffect.cs

using UnityEngine;

public class ModuleEffect : MonoBehaviour
{
    public ArmorModuleType moduleType;

    [ShowIf("moduleType", ArmorModuleType.Defense)]
    public float defensePower;

    [ShowIf("moduleType", ArmorModuleType.Resistance)]
    public EnvironmentType environmentType;

    [ShowIf("moduleType", ArmorModuleType.Skill)]
    public ArmorSkillType skillType;

    private void Start()
    {

    }

    public void ApplyArmorModule()
    {

    }
    public float ApplyDefenseEffect(float damage)
    {
        float reducedDamage = damage * (1 - defensePower);
        Debug.Log(defensePower * 100 + "%의 대미지를 감소시켜 " + reducedDamage + "의 대미지를 입었습니다.");
        return reducedDamage;
    }
}
2. 체력 감소 로직에 적용
// PlayerState.cs

public void ModifyHealth(float amout)
{
	if (isGameOver) return;

    if (amount < 0f && equipmentItems[1] != null)
	{
    	ItemInstance defenseModule = equipmentItems[1].Get<ItemInstance[]>("armorModules")[0];
    	if (defenseModule)
    	{
        	ModuleEffect moduleEffect = defenseModule.GetComponent<ModuleEffect>();
        	if (moduleEffect)
        	{
            	amount = moduleEffect.ApplyDefenseEffect(amount);
        	}
    	}
	}

    // 기존 로직...
}
🎮 중간 결과 1
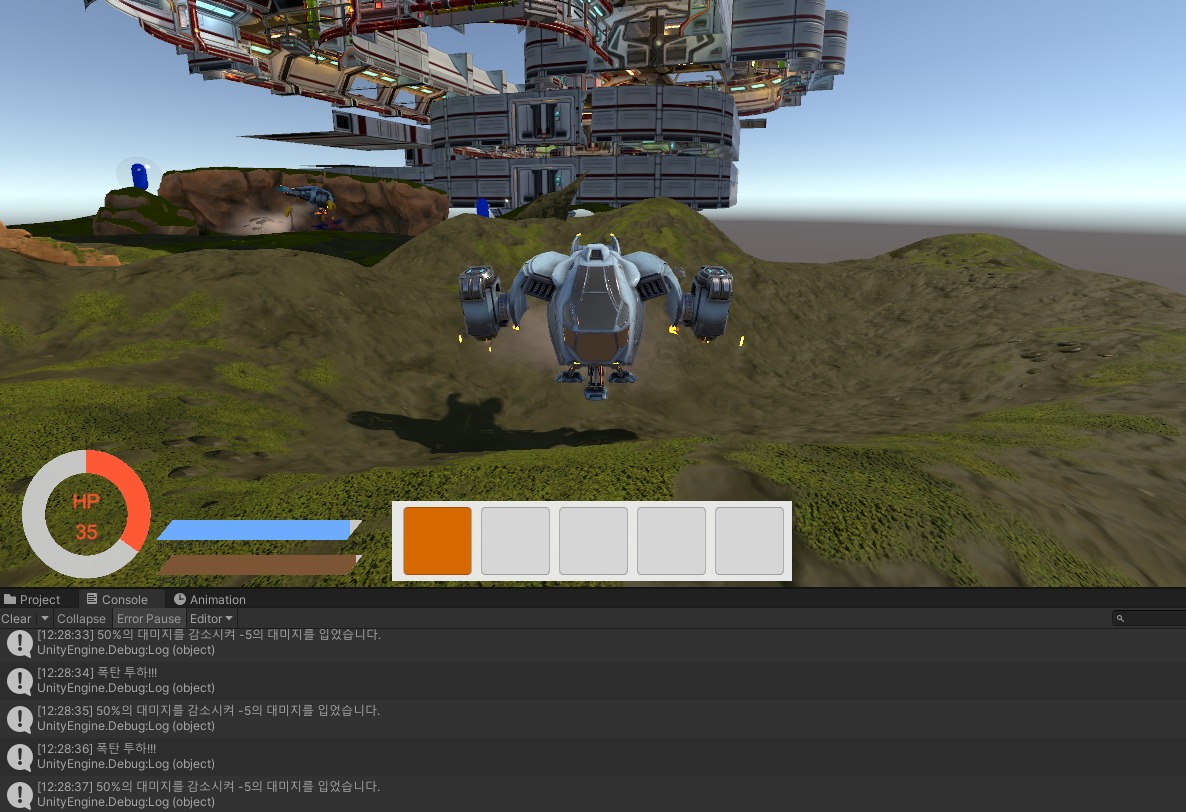
기존 10 대미지였던 것이 방어구 모듈 효과를 얻어 5만 감소하는 것을 볼 수 있습니다.
🔑 환경 적응 모듈
이곳에는 다양한 환경이 있습니다. 물지형, 사막지형, 눈지형 등이 있죠. 각각 산소, 더움, 추움을 넣으면 좋겠죠? 먼저 플레이어가 해당 지형에 있다면 각 스텟이 감소하는 로직을 짜보겠습니다.
1. UI 생성
일단은 산소와 더움만 추가해보겠습니다. HUD_Panel에 HotBar와 BreathingBar를 넣어주세요. 다른 Bar와 같이 Image Type을 Filled로 하여 게이지를 표현합니다.

2. 플레이어의 현재 장소 인식
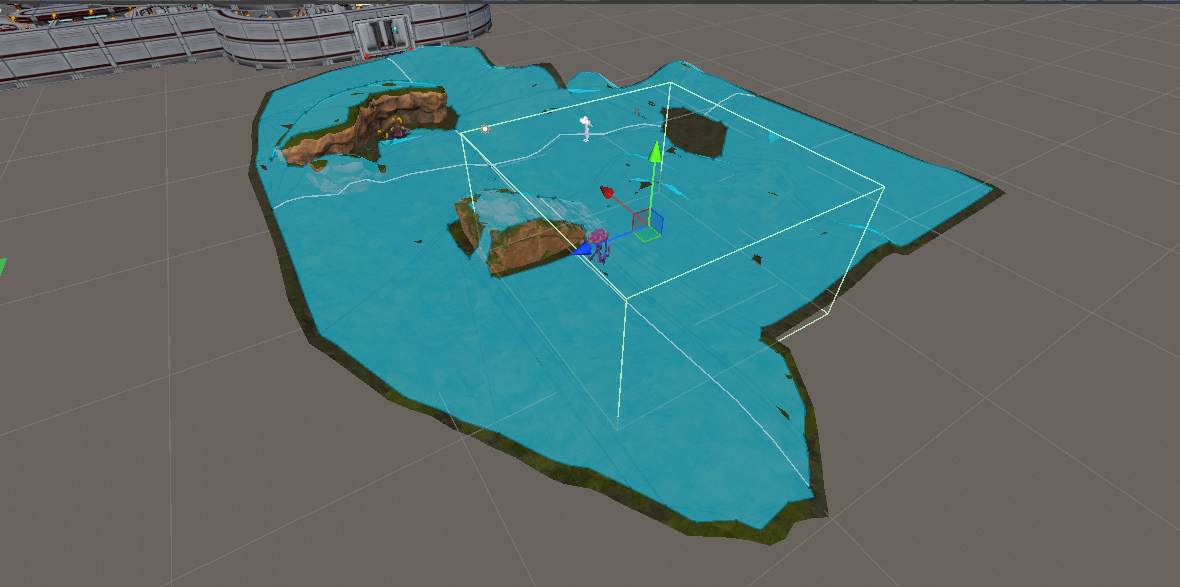
더움은 더운 지역에 있을 때 증가하고, 산소는 물 안에 들어가 있을 때 감소해야만 합니다. 그러니 플레이어가 현재 있는 장소에 대해 알 수 있어야겠죠? 현재 Zone중에 Desert가 있으니 더움은 해당 지역에 있을 때 증가하는 것으로 합시다.
일단 Desert 오브젝트에 그 지역의 범위만큼 Collision을 넣습니다. 그리고 IsTrigger를 체크해주세요.
그리고 아래 코드를 작성하여 Zone안에 들어갔을시 로그가 뜨면 감지 성공입니다.
// ZoneController.cs

private void OnTriggerEnter(Collider other)
{
    if (other.CompareTag("Player"))
    {
        switch(environmentType)
        {
            case EnvironmentType.Desert:
                Debug.Log("Player가 Desert Zone에 들어왔습니다.");
                break;
            default:
                break;
        }
    }
}
3. 게이지 증감
들어가면 Hot이 증가하고, 나가면 서서히 감소하는 로직을 구성해야만 합니다.
// ZoneController.cs

private void OnTriggerEnter(Collider other)
{
    if (other.CompareTag("Player"))
    {
        PlayerState playerState = other.GetComponent<PlayerState>();
        switch(environmentType)
        {
            case EnvironmentType.Desert:
                playerState.EnterInHotZone();
                Debug.Log("Player가 Desert Zone에 들어왔습니다.");
                break;
            default:
                break;
        }
    }
}

private void OnTriggerExit(Collider other)
{
    if (other.CompareTag("Player"))
    {
        PlayerState playerState = other.GetComponent<PlayerState>();
        switch (environmentType)
        {
            case EnvironmentType.Desert:
                playerState.ExitFromHotZone();
                Debug.Log("Player가 Desert Zone을 나갔습니다.");
                break;
            default:
                break;
        }
    }
}

// PlayerState.cs

// PlayerState의 생성자도 변경해줍시다!
public static class GameConstants
{
    public const float MAX_HEALTH = 100f;
    public const float MAX_SATIETY = 100f;
    public const float MAX_HYDRATION = 100f;
    public const float MAX_HOT_GAUGE = 100f;
    public const float MAX_BREATHING_GAUGE = 100f;
}

public class PlayerState : MonoBeHaviour
{
	private float hotGaugeTime = 1f;
	private float breathingGaugeTime = 1f;

	private void Update()
	{
    	Debug.Log($"Hot:{stats.hotGauge}, Breathing:{stats.breathingGauge}");
	}
	public void EnterInHotZone()
	{
    	CancelInvoke("DecreaseHotGaugeByTime");
    	InvokeRepeating("IncreaseHotGaugeByTime", hotGaugeTime, hotGaugeTime);
	}

	public void ExitFromHotZone()
	{
    	CancelInvoke("IncreaseHotGaugeByTime");
        CancelInvoke("DecreaseHealthByHotGauge");
    	InvokeRepeating("DecreaseHotGaugeByTime", hotGaugeTime + 1f, hotGaugeTime + 1f); // 온도 게이지 감소 함수 호출
	}

	public void EnterInWaterZone()
	{
    	CancelInvoke("IncreaseHotGaugeByTime");
    	InvokeRepeating("DecreaseBreathingGaugeByTime", breathingGaugeTime, breathingGaugeTime); // 호흡 게이지 감소 함수 호출
	}

	public void ExitFromWaterZone()
	{
    	CancelInvoke("DecreaseBreathingGaugeByTime");
        CancelInvoke("DecreaseHealthByBreathingGauge");
    	InvokeRepeating("IncreaseBreathingGaugeByTime", breathingGaugeTime + 1f, breathingGaugeTime + 1f); // 호흡 게이지 증가 함수 호출
	}

    // 온도 게이지 증가 함수
	private void IncreaseHotGaugeByTime()
	{
    	ModifyHotGauge(1f);
    	if (stats.hotGauge >= GameConstants.MAX_HOT_GAUGE)
    	{
        	InvokeRepeating("DecreaseHealthByHotGauge", 1f, 1f);
        	CancelInvoke("IncreaseHotGaugeByTime");
    	}
	}

	// 온도 게이지 감소 함수
	private void DecreaseHotGaugeByTime()
	{
    	ModifyHotGauge(-1f);
    	if (stats.hotGauge <= 0f)
    	{
        	CancelInvoke("DecreaseHealthByHotGauge");
        	CancelInvoke("DecreaseHotGaugeByTime");
    	}
	}

	// 호흡 게이지 증가 함수
	private void IncreaseBreathingGaugeByTime()
	{
    	ModifyBreathingGauge(1f);
    	if (stats.breathingGauge >= GameConstants.MAX_BREATHING_GAUGE)
    	{
        	CancelInvoke("DecreaseBreathingGaugeByTime");
        	CancelInvoke("DecreaseHealthByBreathingGauge");
    	}
	}

	// 호흡 게이지 감소 함수
	private void DecreaseBreathingGaugeByTime()
	{
    	ModifyBreathingGauge(-1f);
    	if (stats.breathingGauge <= 0f)
    	{
        	InvokeRepeating("DecreaseHealthByBreathingGauge", 1f, 1f);
        	CancelInvoke("DecreaseBreathingGaugeByTime");
    	}
	}

    // 온도 게이지 수정 함수
	public void ModifyHotGauge(float amount)
	{
    	stats.hotGauge += amount;

    	if (stats.hotGauge > GameConstants.MAX_HOT_GAUGE)
    	{
        	stats.hotGauge = GameConstants.MAX_HOT_GAUGE;
    	}
    	else if (stats.hotGauge < 0f)
    	{
        	stats.hotGauge = 0f;
    	}

    	OnStatsChanged?.Invoke(stats);
	}

	// 호흡 게이지 수정 함수
	public void ModifyBreathingGauge(float amount)
	{
    	stats.breathingGauge += amount;

    	if (stats.breathingGauge > GameConstants.MAX_BREATHING_GAUGE)
    	{
        	stats.breathingGauge = GameConstants.MAX_BREATHING_GAUGE;
    	}

    	else if (stats.breathingGauge < 0f)
    	{
        	stats.breathingGauge = 0f;
    	}

    	OnStatsChanged?.Invoke(stats);
	}
}
코드가 길어보이지만 로직 구조는 거의 같은 편입니다. 어차피 PlayerState는 Player의 현재상태 변화와 같은 코드만 넣을 것이기 때문에, 보기 쉽게 세분화하는 것이 좋습니다. 이제 ZoneController에서 Invoke실행과 종료를 하게끔 함수를 넣습니다.
// ZoneController.cs

private void OnTriggerEnter(Collider other)
{
    if (other.CompareTag("Player"))
    {
        PlayerState playerState = other.GetComponent<PlayerState>();
        switch(environmentType)
        {
            case EnvironmentType.Desert:
                playerState.EnterInHotZone();
                Debug.Log("Player가 Desert Zone에 들어왔습니다.");
                break;
            default:
                break;
        }
    }
}

private void OnTriggerExit(Collider other)
{
    if (other.CompareTag("Player"))
    {
        PlayerState playerState = other.GetComponent<PlayerState>();
        switch (environmentType)
        {
            case EnvironmentType.Desert:
                playerState.ExitFromHotZone();
                Debug.Log("Player가 Desert Zone을 나갔습니다.");
                break;
            default:
                break;
        }
    }
}
4. 결과 확인
영역 안에 들어가면 Hot 게이지가 오르고, 나가면 올라가는 속도 보다 1초 느리게 감소합니다.
🎨 UI에 적용
이제 시각화 해봅시다! 본래 있던 함수에 넣기만 하면 끝입니다.
1. HUD Update
// UIManager.cs

[Header("Bar")]
public Image hotGaugeBar;
public Image breathingGaugeBar;

private void UpdateUI(PlayerStats stats)
{
    if (healthBar && satietyBar && hydrationBar)
    {
        healthBar.fillAmount = stats.health / GameConstants.MAX_HEALTH;
        satietyBar.fillAmount = stats.satiety / GameConstants.MAX_SATIETY;
        hydrationBar.fillAmount = stats.hydration / GameConstants.MAX_HYDRATION;
        hotGaugeBar.fillAmount = stats.hotGauge / GameConstants.MAX_HOT_GAUGE;
        breathingGaugeBar.fillAmount = stats.breathingGauge / GameConstants.MAX_BREATHING_GAUGE;
    }

    if (healthText && satietyText && hydrationText)
    {
        healthText.text = stats.health.ToString("F0");
        satietyText.text = stats.satiety.ToString("F0");
        hydrationText.text = stats.hydration.ToString("F0");
    }
}
2. 결과 확인
Desert Zone안에 있으면 게이지가 오르고, 100이 된다면 체력도 줄어드는 모습입니다. (빠른 결과를 보여주기 위해 time을 0.1로 대폭 줄인 상태입니다)
🔑 모듈 적용
이제 모듈을 적용합시다! 더운 곳에 있을 경우, 해당 게이지가 천천히 오르게 하는 모듈입니다.
// ModuleEffect.cs

[ShowIf("moduleType", ArmorModuleType.Resistance)]
public EnvironmentType environmentType;
[ShowIf("moduleType", ArmorModuleType.Resistance)]
public float resistancePower;

public float ApplyResistanceEffect(float time)
{
    float reducedTime = time + time * resistancePower;
    Debug.Log($"time:{reducedTime}");
    return reducedTime;
}

// PlayerState.cs

[HideInInspector] public bool isInHotZone;

public void EnterInHotZone()
{
    CancelInvoke("DecreaseHotGaugeByTime");
    float resultTime = hotGaugeTime;
    if (equipmentItems[1] != null)
    {
        ItemInstance resistanceModule = equipmentItems[1].Get<ItemInstance[]>("armorModules")[1];
        if (resistanceModule)
        {
            ModuleEffect moduleEffect = resistanceModule.GetComponent<ModuleEffect>();
            if (moduleEffect && moduleEffect.environmentType == EnvironmentType.Desert)
            {
                resultTime = moduleEffect.ApplyResistanceEffect(resultTime);
            }
        }
    }
    isInHotZone = true;
    InvokeRepeating("IncreaseHotGaugeByTime", resultTime, resultTime);
}

// ExitFromHotZone 함수에는 isInHotZone을 False로 바꿉시다
만약 구역 안에서 방어구를 벗거나 입었을때, 감소 시간의 수치가 그대로면 안되니 그때의 경우에도 로직을 넣어줍시다.
// EquipmentSlots.cs

private void RemoveItem(EquipmentType type)
{
	// 기존 로직...
    if (index == 1)
    {
    	if (playerState.isInHotZone)
        {
        	playerState.ExitFromHotZone();
            playerState.EnterInHotZone();
        }
    }
    // 기존 로직...
}

// UIManager.cs

private void UpdateEquipmentUI(EquipmentType type, ItemInstance item)
{
	switch(type)
    {
    	// 기존 로직...
        case EquipmentType.Body:
        	equipmentSlots[1].SetEquipmentSlot(item);
			if (playerState.isInHotZone)
			{
    			playerState.ExitFromHotZone();
    			playerState.EnterInHotZone();
			}
			break;
        // 기존 로직...
}
🎮 중간 결과 2
기본 감소 시간은 0.5초로 했고, 각 방어구가 가진 power는 0.5와 1인 상태입니다.
그러니 0.5인 모듈은 0.75초마다 게이지가 오르고, 1인 모듈은 1초마다 게이지가 오르죠.
🔑 스킬 모듈
현재 스킬은 이속, 공속, 체력 자동 회복, 투명화가 있는데 여기선 이속만 구현하겠습니다. 이속은 간단합니다! PlayerController에 있는 moveSpeed만 조절하면 돼요.
1. 속도 변경
// PlayerController.cs

public void SetMoveSpeed(float speed)
{
	moveSpeed = speed;
}

// ArmorSkill.cs

public class ArmorSkill : MonoBehaviour
{
    public ArmorSkillType skillType;

    [ShowIf("skillType", ArmorSkillType.SpeedBoost)]
    public float speed;

    public void SetSkill(PlayerController playerController)
    {
        switch(skillType)
        {
            case ArmorSkillType.SpeedBoost:
                ApplySpeedBoost(playerController);
                break;
            case ArmorSkillType.Invisibility:
                ApplyInvisibility();
                break;
            default:
                Debug.LogWarning("No skill type set.");
                break;
        }
    }

    private void ApplySpeedBoost(PlayerController controller)
    {
        controller.SetMoveSpeed(speed);
    }

    private void ApplyInvisibility()
    {
        Debug.Log("투명화!");
    }
}

public enum ArmorSkillType
{
    None,
    SpeedBoost,
    Invisibility
}
2. 장착시 적용
스킬이 적용되면 플레이어의 현재 상태가 변경되어야하죠. 그것을 담당하는 PlayerState 스크립트를 수정합시다.
//PlayerState.cs

private void SetEquipmentItems(int index, ItemInstance item)
{
    if (equipmentItems[index])
    {
        inventory.AddItem(equipmentItems[index]);
        uiManager.UpdateItemUI();
    }
    equipmentItems[index] = item;

    SetSkillModule(item);
}

private void SetSkillModule(ItemInstance item)
{
    ItemInstance skillModule = item.Get<ItemInstance[]>("armorModules")[2];
    if (!skillModule) return;

    skillModule.GetComponent<ArmorSkill>().SetSkill(playerController);
}

// 방어구가 바뀔시 이전에 착용했던 모든 효과를 초기화
public void ResetModuleEffect()
{
    if (isInHotZone)
    {
        ExitFromHotZone();
        EnterInHotZone();
    }
    playerController.SetMoveSpeed(5f);
}
🎮 최종 결과
대미지 감소, 열 저항력 증가, 이속 증가 모듈을 모두 장착한 장면입니다. 대미지 감소 모듈은 업그레이드가 가능한 형태로 해야겠습니다. 하나만 있으면 재미가 없으니까요!
일단 그건 나중에...

📚 오늘의 배운 점
- 받는 대미지 감소
- Trigger로 지역 나누기
- 이속 조정
🎯 다음 계획
다음 글에서는:
- 방어구 스킬 구현
- 공속 증가
- 체력 자동 회복
- 투명화
