
Introduction
CVPR 2015년도에 실린 논문지인 Show and Tell: A Neural Image Caption Generator를 참고하여 Image Captioning을 구현한다.
Image Captioning이란
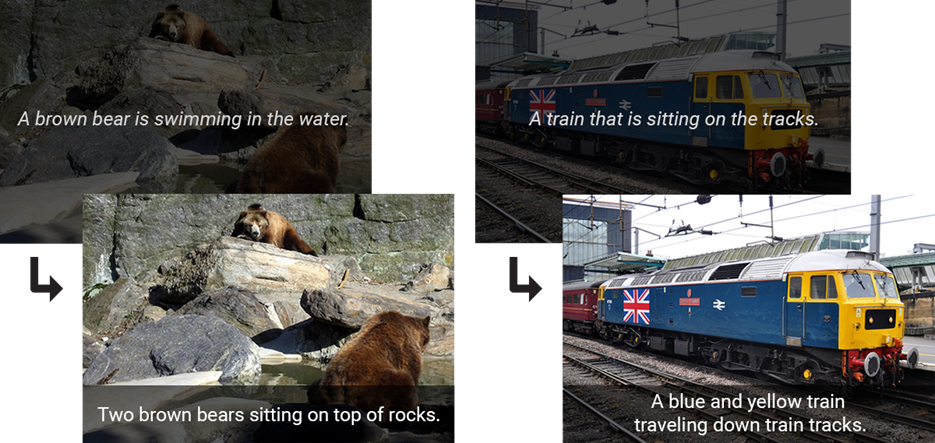
위 그림처럼 어떤 이미지를 잘 설명해주는 문장을 만드는 것을 Image Captioning이라 한다.

Input을 이미지로 받으면 그 이미지를 설명해줄 수 있는 Caption을 Output으로 주기 때문에 Computer Vision과 NLP가 활용되었다고 할 수 있다.
예컨대 앞을 못 보는 사람들에게 이 기술이 도입된다면 자신 앞의 화면을 설명해주어 도움을 줄 수 있다.
개인적으로 생각나는 재미있는 프로젝트로는 여러 그림작품을 학습하고 이에 대한 설명을 간략하게 만들어 주면, 박물관이나 전시관 미술관에서 사용될 수 있을 것 같다.
또한 어린 나이대 층을 상대로 교육적인 목적으로도 사용할 수 있을 것 같다.
참고로 Image Captioning은
- 이미지를 설명하는 문장을 자동으로 만들어 내는것(Image description)은 굉장히 어려운 문제다. (challenging task)
- image classification과 object dection보다 훨씬 어렵다.
- 단순히 이미지에 들어있는 object를 잡아내는 것이 아니라 특성, 활동, 다른 object와의 관계 까지 이해해야 하기 때문!
모델 구조
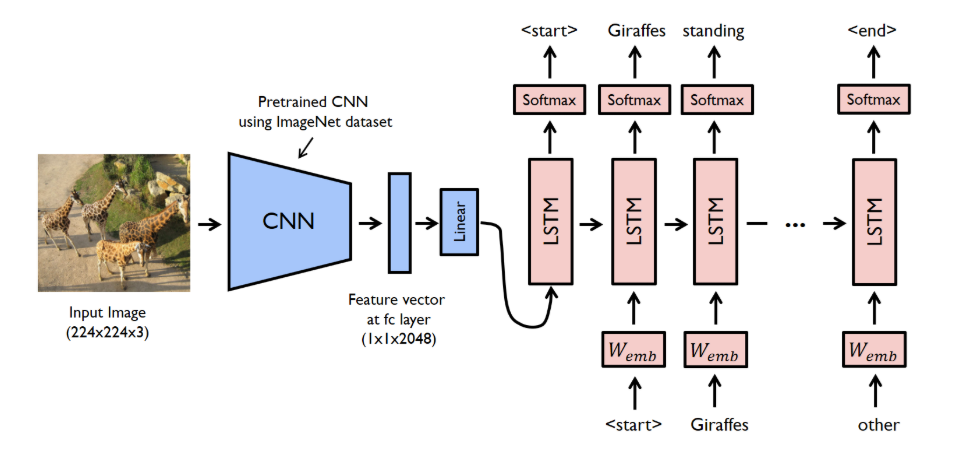
논문에서는 기존에 공부하였던 Encoder구조를 CNN으로 대체하였다. Encoder-Decoder 구조 복습
CNN은 Input image가 Linear vector로써 임베딩하기 때문에 이미지의 특징점을 충분히 잡아서 Encoding 정보를 얻을 수 있다.
그래서 CNN의 Last hidden Layer(Output Layer 아님!!)를 Decoder의 input으로 넣어 문장을 만드는 구조이다.
쉽게 말하면 Input이 Sentence에서 Image로 바뀐것!
이로써 이미지 input이 들어오면 바로 output 단어의 likelihood를 maximize할 수 있는 end-to-end 시스템을 만들어 보자.
학습 방향
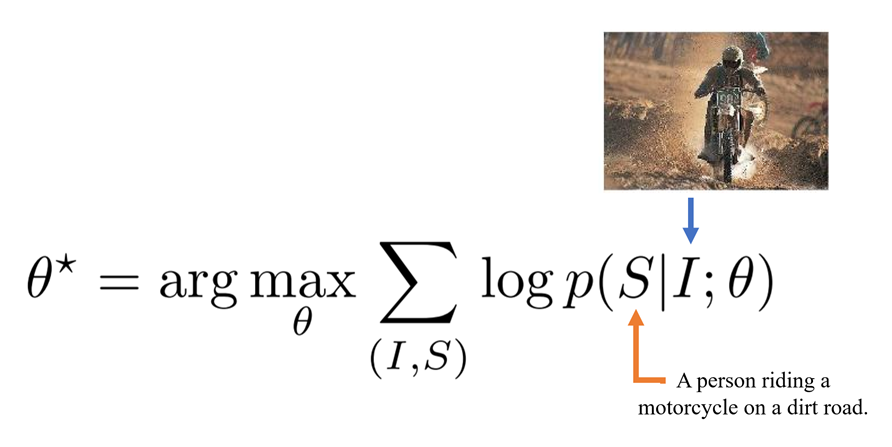
학습의 방향은 주어진 이미지()에 대응되는 정확한 묘사()의 확률을 최대화 하는 방향으로 parameter()를 구하는 것이다.
description 는 길이가 정해지지 않았다. 당연히 단어는 그때그때 다르니까.
그래서 실제 답의 길이가 N개인 경우에 답의 확률은 고정된 수식이 아니다. 이전에 공부했던 확률의 Chain Rule을 기억하면 쉽게 알 수 있다.

답에 대한 확률은 고정된 수식이 아니라 다음과 같이 까지의 확률을 결합확률로 나타내야 한다.
(이미지 I가 주어졌을때 0번째 단어가 일 확률) X ( 이미지 I와 가 주어졌을 때, 1번째 단어가 일 확률) X ... ( 이미지 I와 ... 주어졌을 때, n번째 단어가 일 확률)
Decoder
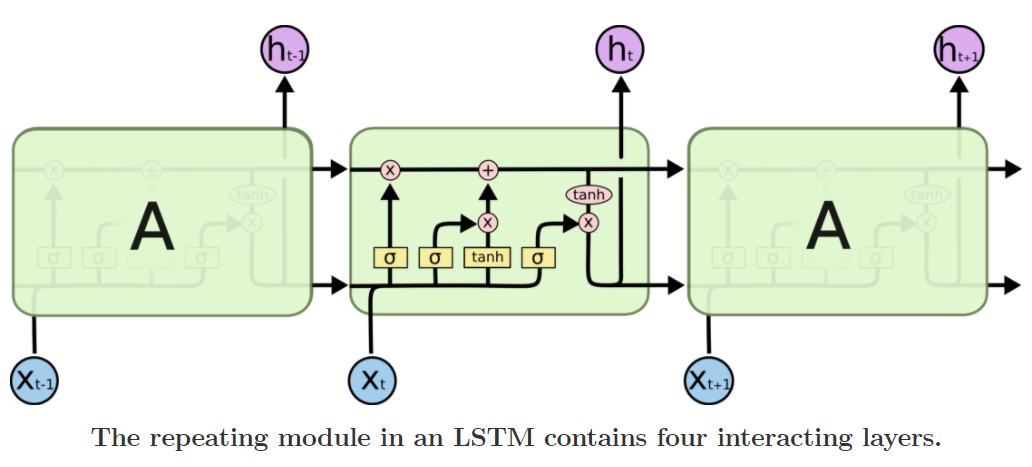
Decoder는 우선적으로 Seq2seq구조와 같고 Recursive모델은 LSTM을 사용한다.
LSTM은 이전글에서 충분히 다루었기 때문에 궁금하면 복습하고 오자!
Train
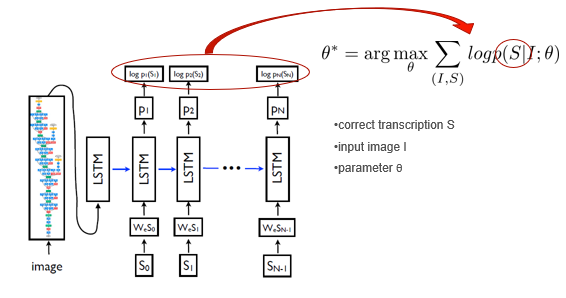
논문에서 제안하는 것은 당시 Vision에서의 SOTA 모델인 GoogleNet과 NLP에서의 SOTA 모델인 Seq2seq이다.
SOTA란 간단히 분야별 Data set별로 가장 뛰어난 성능을 보이는 모델을 이야기한다.
"그럼 Train 성능 평가는 어떻게 할 것인가" 이 부분에서 우리는 Sampling방법을 생각해 볼 수 있다.
짧게 말하자면 Sampling은 각 단계에서 최고의 하나의 단어만을 뽑는 것으로 Greedy한 방법이다.
이는 사실 위험성이 있다.
- 하나의 단어가 잘못되면 그의 기반한 모든 결과가 망가지는 위험이 있다.
- 각 단계에서의 최고의 단어만을 뽑기 때문에 맥락적인 부분에서 어색할 수 있다.
그래서 Beam Search라는 방법을 사용한다.
Beam Search
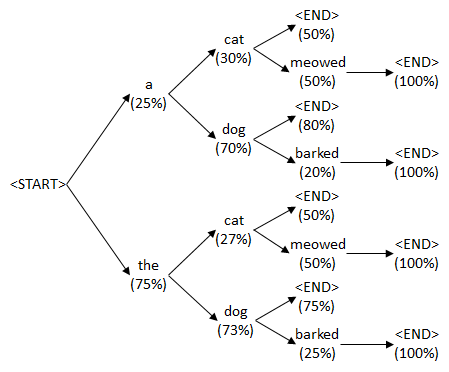
단순히 K 개의 후보(단어)를 뽑아서 다음 t+1에서의 단어와의 조합의 확률을 보고 높은 값을 고른다.
def sample_beam_search(self, features, vocab, device, beam_size=4):
        k = beam_size
        vocab_size = len(vocab)
        encoder_size = features.size(-1)
        features = features.view(1, 1, encoder_size)
        inputs = features.expand(k, 1, encoder_size)

        top_k_scores = torch.zeros(k, 1).to(device)
        seqs = torch.zeros(k, 1).long().to(device)
        complete_seqs = list()
        complete_seqs_scores = list()

        step = 1
        hidden, cell = None, None

     	while True:
...k: 후보군 sizefeature를view를 통해 resize하고 후보군 크기만큼 expand해준다.
While문 안
	    if step == 1:
                outputs, (hidden, cell) = self.lstm(inputs, None)
            else:
                outputs, (hidden, cell) = self.lstm(inputs, (hidden, cell))

            outputs = self.linear(outputs.squeeze(1))
            scores = F.log_softmax(outputs, dim=1)
            scores = top_k_scores.expand_as(scores) + scores


            # 첫번째 스텝은 모두 같은 score을 가진다 <START>라는 뿌리로 시작하기 때문
            if step == 1:
                top_k_scores, top_k_words = scores[0].topk(k, dim=0)  # (s)
            else:
                top_k_scores, top_k_words = scores.view(-1).topk(k, dim=0)  # (s)

            # Score를 정립시켜서 index를 구한다.
            # prev_word_inds : tensor([0, 0, 1, 0], device='cuda:0')
	    # next_word_inds : tensor([78, 30, 50, 31], device='cuda:0')
            prev_word_inds = top_k_words // vocab_size  # (s)
            next_word_inds = top_k_words % vocab_size  # (s)

            # 새로둔 단어를 seqs에 더한다.
            if step==1:
                seqs = next_word_inds.unsqueeze(1)
            else:
                seqs = torch.cat([seqs[prev_word_inds], next_word_inds.unsqueeze(1)], dim=1)  # (s, step+1)

            # Which sequences are incomplete (didn't reach <end>, <end>idx == 2)?
            # 인덱스 마지막 저장하기
            incomplete_inds = [ind for ind, next_word in enumerate(next_word_inds) if
                               next_word != vocab('<end>')]
            complete_inds = list(set(range(len(next_word_inds))) - set(incomplete_inds))

            # 마지막 단어 세팅
            if len(complete_inds) > 0:
                complete_seqs.extend(seqs[complete_inds].tolist())
                complete_seqs_scores.extend(top_k_scores[complete_inds])
            k -= len(complete_inds)  # reduce beam length accordingly

            # Proceed with incomplete sequences
            if k == 0:
                break

            seqs = seqs[incomplete_inds]
            hidden = hidden[:, prev_word_inds[incomplete_inds]]
            cell = cell[:, prev_word_inds[incomplete_inds]]
            top_k_scores = top_k_scores[incomplete_inds].unsqueeze(1)
            k_prev_words = next_word_inds[incomplete_inds].unsqueeze(1)
            inputs = self.embed(k_prev_words)
            if step > self.max_seg_length:
                break
step += 1- 첫번째의 lstm의 경우는 feature값만 넣어준다, 두번째부터는 cell값도 같이 넣어준다.
- output을 linear를 거쳐 softmax로 확률값을 구해준다.
- 다음에는
top_k_scores로 k개 후보군의 높은 Score를 저장해준다. - 후의 지수값을 변환해주고
prev_word_inds와next_word_inds를 계산해준다.
K의 후보군은 예시로 4개를 선택했다.
prev_word_inds: tensor([0, 0, 1, 0], device='cuda:0')
next_word_inds: tensor([ 78, 30, 50, 31], device='cuda:0')
이전 seqs의 후보가
seq: tensor([[  1,   4],
             [  1,  49],
             [  1,  26],
             [  1, 340]], device='cuda:0')

1은 <SoS>, 다음 단어들의 4가지 Top 후보군이다.
이것은 prev의 후보군 tensor([0, 0, 1, 0], device='cuda:0')에서 4가지는 seqs의 0번째, 0번째, 1번째, 0번째를 선택하고 각 next_word_inds를 붙인다.
seq: tensor([[ 1,  4, 78],
             [ 1,  4, 30],
             [ 1, 49, 50],
             [ 1,  4, 31]], device='cuda:0')

prev의 0,0,1,0에 next인 78, 30, 50, 31을 붙인다.
이렇게 하나하나 쌓아가 마지막에 4개의 후보군이 나오면 가장 위의 것을 선택한다.
이부분이 많이 어려우니 Image Captioning 깃허브 코드를 클론해서 직접 실습해보기를 바란다.
BLEU
BLEU (Bilingual Evaluation Understudy)은 흔히 자연어 처리에서 많이 쓰이는 성능 지표이다.

데이터의 X가 순서정보를 가진 단어들(문장)로 이루어져 있고,
y 또한 단어들의 시리즈(문장)로 이루어진 경우에 사용되며,
번역을 하는 모델에 주로 사용된다. 3가지 요소를 살펴보자.
- n-gram을 통한 순서쌍들이 얼마나 겹치는지 측정(precision)
- 문장길이에 대한 과적합 보정 (Brevity Penalty)
- 같은 단어가 연속적으로 나올때 과적합 되는 것을 보정(Clipping)
n-gram을 통한 순서쌍들이 얼마나 겹치는지 측정(precision)

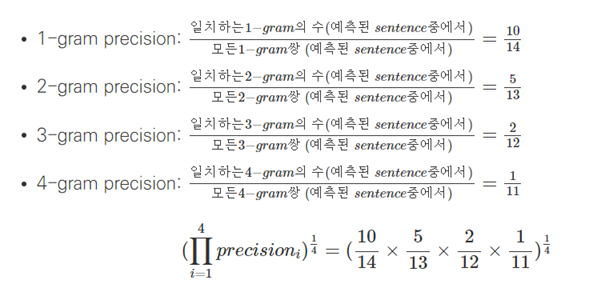
말그대로 1-gram은 각 단어 하나의 일치도, 4-gram은 4개의 단어를 묶어서 정답과 얼마나 일치한지 찾아보는 것이다.
위의 예로는 4-gram precision은 "잠든 사람과 비교할 때"라는 4단어가 일치하기 때문에 로 표현한다.
문장길이에 대한 과적합 보정 (Brevity Penalty)


말 그대로 문장 길이에 대한 과적합 보정이다. 정답 단어의 길이는 14개 예측 단어의 길이는 6개로 1과 비교하여 min값을 선택한다.
같은 단어가 연속적으로 나올때 과적합 되는 것을 보정(Clipping!)


겹치는 단어가 많으면 BLEU값이 올라가는 불상사가 생긴다. 그러면
The more * 100이 예측값이면 1이 될 수 있다는 것이다.
이를 보정해준다.
보정 후 곱

보정후 문장 길이 과적합 보정 값 과 Clipping을 한 n-gram들을 곱하여 주면 된다.
나는 구현에서 BLEU와 perplexity 두 개를 지표로 설정했다.
Dataset
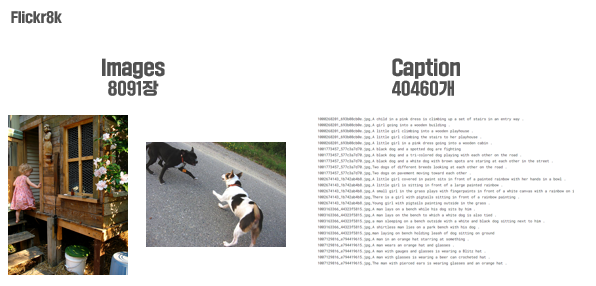
Data는 Flickr8K를 사용했다.
- 이미지 개수 8091장
- Caption 40460개
- 이미지 개당 Caption 4개
Test
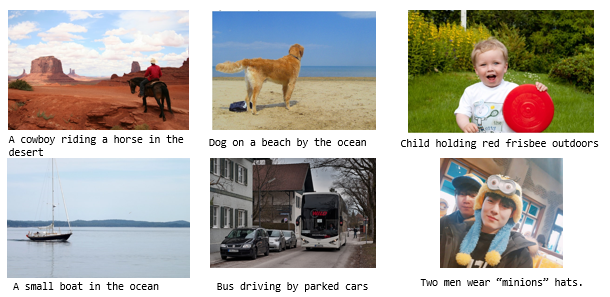
이렇게 6가지의 그림으로 Test를 돌렸다. 마지막은 2018년도 초 풋풋한 나다.
코드
Encoder
class EncoderCNN(nn.Module):
    def __init__(self, embed_size, train_CNN=False):
        super(EncoderCNN, self).__init__()
        self.train_CNN = train_CNN
        self.inception = models.inception_v3(pretrained=True, aux_logits=False)
        self.inception.fc = nn.Linear(self.inception.fc.in_features, embed_size)
        self.relu = nn.ReLU()
        self.dropout = nn.Dropout(0.5)

    def forward(self, images):
        features = self.inception(images)
return self.dropout(self.relu(features))- 논문 내용대로 구현하기 위해 GoogleNet을 사용했다.
train_CNN은 grad_requires를 위해 선언해주었다.- Dropout을 사용
Decoder
class DecoderRNN(nn.Module):
    def __init__(self, embed_size, hidden_size, vocab_size, num_layers):
        super(DecoderRNN, self).__init__()
        self.embed = nn.Embedding(vocab_size, embed_size)
        self.lstm = nn.LSTM(embed_size, hidden_size, num_layers)
        self.linear = nn.Linear(hidden_size, vocab_size)
        self.dropout = nn.Dropout(0.5)

    def forward(self, features, captions):
        embeddings = self.dropout(self.embed(captions))
        embeddings = torch.cat((features.unsqueeze(0), embeddings), dim=0)
        hiddens, _ = self.lstm(embeddings)
        outputs = self.linear(hiddens)
        return outputs
Decoder도 이전에 실습해본 코드와 동일하다.
이제 이 두개를 이으면 된다.
CNNtoRNN
class CNNtoRNN(nn.Module):
    def __init__(self, embed_size, hidden_size, vocab_size, num_layers):
        super(CNNtoRNN, self).__init__()
        self.encoderCNN = EncoderCNN(embed_size)
        self.decoderRNN = DecoderRNN(embed_size, hidden_size, vocab_size, num_layers)

    def forward(self, images, captions):
        features = self.encoderCNN(images)
        outputs = self.decoderRNN(features, captions)
        return outputs

    def caption_image(self, image, vocabulary, max_length=50):
        result_caption = []

        with torch.no_grad():
            x = self.encoderCNN(image).unsqueeze(0)
            states = None

            for _ in range(max_length):
                hiddens, states = self.decoderRNN.lstm(x, states)
                output = self.decoderRNN.linear(hiddens.squeeze(0))
                predicted = output.argmax(1)
                result_caption.append(predicted.item())
                x = self.decoderRNN.embed(predicted).unsqueeze(0)

                if vocabulary.itos[predicted.item()] == "<EOS>":
                    break

        return [vocabulary.itos[idx] for idx in result_caption]
caption_image
result_caption에 넣기위해 배열 선언을 해주고- encoder를 통해 x라는 features값을 구한다.
- x를 decoder에 돌리고 output값으로 확률을 구해주면 된다.
- <EOS>가 나오면 종료
그 외
그 외 데이터를 처리해주는 함수와 batch를 만들어주는 함수를 구현한다.

Tutorial_Google_Net/get_loader.py를 참고하면 된다.
학습
Tutorial_Google_Net/train.py를 참고하면 된다.
코드에 대해 간단히 설명하면 이렇다.
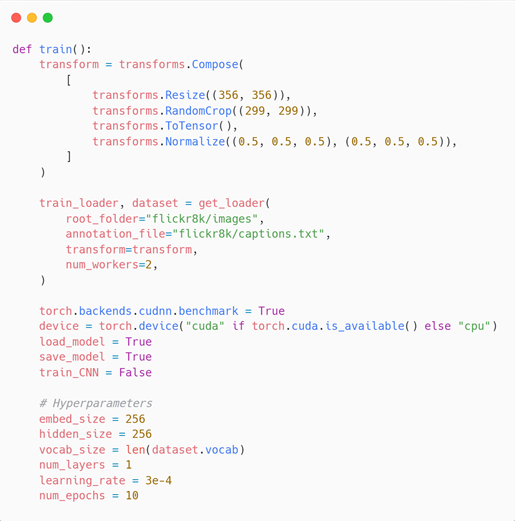
-
Transform을 통해 resize 및 tensor로 변환
-
데이터 로드 get_loader()
-
GPU 세팅
-
하이퍼파라미터 세팅
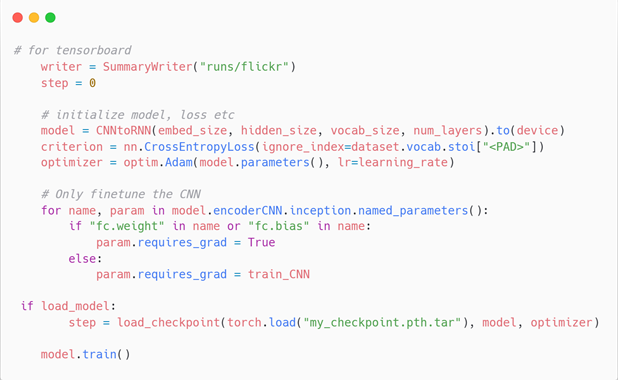
-
모델 초기화
-
Optimizer 는 Adam
-
파이토치 특징인 requires_grad로 fine tuning
-
하이퍼파라미터 세팅
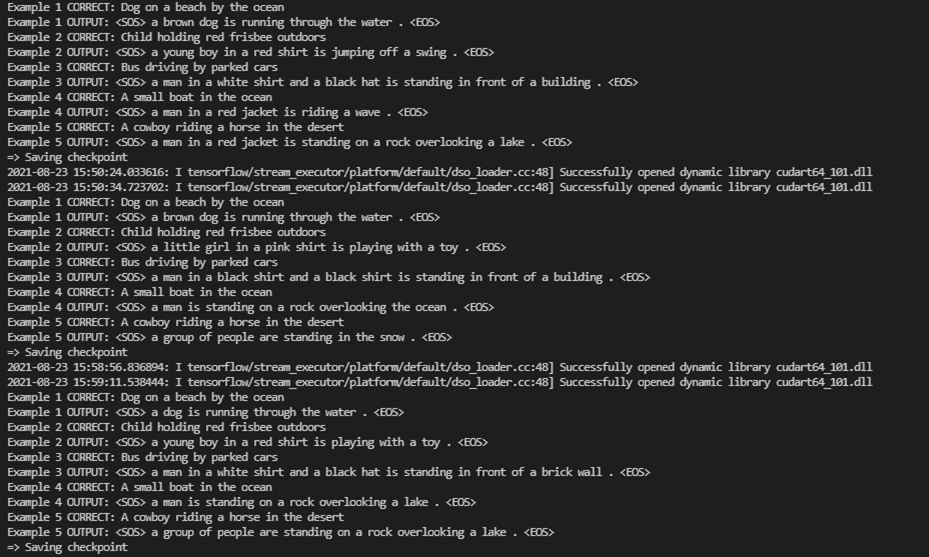
학습하면서 에포크마다 output값을 확인할 수 있다.
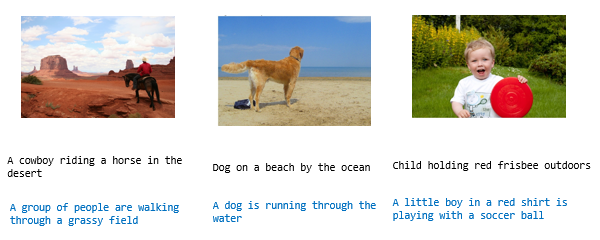
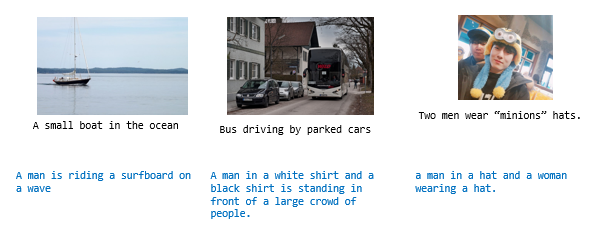
파란색 글씨가 예측한 Caption이다. 대부분... 형편없다.
이유는 뭐.. 10epochs에 우리가 배운 여러 기법을 사용하지 않아서? 인 것 같다.

- tensorboard로 확인해보았을때 Loss값이 2.2까지 학습되는 것을 알 수 있다.
다음 예고
다음에는 GoogleNet + LSTM 구조를 개선해본다.
1. Resnet으로 바꾸기
2. Attention모델 사용
3. 둘다 적용
스포일러를 하자면
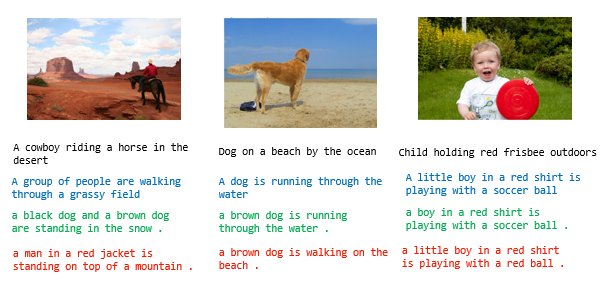
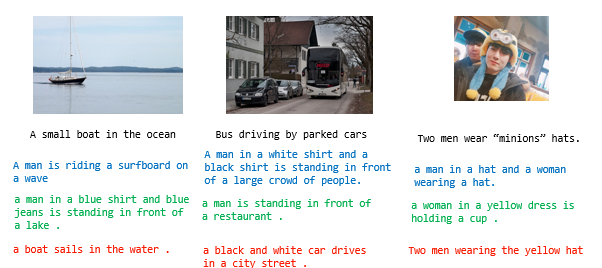
빨간 글씨가 아주 뛰어난 성능을 보인다.
