compare v8 and v10 configurations
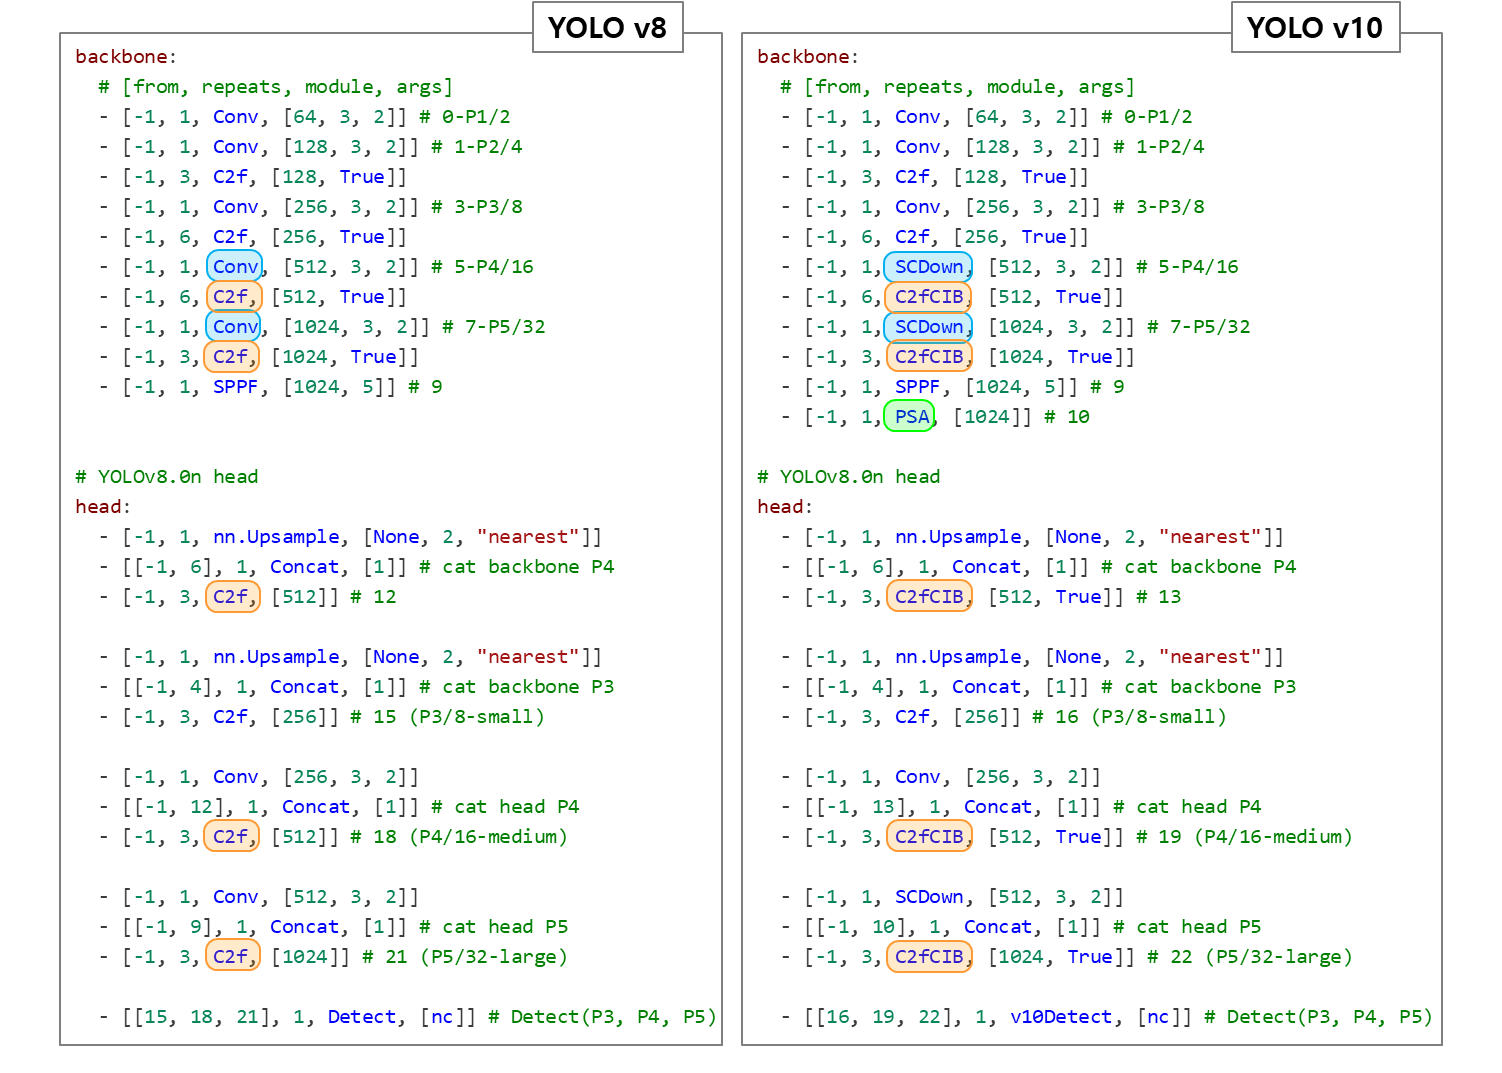
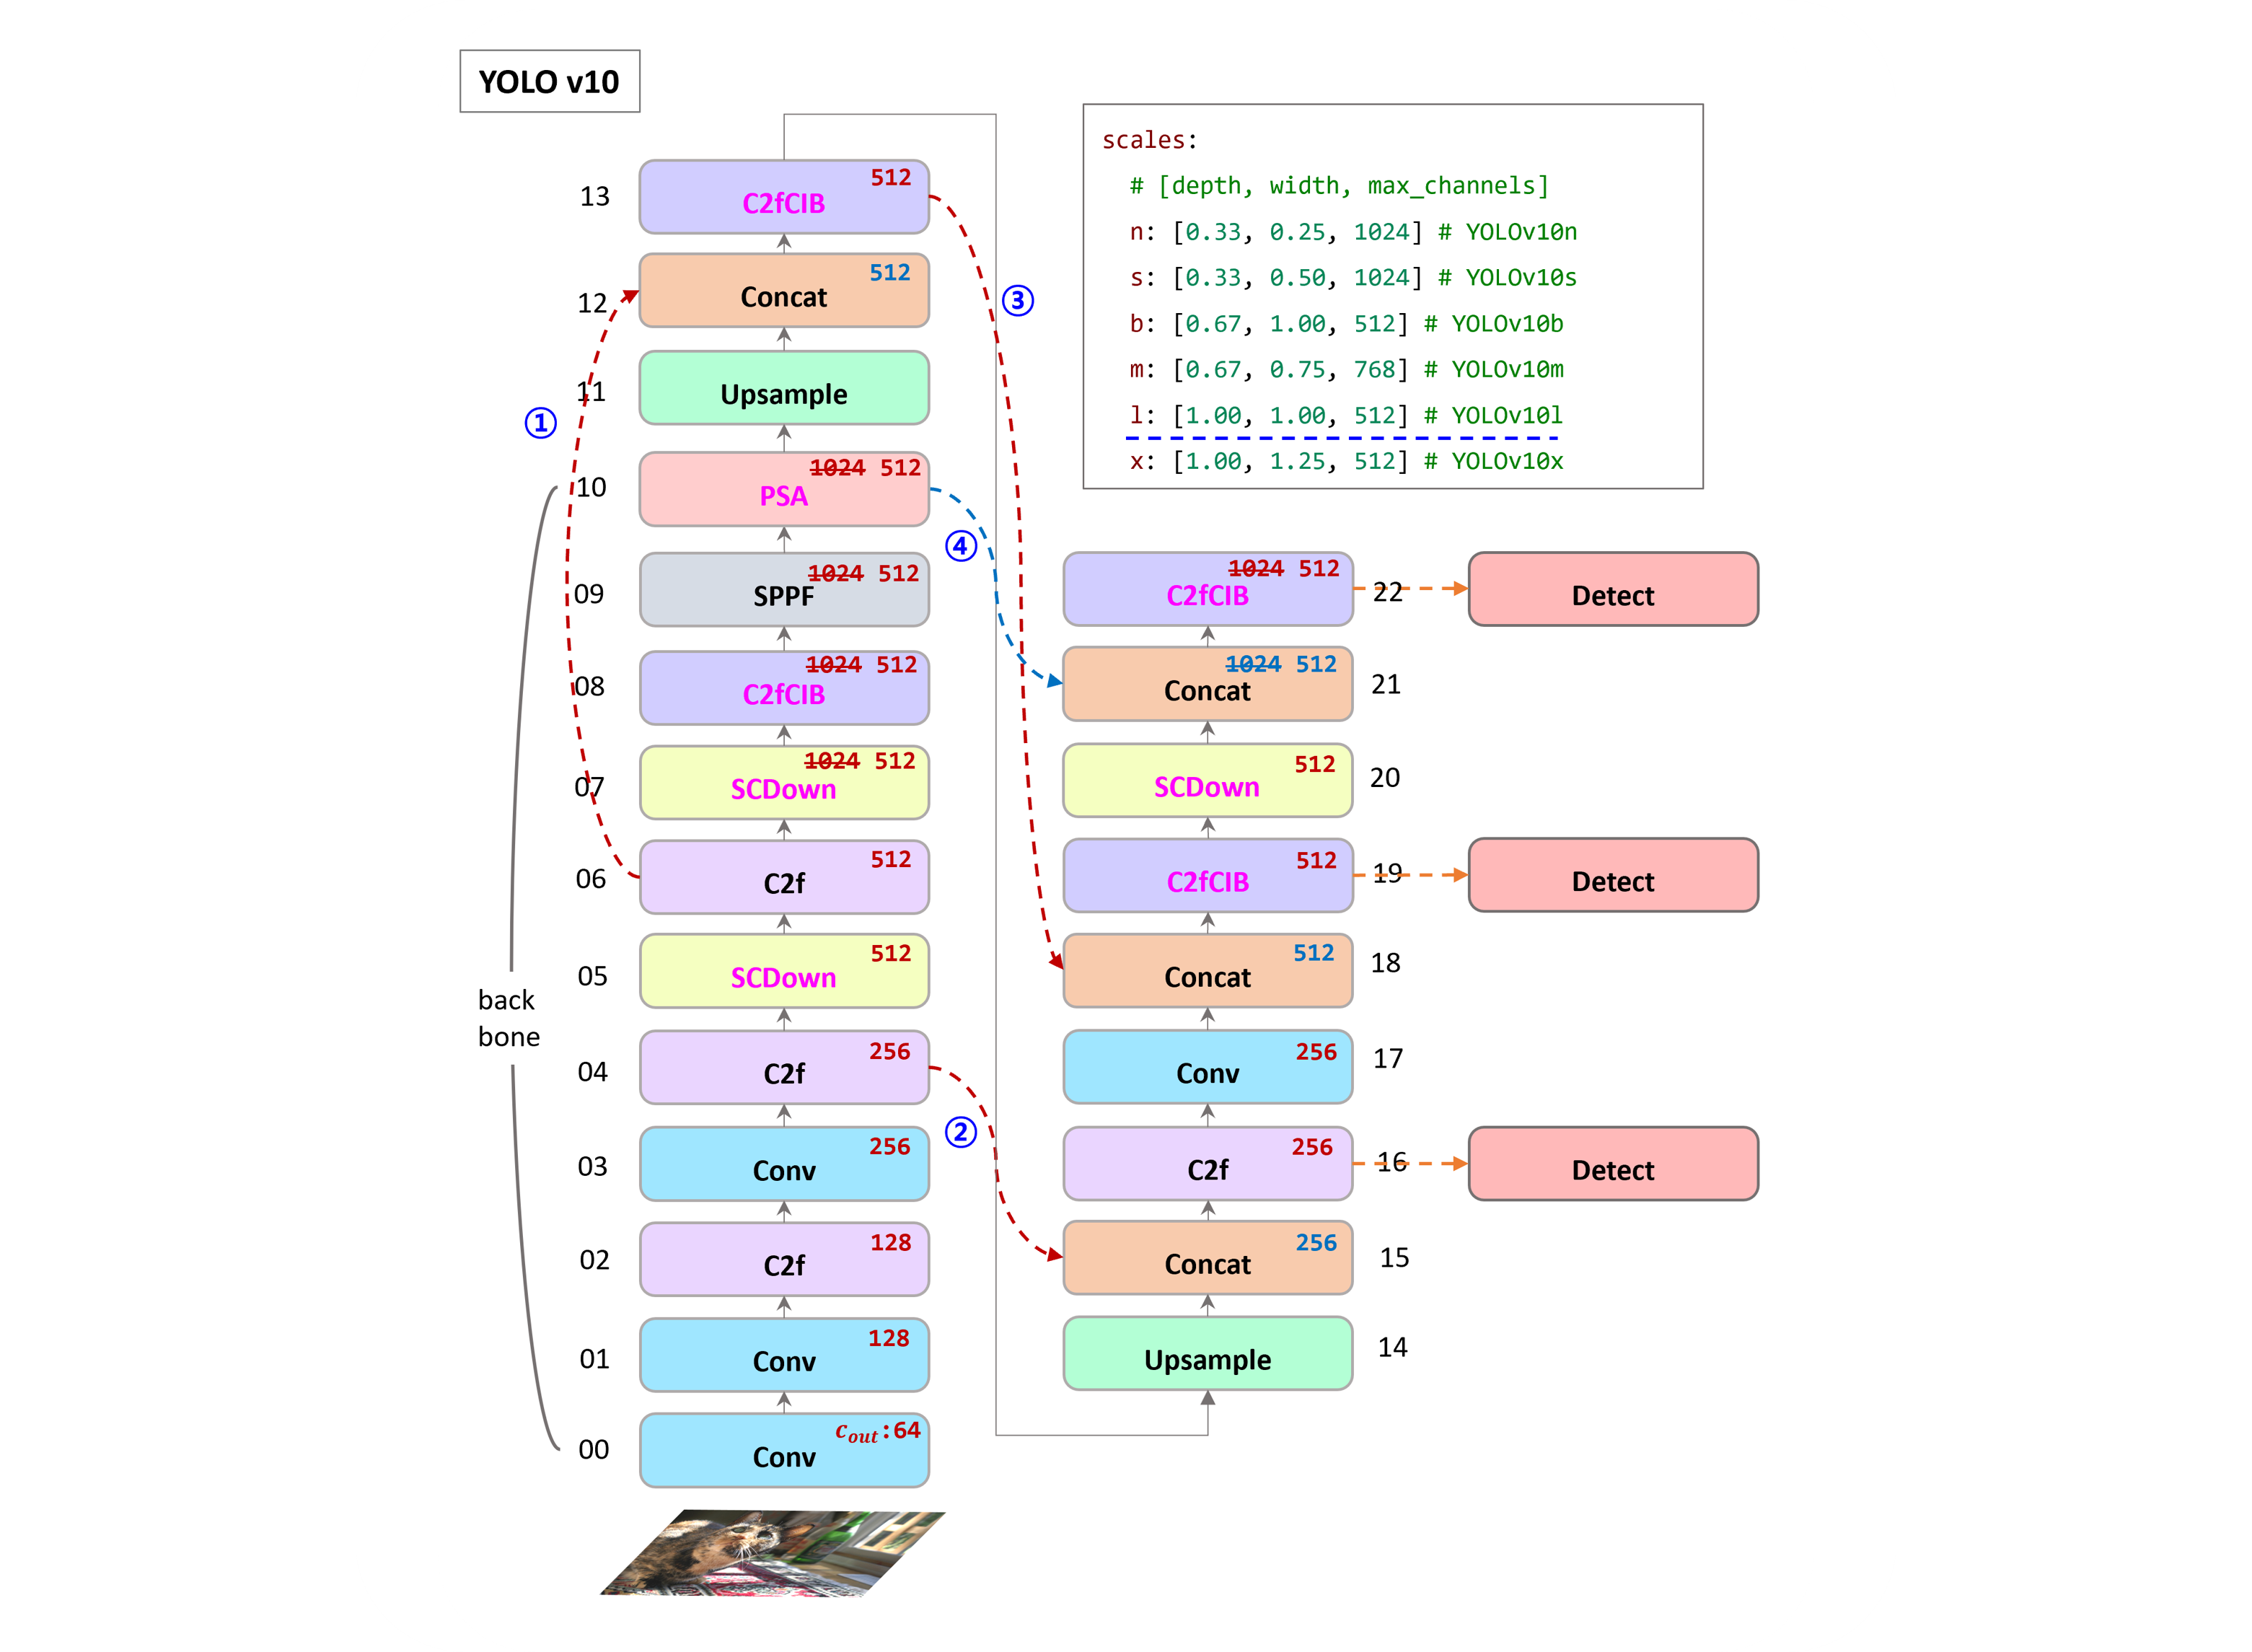
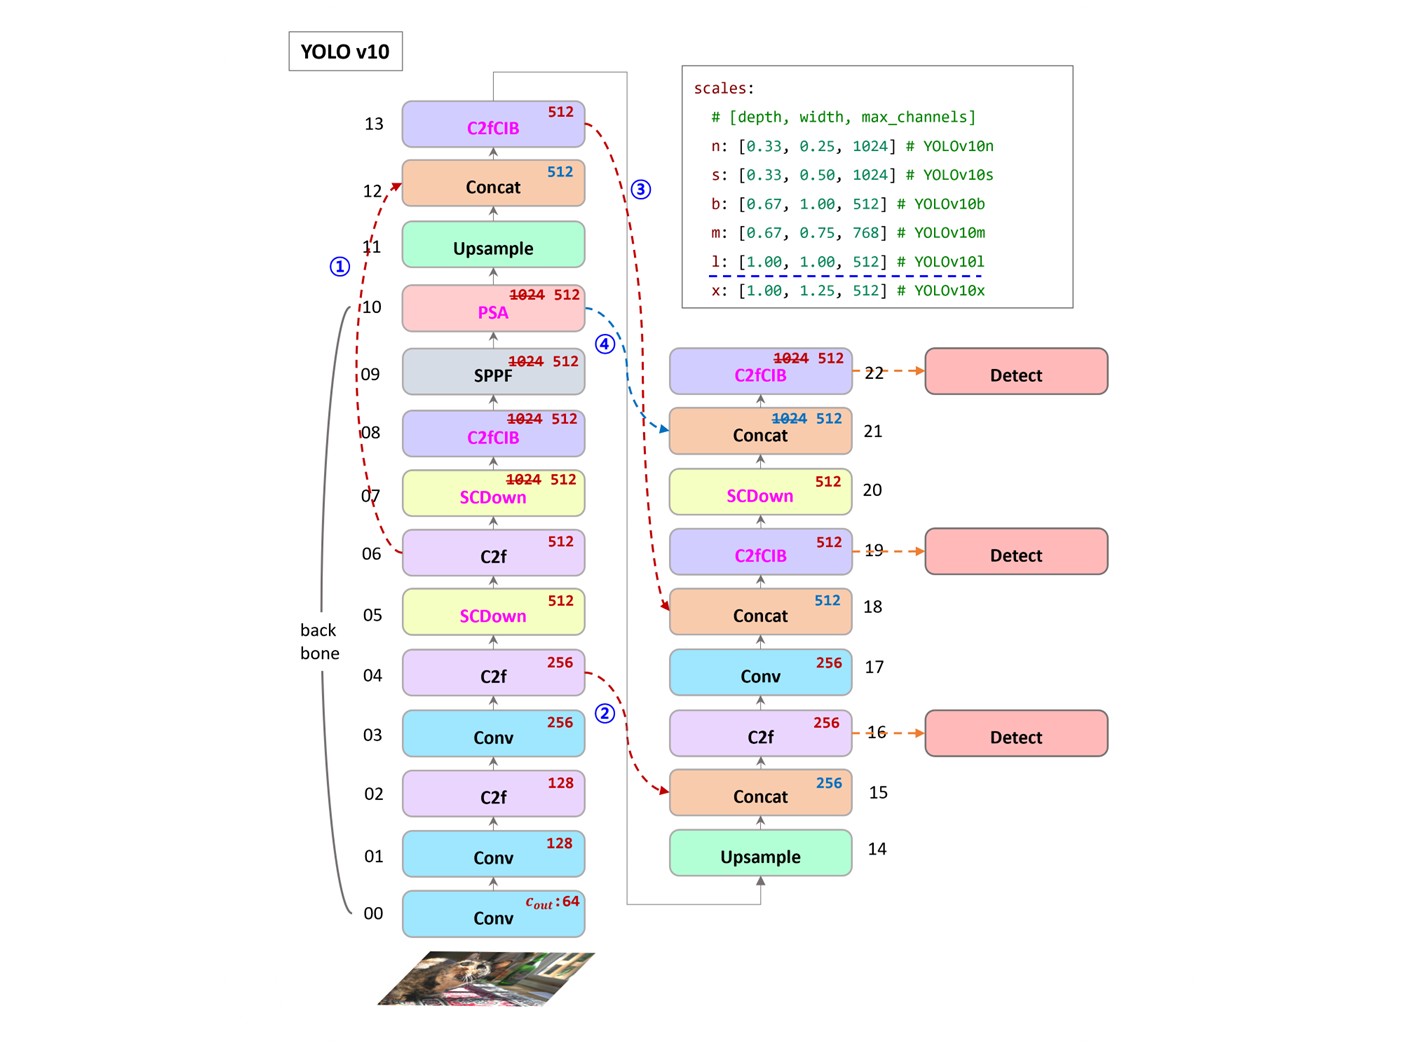
- v8 SPPF 가 마지막 layer 였다면, v10 은 PSA (Self-Attention) 이 들어갔다.
PSA는 Position-wise Spatial Attention.- Self-Attention layer 가 들어가게 하기 위해
SCDown으로 채널 Downsample 을 했다. - 기존은 C2f 만 사용했다면, CIB (Conditional Identity Block) 으로
n(nano),s(small) 일때, 모델 크기를 줄이기 위해서RepVGG기법을 사용한다.
[-1, 3, C2fCIB, [1024, True, True]]Argument 가 2개 사용,m,b,l,x일때는RepVGG는 사용하지 않는다.
- v8 은 모델 크기
- base model 은 같이 쓰고,
[depth, width, max_channels]만 조절한다. - conf 파일이
obb,pose,seg등 tasks 마다 나누어져 있다.
- base model 은 같이 쓰고,
- v10 은 모델 크기
- base model 골격은 같지만, layer 들이 조금씩 다르다.
- conf 파일이 모델 크기마다 나누어져 있고, tasks 는 같이 사용하고 있다.
- 참고로 v10 의
b모델은 balanced version 이다.
backbone
[block] SCDown
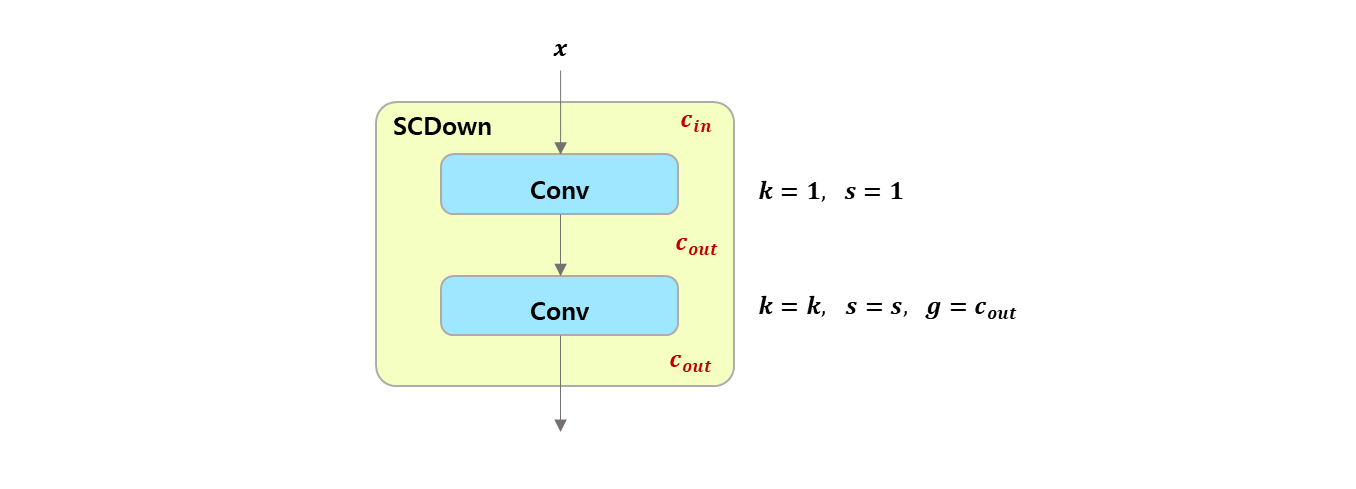
class SCDown(nn.Module):
    def __init__(self, c1, c2, k, s):
        """
        Spatial Channel Downsample (SCDown) module.

        Args:
            c1 (int): Number of input channels.
            c2 (int): Number of output channels.
            k (int): Kernel size for the convolutional layer.
            s (int): Stride for the convolutional layer.
        """
        super().__init__()
        self.cv1 = Conv(c1, c2, 1, 1)
        self.cv2 = Conv(c2, c2, k=k, s=s, g=c2, act=False)

    def forward(self, x):
        """
        Forward pass of the SCDown module.

        Args:
            x (torch.Tensor): Input tensor.

        Returns:
            (torch.Tensor): Output tensor after applying the SCDown module.
        """
        return self.cv2(self.cv1(x))
Depthwise Separable Convolution은 Depthwise Conv 다음 Pointwise Conv 인데..Spatial Channel Downsample은 Pointwise Conv 다음 Depthwise Conv 이다.
Pointwise Convolution
-
kernel크기가 일 경우 입력 채널의 정보를 결합하여 새로운 출력을 생성.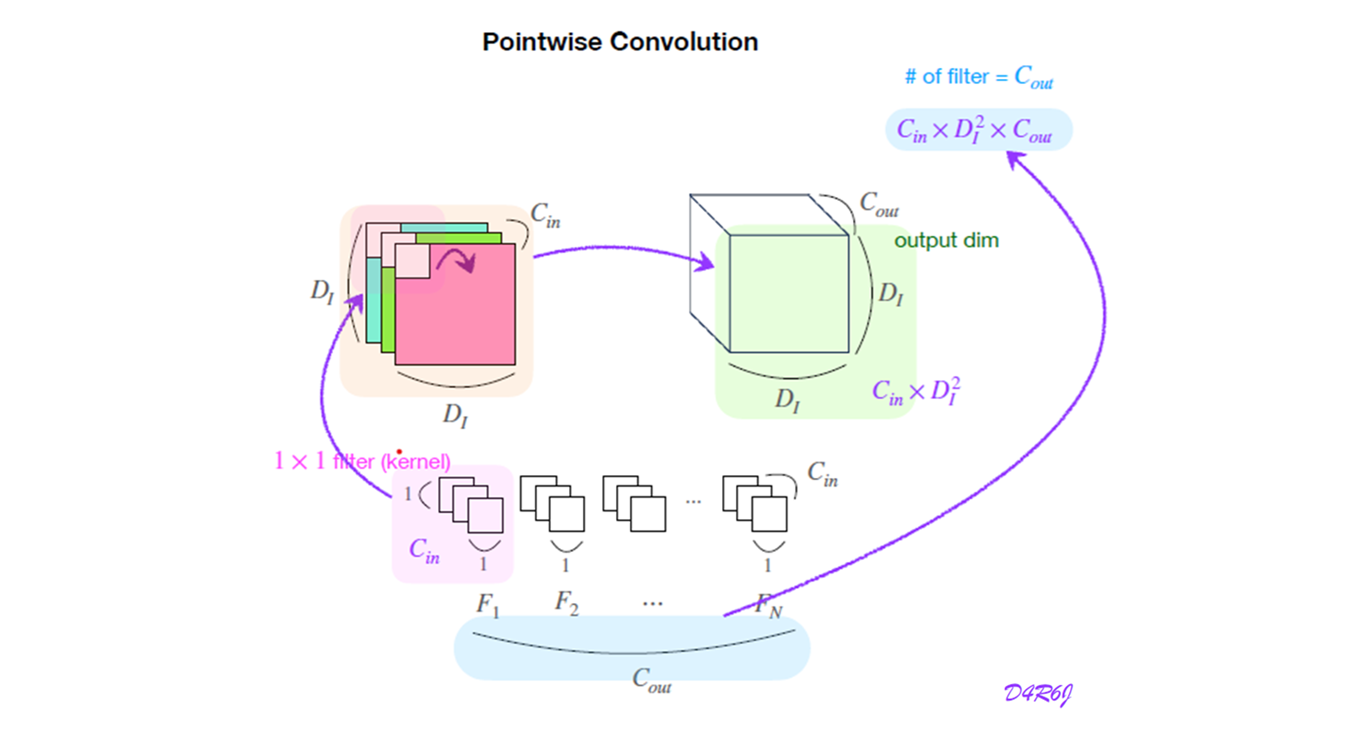
- 모든 channel 에 대해 하나의 kernel 이 적용.
Depthwise Convolution
-
일 경우이고,
group 또한 같은 channel 로 설정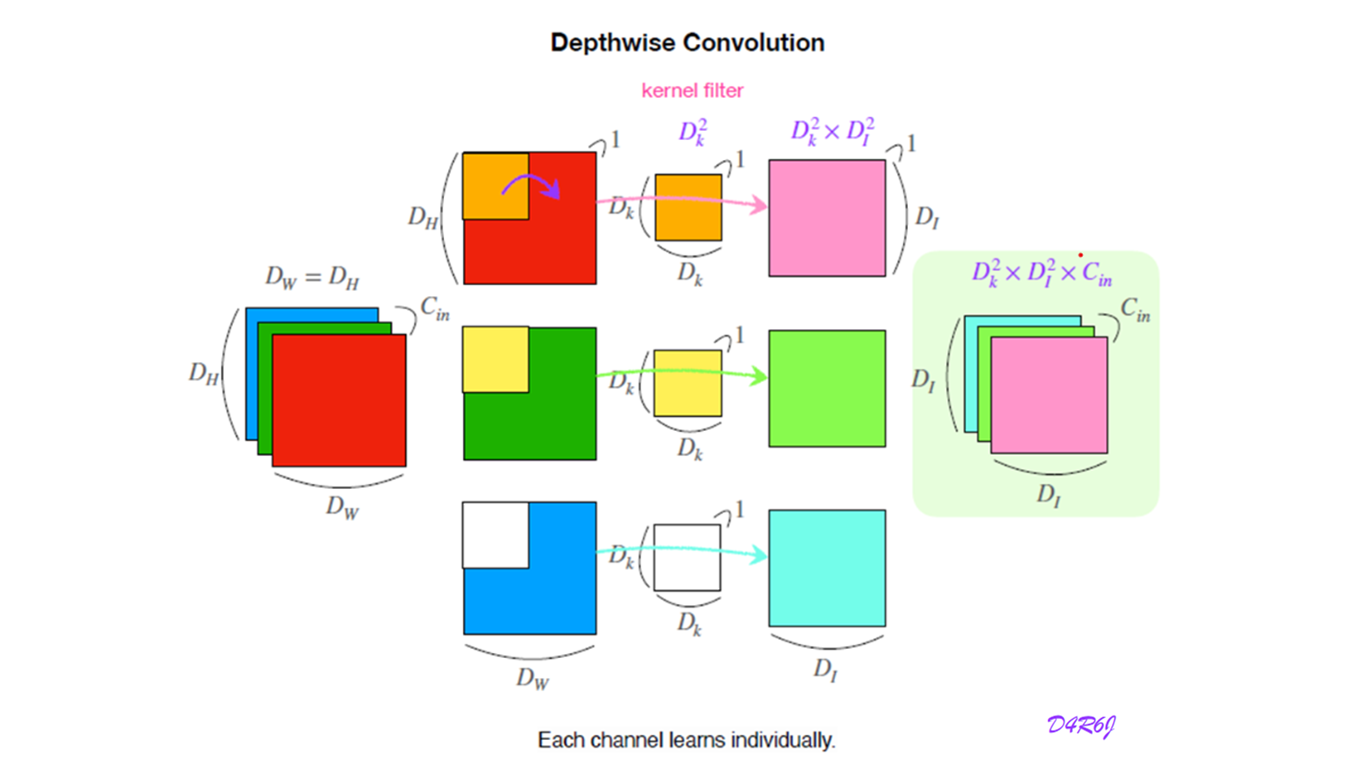
- input 채널에 독립적인 filter 를 적용.
number of parameters
-
이 block 의 learnable parameter 수를 계산 해보자.

-
YOLO v10 structure
model.5.cv1.conv.weight False 131072 [512, 256, 1, 1] -0.000754 0.00819 torch.float32 model.5.cv1.bn.weight False 512 [512] 0.968 0.101 torch.float32 model.5.cv1.bn.bias False 512 [512] -0.746 0.405 torch.float32 model.5.cv2.conv.weight False 4608 [512, 1, 3, 3] 0.000167 0.0182 torch.float32 model.5.cv2.bn.weight False 512 [512] 0.998 0.133 torch.float32 model.5.cv2.bn.bias False 512 [512] 2.21e-07 9.74e-06 torch.float32 model.6.cv1.conv.weight False 262144 [512, 512, 1, 1] 4.71e-05 0.00666 torch.float32 -
sample code
SCDownmoduleConv2d뺀 나머지는 연산 계산을 위해 뺐다.
class Conv(nn.Module): def __init__(self, c1, c2, k=1, s=1, p=None, g=1, d=1): super(Conv, self).__init__() self.conv = nn.Conv2d(c1, c2, k, s, autopad(k, p, d), groups=g, bias=False) def forward(self, x): return self.conv(x) class SCDown(nn.Module): def __init__(self, c1, c2, k, s): super(SCDown, self).__init__() self.cv1 = Conv(c1, c2, 1, 1) self.cv2 = Conv(c2, c2, k=k, s=s, g=c2) def forward(self, x): return self.cv2(self.cv1(x)) c_in = 256 input_data = torch.randn(1, 256, 512, 512) device = torch.device("cuda" if torch.cuda.is_available() else "cpu") model = SCDown(c1=256, c2=512, k=3, s=2).to(device=device) summary(model, (256, 512, 512))- example
c_in = 256 c_out = 512 h = 1024 w = 1024 kernel = 3 stride = 2 input_data = torch.randn(1, c_in, h, w) device = torch.device("cuda" if torch.cuda.is_available() else "cpu") model = SCDown(c1=c_in, c2=c_out, k=kernel, s=stride).to(device=device) summary(model, (c_in, h, w))torchsummary결과yolov10architecture 와 같이 나온다.---------------------------------------------------------------- Layer (type) Output Shape Param # ================================================================ Conv2d-1 [-1, 512, 512, 512] 131,072 Conv-2 [-1, 512, 512, 512] 0 Conv2d-3 [-1, 512, 256, 256] 4,608 Conv-4 [-1, 512, 256, 256] 0 ================================================================ -
parameter formula
+1은 bias 가 있을 경우.g는 group
self.cv1 = Conv(c1, c2, 1, 1)self.cv2 = Conv(c2, c2, k=k, s=s, g=c2)- feature map 은 입력 데이터가 변환되는 결과이지, 학습해야 하는 parameter 가 아니다.
- 학습되는 parameter 는 kernel 의 weight 이므로, (bias 포함)
-
Conv2d바로 사용시 Parameter 수
계산 상 9배 차이가 나게 된다.
[block] RepVGGDW
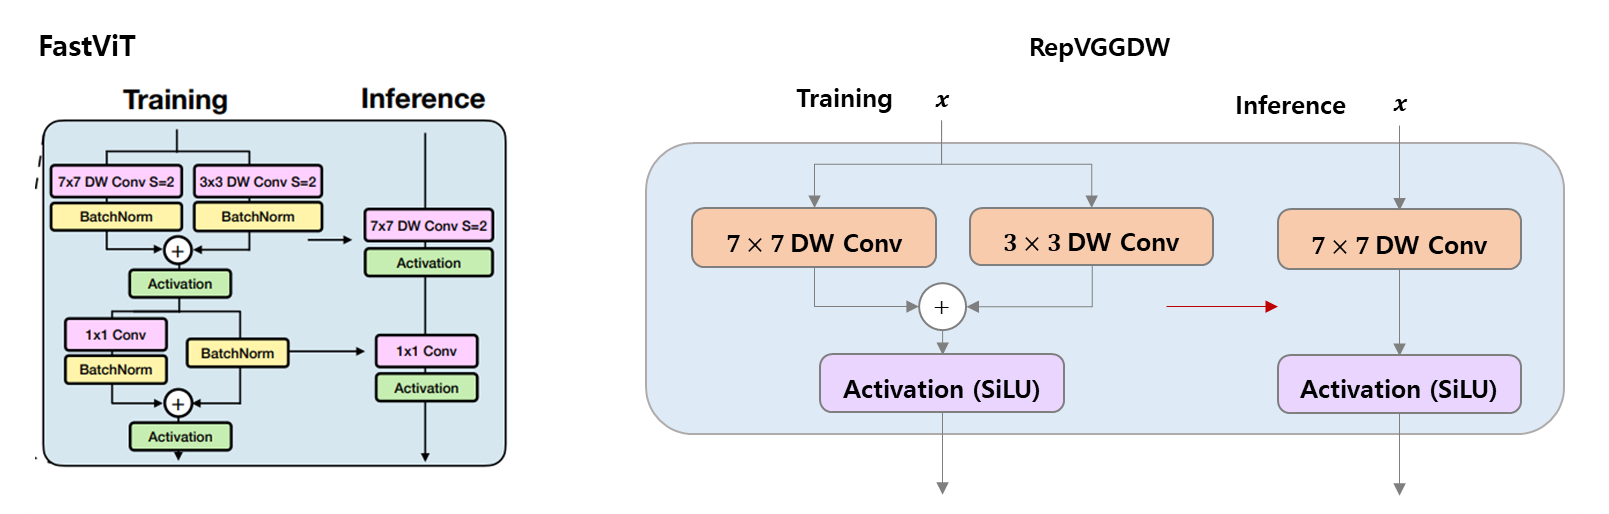
FastViT 에서 봤던 RepVGG + DWConv.. FastViT Link
RepVGG 구조에 DW separable Conv block 을 나타냈다.
- 이고 gruop 도 channel 이 같아 Depthwise Conv 는 맞다.
- kernel 이
7과3으로 되어 있어서 두 가지 의미로 해석이 가능.- kernel 을 사용하여 넓게 공간을 보면서 큰 물체, 주변을 rough 하게 본다.
- kernel 을 사용하여 자세히 공간을 보면서 작은 물체, 주변을 detail 하게 본다.
- 엄밀히 말해서, 여기까지는
Depthwise Conv가 된다.Pointwise Conv는 없다. - 다음 step 에서
k=1짜리Conv2d가 추가되면 완전한DW separable Conv가 된다.
class RepVGGDW(torch.nn.Module):
    """RepVGGDW is a class that represents a depth wise separable convolutional block in RepVGG architecture."""

    def __init__(self, ed) -> None:
        super().__init__()
        self.conv = Conv(ed, ed, 7, 1, 3, g=ed, act=False)
        self.conv1 = Conv(ed, ed, 3, 1, 1, g=ed, act=False)
        self.dim = ed
        self.act = nn.SiLU()

    def forward(self, x):
        """
        Performs a forward pass of the RepVGGDW block.

        Args:
            x (torch.Tensor): Input tensor.

        Returns:
            (torch.Tensor): Output tensor after applying the depth wise separable convolution.
        """
        return self.act(self.conv(x) + self.conv1(x))

    def forward_fuse(self, x):
        """
        Performs a forward pass of the RepVGGDW block without fusing the convolutions.

        Args:
            x (torch.Tensor): Input tensor.

        Returns:
            (torch.Tensor): Output tensor after applying the depth wise separable convolution.
        """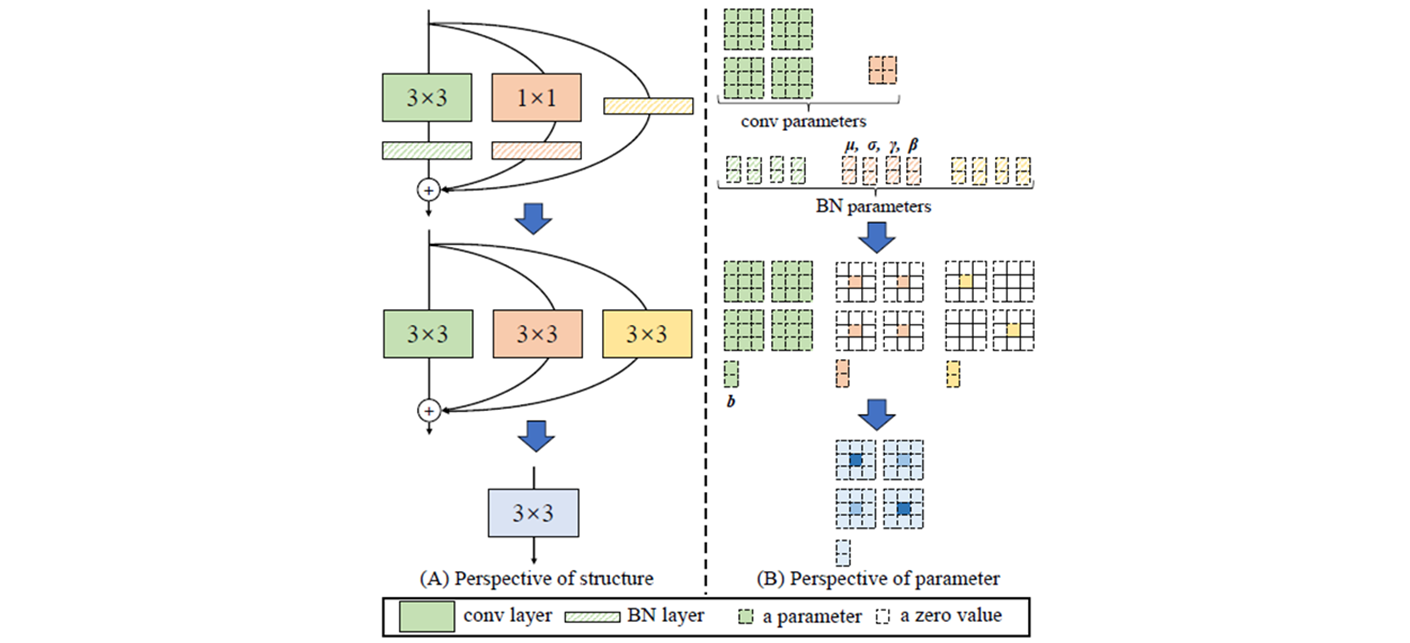
return self.act(self.conv(x))- RepVGGDW 는 inference time 과 분리해야 한다.
- 7 과 3 의 4가 차이나서,
conv1_w에 pad 를[2, 2, 2, 2]붙인다.
RepVGG (with FastViT post) Link
RepVGG Paper Link
    @torch.no_grad()
    def fuse(self):
        """
        Fuses the convolutional layers in the RepVGGDW block.

        This method fuses the convolutional layers and updates the weights and biases accordingly.
        """
        conv = fuse_conv_and_bn(self.conv.conv, self.conv.bn)
        conv1 = fuse_conv_and_bn(self.conv1.conv, self.conv1.bn)

        conv_w = conv.weight
        conv_b = conv.bias
        conv1_w = conv1.weight
        conv1_b = conv1.bias

        conv1_w = torch.nn.functional.pad(conv1_w, [2, 2, 2, 2])

        final_conv_w = conv_w + conv1_w
        final_conv_b = conv_b + conv1_b

        conv.weight.data.copy_(final_conv_w)
        conv.bias.data.copy_(final_conv_b)

        self.conv = conv
        del self.conv1
self.conv(x) + self.conv1(x)를 더하고self.conv1을 지운다.- 실제로 사용하는 모델은
n과s이고, 나머지는 사용하지 않는다.
[block] CIB
의문인 부분이 ..
c2를 e (0.5) 로 곱하여 반으로 줄였는데,2 * c_로2를 곱해서 다 살렸다. 이 영향도는 더 적은 소수점으로 설정 해야 의미가 있어보인다.
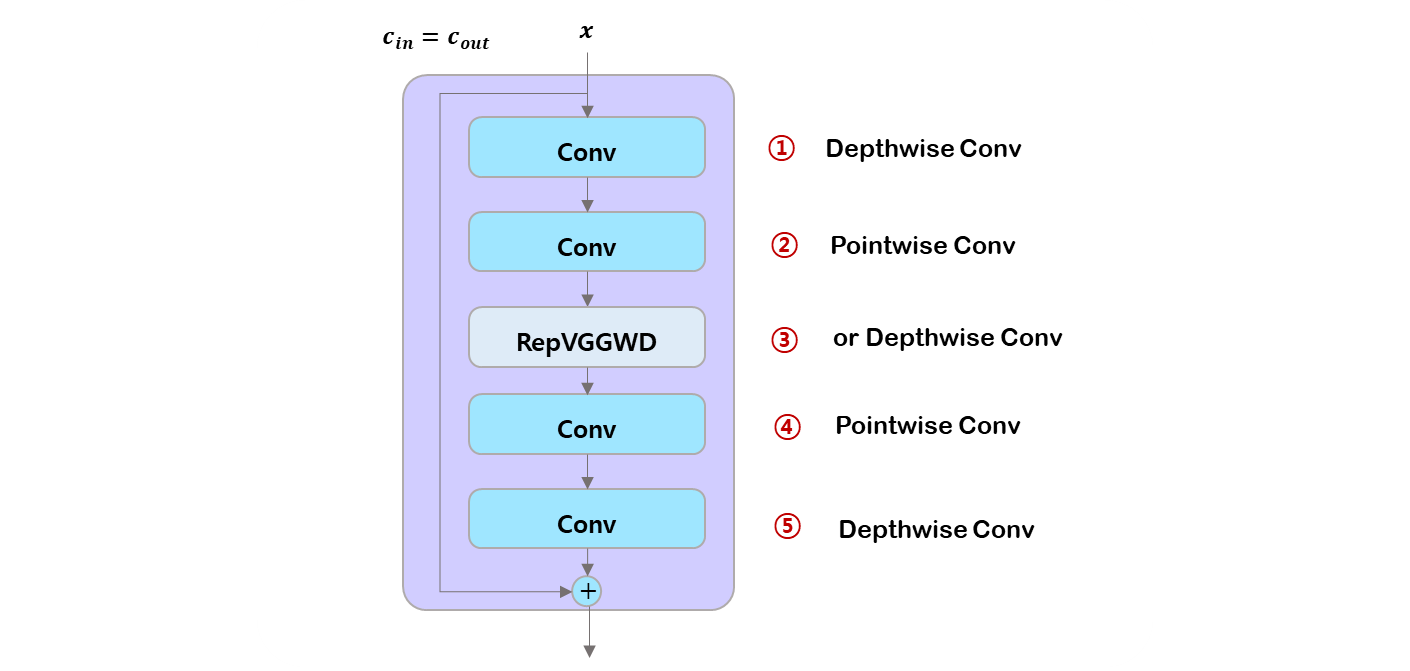
class CIB(nn.Module):
    """
    Conditional Identity Block (CIB) module.

    Args:
        c1 (int): Number of input channels.
        c2 (int): Number of output channels.
        shortcut (bool, optional): Whether to add a shortcut connection. Defaults to True.
        e (float, optional): Scaling factor for the hidden channels. Defaults to 0.5.
        lk (bool, optional): Whether to use RepVGGDW for the third convolutional layer. Defaults to False.
    """

    def __init__(self, c1, c2, shortcut=True, e=0.5, lk=False):
        """Initializes the custom model with optional shortcut, scaling factor, and RepVGGDW layer."""
        super().__init__()
        c_ = int(c2 * e)  # hidden channels
        self.cv1 = nn.Sequential(
            Conv(c1, c1, 3, g=c1),
            Conv(c1, 2 * c_, 1),
            RepVGGDW(2 * c_) if lk else Conv(2 * c_, 2 * c_, 3, g=2 * c_),
            Conv(2 * c_, c2, 1),
            Conv(c2, c2, 3, g=c2),
        )

        self.add = shortcut and c1 == c2

    def forward(self, x):
return x + self.cv1(x) if self.add else self.cv1(x)- 이므로
Depthwise Conv가 맞다. - 이므로
Pointwise Conv가 맞다. lk가True면RepVGGDW, 아니면, 이므로Depthwise Conv가 맞다.- 이므로
Pointwise Conv가 맞다. - 이므로
Depthwise Conv가 맞다.
말을 붙이자면,
- in channel 만큼의 channel 마다 각 특징을 단독 kernel 로 학습하고,
- channel 수를 in channel 에서 축소 혹은 확장 channel 로 바꾸고,
- 0.5 면 같고, 더 작으면 bottleneck, 더 크면 extended.
- 축소 혹은 확장 channel 만큼의 channel 마다 각 특징을 단독 kernel 로 학습하고,
- channel 수를 축소 혹은 확장 channel 에서 out channel 로 바꾸고,
- out channel 만큼의 channel 마다 각 특징을 단독 kernel 로 학습한다.
[block] C2fCIB
YOLO-v8 에서 Cf2 block link 에서 Bottleneck block 을 ModuleList 에 넣는 구조에서의 변형.
- (주관적인 생각) Depthwise Seperable Conv 떡칠... 인거 같다!?
class C2fCIB(C2f):
    """
    C2fCIB class represents a convolutional block with C2f and CIB modules.

    Args:
        c1 (int): Number of input channels.
        c2 (int): Number of output channels.
        n (int, optional): Number of CIB modules to stack. Defaults to 1.
        shortcut (bool, optional): Whether to use shortcut connection. Defaults to False.
        lk (bool, optional): Whether to use local key connection. Defaults to False.
        g (int, optional): Number of groups for grouped convolution. Defaults to 1.
        e (float, optional): Expansion ratio for CIB modules. Defaults to 0.5.
    """

    def __init__(self, c1, c2, n=1, shortcut=False, lk=False, g=1, e=0.5):
        """Initializes the module with specified parameters for channel, shortcut, local key, groups, and expansion."""
        super().__init__(c1, c2, n, shortcut, g, e)
        self.m = nn.ModuleList(CIB(self.c, self.c, shortcut, e=1.0, lk=lk) for _ in range(n))
그 CIB 블럭을 range n 만큼 모은다.
- 근데 code 가
__init__에서 default 가e=0.5인데, 정작 함수는e=1.0으로 넣네? - default 로 아무것도 안넣으면 extended 네. out_channel 에 2 배를 곱하잖아?
- 개인적으로 default 가 0.5 같은데 ...
[block] Attention
class Attention(nn.Module):
    """
    Attention module that performs self-attention on the input tensor.

    Args:
        dim (int): The input tensor dimension.
        num_heads (int): The number of attention heads.
        attn_ratio (float): The ratio of the attention key dimension to the head dimension.

    Attributes:
        num_heads (int): The number of attention heads.
        head_dim (int): The dimension of each attention head.
        key_dim (int): The dimension of the attention key.
        scale (float): The scaling factor for the attention scores.
        qkv (Conv): Convolutional layer for computing the query, key, and value.
        proj (Conv): Convolutional layer for projecting the attended values.
        pe (Conv): Convolutional layer for positional encoding.
    """

    def __init__(self, dim, num_heads=8, attn_ratio=0.5):
        """Initializes multi-head attention module with query, key, and value convolutions and positional encoding."""
        super().__init__()
        self.num_heads = num_heads
        self.head_dim = dim // num_heads
        self.key_dim = int(self.head_dim * attn_ratio)
        self.scale = self.key_dim**-0.5
        nh_kd = nh_kd = self.key_dim * num_heads
        h = dim + nh_kd * 2
        self.qkv = Conv(dim, h, 1, act=False)
        self.proj = Conv(dim, dim, 1, act=False)
        self.pe = Conv(dim, dim, 3, 1, g=dim, act=False)

    def forward(self, x):
        """
        Forward pass of the Attention module.

        Args:
            x (torch.Tensor): The input tensor.

        Returns:
            (torch.Tensor): The output tensor after self-attention.
        """
        B, C, H, W = x.shape
        N = H * W
        qkv = self.qkv(x)
        q, k, v = qkv.view(B, self.num_heads, self.key_dim * 2 + self.head_dim, N).split(
            [self.key_dim, self.key_dim, self.head_dim], dim=2
        )

        attn = (q.transpose(-2, -1) @ k) * self.scale
        attn = attn.softmax(dim=-1)
        x = (v @ attn.transpose(-2, -1)).view(B, C, H, W) + self.pe(v.reshape(B, C, H, W))
        x = self.proj(x)
        return x
query, key, value 로 split 하고
attn = (q.transpose(-2, -1) @ k) * self.scale
attn = attn.softmax(dim=-1)

self.proj = Conv(dim, dim, 1, act=False)
self.pe = Conv(dim, dim, 3, 1, g=dim, act=False)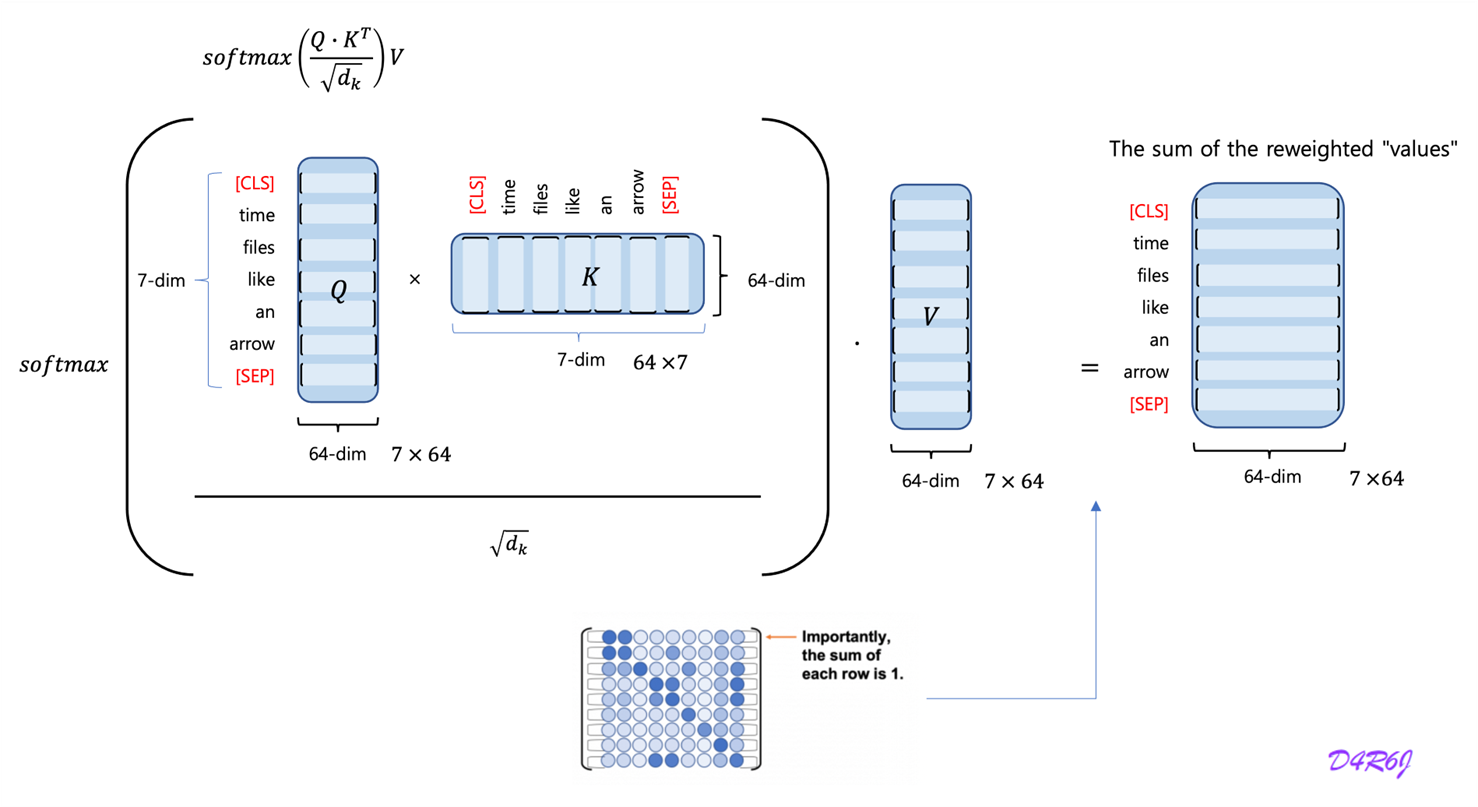
일단, 이 상태에서 Positional Encoding 이 재밌게 되어 있다.
- Transformer PE 는
sin, cos의 주기. - Llama rotary PE 로 degree 로 rotate.
- ViT 의 로 하나 대롱대롱 달고 다니는것.
- FastViT 처럼 PE 는 Depthwise Conv 로 만들어진다.
- channel 마다 독립적으로 연산하여, 각 공간의 정보들을 보전한다.
- 입력과 출력의 개수가 많을 때, 계산의 효율성이 높아지는 것은 당연하다.
- 숫자가 아닌 학습 가능하게 하여, 데이터에 맞게 parameter 를 학습 시킬 수 있다.
다음,projection Linear 대신 Conv 로 하는 것은 처음 봤다.
- 일단 in, out channel 이
dim이어서 channel 은 변하지 않는다. - pointwise 라고 생각해보면, kernel 의 weight 이 학습이 될 것이다.
- 각 channel 의 짜리 weight (kernel) 이 학습하게 될 것이다.
[block] PSA
Position-wise Spatial Attention
class PSA(nn.Module):
    """
    Position-wise Spatial Attention module.

    Args:
        c1 (int): Number of input channels.
        c2 (int): Number of output channels.
        e (float): Expansion factor for the intermediate channels. Default is 0.5.

    Attributes:
        c (int): Number of intermediate channels.
        cv1 (Conv): 1x1 convolution layer to reduce the number of input channels to 2*c.
        cv2 (Conv): 1x1 convolution layer to reduce the number of output channels to c.
        attn (Attention): Attention module for spatial attention.
        ffn (nn.Sequential): Feed-forward network module.
    """

    def __init__(self, c1, c2, e=0.5):
        """Initializes convolution layers, attention module, and feed-forward network with channel reduction."""
        super().__init__()
        assert c1 == c2
        self.c = int(c1 * e)
        self.cv1 = Conv(c1, 2 * self.c, 1, 1)
        self.cv2 = Conv(2 * self.c, c1, 1)

        self.attn = Attention(self.c, attn_ratio=0.5, num_heads=self.c // 64)
        self.ffn = nn.Sequential(Conv(self.c, self.c * 2, 1), Conv(self.c * 2, self.c, 1, act=False))

    def forward(self, x):
        """
        Forward pass of the PSA module.

        Args:
            x (torch.Tensor): Input tensor.

        Returns:
            (torch.Tensor): Output tensor.
        """
        a, b = self.cv1(x).split((self.c, self.c), dim=1)
        b = b + self.attn(b)
        b = b + self.ffn(b)
return self.cv2(torch.cat((a, b), 1))e=0.5로 두고 2 를 곱해서cv1,cv2의 channel 은model.10.cv1.conv.weight False 262144 [512, 512, 1, 1] model.10.cv2.conv.weight False 262144 [512, 512, 1, 1]self.ffn에서 channel 은model.10.ffn.0.conv.weight False 131072 [512, 256, 1, 1] model.10.ffn.1.conv.weight False 131072 [256, 512, 1, 1]- 설명에
with channel reduction.이라는데..l사이즈는 일단 그렇지는 않다.
model architecture
result
FastViT에서 본Depthwise Separable Conv구조를 block 마다 넣어서 굉장히 재밌었다.- channel 의 경량화를 시키고 Attention 을 넣는 것은 YOLO 도 들어왔으니..
- nano, small 모델에서 학습은 7x7, 3x3 DWConv 를 하고 나서 no_grad 에서 과감하게
self.conv1삭제 하는 것은 볼때마다 흥미롭다.
이런 방법은 대세가 아닐까 싶다.
Yolo 와 경량화 + attention 이 합쳤졌으니.. 더 나올 것이 있을까?
구조 파악은 얼추 됬으니 논문 봐봐야지.