launch file이란
실행해야 하는 node가 많아지면 이를 일일이 ros2 run으로 실행시키는 게 번거로워진다. ros launch는 여러 개의 node를 동시에 실행할 수 있게 하여 이런 문제를 해결한다. 또, 실행과 동시에 parameter도 정할 수 있게 해준다. 주로 정해진 configuration으로 여러 node를 매번 실행시켜야 할 때 사용한다. 나중에 알게될 TF나 URDF 파일을 실행할 때도 유용하다.
작성법
launch file은 yaml, xml, python file로 만들 수 있다. tag를 사용하는 xml 파일이 가장 짧고 간단하지만, 여러가지 기능을 수행하려면(launch file 안에서 또 다른 launch file 실행 등) python 또는 yaml로 작성해야하는 듯 하고, 계속해서 python node file에 대해 다루고 있으므로 python 기준으로 launch file을 작성해보도록 하겠다.
예제로 node가 실행되는 것까지 확인을 할텐데, 이는 토픽, 서비스 등의 예제로 활용했던 turtlebot을 이용할 것이다.
우선 turtlebot이 깔려있지 않다면, turtlebot을 설치해야 한다.
sudo apt update
sudo apt install ros-dashing-turtlesim
이 명령어로 turtlesim을 설치해준다.
그 뒤 사용 중인 workspace/src에 launch file을 넣을 패키지를 만든다.
ros2 pkg create --build-type ament_python py_launch_ex
cd py_launch_ex
mkdir launch
cd launch
py_launch_ex 폴더 아래에 launch 파일을 넣을 launch 폴더를 만들어주고, 그 안으로 이동하였다. 보통 패키지 내의 launch 폴더에 launch 파일을 넣고, launch file은 launch.py로 끝나는 게 국룰이다.
그 다음 setup.py에 다음을 추가해주어야 한다.
import os
from glob import glob
# Other imports ...

package_name = 'py_launch_example'

setup(
    # Other parameters ...
    data_files=[
        # ... Other data files
        # Include all launch files.
        (os.path.join('share', package_name, 'launch'), glob(os.path.join('launch', '*launch.[pxy][yma]*')))
    ]
)
package name은 이미 있을 것이고 라이브러리 임포트와 data files에 path를 추가해주는 작업이 필요하다. 이렇게 해야 launch 파일을 읽어오고 실행할 수 있다.
그 뒤 다음과 같은 ex_launch.py 파일을 만들어준다.
from launch import LaunchDescription
from launch_ros.actions import Node

def generate_launch_description():
    return LaunchDescription([
        Node(
            package='turtlesim',
            namespace='turtlesim1',
            executable='turtlesim_node',
            name='sim'
        ),
        Node(
            package='turtlesim',
            namespace='turtlesim2',
            executable='turtlesim_node',
            name='sim'
        ),
        Node(
            package='turtlesim',
            executable='mimic',
            name='mimic',
            remappings=[
                ('/input/pose', '/turtlesim1/turtle1/pose'),
                ('/output/cmd_vel', '/turtlesim2/turtle1/cmd_vel'),
            ]
        )
    ])
사용법은 단순하다. 실행할 노드의 package, executable을 작성해주면 된다. 나머지는 선택인 듯 하다. 예를 들어 첫번째 노드와 두번째 노드는 같은 executable을 실행하고 이름도 같은 대신 namespace가 달라 충돌하지 않는다. 이런 경우 namespace를 따로 지정해준다. 세번째 노드는 remapping을 통해 첫번째 노드의 움직임을 두번째 노드가 따라하게 만든다. 이런 경우 Node에 토픽 이름을 꼼꼼히 적어주어야 한다.
저장하고, package.xml에 다음을 추가해준다.
<exec_depend>ros2launch</exec_depend>그 뒤 colcon build를 수행하고 ros launch로 실행해준다.
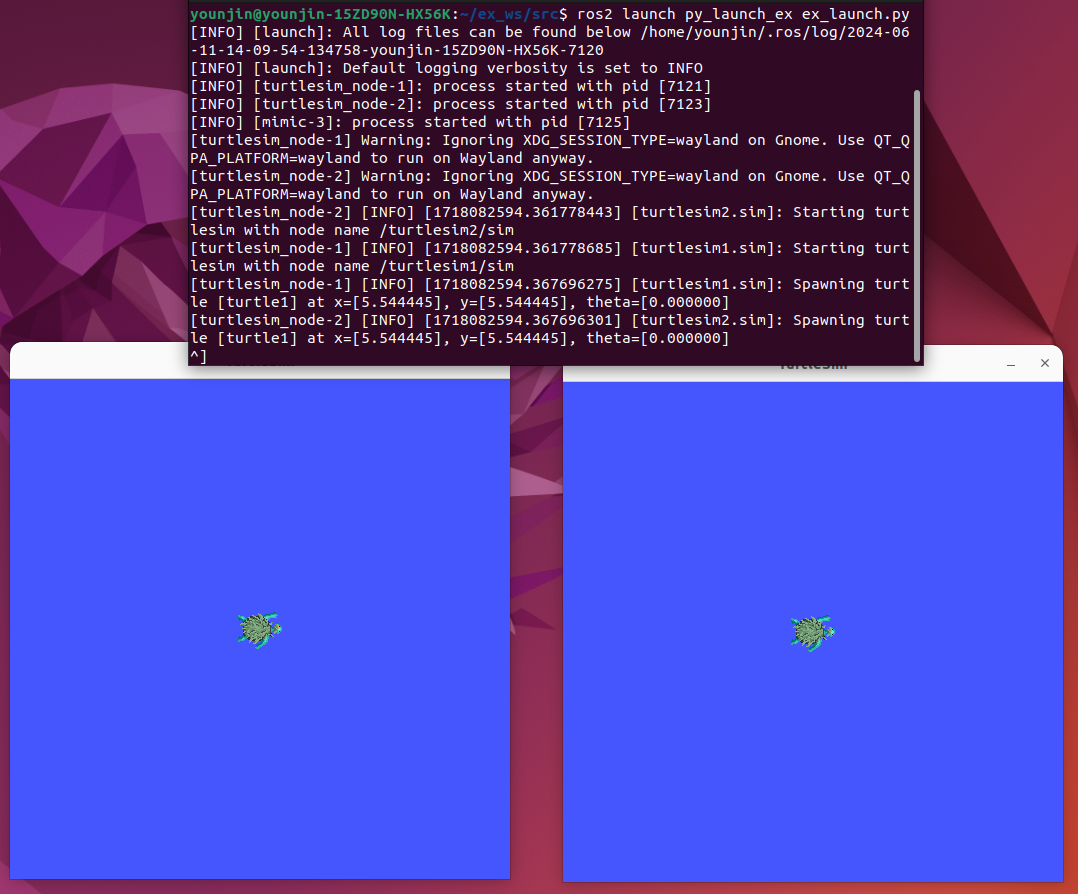
ros2 launch py_launch_ex ex_launch.py그러면 다음과 같은 node가 뜨는 것을 확인해볼 수 있다.
다른 launch file을 launch file에서 실행하기
단순한 예제를 통해 launch file 작성법을 알아보았다. launch file은 다른 launch file을 함께 실행시킬 수도 있다. 이 과정에서 argument 설정도 가능하다. 특히 사용하고자 하는 부품이나 센서가 이미 launch file을 통해 작동할 때 이 방법이 유용하다. launch file 두 개를 작성하여 이를 확인해보자.
마찬가지로 workspace/src에 launch file을 넣을 패키지를 만들고, launch 폴더로 이동한다. 위 예제와 같은 이름을 사용하겠다.
ros2 pkg create --build-type ament_python py_launch_ex
cd py_launch_ex
mkdir launch
cd launch
setup.py와 package.xml을 수정하는 것을 잊지 말자.
그 뒤 다음과 같은 ex_main_launch.py 파일을 작성해준다
from launch_ros.substitutions import FindPackageShare

from launch import LaunchDescription
from launch.actions import IncludeLaunchDescription
from launch.launch_description_sources import PythonLaunchDescriptionSource
from launch.substitutions import PathJoinSubstitution, TextSubstitution


def generate_launch_description():
    colors = {
        'background_r': '200'
    }

    return LaunchDescription([
        IncludeLaunchDescription(
            PythonLaunchDescriptionSource([
                PathJoinSubstitution([
                    FindPackageShare('py_launch_ex'),
                    'launch',
                    'ex_substitutions.launch.py'
                ])
            ]),
            launch_arguments={
                'turtlesim_ns': 'turtlesim2',
                'use_provided_red': 'True',
                'new_background_r': TextSubstitution(text=str(colors['background_r']))
            }.items()
        )
    ])
복잡해보이지만, ex_substitutions.launch.py 파일을 실행하면서 launch_arguments를 넘겨주는 것에 불과하다. ex_substitutions.launch.py는 다음과 같이 작성해준다.
from launch_ros.actions import Node

from launch import LaunchDescription
from launch.actions import DeclareLaunchArgument, ExecuteProcess, TimerAction
from launch.conditions import IfCondition
from launch.substitutions import LaunchConfiguration, PythonExpression


def generate_launch_description():
    #launch argument 선언
    turtlesim_ns = LaunchConfiguration('turtlesim_ns')
    use_provided_red = LaunchConfiguration('use_provided_red')
    new_background_r = LaunchConfiguration('new_background_r')

    turtlesim_ns_launch_arg = DeclareLaunchArgument(
        'turtlesim_ns',
        default_value='turtlesim1'
    )
    use_provided_red_launch_arg = DeclareLaunchArgument(
        'use_provided_red',
        default_value='False'
    )
    new_background_r_launch_arg = DeclareLaunchArgument(
        'new_background_r',
        default_value='200'
    )

    # turtlesim node
    turtlesim_node = Node(
        package='turtlesim',
        namespace=turtlesim_ns,
        executable='turtlesim_node',
        name='sim'
    )
    # command로 process execute
    # turtlesim_ns argument로 spawn을 조정
    spawn_turtle = ExecuteProcess(
        cmd=[[
            'ros2 service call ',
            turtlesim_ns,
            '/spawn ',
            'turtlesim/srv/Spawn ',
            '"{x: 2, y: 2, theta: 0.2}"'
        ]],
        shell=True
    )
    # background_r을 조정
    change_background_r = ExecuteProcess(
        cmd=[[
            'ros2 param set ',
            turtlesim_ns,
            '/sim background_r ',
            '120'
        ]],
        shell=True
    )
    # new_background_r을 조정 - if condition.
    change_background_r_conditioned = ExecuteProcess(
        condition=IfCondition(
            PythonExpression([
                new_background_r,
                ' == 200',
                ' and ',
                use_provided_red
            ])
        ),
        cmd=[[
            'ros2 param set ',
            turtlesim_ns,
            '/sim background_r ',
            new_background_r
        ]],
        shell=True
    )

    return LaunchDescription([
        turtlesim_ns_launch_arg,
        use_provided_red_launch_arg,
        new_background_r_launch_arg,
        turtlesim_node,
        spawn_turtle,
        change_background_r,
        TimerAction(
            period=2.0,
            actions=[change_background_r_conditioned],
        )
    ])
앞서 main에서도 봤었던 argument를 설정해주고, execute process를 넘겨주었다.
마찬가지로 colcon build를 수행한 뒤, main을 실행시켜주면 된다.
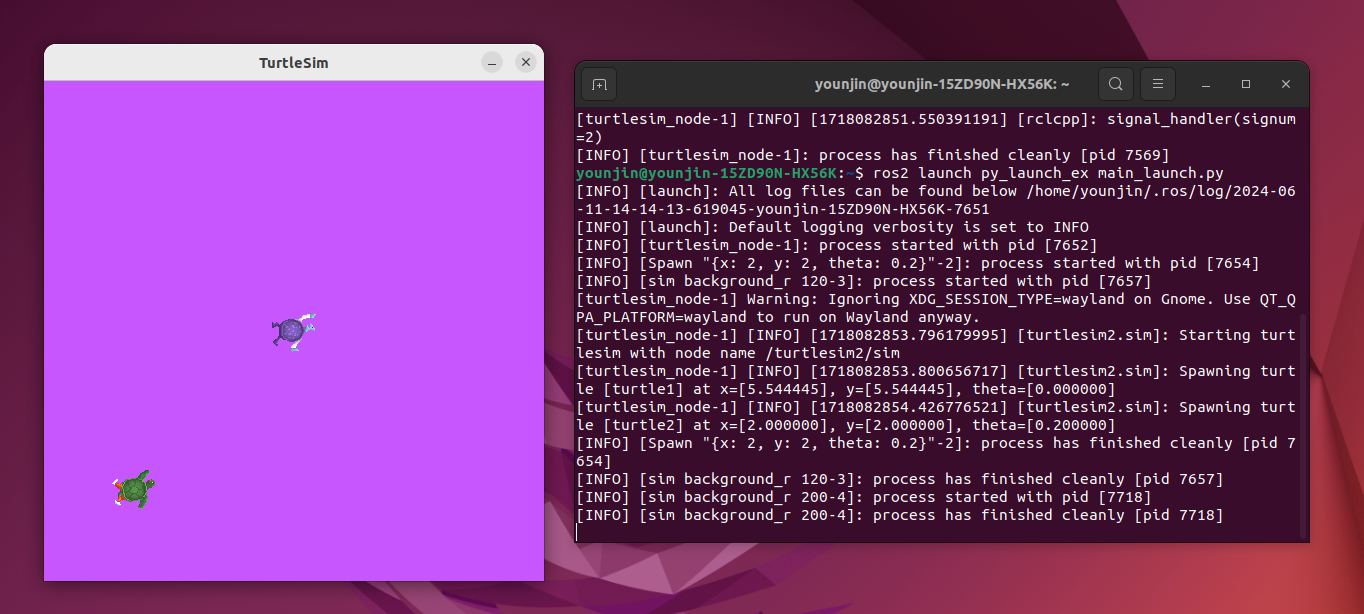
ros2 launch launch_tutorial example_main.launch.py그러면 main에서 argument를 정하여 substitution을 실행시키는 것을 확인할 수 있다.
실행 결과는 다음과 같다. 실행하면 turtlesim의 background color가 두 번 변하는 것을 확인할 수 있을 것이다.