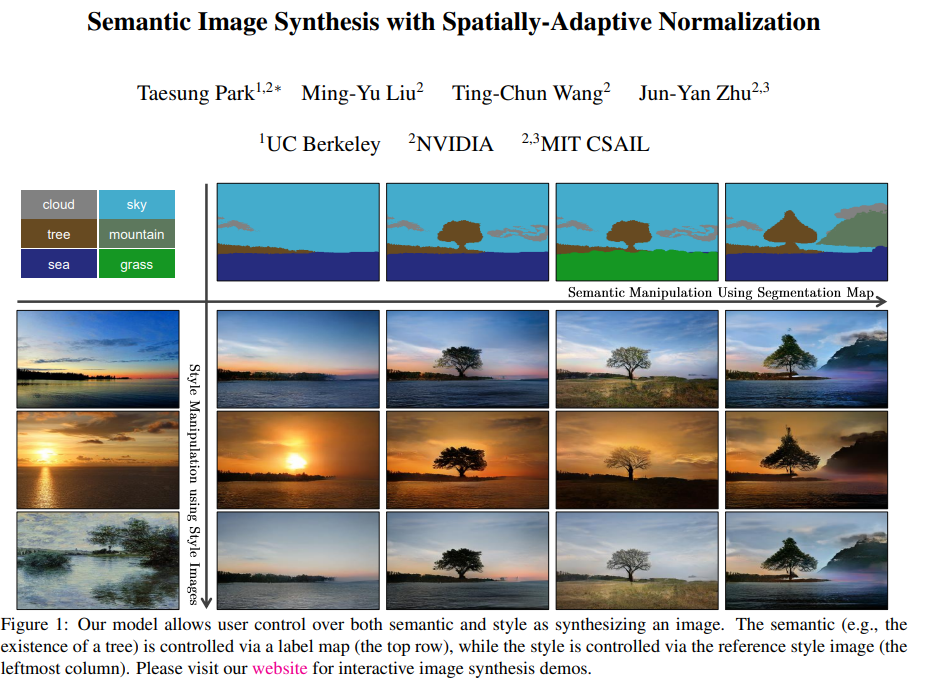
[코드리뷰] Semantic Image Synthesis with Spatially-Adaptive Normalization: GauGAN
Generative Model
Paper : Semantic Image Synthesis with Spatially-Adaptive Normalization
Code : github.com/NVlabs/SPADE
1. Installation
저장소를 불러옵니다.
git clone https://github.com/NVlabs/SPADE.git
cd SPADE/
해당 모듈은 Pytorch 1.0+, python 3+를 필요로 합니다.
이후, 필요한 라이브러리를 설치합니다.
pip install -r requirements.txt
해당 모듈은 추가적으로 Synchronized-BatchNorm-Pytorch rep 또한 필요로 합니다.
cd models/networks/
git clone https://github.com/vacancy/Synchronized-BatchNorm-PyTorch
cp -rf Synchronized-BatchNorm-PyTorch/sync_batchnorm .
cd ../../
2. Dataset Preparation
만약 COCO-Stuff, Cityscapes or ADE20K를 사용하려면 데이터셋을 먼저 다운로드 받아야 합니다.
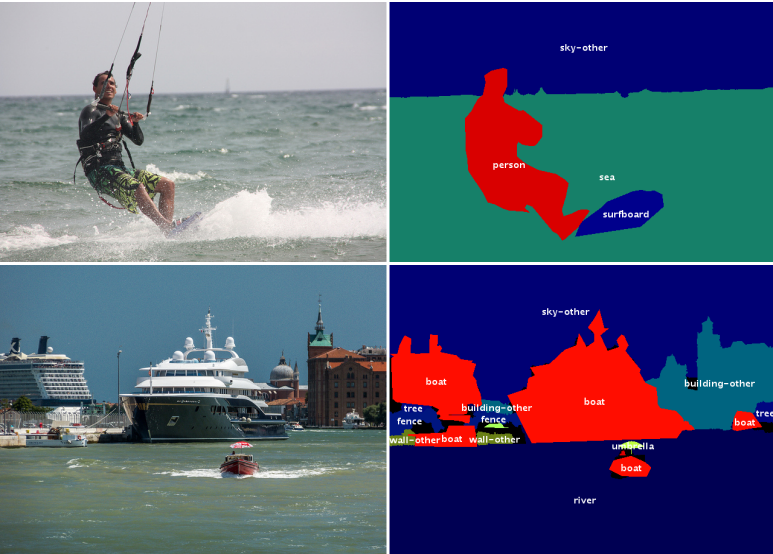
2.1. Preparing COCO-Stuff Dataset
COCO-Stuff dataset은 여기에서 받을 수 있습니다.
images, labels, instance maps이 같은 디렉토리에 있어야 합니다.
특히, 저자들은 "things instance map"과 "stuff label map"의 boundaries를 모두 통합하는 instance map을 사용했습니다.
여기서 things란 "차,사람" 등의 object를 말하고, stuff란 "하늘, 들판" 등 배경을 말합니다.
이와 같이 object와 background가 나누어져 있는 데이터셋의 경우
datasets/coco_generate_instance_map.py를 참고해 통합된 segmentation map을 사용합시다.
참고로 COCO-stuff의 경우 해당 repo에 약간의 sample image가 존재합니다.
2.1.a. coco-stuff Dataset의 구조 파악
Image, instance map, Label이 한 디렉토리 안에 있으면 됩니다.
# in dataset/Custom/[...] <-

train_img
|___0001.jpg
|___0002.jpg
|___ ...
train_inst
|___0001.png
|___0002.png
|___ ...
train_label
|___0001.png
|___0002.png
|___ ...
val_img
|___02001.jpg
|___02002.jpg
|___ ...
val_inst
|___02001.png
|___02002.png
|___ ...
val_label
|___02001.png
|___02002.png
|___ ...
위의 img, inst, label은 각각 아래와 같이 이루어져 있습니다.
Img  |
inst  | label  |
겉으로는 비슷해보이나, 실제로는
>>>np.unique(label)
array([ 15, 119, 154, 255], dtype=uint8)
>>>np.unique(label)
inst : array([ 0, 1,  2, 15, 119, 154, 255], dtype=uint8)

15: 새
119 : 하늘
154 : 바다
255 : 기타
와 같이 label은 새에 대해 의 값만을 가지는 반면, inst는 같은 object인 경우 의 값으로 객체를 표현합니다.
2.2. Preparing ADE20K Dataset
COCO-Stuff dataset과는 다른 방식으로 준비해야 하지만, 이에 대해서는 해당 데이터셋을 이용할 일이 있을 때 참고하면 될 것 같습니다.
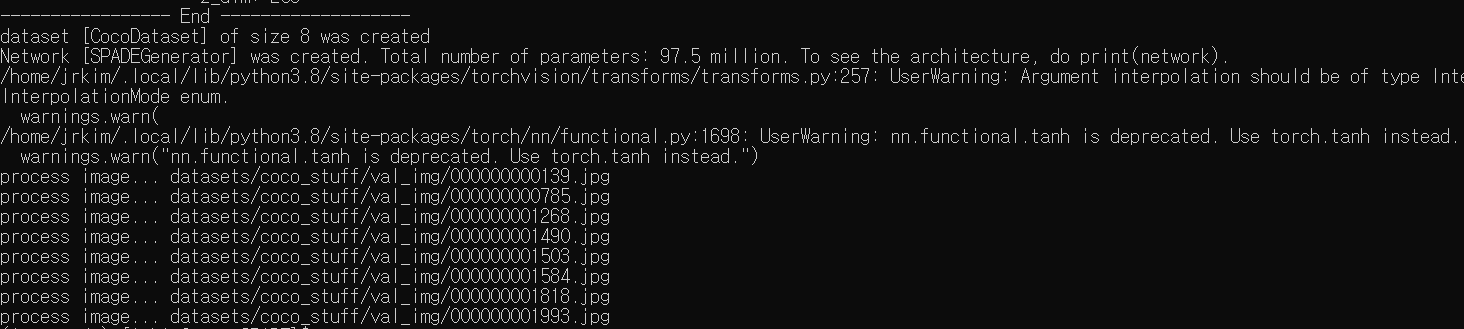
3. Generating Images Using Pretrained Model
3.1. 실행
데이터 셋이 준비될 경우 pretrained model을 이용해 이미지를 생성할 수 있습니다.
1. Google Drive Folder에서 'tar' 형식의 모델을 다운 받고, 이를 SPADE 폴더 내 checkpoints/에 저장한 후 아래의 명령어를 실행시킵니다.
cd checkpoints
tar xvf checkpoints.tar.gz
cd ../
2. 이미지를 생성합니다.
python test.py --name [type]_pretrained --dataset_mode [dataset] --dataroot [path_to_dataset]
[type] : coco or ade20k or cityscapes
[dataset] coco or ade20k or cityscapes
[path_to_dataset] : dataset의 경로.
참고로, CPU로 실행하고 싶은 경우 --gpu_ids -1 명령어를 추가하면 됩니다.
3. output image는 아래 경로에 저장됩니다.
./results/[type]_pretrained/해당 디렉토리 내의 HTML을 이용하면 손 쉽게 볼 수 있습니다.
3.2. 결과

Label  | Generated Image  |
Label  | Generated Image  |
Label  | Generated Image  |
Label  | Generated Image  |
Label  | Generated Image  |
디테일한 부분은 (당연하게도) 잡기 힘든 모습을 보여줍니다.
4. Training New Models
4.1. Train
- Dataset을 준비합니다.
Paper에 쓰인 dataset을 학습하기 위해서는 dataset을 다운로드하고--dataset_modeoption을 사용할 수 있습니다. 해당 모드는BastDataset의 어떤 subclass가 load될 지 선택합니다.
Custom dataset을 사용하기 위한 가장 쉬운 방법은--dataset_mode custom을 할당한 뒤./data/custom_dataset.py를 사용하는 것입니다.
--label_dir [path_to_labels],--image_dir [path_to_images]option을 사용하면 됩니다.
추가적으로, --label_nc를 통해 label classes의 개수를 할당해주어야 하며, unknown label이 있을 경우 --contain_doncare_label, dataset이 instance maps을 갖지 않는 경우 --no_instance를 할당해줍니다.
- Train.
# To train on the Facades or COCO dataset, for example.
python train.py --name [experiment_name] --dataset_mode facades --dataroot [path_to_facades_dataset]
python train.py --name [experiment_name] --dataset_mode coco --dataroot [path_to_coco_dataset]

# To train on your own custom dataset
python train.py --name [experiment_name] --dataset_mode custom --label_dir [path_to_labels] -- image_dir [path_to_images] --label_nc [num_labels]
python train.py --help로 추가적인 option을 확인할 수 있습니다.
사용하는 GPU 개수에 따라 --gpu_ids 1,2등으로 조절할 수 있습니다.
학습 log를 추출하기 위해서 Tensorboard를 활용한 --tf_log를 사용할 경우 [checkpoints_dir]/[name]/logs에 log가 저장됩니다.
5. Testing
pretrained model을 사용할 때랑 비슷합니다.
python test.py --name [name_of_experiment] --dataset_mode [dataset_mode] --dataroot [path_to_dataset]--result_dir : output directory를 보여줍니다.
--how_many : 생성할 이미지의 최대 개수를 명시해줍니다.
--which_epoch : 사용할 모델의 버전(epoch)을 명시해줍니다(default : latest).
6. Code Structure
train.py, test.py: 학습과 테스트를 위한 시작 지점.
trainers/pix2pix_trainer.py: 훈련의 진행상황을 활용하고 report합니다.
models/pix2pix_model.py: 네트워크를 생성하고, loss를 계산합니다.
models/networks/: 모든 모델의 아키텍처를 정의합니다.
options/: argparse package를 사용해 모든 option을 생성합니다. 다른 파일에서도 동적으로 추가될 수 있습니다. 아래 단락에 구체적으로 나타나 있습니다.
data/: images와 label maps에 대한 class를 정의합니다.
7. Options
This code repo contains many options. Some options belong to only one specific model, and some options have different default values depending on other options. To address this, the BaseOption class dynamically loads and sets options depending on what model, network, and datasets are used. This is done by calling the static method modify_commandline_options of various classes. It takes in the parser of argparse package and modifies the list of options. For example, since COCO-stuff dataset contains a special label "unknown", when COCO-stuff dataset is used, it sets --contain_dontcare_label automatically at data/coco_dataset.py. You can take a look at def gather_options() of options/base_options.py, or models/network/__init__.py to get a sense of how this works.
8. VAE-Style Training with an Encoder For Style Control and Multi-Modal Outputs
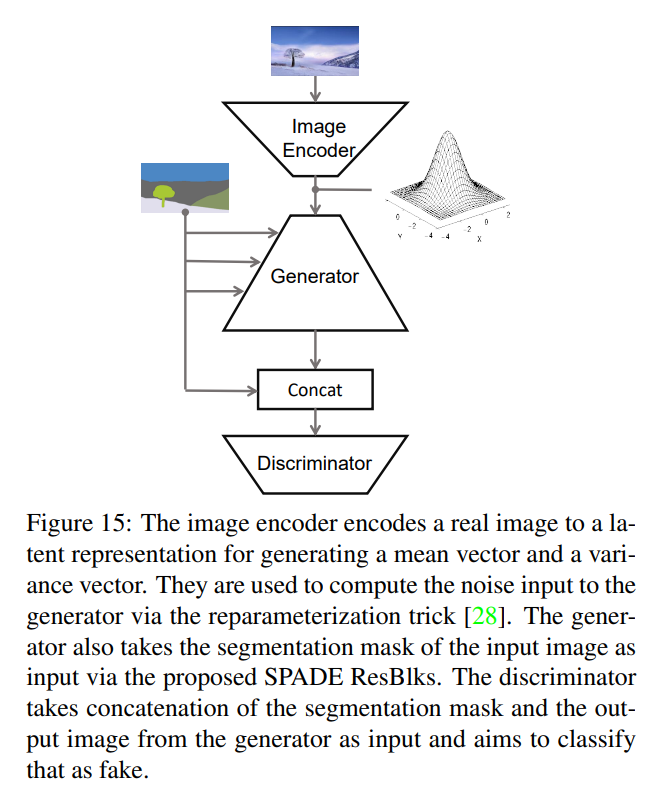
위와 같은 Style Control / Multi-Modal task를 하고 싶은 경우 --use_vae를 사용할 수 있습니다 !!
이 모델은
netG,netD뿐만 아니라 인코더인netE또한 추가하여 KL-Divergene loss를 이용해 학습합니다.
a. 고려사항
- Instance가 반영되는지? -->
datasets/coco_generate_instance_map.py확인
b. 기타
참고로, NVIDIA labs에서 개발한 GAN 기반 모델들은 하나의 라이브러리로 합쳐진 'imaginaire'를 통해 사용할 수 있습니다(Docs).
약간의 성능 개선 또한 있었다고 하나(아마 edge 이용하는 듯) 분재되어 있는 라이브러리 내에서는 단일 모델의 구조를 파악하기가 쉽지 않아, 본 글에서는 기존의 SPADE 단일 연구의 코드를 다룹니다.
