Rviz에서 Mapping 과정 시각화
Rviz Display
- Map display
- LaserScan display
- RobotModel display
Rviz 구성하기
지난번 처럼 rviz_launcher에 있는 launch 파일로 열었지만
이번에는 직접 rviz를 꾸며보자
roslaunch turtlebot_navigation_gazebo main.launch
roslaunch turtlebot_navigation_gazebo gmapping_demo.launch
rviz-
빈 rviz 창에서 add를 눌러 LaserScan을 추가해준 후
topic에서 kobuki/laser/scan으로 설정해준다.
size > 0.05 (=5cm) -
Global option > Fixed frame > map
-
add > RobotModel
-
add > map > topic > /map
roslaunch turtlebot_teleop keyboard_teleop.launch로봇을 움직이며 mapping을 하면 된다.
Rviz configuration 저장하기
- File > Save Config As > Save
view_mapping.launch에서 저장한 .rviz파일을 실행할 수 있음
teleop_keyboard로 mapping을 하고나면
map을 저장해야 한다.
.
.
Map 다루기
- 오픈소스 기반 SLAM 패키지 : gmapping
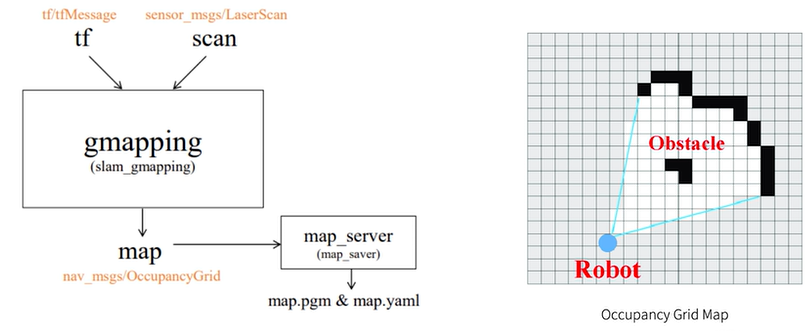
(자료출처; programmers)
rviz는 topic을 시각화하는 tool이므로 nav_msgs/OccupancyGrid를 시각화한다.
-
오픈소스 기반 Map 관리 패키지 : map_server
-
2가지 노드를 제공 (map_saver & map_server)
-
map_saver 노드
- 현재 얻은 지도를 저장할 수 있다
(확장자 .pgm & .yaml 파일이 저장된다)
.
키보드로 mapping을 모두 한 이후에 아래 명령어로 mapping한 map을 저장해주자
-f 뒤에 적는 것이 파일명이 된다.
roscd turtlebot_navigation_gazebo/maps
rosrun map_server map_saver -f my_map
<my_map.yaml>
image : grid map pgm 파일이름 지정
resolution : map의 해상도를 pixel 당 m 단위로 지정 (e.g. 0.05m x 0.05m = 1 pixel)
origin : 전역 좌표계에서 지도 원점을 지정 - 2D (x, y, rotate)
negate : map 반전 여부 결정 (boolean), 빈칸 - 점유된 칸 반전 -> 장애물 map을 만들 때 유용
occupied_thresh : occupied 되었는지 결정하는 threshold, 이 값보다 크거나 같은 값은 점유된 것으로 간주
free_thresh : map에서 cell이 사용가능한지 결정하는 threshold, 이 값보다 작거나 같은 값은 모두 비어있는 것으로 간주
<my_map.pgm>
pixel의 점유 / 빈칸 여부를 색으로 표시
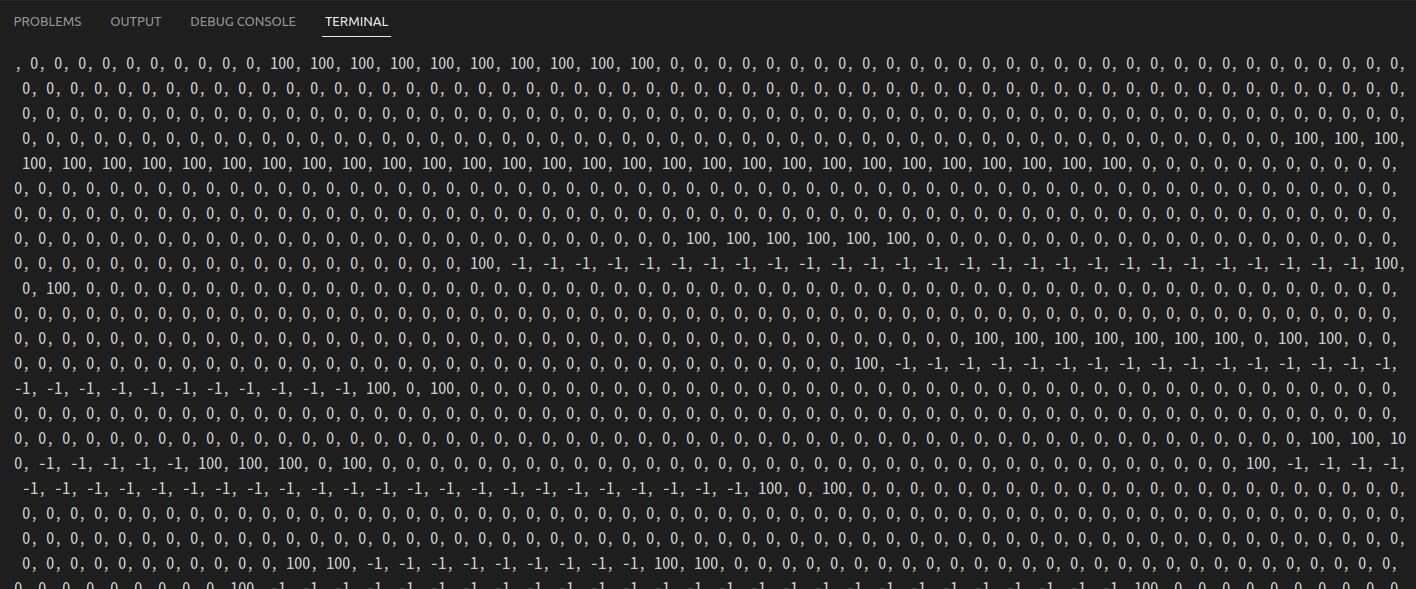
ros_msgs로 map의 정보가 전달될 때는 0~100까지의 정수를 이용하는데
0 = 빈칸
100 = 장애물 (occupied)
-1 = unknown
- map_server 노드 - 다른 노드가 지도를 요청하면 지도 제공
1. map_server 노드가 제공하는 service
static_map(nav_msgs/GetMap)
2. map_server 노드가 제공하는 latched topic = 토픽의 마지막 msg가 저장됨
map_metadata(nav_msgs/MapMetaData) - .yaml파일에 있는 정보들
* map (nav_msgs/OccupancyGrid) - -1,0,100으로 그린 map
아래 명령어로 지도의 정보를 또ㅍ다른 노드 (e.g move_base) 에게 제공할 수 있다.
(파일이 저장된 경로에서는 경로 지정없이 파일 이름만으로 가능)
rosrun map_server map_server map_file.yaml
rqt
rqt를 열어보면 /map 과 /map_metadata가 topic으로 publishing되는 것을 확인할 수 있다.
rviz를 켜고 map을 add 한 후 rosrun으로 map을 켜주면 rviz에 map이 나타난다.
실습
mission
map_server 노드를 rosrun이 아닌 launch 파일로 실행하기
- arg 태그를 활용해 .yaml 파일도 받을 수 있도록 만들기
code ~/sim_ws/src/programmers_turtlebot/turtlebot_navigation_gazebo/launch/map_server.launch
<map_server.launch><node name="map_server" pkg="map_server" type="map_server" args="$(arg map_file)" />roscore
rviz
roslaunch turtlebot_navigation_gazebo map_server.launch.
/static_map service를 처리할 수 있는 service client node (call_map_service.py) 작성하기
- 지도 데이터를 가져오기 위해 /static_map 서비스를 호출
- 결과로 터미널에 지도의 크기와 해상도를 인쇄
mkdir ~/sim_ws/src/programmers_turtlebot/turtlebot_navigation_gazebo/script
code ~/sim_ws/src/programmers_turtlebot/turtlebot_navigation_gazebo/script/call_map_service.py
<call_map_service.py>
#! /usr/bin/env python3

import rospy
from nav_msgs.srv import GetMap, GetMapRequest
import sys

rospy.init_node('service_client') # Initialise a ROS node with the name service_client
rospy.wait_for_service('static_map') # Wait for the service /static_map to be running
rospy.loginfo("init complete")

get_map_service = rospy.ServiceProxy('static_map', GetMap) # Create the connection to the service
get_map = GetMapRequest() # Create an object of type GetMapRequest

result = get_map_service(get_map) # Call the service
print(result) # Print the result given by the service called
chmod +x call_map_service.py
roscore
roslaunch turtlebot_navigation_gazebo map_server.launch
rosrun turtlebot_navigation_gazebo call_map_service.py(rviz)
terminal에서 map이 출력된 것을 확인할 수 있다.
static map - 호출했을 때의 상태를 유지 (환경이 변화해도 반영되지 않음, 2D map이므로 높이 정보 없음 - 드론에는 적용 불가)
.
.
Transforms
좋은 mapping을 위한 다양한 조건들
2D Lidar SLAM을 위한 하드웨어 요구사항
- Good Laser Data
- Good Odometry Data
Odometry : 원점으로부터 로봇이 얼마나 이동했는가를 나타내는 값
Transforms
.
- 한 프레임에 표현된 데이터를 다른 프레임으로 변환하는 방법
- Laser 정보를 이용해 map을 구성하기 위해서는 Laser의 위치와 방향을 로봇에게 알려줘야함 = transform
- Position, Orientation 정보를 포함
예를 들어 lidar가 30cm 앞에 장애물이 있다고 인지했다면 로봇의 중심으로부터의 거리는 또 다를 것이다.
그래서 lidar frame에서 robot frame으로 변환이 필요하다.
Mapping을 위해 꼭 필요한 변환 관계
- laser_link -> base_link
- 일반적으로 고정된 값
- robot_state_publisher or static_transfrom_publisher 노드에 의해 주기적으로 broadcast - base_link -> odom (기준위치로부터 로봇이 얼마나 움직였는가)
- Odometry 시스템에 의해 제공 (wheel odometry, visual odometry)
.
.
tf 시각화하기
roslaunch turtlebot_navigation_gazebo main.launch
rqt
rqt에서
plugins > visualization > tf tree
변환관계를 확인할 수 있음!
TF Broadcast - TF 관계 설정하는 방법
- static_transform_pulbisher
- x, y, z: 프레임간의 거리 오프셋- yaw, pitch, roll (rad): 프레임 간의 회전 오프셋
- frame_id, child_frame : 각각의 frame ID
- period_in_ms : TF를 퍼블리싱할 주기
방법1
rosrun tf static_transform_publisher x y z yaw pitch roll frame_id child_frame_id period_in_ms방법2
<launch>
	<node pkg="tf" type="static_transform_publisher name="node_name"
	      arg="x y z yaw pitch roll frame_id child_frame_id period_in_ms">
    </node>
</launch>
실습
mission
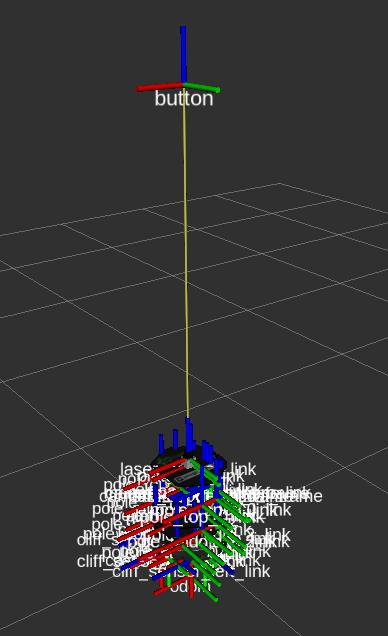
- static_transform_publisher 노드를 시작하기 위한 launch 파일 만들기(pub_static.launch)
- 로봇 최상단에 button을 부착한다고 가정, button과 로봇의 base_link 사이의 TF publishing
- TF 시각화를 통해 프레임 그래프를 다시 생성하고 새 Transform이 게시되는지 확인
code ~/sim_ws/src/programmers_turtlebot/turtlebot_navigation_gazebo/launch/pub_static.launch<pub_static.launch>
<launch>
    <node pkg="tf" type="static_transform_publisher" name="static_tf_node"
          args="0 0 2 0 0 0 base_link button 30">
    </node>
</launch>
roslaunch turtlebot_navigation_gazebo main.launch
rviz
roslaunch turtlebot_navigation_gazebo pub_static.launch
rqtbutton 노드가 추가되었다.
rviz 상에서 RobotModel과 TF 를 추가하여 만든 tf를 확인할 수 있다.
- 모든 로봇을 설계할 때 이런 식으로 하나씩 다 tf를 정의해야하는 걸까??
-> 아니다. 로봇 모델의 정의를 하는 URDF에서 TF를 정의한다. 가끔 하나씩 추가를 해줘야할 떄 사용하기에 유용하다.
.
.
오픈소스 SLAM 패키지
gmapping의 일반 파라미터
-
roslaunch, yaml 파일에서 별도로 설정할 수 있음
-
base_frame (default: "base_link")
- 모바일 베이스의 기준 프레임 - 모바일 베이스, 로봇의 기준점을 의미 -
map_frame (default: "map")
- 지도의 기준이 될 프레임의 이름 - map을 기준으로 baseframe이 어디있는지 알기 위해 -
odom_frame (default: "odom")
- Odometry 시스템에 연결된 프레임의 이름 - map -> odom -> base -
map_update_interval(default: 5.0)
- 지도를 업데이트할 때까지 대기할 시간을 설정
gmapping의 laser 관련 파라미터
- maxRange (float)
- Laser의 최대 범위를 설정- 이 값은 실제 센서의 최대 범위보다 약간 높은 값으로 설정
- maxUrange (default: 80.0m)
- Laser의 최대 사용 가능 범위를 설정- Laser의 beam이 이 값으로 잘림
- minimumScore (default: 0.0)
- Laser의 센서 값이 양호하다고 간주하는 최소 점수를 설정
gmapping의 Map 관련 파라미터
- xmin (default: -100.0)
- initial map size - ymin (default: -100.0)
- initial map size - xmax (default: 100.0)
- initial map size - ymax (default: 100.0)
- initial map size - delta (default: 0.05)
- sets the resolution of the map
gmapping의 기타 파라미터
- linearUpdate (default:1.0)
- laser 센서 값을 처리하기 위해, 로봇이 이동해야 하는 선형 거리
- 최소한 1m는 이동해야 map이 업데이트 된다 - angularUpdate (default: 0.5)
- laser 센서값을 처리하기 위해, 로봇이 이동해야 하는 각도
- 최소한 0.5rad는 회전을 해야 map이 업데이트 된다
YAML 파일을 이용한 파라미터 load
launch 파일에서의 yaml 파일 업로드
<rosparam file=$(find my_mapping_launcher)/params/gmapping_params.yaml" commad = "load" />yaml 파일 내부구조
name_of_parameter: value_of_parameter실습
mission
-
map_update_interval을 15로 바꾸고 map update 주기 확인
- 키보드로 로봇을 움직여 보면서 update주기가 바뀌었는지 확인
-
maxUrange를 2로 바꾸고 mapping 영역 확인
- map이 없데이트되는 범위가 확 줄어든다.

-
xmin, ymin를 -100d으로 xmax, ymax를 100으로 설정하고 초기 map이 어떻게 보이는지 확인
- scan할 수 있는 범위가 매우 넓어짐 (로봇이 움직이면 더 확장됨)
-
모든 파라미터 변겅은 yaml파일에서 하도록 함 (gmapping_params.yaml)
.
code ~/srm_ws/src/programmers_turtlebot/turtlebot_navigation_gazebo/param/gmapping_params.yamlprogrammers_turtlebot/turtlebot_navigation/launch/includes/gmapping/gmapping.launch.xml 파일을 참고해서 yaml 파일의 양식에 맞게 작성해주면 된다.
<gmapping_params.yaml>
base_frame: base_footprint
odom_frame: odom
map_update_interval: 5.0
maxUrange: 6.0
maxRange: 8.0

minimumScore: 200

linearUpdate: 0.5
angularUpdate: 0.436
temporalUpdate: -1.0
resampleThreshold: 0.5
particles: 80
xmin: -1.0
ymin: -1.0
xmax: 1.0
ymax: 1.0

delta: 0.05
llsamplerange: 0.01
llsamplestep: 0.01
lasamplerange: 0.005
lasamplestep: 0.005
이제 이 파라미터들을 읽어올 launch 파일을 만들어보자
code ~/sim_ws/src/programmers_turtlebot/turtlebot_navigation_gazebo/launch/my_gmapping.launch<my_gmapping.launch>
<launch>
    <arg name="scan_topic" default="kobuki/laser/scan" />

    <node pkg="gmapping" type="slam_gmapping" name="slam_gmapping" output="screen">
        <rosparam file="$(find turtlebot_navigation_gazebo)/param/gmapping_params.yaml" command="load" />

        <remap from="scan" to="$(arg scan_topic)" />
    </node>
</launch>
일단 launch 파일을 잘 설정했는지 확인하기 위해 실행해본 후
.yaml 파일의 파라미터를 바꿔보면 된다.
(yaml 파일에서 파라미터를 바꿀 때마다 launch 다시 해야함)
roslaunch turtlebot_navigation_gazebo main.launch
roslaunch turtlebot_navigation_gazebo my_gmapping.launch
roslaunch turtlebot_rviz_launchers my_gmapping.launch
.
.
기타 Tip
Map을 수동으로 조작하기
- 직접 포토샵을 이용해서 지울 수 있다. - gimp
Logging된 데이터를 이용해 Map 생성하기
- 매번 mapping을 할 수 없으니까 bag 파일로 저장해서 slam 만 추후에 진행하는 방식
- bag file 만들기
- LaserScan topic과 TF 정보를 recording 하기
robag record -O mylaserdata /laser_topic /tf_topic2.bag file을 재생하고 map 생성하기
rosbag play bag_file_name실습
키보드로 로봇을 움직이며 그동안의 bag file 을 저장
roslaunch turtlebot_navigation_gazebo main.launch
roslaunch turtlebot_teleop keyboard_teleop.launch
rosbag record -O mylaser /kobuki/laser/scan /tf /tf_static
모두 종료 후 저장된 bag 파일로 mapping
roslaunch turtlebot_navigation_gazebo my_gmapping.launch
roslaunch turtlebot_rviz_launchers view_mapping.launch
rosbag info mylaser.bag (잘 저장되었나 확인)
rosbag play mylaser.bag
rviz상에서 map이 점점 그려지는 것을 확인할 수 있다.
.
.
과제 - Map 만들기
목표
- corridor.world 환경의 Map 구성하기
- 또는 4강 과제에서 만들었던 나만의 world를 load해서 map 구성하기
(.pgm & .yaml 파일 제출)
Mission
기존 실행했던 main.launch 파일을 수정해 다른 world load
나는 corridor_main.launch 라는 이름으로 파일을 만들어주었다.
나머지는 main.launch 파일과 모두 동일하고 world 파일만 corridor로 바꾸어주면 된다.
<corridor_main.launch>
<launch>
  <arg name="world_file"  default="$(find turtlebot_navigation_gazebo)/worlds/corridor.world"/>
  <!-- <arg name="world_file"  default="$(find summit_xl_gazebo)/worlds/test_zone.sdf"/> -->

  <arg name="base"      value="$(optenv TURTLEBOT_BASE kobuki)"/> <!-- create, roomba -->
  <!-- arg name="battery"   value="$(optenv TURTLEBOT_BATTERY /proc/acpi/battery/BAT0)"/ -->  <!-- /proc/acpi/battery/BAT0 -->
  <arg name="stacks"    value="$(optenv TURTLEBOT_STACKS hexagons)"/>  <!-- circles, hexagons -->
  <arg name="3d_sensor" value="$(optenv TURTLEBOT_3D_SENSOR kinect)"/>  <!-- kinect, asus_xtion_pro -->

  <arg name="paused" default="false"/>
  <arg name="use_sim_time" default="true"/>
  <arg name="gui" default="true"/>
  <arg name="headless" default="false"/>
  <arg name="debug" default="false"/>

  <include file="$(find gazebo_ros)/launch/empty_world.launch">
    <arg name="world_name" value="$(arg world_file)" />
    <arg name="paused" value="$(arg paused)"/>
    <arg name="use_sim_time" value="$(arg use_sim_time)"/>
    <arg name="gui" value="$(arg gui)"/>
    <arg name="headless" value="$(arg headless)"/>
    <arg name="debug" value="$(arg debug)"/>
  </include>

  <include file="$(find turtlebot_navigation_gazebo)/launch/includes/$(arg base).launch.xml">
    <arg name="base" value="$(arg base)"/>
    <arg name="stacks" value="$(arg stacks)"/>
    <arg name="3d_sensor" value="$(arg 3d_sensor)"/>
  </include>

  <node pkg="robot_state_publisher" type="robot_state_publisher" name="robot_state_publisher">
    <param name="publish_frequency" type="double" value="30.0" />
  </node>

  <!-- Fake laser -->
  <!-- node pkg="nodelet" type="nodelet" name="laserscan_nodelet_manager" args="manager"/>
  <node pkg="nodelet" type="nodelet" name="depthimage_to_laserscan"
        args="load depthimage_to_laserscan/DepthImageToLaserScanNodelet laserscan_nodelet_manager">
    <param name="scan_height" value="10"/>
    <param name="output_frame_id" value="/camera_depth_frame"/>
    <param name="range_min" value="0.45"/>
    <remap from="image" to="/camera/depth/image_raw"/>
    <remap from="scan" to="/scan"/>
  </node -->
</launch>
.
.
slam_gmapping 노드를 실행시키고 mapping 수행하기
roslaunch turtlebot_navigation_gazebo corridor_main.launch
roslaunch turtlebot_navigation_gazebo gmapping_demo.launch
roslaunch turtlebot_rviz_launchers view_mapping.launch
roslaunch turtlebot_teleop keyboard_teleop.launch
위 launch 파일들을 모두 실행하고 키보드로 world를 돌아다니며 mapping을 해주면 된다.
mapping 결과 저장하기
rosrun map_server map_saver -f corridor_map_yj이 명령어를 실행하고 나면 .pgm파일과 .yaml 파일로 map이 저장된다.
<corridor_map_yj.pgm>

<corridor_map_yj.yaml>
image: corridor_map_yj.pgm
resolution: 0.050000
origin: [-12.200000, -13.800000, 0.000000]
negate: 0
occupied_thresh: 0.65
free_thresh: 0.196