혹시 이 simulation을 따라하는 사람이 있다면...
심화과정으로 갈수록 virtual machine은 정신건강에 좋지 않다. (저도 알고싶진 않았어요)
듀얼부팅을 하거나 리눅스용 노트북을 장만하는 것을 추천한다.
나는 로봇에 관한 것들을 계속 할 것이기 때문에 리눅용 노트북을 하나 마련했다 💻
새 노트북에서 gazebo를 돌리니 아주 천국이다 :)
개요
- summit XL
- PR2
- Jackal
- Turtlebot3
- sim_ws/src/ 안에 chapter10 파일 넣어주기
- hidden folders 중에서 .gazebo/models 에 extra_models 안에 있는 모든 파일 붙여넣기
chapter10에 대한 dependency 설치
cd sim_ws
rosdep install -i --from-path src/chapter10 --rosdistro noetic -y --os=ubuntu:focal
catkin_make

roslaunch turtlebot3_gazebo turtlebot3_world.launch
roslaunch turtlebot3_navigation turtlebot3_navigation.launch
roscd turtlebot3_navigation/rviz/
rviz -d turtlebot3_nav.rviz
초기위치가 안 맞을 경우 2D Pose Estimate를 이용해 맞춰주면 된다.
roslaunch turtlebot3_teleop turtlebot3_teleop_key.launch
or
rosrun teleop_twist_keyboard teleop_twist_keyboard.py
launch 파일이 안되는 경우, rosrun으로 실행하면 키보드로 map 안에서 주행이 가능하다.
관성값을 잘 설정해준 관계로 벽에 부딪혀도 매우 잘 일어나는 것을 확인할 수 있다.
끝
.
.
목적지 경유 (waypoint)
2D pose estimate로 map에 직접 찍어주기
turtlebot의 경우, 한번에 한 위치로만 이동할 수 있음.
여러 포인트를 이동하기 위해서는 어떻게 해야할까?_?
roslaunch turtlebot3_gazebo turtlebot3_world.launch
roslaunch turtlebot3_navigation turtlebot3_navigation.launch
roscd turtlebot3_navigation/rviz
rviz -d turtlebot3_nav.rviz
roslaunch follow_waypoints follow_waypoints.launch
follow_waypoints.launch 파일을 열고나면 /initialpose를 받기를 기다린다는 내용이 terminal에 출력된다.

rviz 상에서 2D pose estimate를 찍어주면 /initialpose가 출력되므로 2D pose estimate 버튼을 이용해 여기저기 점을 찍어주면 terminal 상에서 계속
Received new waypoint라는 메세지가 나올 것이다.
rostopic pub /start_journey std_msgs/Empty -1위 명령어를 쳐주면 찍어준 포인트들로 이동하는 것을 확인할 수 있다.
원하는 경유지를 하나씩 2D pose estimate로 찍어줄 수 있어서 편하지만
costmap이 계속 남아있게되는데 이는 2D pose estimate로 지정해주는 /initialpose를
amcl 노드도 받아 초기 위치를 localization하기 때문이다.
그래서 위치를 찍어줄 때마다 로봇의 초기 위치도 같이 이동하고 다니게 되면서 잔상이 남는다.
따라서 코드를 통해 waypoint를 깔끔하게 설정해보자
Code로 waypoint 찍어보기
smach (state machine)
로봇을 여러 state로 만들고 그 state를 전환을 지정해주어 시스템 또는 로봇의 동작을 모델링하는 소프트웨어 모듈
센서데이터, 사용자 명령, 또는 내부 이벤트와 같은 input에 대해 응답하고 현재상태에 따라 작업을 수행하도록 설계되어 있다.
로봇 팔을 제어할 때, 물체 감지 / 사용자 명령을 기반으로 동작 등 상태를 전환할 때 state machine을 사용할 수 있다.
- state 만들기
class Foo(smach.State):
    def _init_(self, outcomes=[‘outcome1’, ‘outcome2’]):

    def execute(self, userdata):
        if xxx:
            return ‘outcome1’
        else:
return ‘outcome2’- State Machine에 state 추가하기
state machine : 여러 state를 보관하는 컨테이너
State machine is also state so you can add the states machine to another state machine
sm = smach.StateMachine(outcomes=[‘outcome4’, ‘outcome5’])
with sm:
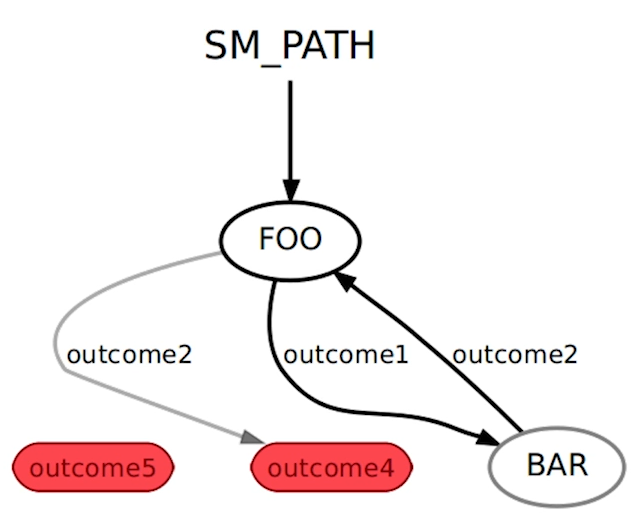
smach.StateMachine.add(‘FOO’, Foo(), transitions={‘outcome1’ : ‘BAR’, ‘outcome2’ : ‘outcome4’})
smach.StateMachine.add(‘BAR’, Bar(), transitions={‘outcome2’ : ‘FOO’})위 코드를 그림으로 나타내면 아래와 같다.
FOO일 때는 결과 값이 outcome1이면 BAR로 가고 outcome2 면 FOO로 간다
이것을 바탕으로 waypoint를 경유 하는 코드를 작성 해 보자.
mkdir ~/sim_ws/src/chapter10/turtlebot3/t3_course/scripts
code ~/sim_ws/src/chapter10/turtlebot3/t3_course/scripts/custom_follow_waypoints.py
<custom_follow_waypoints.py>
#!/usr/bin/env python3

import threading
import rospy
import actionlib

from smach import State, StateMachine
from move_base_msgs.msg import MoveBaseAction, MoveBaseGoal

waypoints = []
class FollowPath(State):
    def __init__(self):
        State __init__(self, outcomes=[‘success’], input_keys=[‘waypoints’])
       self.frame_id = rospy.get_param(‘~goal_frame_id’, ‘map’)
code ~/sim_ws/src/chapter10/turtlebot3/t3_course/launch/start_follow_waypoints.launch < start_follow_waypoints.launch >
<launch>
    <env name="ROSCONSOLE_FORMAT" value="[${severity}][${thread}][${node}/${function}:${line}]: ${message}"/>
    <arg name="waypoints_topic" default="my_t3_waypoints"/>

    <node pkg='t3_course' type='custom_follow_waypoints.py' name="custom_follow_waypoints"
    output="screen" clear_params="true">
        <param name="goal_frame_id" value="map"/>
        <param name="custom_waypoints_topic" value="$(arg waypoints_topic)"/>
    </node>
</launch>
또한 rviz 상에서 2D pose estimate로 waypoint를 설정할 경우,
amcl노드도 동일하게 영향을 받기 때문에 코드로 직접 waypoint publish 해주도록 하겠다.
rostopic info /initialpose를 해보면 msg type이
geometry_msgs/PosewithCovarianceStamped 이므로 이 type으로 publish 해주면 된다.
rviz상에서 좌표를 보기 어려울 때는 rostopic echo /clicked_point를 해주고
rviz ui에 있는 Publish Point로 찍어주면 msg가 출력된다.
<waypoint_publisher.py>
#!/usr/bin/env python3

import rospy
import time
import tf.transformations

from std_msgs.msg import Empty
from geometry_msgs.msg import PoseWithCovarianceStamped

# wp_id : (x, y)
wp_list = {1 : (0.427, -1.795),
           2 : (0.444, 1.784),
           3 : (-1.833, -0.021)}

"""
user:~$ rosmsg show geometry_msgs/PoseWithCovarianceStamped
std_msgs/Header header
  uint32 seq
  time stamp
  string frame_id
geometry_msgs/PoseWithCovariance pose
  geometry_msgs/Pose pose
    geometry_msgs/Point position
      float64 x
      float64 y
      float64 z
    geometry_msgs/Quaternion orientation
      float64 x
      float64 y
      float64 z
      float64 w
  float64[36] covariance
"""

def talker():
    pub_wp = rospy.Publisher('my_t3_waypoints', PoseWithCovarianceStamped, queue_size=1)
    pub_path_ready = rospy.Publisher('path_ready', Empty, queue_size=1)

    rospy.init_node('waypoint_publisher', anonymous=True)
    rate = rospy.Rate(10) # hz

    my_wp = PoseWithCovarianceStamped()
    my_wp.header.stamp = rospy.Time.now()
    my_wp.header.frame_id = 'map'

    init_x = -1.81
    init_y = -0.46
    init_roll = 0.0
    init_pitch = 0.0
    init_yaw = 0.7071

    quaternion = tf.transformations.quaternion_from_euler(init_roll, init_pitch, init_yaw)
	# transfromation from roll, pitch, yaw to x y z w

    my_wp.pose.pose.orientation.x = quaternion[0]
    my_wp.pose.pose.orientation.y = quaternion[1]
    my_wp.pose.pose.orientation.z = quaternion[2]
    my_wp.pose.pose.orientation.w = quaternion[3]

    for i in range(len(wp_list)):
        rospy.loginfo("Waypoint" + str(i))
        # my_wp.pose.pose.position.x = float(i)*0.3 + init_x
        # my_wp.pose.pose.position.y = float(i)*0.3 + init_y
        my_wp.pose.pose.position.x = wp_list[i+1][0]
        my_wp.pose.pose.position.y = wp_list[i+1][1]

        while not rospy.is_shutdown():
            connections = pub_wp.get_num_connections()
            if connections > 0:
                pub_wp.publish(my_wp)
                break
            rospy.loginfo("Wait for 'my_t3_waypoints' topic")
            rate.sleep()

        rospy.loginfo("Published waypoint number " + str(i))
        time.sleep(2)

    start_command = Empty()

    while not rospy.is_shutdown():
        connections = pub_path_ready.get_num_connections()
        if connections > 0:
            pub_path_ready.publish(start_command)
            rospy.loginfo("Sent waypoint list execution command")
            break
        rospy.loginfo("Waiting for 'path_ready' topic")
        rate.sleep()

if __name__=='__main__':
    try:
        talker()
    except rospy.ROSInterruptException:
        pass
실행해보자
roslaunch turtlebot3_gazebo turtlebot3_world.launch
roslaunch turtlebot3_navigation turtlebot3_navigation.launch
roscd turtlebot3_navigation/rviz/
rviz -d turtlebot3_nav.rviz
roslaunch t3_course start_follow_waypoint.launch
rosrun t3_course waypoint_publisher.py
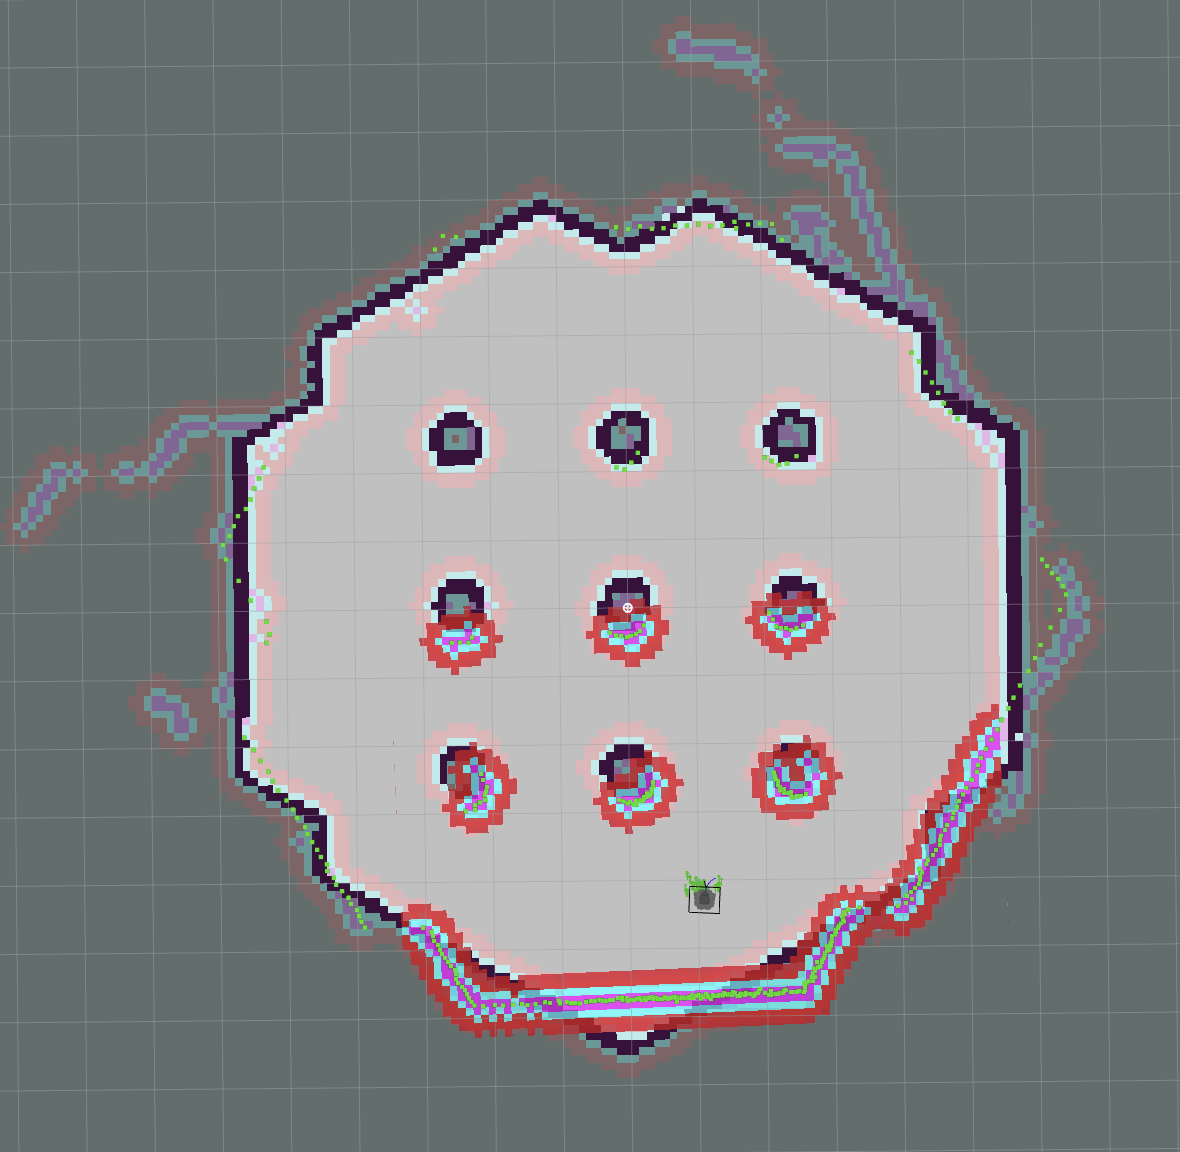
이처럼 잘 이동하는 것을 볼 수 있다. (내 rviz가 지저분한 것은 초기위치 설정을 찾느라 좀 헤맸기 때문이다 ㅎ)
state machine은 꽤나 복잡해보이지만
다양한 종류의 동작을 하는 로봇을 설계할 때는 state machine을 쓰는 것이 유리하다.
각 동작의 결과에 따른 다음 동작을 설정하거나 각각 state일 때 수정할 부분을 찾기도 편하기 때문
재미있다!! 😎️ 😎️ 😎️ 👍
.
.
Line follower
Opencv는 ros library는 아니지만 cv-bridge를 이용해서 통합할 수 있음
이 라이브러리를 이용해서 rosmsg-imagetype 간의 변환이 편하므로 다양하게 이용할 수 있다.
Line 따라 이동하도록 하기
- ROS 이미지를 가져와서 OpenCV 형식으로 변환
- OpenCV 라이브러리를 사용하여 이미지를 처리하여 작업에 필요한 데이터를 얻음
- 얻은 데이터를 기반으로 노란색 선을 따라 로봇을 이동
간단하게 cv bridge를 알아보자
message type을 알고 싶을 때는 둘 중 하나를 해주면 된다.
1. rosmsg show sensor_msgs/Image
2. google에 sensor_msgs/Image를 검색하면 된다.
/t3_course/scripts/example_cv_bridge.py 를 만들어 주자
<example_cv_bridge.py>
#!/usr/bin/env python3

import rospy
import cv2
from cv_bridge import CvBridge, CvBridgeError
from sensor_msgs.msg import Image


class LineFollower(object):

    def __init__(self):
        self.bridge_object = CvBridge()
        self.image_sub = rospy.Subscriber("/camera/rgb/image_raw",Image,self.camera_callback)

    def camera_callback(self,data):
        try:
            # We select bgr8 because its the OpneCV encoding by default
            cv_image = self.bridge_object.imgmsg_to_cv2(data, desired_encoding="bgr8")
        except CvBridgeError as e:
            print(e)

        cv2.imshow("Image window", cv_image)
        cv2.waitKey(1)


def main():
    line_follower_object = LineFollower()
    rospy.init_node('line_following_node', anonymous=True)
    try:
        rospy.spin()
    except KeyboardInterrupt:
        print("Shutting down")
    cv2.destroyAllWindows()

if __name__ == '__main__':
    main()
실행시켜보자!
roslaunch t3_course follow_line.launch
rosrun t3_course example_cv_bridge.py
실행해보면 robot이 보는 image가 나오게 된다.
Line을 따라 이동하도록 코드를 만들어보자
파일 2개를 만들어줄 것이다.
로봇을 움직이기 위한 파일과
/turtlebot3/t3_course/scripts/move_robot.py
노란선을 검출하고 따라가도록 하는 파일
/turtlebot/t3_course/scripts/follow_line_step_hsv.py
<move_robot.py>
#!/usr/bin/env python3
import rospy
from geometry_msgs.msg import Twist

class MoveRobot(object):
    def __init__(self):
        self.cmd_vel_pub = rospy.Publisher('cmd_vel', Twist, queue_size=10)
        self.last_cmd_vel = Twist()

        self.pub_rate = rospy.Rate(10)

        self.shutdown_detected = False

    def move_robot(self, cmd_vel_msg):
        self.cmd_vel_pub.publish(cmd_vel_msg)

    def stop_robot(self):
        cmd_vel = Twist()
        cmd_vel.angular.z = 0.0
        self.move_robot(cmd_vel_msg=cmd_vel)
        self.shutdown_detected = True

def main():
    rospy.init_node('move_robot_node', anonymous=True)

    move_robot_obj = MoveRobot()
    cmd_vel = Twist()

    # Make it start turning
    cmd_vel.angular.z = 0.15

    rate = rospy.Rate(5)

    ctrl_c = False

    def shutdownhook():
        # works better than the rospy.is_shut_down()
        move_robot_obj.stop_robot()
        rospy.loginfo("shutdown time!")
        ctrl_c = True

    rospy.on_shutdown(shutdownhook)

    while not ctrl_c:
        move_robot_obj.move_robot(cmd_vel_msg=cmd_vel)
        rate.sleep()

if __name__=='__main__':
    main()
<follow_line_step_hsv.py>
python code를 만들고나면 항상 terminal에서 chmod +x * 해주는 것을 잊지말자
결과
노란선을 잘 따라가는 귀여운 turtlebot을 볼 수 있다. ㅎㅎ
.
Blob tracking
- 비디오 sequance의 객체를 감지하고 추적하는데 사용되는 기술
- blob = 색 / intensity 이런 속성을 공유하는 연결된 그룹을 의미한다.
- 위치 크기 모양 등이 추출되어 사용가능하다
.
.
Object Detection
.
.